Advertisement
Advertisement
Table of Contents

Related Manuals for VTOMAN X5


Summary of Contents for VTOMAN X5
- Page 1 User Manual Jump Starter with Air Compressor Model No.:Epower-325...
-
Page 2: Table Of Contents
TABLE OF CONTENTS WELCOME COMPONENTS AND FUNCTIONS KEY POINTS BUTTONS AND DISPLAY SCREEN OPERATION GUIDANCE TECHNICAL SPECIFICATIONS FAQS TROUBLESHOOTING REMINDERS MAINTENANCE AND SUPPORT... -
Page 3: Welcome
WELCOME Thank you for choosing vtoman jump starter.To ensure a good user experience,personal safety,and property security please read all of the instructions carefully before using thi product,please keep this manual for reference. Charge it first! While reading through the manual,you can start to charge your X5 with type-c cable provided. -
Page 4: Components And Functions
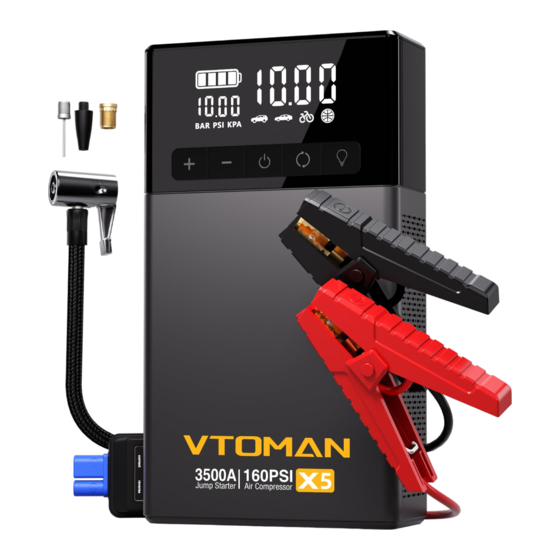
COMPONENTS AND FUNCTIONS ① ② ③ ④ ⑤ ⑥ ⑦ ⑧ ⑨ . Pressure adjustment 6. Air inflating port . Power switch / Inflating 7. LED flashlight pump starting button (distress signal light) . Settings 8. 5V/9V/12V output port . Lamp switch 9. -
Page 5: Key Points
Large 5.1-Inch Smart Screen: Compared with traditional jump starters that only have analog indicators, the X5 jump starter for car battery features a 5.1-inch smart screen that displays important information such as battery level, inflator mode and tire pressure in 3 units (PSI, BAR, KPA), making it more easier and clearer for you to use. - Page 6 KEY POINTS Upgraded Thermal Design: The X5 jump starter incorporates an upgraded thermal design that ensures cool operation even during prolonged use. This prevents overheating and guaran- tees long-lasting performance and durability. More Than A Jump Starter: Upgraded from traditional heavy battery jump box;...
-
Page 7: Buttons And Display Screen
BUTTONS AND DISPLAY SCREEN 1. Long press the switch button for 2 seconds so that the starter displays information on the electrical configuration (1), preset tire pressure value (2), static air pressure value (3), BAR, PSI & KPA (4), or icons of cars, SUVs, basketballs, bicycles or other inflatable items (5), The electric quantity will be displayed on the bar (see the illustration on the right), and the charger will enter the to-be-inflated mode. - Page 8 BUTTONS AND DISPLAY SCREEN 4. When the product is in the standby mode or working normally, press the "Set" key to enter the inflating pump editing mode, after which the SUV icon will display; at the same time, preset the tire pressure value (unit: BAR), where you can short press the "+"...
- Page 9 BUTTONS AND DISPLAY SCREEN SUVs: 2.5 BAR Cars: 2.4 BAR Bicycles: 45 PSI Basketballs: 8PSI Please switch the unit accordingly on the left. Only one unit can be displayed for each item. 6. While charging, the bars at the battery icon will flash in accordance with the actual level of remaining battery life.
-
Page 10: Operation Guidance
OPERATION GUIDANCE Charging the host machine of the jump starter Starting a 12V car 1. Insert the blue end of the battery clip into the hose machine while making sure that the indicator on the clip is off. 2. Connect the clip correctly respectively to the positive and negative ends of the car battery, where the red clip connects to the positive pole of the battery (+) and the black one connects... - Page 11 OPERATION GUIDANCE Red light long on : indicating that the sitive/negative poles have been connected wrongly. Reconnect, and don’t start again until the green light is long on. Green light flashes: indicating that the pressure of the car battery is too low. Press the BOOST button and finish starting within 30 seconds after the green light is on.
- Page 12 OPERATION GUIDANCE Powering 12 V electronic/on-board devices 1. Insert the adaptor end of the adaptor cable to the 15V output port of the host machine 2. Connect the 12V device to be charged to the other end of the adaptor cable 3.
-
Page 13: Technical Specifications
TECHNICAL SPECIFICATIONS Technical specifications: Size: 223*123*63mm Weight: 1352 ±5g Capacity: 59.2Wh Output: Fast charging (5V 3A,9V 2A,12V 1.5A); 15V 10A, 12V car starting Input: 9V 2A Time taken to charge to the full: Around 4 hours Starting current: 600A (3S) Peak current: 3500A Temperature: -4~140°F PAGE 11... -
Page 14: Faqs
FAQS 1. Q: How to turn off the jump starter? A: (a) The product has an automatic detection function. Once it has no loading or the charging process is finished, the starter will automatically go dormant to save electricity. (b) Press the switch button for 2 seconds to turn it off. 2. -
Page 15: Troubleshooting
TROUBLESHOOTING Please stop using the product and contact the seller if the instructions below cannot solve the problems you have encountered. Phenomenon Reason Instruction Tap the switch button The EPOWER’s voltage is Insert the charging and EPOWER does excessively low that the low- plug into the 5V input not react. -
Page 16: Reminders
REMINDERS 1. Please carefully read through the user manual before using this product. 2. This product can only be used to start 12V cars. It can cause danger if used on other cars. It is prohibited on airplanes or ships. 3. - Page 17 REMINDERS 11. Please remove the product from the car battery within 30 seconds after starting, otherwise it may cause damage. 12. Please connect the positive/negative polar of the clip correctly. 13. Please make sure that 3-4 indicators are on before starting. 14.
- Page 18 REMINDERS In case of liquid leakage from the host machine, restore the leaked liquid immediately with proper containers. Under extreme conditions, battery leakage can occur. If liquid is coming out of the product, it cannot be handle directly by hand. In case of skin contact, wash immediately with soap and water.
-
Page 19: Maintenance And Support
Avoid Extreme Temperatures Do Not Place Near or Into Fire Overcharge/discharge Fuse Protection Against-revers Protection Plug Customer Service 18 Months Limited Warranty Service Lifetime Technical Service Feel Free to Contact Us Support@vtoman.com For FAQ and More Information Support@vtoman.com PAGE 17... - Page 20 Thank You for Choosing Us! LIFE Made in China...
Need help?
Do you have a question about the X5 and is the answer not in the manual?
Questions and answers