
Subscribe to Our Youtube Channel
Related Manuals for Sonifex avn AVN-AH8


Summary of Contents for Sonifex avn AVN-AH8
- Page 1 AVN-AH8 8 Stereo Headphone Output ® Dante Audio Interface Manufacturers of Audio Products for AV, Installed Sound, Broadcast Radio & Broadcast TV...
- Page 2 Informa�on in this document is subject to change without no�ce and does not represent a commitment on the part of the vendor. Sonifex Ltd shall not be liable for any loss or damage whatsoever arising from the use of informa�on or any error contained in this manual.
-
Page 3: Table Of Contents
Product Warranty - 2 Year Extended Fig 2-1: AVN-AH8 Front Panel Fig 2-2: AVN-AH8 Indicators and Reset Sonifex Warranty & Liability Terms & Condi�ons Fig 2-4: AVN-AH8 Headphone Volume, Source Selec�on & Headphone O/P 1. Defini�ons Fig 2-5: AVN-Rear Back Panel 2. -
Page 4: Warranty
To register your product, please go online to www.sonifex.co.uk/register Sonifex Limited ● 61 Station Road ● Irthlingborough ● Northamptonshire ● NN9 5QE ● United Kingdom Tel: +44 (0)1933 650 700 ● Email: technical.support@sonifex.co.uk ● Internet: www.sonifex.co.uk... - Page 5 Product Warranty - 2 Year Extended ma�er hereof and may not be changed or terminated except in wri�ng in As standard, Sonifex products are supplied with a 1 year back to base accordance with the provisions of this Contract. A reference to the consent, warranty.
-
Page 6: Unpacking Your Product
Warranty CE Conformity At the request and expense of the Purchaser the Company will vii. the Goods have been assembled or incorporated into other test the Goods to ascertain performance levels and provide a goods only in accordance with any instruc�ons issued by the report of the results of that test. -
Page 7: Repairs & Return S Iii
Please contact Sonifex or your supplier if you have any problems with your Sonifex product. Email technical.support@sonifex.co.uk for the repair/ The policy of Sonifex Ltd is to comply with all applicable laws of all upgrade/returns procedure, or for support & ques�ons regarding the jurisdic�ons having authority over Sonifex’s business, including the WEEE... -
Page 8: Introduc�On
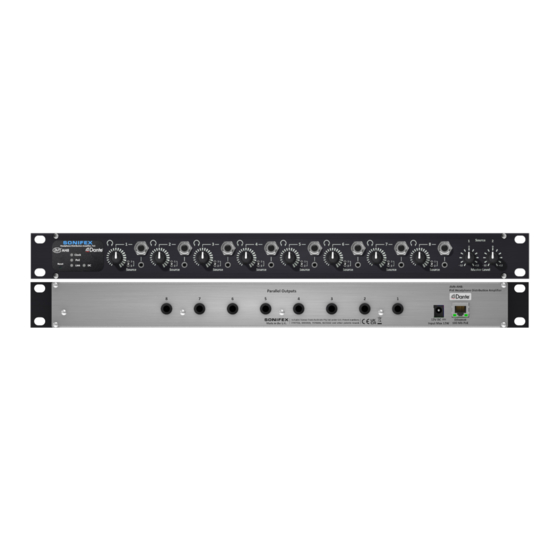
Introduction Introduction ® AVN-AH8 8 Stereo Headphone Dante Audio Interface 1. Introduction rotary controls. The unit supports AES67 opera�on and is Dante Domain Manager compliant. The AVN-AH8 mul�-channel headphone amplifier is a 1U rack-mount which distributes 2 sets of stereo audio to up to 8 different sets of headphones, fed The AVN-AH8 front panel contains a power (PoE) LED, a DC LED, a network from the Dante AoIP network. -
Page 9: Features
Introduction Introduction Features • 8 x front panel 1/4” & 3.5mm jack sockets. • 8 x parallel connec�ons on rear panel • 8 x volume control poten�ometers. • Switch selec�on for each headphone output between 2 dual-channel Dante sources. • 2 x master level controls, one for each stereo Dante input. •... -
Page 10: Controls, Indicators & Connec�Ons
Controls, Indicators & Connections Controls, Indicators & Connections 2. Controls, Indicators & Connections This sec�on describes the opera�onal controls and indicators on the front and rear of the product, such as LED descrip�ons, func�ons and connector pin-outs. Front Panel Fig 2-1: AVN-AH8 Front Panel Status LEDS On the le�-hand side of the front panel are the status LEDs and reset bu�on. -
Page 11: Master Dante Input Level Adjustment
Controls, Indicators & Connections Controls, Indicators & Connections Master Dante Input Level Adjustment At the right end of the front panel are two linear poten�ometers with centre detents. The le� poten�ometer adjusts the master level of source 1 (Dante channels 1&2) and the right poten�ometer adjusts the master level of source 2 (Dante channels 3&4). -
Page 12: Rear Panel Connec�Ons
Controls, Indicators & Connections Controls, Indicators & Connections Rear Panel Connections The rear panel of the device provides access to all the inputs and outputs. provides the DC power input and Ethernet connec�ons, as well as ¼” parallel outputs of the front panel jack sockets, to make cable rou�ng �dier in installed applica�ons. -
Page 13: Ethernet Dante® Connec�On(S)
Controls, Indicators & Connections Controls, Indicators & Connections ® Ethernet Dante Connection(s) On the right-hand side of the rear panel is a single Ethernet/PoE connec�on. The Ethernet connec�on provides PoE and networking capability. There are two status LEDs on the connector. The le� LED indicates the link speed, the right indicates link ac�vity Green Le�... -
Page 14: Dante Controller
Dante Controller Dante Controller Select your opera�ng system and click the red bu�on, this will take you to 3. Dante Controller another page with the correct download file. Dante Controller is used to create connec�ons between Dante enabled devices on the network. This sec�on will help you get up and running. However for more detailed documenta�on it is recommended that you visit the official Audinate documenta�on page at: h�p://dev.audinate.com/GA/dante-controller/userguide/pdf/latest/... -
Page 15: Configuring A Device
Dante Controller Dante Controller Configuring a Device In order to open the ‘Device View’ window for a device in Dante Controller, double click the name of that device in the rou�ng grid. Device Name To change the device name, open the ‘Device View’ window and click on the ‘Device Config’... -
Page 16: Filtering Devices
Dante Controller Dante Controller Within the ‘Transmit’ tab the names of labels are instead entered in the Filtering Devices ‘Channel Label’ field. When there are a large number of devices on a network it could take a while to look through all the transmi�ers and receivers to find the right one. -
Page 17: Rou�Ng Audio
Dante Controller Dante Controller Routing Audio Rou�ng audio between two Dante devices is simple. Click on the box at which a transmit and receive channel meet. In the example ‘01@AVN-CU2’ is routed to ‘Commentator@AVN-AIO4- Example’. Ini�ally an hour glass icon is shown on the square to indicate a rou�ng is pending. -
Page 18: Clock Synchronisa�On
Dante Controller Dante Controller Clock Synchronisation The clock synchronisa�on can be checked in the ‘Clock Status’ tab. Fig 3-15: Clock Status Tab Fig 3-13: Quick Rou�ng Before The status of the PTP clocking between devices keeping audio in sync can be checked here. -
Page 19: Aes67 Compa�Bility
Dante Controller Dante Controller AES67 Compatibility Dante devices with AES67 compa�bility will have an ‘AES67 Config’ tab within the ‘Device View’ window. Fig 3-17: Warning Message Click ‘Yes’ to con�nue. Then reboot the unit by clicking the ‘Reboot’ bu�on in the ‘Reset Device’ sec�on of this tab. Fig 3-16: AES67 Config Tab with AES67 Mode Disabled This is ‘Disabled’... -
Page 20: Fig 3-19: Reboot Warning Message
Dante Controller Dante Controller In the example an AES67 stream ‘AVN-PA8-0’ on the mul�cast address ‘239.69.2.38’ is routed to channels ‘01’ and ‘02’ on the device ‘AVN-AIO4- Example’. To create AES67 transmit streams first open the device configura�on window, and click on the ‘Create Mul�cast’ flow icon. Alterna�vely hold Fig 3-19: Reboot Warning Message ‘Ctrl’... -
Page 21: Fig 3-22: Create Mul�Cast Flow Window
Dante Controller Dante Controller In the example ‘Mul�cast Flow 16’ is created and has a mul�cast address of ‘239.69.147.9’. The mul�cast flow can then be added to AES67 devices. In the example below the mul�cast flow is added to an AVN-Portal. Fig 3-22: Create Mul�cast Flow Window In the example the channels ‘01’... -
Page 22: Network Troubleshoo�Ng
Dante Controller Dante Controller Double click Internet Protocol Version 4 (TCP/IPv4) in the item list and edit Network Troubleshooting the IP address. The device can be seen within Dante® Controller if it is connected to the same network as the computer. If the device doesn’t show up in Dante® Controller please check that the connec�on to the network is correct and that the device and computer are on the same network. -
Page 23: Fig 3-28: Dante Controller Network Config
Dante Controller Dante Controller Fig 3-28: Dante Controller Network Config For more troubleshoo�ng informa�on please see the official Dante® FAQs h�ps://www.audinate.com/resources/faqs And Dante® Controller User Guide at: h�ps://dev.audinate.com/GA/dante-controller/userguide/pdf/latest/... -
Page 24: Technical Specifica�On
Technical Specification Technical Specification Front Panel Connec�ons & Controls 4. Technical Specification LED Indicators Clock LED – indicates valid clock on AoIP Network and AoIP network PoE LED – indicates power presence Aoip Standard Dante Link LED – indicates network link status Number of Channels 4 receive DC LED –... - Page 25 Technical Specification Technical Specification Headphone Output Specifica�ons Parameter Descrip�on Output Impedance: Capable of driving 150mW into 32Ω to 600Ω headphones Maximum Output Level: +18dBu unclipped D to A Line-Up: 0dBFS = +18dBu (Volume = 100%, Master level = 50% = 0dB) Volume Pot Range -80dB (Volume = 0%) to 0dB (Volume =100%) Frequency Response:...
- Page 26 . s o n i f e x . c o . u k t:+44 (0)1933 650 700 sales@sonifex.co.uk...
Need help?
Do you have a question about the avn AVN-AH8 and is the answer not in the manual?
Questions and answers