Table of Contents
Advertisement
Quick Links
Advertisement
Table of Contents
Troubleshooting

Subscribe to Our Youtube Channel
Related Manuals for Sonifex COURIER


Summary of Contents for Sonifex COURIER
- Page 1 Portable Hard Disk Recorder User Handbook...
- Page 2 Information in this document is subject to change without notice and does not represent a commitment on the part of the vendor. Sonifex Ltd shall not be liable for any loss or damage whatsoever arising from the use of information or any error contained in this manual.
-
Page 3: Table Of Contents
2.3. Notes on operation.................. 2-4 2.3.1. Handling the unit ..................2-4 2.3.2. Care of the unit ..................... 2-4 2.3.3. Use of Courier for the partially sighted ............2-4 2.4. Identification of parts................2-5 2.5. Front Panel Controls ................2-6 2.6. Right side panel connectors & controls ..........2-10 2.7. - Page 4 5.6.2. Disk time remaining ..................5-7 5.7. Selecting the recording format (Record Style) ........5-8 5.7.1. Record Style menu ..................5-8 5.7.2. Checking the settings of the Courier’s current Record Style.......5-10 5.7.3. Altering the parameters of a Record Style...........5-11 5.7.4. Volume data ....................5-14 5.7.5.
- Page 5 7.9. Editing a Playlist in the Playlist Compile Mode ........7-18 7.9.1. Rearrangement of cuts in Playlists.............. 7-19 7.9.2. Deleting Playlist cuts .................. 7-19 7.9.3. Segueway (cut join) auditioning ..............7-20 7.9.4. Fine-editing cuts in a Playlist ..............7-20 7.10. Merging linear files................7-21 Courier User Handbook...
- Page 6 Contents 8. Using the Courier file system................8-1 8.1. File management ..................8-1 8.1.1. Naming audio recordings ................8-1 8.1.2. Renaming recordings already made ..............8-4 8.1.3. Deleting cuts from the disk ................8-5 8.1.4. Deleting multiple cuts from the disk .............8-6 8.2. Disk management..................8-6 8.2.1.
- Page 7 13.2.2. Format of the Setup .ini file................ 13-7 13.2.3. Description of setup .ini terms..............13-9 13.3. Transferring files between the Courier and a PC using CCM..... 13-12 13.3.1. Setting up the Courier comms options for PC connection......13-12 13.3.2. Connecting the Courier to a PC..............13-13 13.3.3.
- Page 8 A.1. Format of a firmware download file............A-1 A.2. Where to get new firmware ..............A-1 A.3. Upgrading the firmware .................A-2 A.4. Subscribing to the Courier firmware updates list ........A-3 B. Appendix B : Diagnostics and troubleshooting.......... B-1 B.1. Diagnostics..................... B-1 B.1.1. Checking the LCD..................B-1 B.1.2.
-
Page 9: Courier User Handbook
Edit Mode - This is where editing is carried out and is entered by pressing the EDIT button. Cut-List Mode - This is the normal operational mode of Courier and shows a scrollable list of cuts on the display. Play Mode - Press the PLAY button to enter the Play Mode. - Page 10 Notation Properties Mode - From the Cut-List Mode, press the ENTER button to see the properties of a cut. Courier User Handbook...
-
Page 11: Warranty & Safety Information
(c) The Company accepts liability: (i) for death or personal injury to the extent that it results from the negligence of the Company, its employees (whilst in the course of their employment) or its agents (in the course of the agency); Courier User Handbook... - Page 12 Seller in Condition (c). (h) Where the Goods are sold under a consumer transaction (as defined by the Consumer Transactions (Restrictions on Statements) Order 1976) the statutory rights of the Purchaser are not affected by these Conditions of Sale. Courier User Handbook...
-
Page 13: Returning The Warranty Card
1.1.2. Reporting software bugs Whilst every effort has been made to ensure that the Courier software is bug-free, it is possible that there are bugs in the software. If you find any bugs, please report them to Sonifex because it helps us to improve the quality of the product and we will usually be able to issue another version of firmware onto the Sonifex website for you to upload into your Courier. -
Page 14: Equipment Safety
This equipment has been designed to meet the safety regulations currently advised in the country of purchase. The mains supply which is provided with the Courier has four adapters for use in different countries of the world. It is important to use the correct adapter for the particular country that you are using the Courier in. -
Page 15: Introduction
Handbook and warranty card The first thing to do is to complete your warranty card and to send this back to Sonifex Ltd in the United Kingdom. This way, you can be sure to receive any information on software updates for the Courier. - Page 16 When recording in the field you often only get one chance, so it is imperative that you can rely on your recorder. Courier has a confidence monitor - it is able to replay material recorded to disk whilst still recording. Once you are recording, all other controls are disabled except record levels, so you can’t accidentally stop your...
- Page 17 Sonifex Web site, where you can also find details of compatible systems. Each Courier has a unique serial number that is not only affixed to the base of the unit on a tamper proof label but is also blown into the memory devices of the Courier.
-
Page 18: Notes On Operation
The Courier should not be used under water or in extremely heavy downpours, or in extremely hot conditions (above 40°C). Note : The Courier itself has a low temperature LCD and can be used in the temperature range 0° ° ° ° C to 40° ° ° ° C. -
Page 19: Identification Of Parts
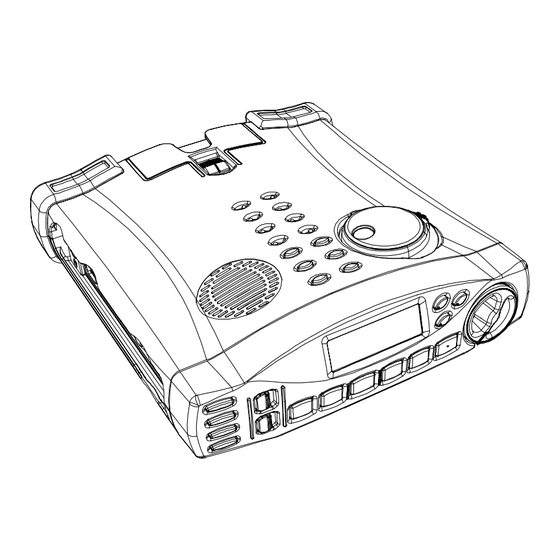
• The MARK button has a raised node on the front so that it can be identified. 2.4. Identification of parts The Courier portable recorder is a compact, light-weight, solid state recorder for use by journalists and sound recordists. All the operational controls have been placed on the front panel for ease of access, split into five groups : •... -
Page 20: Front Panel Controls
Chapter 2 - Introduction 2.5. Front Panel Controls Courier User Handbook... - Page 21 Chapter 2 - Introduction General buttons Depress and hold the POWER button for 0.5 sec to turn the Courier on. The machine initializes and is ready to operate in about 10 seconds. To turn the machine off, press and hold the POWER POWER button for 1 second until the display indicates that the machine will be switched off.
- Page 22 If playing : Stops the audio and recues to the beginning of the cut. STOP This button places an editing Mark at the current position and has the same function as the MARK/DRAG button on the top panel. MARK Courier User Handbook...
- Page 23 Knurled edge Level markers Strap clips - There are two sockets on the underside of the Courier used for attaching the strap to the Courier when it is out of the bag. These simply clip into place. Courier User Handbook...
-
Page 24: Right Side Panel Connectors & Controls
Chapter 2 - Introduction 2.6. Right side panel connectors & controls 2-10 Courier User Handbook... - Page 25 The XLR-3 plug is an output for dubbing audio in the digital domain. This plug can be connected directly to the input of a suitably equipped recorder so that the highest quality recordings are made. AES/EBU OUT Courier User Handbook 2-11...
-
Page 26: Left Side Panel Connectors & Controls
Chapter 2 - Introduction 2.7. Left side panel connectors & controls 2-12 Courier User Handbook... - Page 27 ISDN Reset Pin - in the unlikely event of the software in the Courier locking up, the Courier can be RESET by pushing the reset pin, through the hole. PCMCIA card and eject button PCMCIA CARD...
-
Page 28: Top Panel Controls
MIC/LINE ATTEN ATTEN OFF ON OFF ON PHANTOM PHANTOM OFF ON OFF ON LIMITER LIMITER MIC FILTER L & R L & R L & R OFF ON OFF ON MARK/DRAG SELECT DELETE KEEP EDIT MENU 2-14 Courier User Handbook... - Page 29 Chapter 2 - Introduction Battery - The Courier uses a standard 8mm camcorder battery, or there is an optional AA cell carrier. Battery release catch The battery release catch is used to release the current battery so that you can replace it with a new one.
- Page 30 KEEP button to keep a section of audio between two Marks. Keep is used in cut list to add a cut to the current playlist. In entry dialog it inserts a character. EDIT : Use the EDIT button to Enter and Exit the 2-16 Courier User Handbook...
- Page 31 The centre position of the ½ x SPEED SHUTTLE stops playback. STOP When used on linear recordings, the shuttle selections which are faster than normal ½ x SPEED playback speed are inaudible. SPEED SPEED SPEED Courier User Handbook 2-17...
- Page 32 Chapter 2 - Introduction This page is deliberately blank. 2-18 Courier User Handbook...
-
Page 33: Preparing The Machine For Use
• USA/Japan • Australasia This means that you can travel world-wide with your Courier and still be able to use the native mains supply. To remove an adapter simply push it out from the main supply unit, away from the supply lead. -
Page 34: Optional 12V Power Supply
30 minutes of recording time using fresh AA cells. Note : This adapter can only be inserted into the Courier one way up - the orientation is shown on the label. Also, when you use AA cells, ensure that you change the [Battery Type] to show [AA Cell Pack] (see later). -
Page 35: Inserting The Battery
To remove the battery, hold the battery in your palm and use your thumb to slide the catch on the top of the Courier. If you pull up with your hand, the battery is released. Putting the battery in and taking it out needs a small amount of practice before you can do it smoothly, but is very quick once mastered. -
Page 36: Changing The [Battery Type] In Courier
If you use different types of external batteries, even different types of camcorder batteries, you’ll need to tell the Courier which type of battery you are inserting. This is so that it can calculate more accurately the battery lifetime and voltages used. The [Battery Type] menu can be accessed in the Record Pause Mode, in the Cut-List Mode by pressing the MENU button, or in the [Setup], [Power] menu. -
Page 37: Recharging The Internal Cells (Used For The Hot Swap)
Chapter 3 - Preparing the machine for use The length of time taken to charge a battery in the Courier depends on the amount of charge in it when the mains adapter is applied. Courier trickle charges at a rate of 800mA/hour, so the standard 1200mAh GP_VD101 battery supplied with the Courier will take 2 hours to charge from being fully discharged. -
Page 38: Removable Disks For Operation In Courier
Courier 3.2.1. Types of PCMCIA hard disk Courier operates with a Type III or Type II PCMCIA (PC Card) hard disk. At the time of going to press, the following types of disks have been tested and are supported by Courier : •... -
Page 39: Inserting A Pcmcia Disk
The PCMCIA CARD slot is on the left hand side of the machine. It is best to have the card at the same angle as the Courier and flat against the bottom of the slot when you are inserting it. Push the disk in until the EJECT button pops out. As soon as the disk is inserted, the Courier will sense it and begin to read the disk. -
Page 40: Connecting The Courier For Use
12 hours. This is so that the internal cells in the Courier can be fully charged. To do this, you should ensure that the “automatic power-down”... -
Page 41: Switching Off The Courier
In order to preserve battery life, the Courier can automatically shut down power if the Courier is not being used and has not been used for a certain time duration (5 minutes by default, but software configurable in the Power menu). -
Page 42: Inserting The Courier Into The Carry Case
Open all of the velcro flaps on the carry case and insert the Courier base-first into the opening. It is a tight fit, so ease the Courier left and right until it shuffles down into place. The rubber boots at the base of the Courier should fit snugly into the base of the carry-case. -
Page 43: Menu Operation & Structure
Chapter 4 – Menu operation Menu operation & structure The menus allow you to alter options settings for the Courier and to configure it in different ways. It is used for changing the battery type, for deleting and renaming files, for formatting disks, for changing the meter type, for selecting the type of recording being made and much, much more. -
Page 44: Menu Operation
Once you’ve entered a menu option, you’ll notice that the currently selected option has a tick to the left of it. Use the UP and DOWN arrows to select the option that you require and press the ENTER key. Courier User Handbook... -
Page 45: Menu Structure
Edit Menu - In the Edit Mode, pressing the MENU button displays options for adding to the PlayList, deleting all the placed marks, undo’ing the last edit commands, changing the timer mode and the scale of the displayed audio waveform and for saving files. Courier User Handbook... -
Page 46: Cut List Menu Structure
New Playlist Open Save Save As New MP2 File Close New BWF File Playlist Menu New EncoDAD File New Playlist Close Save As Menu Audio Filing Styles PhoneBook Indicates that its appearance on the menu is software controllable Courier User Handbook... - Page 47 Chapter 4 – Menu operation Audio Filing Styles PhoneBook Timer Modes PhoneBook M enu Play Edit Close T im er M od es M enu Courier User Handbook...
- Page 48 Chapter 4 – Menu operation This page is deliberately blank. Courier User Handbook...
-
Page 49: Recording
Each recording results in a separate cut (file) on the disk. When a hard disk is placed in the slot on the side of the unit, the Courier automatically shows the list of existing cuts and is then ready to record. -
Page 50: Making A Recording
• Make sure that the Courier has a charged battery or is connected to an external power supply. • Check that a PCMCIA disk is fitted into the slot on the side of the Courier. • Connect a suitable microphone or line input (e.g. cassette) to the left MIC/LINE IN connector for mono, and left and right inputs for stereo, and alter the SOURCE switch on the top surface of the Courier to suite the type of input. -
Page 51: Pausing And Stopping A Recording
Pause Mode, regardless of the position of the RECORD switch. If you don’t use the RECORD PAUSE switch at all, each time you make a recording, the Courier will generate a new cut. Using the RECORD PAUSE switch while recording is a useful way of putting many continuous clips onto one cut. -
Page 52: Placing Marks On A Recording
When an AutoStart level is set, whenever you begin to record, the display will show “REC AUTO” in the main record screen : Note : the Courier will stay in the AutoStart Record Mode until you set the option to [Off], using the same method as for selecting the threshold level. -
Page 53: Confidence Monitor
Chapter 5 - Recording 5.5. Confidence monitor Courier has a MONITOR key on the front panel which can be used during recording as a confidence monitor to playback the audio whilst you are still recording it. For example if you record, "testing, testing, one, two, three.."... -
Page 54: Checking The Battery Status & Disk Time Remaining While Recording
5.6. Checking the battery status & disk time remaining while recording There are a number of features of the Courier to help you know the amount of battery time and hard disk time that you have remaining. 5.6.1. Battery status 1. -
Page 55: Disk Time Remaining
This tells you the disk time remaining with the current setting for the Record Style. 2. You can configure the Courier to beep in the headphones, or speaker, when the disk time remaining is less than two minutes. The Courier will beep every ten seconds until the recording is stopped. -
Page 56: Selecting The Recording Format (Record Style)
Record Style menu. There are a number of reasons for using Record Styles: • The Courier allows a huge range of recording formats and sample rates, so it is important that the use of these is controlled, so that fewer mistakes are made by whoever is using the Courier. - Page 57 Mono 64kbps Select the Record Style that you wish to use. The Courier will beep to acknowledge the change of parameters, and automatically Closes that menu to return to the previous menu (Note : The beep can be disabled if you wish to operate in quiet surroundings).
-
Page 58: Checking The Settings Of The Courier's Current Record Style
The Information screen shows the current software version being used in the Courier, the serial number of the machine, the current Record Style settings and the current Time and Date. It is also used to show a security key which can be entered, if you lose your password setting. -
Page 59: Altering The Parameters Of A Record Style
5.7.3. Altering the parameters of a Record Style Any of the initial Styles supplied with the Courier can be altered in the following way. In the Cut-List Mode, press the MENU button and select [Setup], [Styles]. The following menu will be displayed : Record Styles Menu V2.51... -
Page 60: Recording Format
Dalet Mono records on the left input and replicates this onto the left and right outputs, thus giving a stereo recording that has both the left and right channels with the same level. It uses stereo metering. 5-12 Courier User Handbook... - Page 61 128kbps has a ratio of 1,024/128 = 8. Courier supports the full range of bit-rates for both mpeg 1 layer 2 and mpeg 2 layer 2 recordings. The list of bit-rates that are available to you depend on the sample rate and recording mode chosen.
-
Page 62: Volume Data
Use [Save As] to save the settings to a new Style name. Use [Quit] to return to the Styles menu without saving any of the changes. Note : You can have a maximum of 20 Record Styles. 5-14 Courier User Handbook... -
Page 63: Renaming A Record Style
ENTER on [OK] if the new name is correct, or select [Cancel] if not. 5.7.7. Deleting a Record Style In the Cut-List Mode, press the MENU button and select [Setup], [Styles] and then [Delete]. Select the Record Style that you wish to delete and press ENTER : Courier User Handbook 5-15... -
Page 64: Checking The Record Style Setting Of A Cut
Press the ENTER button and a scrollable screen is shown : Use the UP and DOWN arrow keys or the SCRUB-WHEEL to scroll up and down the screen. When you’ve finished viewing the display, press the ENTER key to return back to the Cut-List Mode. 5-16 Courier User Handbook... -
Page 65: Audio Options
Chapter 5 - Recording 5.8. Audio Options There are a number of option settings which affect the way that the Courier will record. 5.8.1. Using the Mic Filter As mentioned in Section 2.8, the MIC FILTER L & R switch operates a high pass filter that has a -3dB point at 125Hz rolling off at 6dB/octave and operates on both left and right channels simultaneously. -
Page 66: Using The Limiter
A/D converters, to prevent digital clipping. 5.8.2.1. Setting the Limiter level The level of the DSP limiter is set in the Courier software. In the Cut-List Mode : Press the MENU button. The following will be displayed :... - Page 67 Select either [Dual Mono] or [Link] depending on the number and type of sources that you will be recording and then choose [Close] to return to the previous menu. Courier User Handbook 5-19...
- Page 68 L & R L & R L & R OFF ON OFF ON When the switch is ON, the Record and Record Pause Modes indicate this with an “L” symbol next to the battery indicator : 5-20 Courier User Handbook...
-
Page 69: Changing The Metering Between Db Scale And Ppm Scale
[Audio] : Select [Meter Type], to show : Press the ENTER key to choose either [PPM Meter] or [dB Meter] and return to the previous menu, or select [Close] to exit without making any changes. Courier User Handbook 5-21... -
Page 70: Setting The Peak Led Level
When the [Peak LED Level] is selected, the display changes depending on whether the [Meter Type] is set to [PPM Meter] or [dB Meter]. [PPM Meter] shows : [dB Meters] shows : Select the setting that you require, or select [Close] to exit without making any changes. 5-22 Courier User Handbook... -
Page 71: Muting The Speaker While Recording
In most interview situations when a microphone is being hand-held and the Courier is close to the microphone, you will want the Courier speaker to be muted so that you do not get feedback on the recording and you can monitor using headphones. -
Page 72: Phantom Power Options
Press the MENU key in the Cut-List Mode and select [Setup] and [Audio] to show : Select [Phantom Power] to show : [All Mic] - This is the standard setting where the Courier provides phantom power regardless of the MIC/LINE ATTEN switch setting. -
Page 73: Waveform (Sound) Option
Select [Waveform], or in earlier versions [Sound], to show : [All] - This is the standard setting where the Courier will show the waveform if it is available, or will try to generate it if it is not available (for new linear recordings). -
Page 74: Mpeg Coding
This option uses more of the DSP encoding by eliminating the limit facility NOTE: If you wish to use the limiter feature the [DSP Encode Plus] option is not suitable at the highest sample and bit rate. 5-26 Courier User Handbook... -
Page 75: Playing & Monitoring
Playing & Monitoring 6.1. Playing and reviewing a recording The Courier can play any recording selected in the Cut-List Mode by pressing the PLAY button on the front panel. The output is simultaneously played to the analogue line output, AES/EBU digital output and any telephone connection that is established at the time of playout. -
Page 76: Transport Keys
If playing : Stops the audio and recues to the beginning of the cut. STOP This button places an editing Mark at the current position and has the same function as the MARK/DRAG button on the top panel. MARK Courier User Handbook... -
Page 77: Adjusting The Output Level
Mode, the level changes made on the cut will be lost. Note : Adjusting the headphone and speaker volume using the rotary control near the headphone socket will not alter the output level at the analogue or digital output. Courier User Handbook... -
Page 78: Monitoring Audio
6.2. Monitoring audio 6.2.1. Headphone and speaker monitoring The Courier is equipped with a 1/4" jack socket for connection to a pair of stereo headphones ranging from 32 - 600 ohm. A small speaker is also supplied on the top surface of the Courier which uses the same level control. -
Page 79: Playback Options
You can alter this display so that it shows a count-up timer from zero : From the Cut-List, press the MENU button and select [Setup], [Display], [Timer Modes] and [Play] to show : [Count Down] – shows a count-down timer (default selection). [Count Up] – shows a count-up timer. Courier User Handbook... - Page 80 Chapter 6 - Playing & Monitoring This page is deliberately blank. Courier User Handbook...
-
Page 81: Editing
Courier. You can delete multiple sections of audio from a cut and create a Playlist of multiple cuts, which you can edit and play back. Courier has graphical editing so that you can see the waveform of the recording - an invaluable help, especially for speech editing where wave-packets often represent whole words. -
Page 82: Keys Used For Editing
Chapter 7 - Editing 7.2. Keys used for editing The keys needed for editing are found on the top surface of the Courier, although the transport keys on the front panel can also be used. At any time, the use of an editing control takes over from the control that is currently being used. - Page 83 This has the same function as the MARK/DRAG key on the top surface and is used for placing, moving and dropping a Mark. Note : Linear recordings can’t audibly be fast-forwarded, i.e. you can only go through paused linear cuts by pressing and holding the FFWD key. Courier User Handbook...
-
Page 84: Entering The Edit Mode
7.3. Entering the Edit Mode In the Cut-List Mode, highlight the cut that you would like to edit and press the EDIT key on the top of the Courier : Press the EDIT button. For some types of recording, such as linear .wav files, a waveform file will need to be generated, which may take some time to display. -
Page 85: Principles Of Editing
Marks and use the transport keys to audition your edit. 7.4.1. Using Marks Marks are the key to editing on the Courier. They appear along the top of the screen as a black triangle which moves with the waveform : 7.4.1.1. -
Page 86: Deleting A Mark
Select [Delete All Marks] from this menu – you’ll be returned to the Edit Mode and all the Marks will have been removed. Note : If you use [Delete All Marks] by accident, you can use the [Undo] option to get your Marks back. Courier User Handbook... -
Page 87: Removing Audio Segments
7.4.4. Selecting multiple sections of audio You can use the SELECT button to select multiple segments of audio to delete or keep in a cut. With the cursor positioned between two Marks, press the SELECT button : Courier User Handbook... -
Page 88: Saving Edited Audio Files
As standard, for mpeg compressed and linear .wav recordings (including broadcast wave format files), the Courier saves the file in the same format as that which you recorded it. However, by using “Save As”, you can save the file as a Broadcast Wave Format file, as another copy of the audio file, or as an edit decision list copy (edl .CPY) of the file. -
Page 89: Save As
- the .CPY file uses the source file whenever audio playback is required. The .CPY files can not be used on a PC - they are for use only in Courier. Note : Deleting the source audio of a .CPY file will mean that you can’t then play the .CPY file. -
Page 90: Editing Tools
The display scale can be altered for recordings which were made at a very high or very low level. Nominally, the scale shows a peak of +10dB and a baseline of - 10dB. These values can be altered. 7-10 Courier User Handbook... -
Page 91: Changing The Mode Of The Timer Display
The position of the central cursor in the whole cut – this is the normal method of operation so that you can view where you are in the cut and is useful for edits of long recordings. Courier User Handbook 7-11... -
Page 92: Exiting The Edit Mode
To leave the Edit Mode, press the EDIT button. If you have made any changes to the cut the display will show : Select [Yes] to save the changes to the disk, [No] to return to the cut list without making changes or [Cancel] to return to the Edit Mode. 7-12 Courier User Handbook... -
Page 93: Cut And Paste Editing
7.8.1. Creating a new Playlist On power up, the Courier automatically generates a default empty Playlist and opens it. Only one Playlist can be open for editing at any one time. -
Page 94: Opening An Existing Playlist
Playlist. 3. If you are in the Edit Mode, either use the SELECT button, or the KEEP button, to highlight the sections of the cut that you’d like to add to the Playlist. 7-14 Courier User Handbook... -
Page 95: Saving A Playlist
If you have used the DAVE2000 file format you can save the Playlist as follows : DAVE2000 or as a New Playlist Note : When Courier is powered down, any Playlist in memory will be discarded, so it is important to save the Playlist to disk if you have added edits to the Playlist but have not used the Playlist Compile screen to change them. -
Page 96: Playing A Playlist
Cut-List Mode. The individual cuts within the Playlist are played in the order in which they appear in the Playlist, as one seamless cut. In addition to the Playlist entry title appearing in the Play screen, the current cut position within the Playlist is shown. 7-16 Courier User Handbook... -
Page 97: Deletion Or Renaming Of A Cut That Is Also Included In A Playlist
You can still play the Playlist that you have created but when it needs to play the deleted cut, the Courier will skip over the missing audio file and continue to play the cut following it. 7.8.7. Checking the contents of a Playlist Normally, you need to enter the Playlist Compile Mode to see the list of cuts contained in a Playlist. -
Page 98: Editing A Playlist In The Playlist Compile Mode
- See Section 7.9.3. To leave the Playlist Compile Mode, select [Close] at the bottom of the list. If you have made any changes to the Playlist, you are prompted to save it : 7-18 Courier User Handbook... -
Page 99: Rearrangement Of Cuts In Playlists
In the Playlist Compile Mode, unwanted cuts cans be deleted from the Playlist by highlighting them and pressing the DELETE button. You will need to confirm the selection to ensure that you have deleted the correct cut : There is no Undo facility for this action. Courier User Handbook 7-19... -
Page 100: Segueway (Cut Join) Auditioning
Marks and changing the areas that are kept and deleted. Note : The original cut is not affected by the editing in this mode, only the Playlist entry is affected. 7-20 Courier User Handbook... -
Page 101: Merging Linear Files
Chapter 7 - Editing 7.10. Merging linear files The Courier is able to take two linear files of the same file settings and merge them to become one cut. This may be useful in recording background sounds or music onto a main recording. - Page 102 Chapter 7 - Editing This page is deliberately blank. 7-22 Courier User Handbook...
-
Page 103: Using The Courier File System
The Machine ID could be used to identify the Courier, if you have a number of them, or could represent a particular location of where you are carrying out the recording. When the clip is sent to the studio, the studio will know who recorded the file and where it came from. - Page 104 Chapter 8 - Using the Courier file system 8.1.1.1. Altering the first three [Initials] characters Press the MENU key in the Cut-List Mode and select [Setup] and [Filing] to show : Select [Initials] : The first character of the [Initials] will be highlighted. Use the UP and DOWN arrows, or the SCRUB-WHEEL, to change the character and the ENTER key to move on to the next character.
- Page 105 Enter the number, save the option to disk as an .ini file, and copy it to the Courier. Once you load the new Setup into Courier, your recordings will start at the new number. See Appendix B for more information on how to use this software.
-
Page 106: Renaming Recordings Already Made
Chapter 8 - Using the Courier file system 8.1.2. Renaming recordings already made If you want to rename the first eight characters of a cut to whatever you like, you can use the Rename command to do this. In the Cut-List Mode, highlight the cut that you wish to rename and press the ENTER key. -
Page 107: Deleting Cuts From The Disk
8.1.3.1. Quick delete In the Cut-List Mode, highlight the cut that you wish to delete and press the DELETE button on the top surface of the Courier. The Courier asks you to confirm the deletion : [Yes] deletes the file, [No] returns to the Cut-List Mode. -
Page 108: Deleting Multiple Cuts From The Disk
You should try to keep as few audio cuts, or files, on the disk as possible, for two reasons : 1. The fewer the cuts on the disk, the faster the Courier will be able to read the file-structure when it is powered up. -
Page 109: Formatting A Disk
Courier, i.e. before the password protected [Setup] menu option. If your users of the Courier are competent and unlikely to use the [Format Disk] command rashly, then it would be wise to allow access to this command. If your Courier users are not familiar with computer technology and could wipe out a disk’s contents unknowingly, then it might be prudent to disallow the [Format Disk]... -
Page 110: Where Recordings And Information Files Are Stored
Note : When Courier displays the Cut-List, it only searches for audio files in the specified Record Directory. If you have made recordings in one directory and you then change to a new directory name, the Courier screen will display “No Files On {New Record Directory}”... -
Page 111: Information Files
They have the extension .ini (like Windows 3.11 information files) and are stored in the \SETUPS directory. If you put the files into a different directory, Courier will not be able to use them to configure the options. -
Page 112: Displaying Information About A Cut In The Properties Mode
Chapter 8 - Using the Courier file system Waveform data files - These files are generated for linear files the first time that the EDIT button is pressed and are used to show the waveform whilst editing. They have the extension .pk and are stored in the defined Audio Directory, along with the audio files. -
Page 113: Audio File Formats
Secondly, contact Sonifex to see if the specific file format can be written directly on the Courier. Systems that are supported currently are Dave2000 and the ENCO DAD. -
Page 114: Compatibility With Editing Systems
AIFF is a linear RIFF file format used on Apple Mac systems. • Dave2000 is an independent audio editing system which records 12 bit linear files. Dave2000 audio files recorded on Courier can be edited on a Dave2000 workstation directly. •... -
Page 115: System Settings And Display Options
9.1. System settings The [System] menu settings for the Courier are important when configuring the machine, for entering the time and date, for reading and writing Setup configuration files and for limiting access to the [Setup] menu by use of a password. -
Page 116: Altering The Time
= Day, MM = Month, YY = Year. Use the UP and DOWN arrows, or the SCRUB- WHEEL, to change the highlighted date and the ENTER key to accept it. If you want to quit from this screen at any time without making any changes, press the MENU button. Courier User Handbook... -
Page 117: Checking The Current Time & Date Settings
MENU button then select [Information]. Scroll to the bottom of the screen and the time and date will be shown. N.B.: The time will not continue to change, it shows the time when you went into the Information screen. Courier User Handbook... -
Page 118: Reading And Writing Setup .Ini Files
[Read Setup] and [Write Setup], found under the [Setup], [System] menu. When you write a setup file to disk, Courier writes a standard Windows .ini file to a directory on the disk called /SETUPS. You can name the file however you wish, so you can have multiple .ini files with different configurations. -
Page 119: Reading A Setup File From Disk
In the Cut-List Mode, press the MENU button and select [Setup], [System] and [Read Setup]. If there are no suitable files on the disk, the Courier will display the message “No Files on Disk” and will return to the menu after a few seconds. If there are .ini files on the disk, they will be displayed :... -
Page 120: Passwording
Courier menu structure. On delivery of the Courier there is no password set, so you will have access to the full [Setup] menu structure. 9.5.1. Setting the password In the Cut-List Mode, press the MENU button and select [Setup], [System] and [Enter Password]. -
Page 121: Entering The Password At The [Setup] Menu
9.5.2. Entering the password at the [Setup] menu Once a password has been accepted by the Courier, every time that you select the [Setup] menu, the Courier will ask you to enter a password : Initially, the cursor rests on the first character. flashing alternately reverse and normal video. - Page 122 [Information] from the menu : Press the ENTER key to exit from this screen. NOTE: To remove the password, select [Setup], [System] and [Enter Password] and under the new password leave it blank. Repeat this in the confirmation of the password. Courier User Handbook...
-
Page 123: Display Options
[Biggest] and [Smallest] display the cuts by file size. [Close] exits the menu without making any changes. As standard, [Newest] is selected so that the most recent recording is highlighted at the top of the Cut-List, ready to play, when you have finished recording. Courier User Handbook... -
Page 124: Appearance Of The Menu
9.6.2.1. Adjustment of the LCD contrast If you are using the Courier in exceptionally dark, or light conditions, you can adjust the contrast of the LCD display to suite your environment. From the Cut-List Mode, press the MENU button and select [Setup], [Display] and [LCD Contrast] : Use the UP and DOWN arrows, or the SCRUB-WHEEL, to adjust the contrast and use the ENTER key when you are happy with the setting. - Page 125 When you are navigating the menu for the first time, you can use the help screens built into Courier to help identify what each option does and how they can be altered. For example, with the [Show Help] option set to [On], pressing the MENU...
-
Page 126: Type Of Warning Beep
9.6.3. Type of warning beep When an error occurs on the Courier, or something is wrong apart from low battery and low hard-disk time, it can emit a warning beep to alert. You can select the type of beep heard. -
Page 127: Battery And Power Management
Chapter 10 - Battery & power management 10. Battery and power management Courier can draw it’s power from a 90V - 250V DC mains supply, from a 12V car battery supply, from a standard 8mm camcorder cell, or a pack of AA cells. Courier also has internal cells so that external batteries can be “hot-swapped”... - Page 128 Chapter 10 - Battery & power management 10.1.1.1. Unit power status The unit power status is updated to show how Courier is sourcing power. The message displayed is from one of the following : Text Message Description Battery Power from the external battery. The battery voltage is n.nnV...
-
Page 129: Battery Status Icon
This is the case even while recording, although the beep is not replicated on the audio which is recorded. Courier User Handbook 10-3... -
Page 130: Front Panel Power Indicator Led
Indicator LED Colour Description LED is off The Courier is powered by the external battery and has sufficient charge to operate correctly. Green A green light is displayed while the Courier is mains powered and the battery is not charging (i.e either there is no battery inserted, or it is fully charged already). -
Page 131: Power Management
The LIGHT button is a toggle button for switching the LCD backlight on and off.. You can configure the Courier to switch off the backlight after a defined period to conserve battery power. From the Cut-List Mode press the MENU button and select [Setup], [Power] and [Light Off Time] to show : Select [Never] to never use the automatic backlight switch off facility. - Page 132 Chapter 10 - Battery & power management This page is deliberately blank. 10-6 Courier User Handbook...
-
Page 133: Phonebook
Chapter 11 – PhoneBook 11. PhoneBook The Courier PhoneBook is used to store all of the telephone numbers needed for use with either the modem, GSN mobile, or ISDN line connections. Once the PhoneBook has been configured, the transfer of audio, or data, to a remote studio is very easy. -
Page 134: Transfer Protocol Used
Courier as an ISDN codec for the transmission of live audio. [No Modem] – This is the mode used when Courier is playing audio down a telephone line and requires a suitable telephone hybrid unit to be connected between the Courier and the telephone line. -
Page 135: Entering A Number
[Live Audio] - This is the “protocol” that should be used when you need to use the Courier as an ISDN codec which allows the Courier to transmit live audio down an ISDN line to a remote studio. Pre- recorded files can also be transmitted down the line if they have been recorded in the correct format. -
Page 136: Selecting A Script File
Courier menus. Script files are ASCII text files with the extension of .scp (e.g. host1.scp). They can not be generated on the Courier, but can be written either by the Courier Configuration Manager software, or by using a standard text editing program, such as Windows Notepad. -
Page 137: Adding An Entry To The Phonebook
If the setting [Modem A] does not work for you, try [Modem B]. If this does not work, then contact Sonifex at the email address in the front of this handbook, giving us the make and model number of the modem that you are using. - Page 138 Using [Save As], you can change the name if you wish, or you can use the PhoneBookXX title (XX being replaced by number 01-60), which is automatically generated by Courier. Use the UP and DOWN arrows, or the SCRUB-WHEEL, to change the character and the ENTER key to move on to the next character.
-
Page 139: Editing An Entry In The Phonebook
(See section 11.1 for further information) : Select [Save] to save over the current entry, [Save As] to save the current settings as a new entry or [Close] to exit without saving. Courier User Handbook 11-7... -
Page 140: Deleting An Entry In The Phonebook
Select the PhoneBook entry that you wish to rename and press ENTER : Use the UP and DOWN arrows, or the SCRUB-WHEEL, to change each character of the phone number title and use the ENTER key to move on to the next character. 11-8 Courier User Handbook... -
Page 141: Setting The Default Phone Number For File Transfer
Select [Save] to save the default PhoneBook entry, or [Close] to exit without making any changes. To use a PhoneBook entry for file transfer it can use any communication method except “No Modem”. (See section 11.1 for further information). Courier User Handbook 11-9... -
Page 142: Setting The Default Phone Number For Live Audio Transmission
Note : For live audio transfer over ISDN, it is assumed that the CO-ISDN version of the Courier is being used and that you are using the internal ISDN modem. If you want to use Courier by connecting the audio inputs and... -
Page 143: Connectivity
• You can use the Courier as an ISDN codec to send live audio to a codec back at your studio. You can use the microphone input or play recorded cuts from the hard disk/flash card across the line. -
Page 144: Connecting Directly To A Pc
12.1. Connecting directly to a PC 12.1.1. Using a drive-bay By far the fastest way of getting the recorded audio from the Courier into a PC is to install a PCMCIA drive bay into your PC, so that disks can be removed from the Courier and inserted directly. - Page 145 The LEDs will show the USB activity : the top LED is used to show transmit and the lower for receive. When performing file transfers to the Courier it is important to ensure that the transfer is properly completed as Windows Explorer will use caching techniques and will appear to complete before all the data has been transferred.
-
Page 146: Using A Telephone Line To Transfer Audio
There are two methods by which you can send audio back to your studio from a remote location using a telephone line : You can connect an external modem to the RS232 port of the Courier and send the recordings as data files. At the other end of the telephone line, you just need another modem connected to your PC or Apple Mac. - Page 147 Modem Types, please refer to section 11.1.5 : Then select [Dial] to dial the number, or [Close] to exit without making any changes. When Courier is dialling and trying to establish a connection, the following screen is displayed :...
- Page 148 In the Cut-List Menu select the cut or cuts you wish to send. Then, press the MENU button and select [Connectivity], [File Transfer] and then [Dial Default] : The number stored as the default will be dialled immediately. When Courier is dialling and trying to establish a connection, the following screen is displayed :...
- Page 149 When a connection has been established and the file transfer is taking place, the screen changes to show the number of files and the file size transferred : Once the Courier has completed the file transfer, the Courier automatically hangs up and disconnects the line with the display indicating “Closing” and “Complete”.
- Page 150 When a connection has been established and the file transfer is taking place, the screen changes to show the number of files and the file size transferred : Once the Courier has completed the file transfer, the Courier automatically hangs up and disconnects the line with the display indicating “Closing” and “Complete”.
-
Page 151: Using A Telephone Hybrid To Transfer Audio
By connecting an external telephone hybrid to the Courier, audio can be played from the Courier down a telephone line and it can also receive a return feed from the telephone line, to monitor. The Courier can generate DTMF dialling tones to dial requested numbers. - Page 152 To exit from this screen, press the MENU button to show : Select [Disconnect] to finish the transmission and [Redial] to redial the same number. Use [Close] to leave this screen without making any alterations. 12-10 Courier User Handbook...
-
Page 153: Using A Gsm Mobile Phone To Transfer Audio
Chapter 12 – connectivity 12.3. Using a GSM mobile phone to transfer audio Courier treats a GSM mobile phone in exactly the same way as an external modem, except that the data rates for transferring data are much slower (only 9,600kbps currently). -
Page 154: Using An Isdn Line To Transfer Audio
ISDN codec allowing the user to carry out a live report using the analogue inputs or playback from the PCMCIA disk. For this feature to work you will either need a Courier with the built in ISDN interface or a standard Courier with an external ISDN codec. - Page 155 [National ISDN NI-1]. You will also need to enter a SPID together with a Local Number. [Auto Sel Switch] - Selecting this option allows the Courier to automatically negotiate with the ISDN switch that you are using. However, this method should not be relied upon as it has varying success.
- Page 156 [ISDN Upgrade Code] option below. From time to time, new versions of ISDN firmware may become available on the website. To load this into the Courier you will need to use the [ISDN Upgrade Code] option. 12.4.1.2. Upgrading the ISDN firmware...
- Page 157 This option is used for defining the format in which the audio will be compressed for live audio transfer over ISDN. Courier uses mpeg layer 2 as the compression algorithm and can use either 24kHz, or 48kHz sampling rates. The selections that you make here depend very much on the audio codec that you will be using to receive and decode the audio at the other end of the ISDN line.
-
Page 158: Transferring Data Files Over Isdn
The internal ISDN modem can be used to transfer data files over a single ISDN B channel, at 64kbps. Simply use the supplied ISDN cable to connect the ISDN line directly to the Courier. At the other end of the ISDN line, you just need a suitable ISDN modem to receive the data file. -
Page 159: Live Audio Over Isdn
Connect] and [Select Phone #] Select the telephone number that you previously entered and choose [Dial]. The Courier will show the following screen whilst dialling the number : Once the number has been dialled, the microphone input is enabled so that a live report can be given. - Page 160 From the Cut-List press the MENU button, then select [Connectivity], [Live Connect], [Dial Default] : The procedure for initiating the call, playing pre-recorded cuts and using the microphone input(s) is the same as for section 12.4.3.2. 12-18 Courier User Handbook...
-
Page 161: Dialling The Last Number Used
12.4.3.2. 12.4.4. Dialling the last number used The Courier stores the parameters of the last number that you dialled, whether it was an ISDN live audio connection or a GSM mobile data transfer. To dial the last number that you used, from the Cut-List Mode, press the MENU button and select [Connectivity], [Last Num Redial]. - Page 162 Chapter 12 - connectivity This page is deliberately blank. 12-20 Courier User Handbook...
-
Page 163: Courier Configuration Manager
The Courier Configuration Manager (CCM) is a piece of software supplied with your Courier which you can use for writing setup .ini files which can be loaded into a Courier machine to configure the options. Every Courier has the ability to read and write these .ini files so that you can load the same setup file onto different... - Page 164 Chapter 13 - courier configuration manager In the Add/Remove Programs window, select “Install”. Check that the floppy disk is inserted and click on “Next” The file “setup.exe” on the disk should be found automatically by the install software. If it isn’t, then use “Browse” to select it. Click on the “Finish”...
- Page 165 Chapter 13 - courier configuration manager Make sure that you are not running any other applications or programs. If you are, then Close them before clicking on the “Next” button. Enter your name and company/organization details and click on “Next”.
- Page 166 Chapter 13 - courier configuration manager Click “Next” to accept the Program Folder name of “Sonifex Courier”, or enter your own folder name. Click on “Back” to change some of the settings displayed, or click “Next” to accept the settings and begin the installation.
-
Page 167: Running The Courier Configuration Manager Software
Click on the Courier icon to run the program. The following screen will be displayed : Note : This screen will be updated whenever the options in the Courier alter, so future versions of the software may look slightly different to this. -
Page 168: Saving A Setup.ini File
Chapter 13 - courier configuration manager 13.2.1. Saving a setup.ini file Operation of the CCM program is fairly self-explanatory. Select each tab in turn and alter any options to the settings that you require. If you don’t want a setting to be included in the setup file, then deselect the tick box. -
Page 169: Format Of The Setup .Ini File
Chapter 13 - courier configuration manager If you have a setup file that you want to make alterations to, then click on the “Open” button to open a setup file. You can then make changes to it and “Save” the file under the same filename, or “Save As”... - Page 170 Chapter 13 - courier configuration manager LightOffDelay=0 PowerOffDelay=0 BatteryBeep=3 [Communications] ISDNSelect=0 ISDNSwitch=0 ISDNAutoSelSPID=0 ISDNSPID= ISDNLiveFrequency=2 ISDNLiveFormat=1 ISDNLiveCRC=1 ISDNLiveEndPlayBeeps=1 [System] DateFormat=1 [RecordStyles] RecordStyle0="CD Quality", 3, 48, 2, 384, 0 RecordStyle1="FM Quality", 3, 32, 2, 192, 1 RecordStyle2="AM Quality", 3, 22, 1, 80, 2 RecordStyle3="Tel Quality", 3, 16, 1, 24, 3...
-
Page 171: Description Of Setup .Ini Terms
Chapter 13 - courier configuration manager 13.2.3. Description of setup .ini terms Selections shown in bold are the default settings used when the Courier is shipped. [Audio] Section MeterType 1 = PPM Meter, 2 = dB Meter PeakLEDLevel 0 = Peak 4 / Peak 0 dB 1 = Peak 4.5 / Peak +2 dB... - Page 172 Chapter 13 - courier configuration manager ShowHelp 0 = Off, 1 = On AllowFormat 0 = Off, 1 = On Language 1 = English, 2 = American EditScaleMax -24 to +12 = -24 dB to +12 dB, 10dB EditScaleMin -24 to +12 = -24 dB to +12 dB, -20dB...
- Page 173 Chapter 13 - courier configuration manager [RecordStyles] Section RecordStyle[n] Name, Filetype, Sample Rate, Channels, Bit Rate, CRC. See Section 5.7.1 for default styles Filetypes 0 = Linear WAV, 1 = Linear BWF, (Column 1) 2 = Mpeg2 WAV, 3 = Mpeg2 BWF, 4= Raw Mpeg2, 5 =...
-
Page 174: Setting Up The Courier Comms Options For Pc Connection
Courier by using the [Load Firmware] command – See appendix A for further information. 3. Transferring audio recorded on the Courier to a PC for editing, if the PC has no PCMCIA slot available. 13.3.1. Setting up the Courier comms options... -
Page 175: Connecting The Courier To A Pc
Chapter 13 - courier configuration manager 13.3.2. Connecting the Courier to a PC You must have a spare COM port free on your PC to connect to the Courier, or if you are using the optional USB connection, a free USB port. Use the supplied cable to connect the RS232 or USB port of the Courier to either COM1 or COM2 of your PC for RS232 or a free USB port. -
Page 176: Establishing A Connection
2. Is the cable connected to the same communications port that you have specified in the [Serial Port] option above ? 3. Are the baud rates the same in both the [Baud] of the Courier and the [Baud Rate] option in the CCM software ? If the software does still not connect after the above checks, then contact your dealer. -
Page 177: Sending Files From The Pc To The Courier
The [Target Directory] refers to the area on the PCMCIA disk in the Courier where the selected file is to be transferred to. Firmware files should be stored in the root directory of the PCMCIA disk. - Page 178 Once you have selected a directory, choose [Open] to continue or [Cancel] to exit. Now you can select the file which you wish to download to the Courier. Useful files to send are : •...
- Page 179 Courier. The PC screen shows “Downloading selected file” and a percentage transferred bar. The Courier screen shows the status of the connection [Status], the name of the file [File] and the percentage of the file that has been transferred [Progress].
-
Page 180: Sending Files From The Courier To The Pc
13.3.7. Sending files from the Courier to the PC On the [Courier Connection] tab of the CCM software, select the [Upload file from Courier] option and click on the [Select File] button. You are now shown the file and directory listing of the PCMCIA disk in your Courier. - Page 181 Chapter 13 - courier configuration manager Once the file that is required to be uploaded has been highlighted, select either [Open] to continue or [Cancel] to exit. Now select where on your PC you would like the file to be saved and the name under which it is to be saved as.
- Page 182 Courier. The PC screen shows “Uploading selected file” and a percentage transferred bar. The Courier screen shows the status of the connection [Status], the name of the file [File] and the percentage of the file that has been transferred [Progress].
-
Page 183: Script Files
Chapter 13 - courier configuration manager 13.4. Script files Script files are used by Courier when trying to initiate a modem transfer to a secured host PC which requires a password, or set routing to enable it to receive a file(s) from a remote location. - Page 184 Chapter 13 - courier configuration manager The Commands are as follows (not case sensitive) : Command Definition *:lll Define label. *Cnnn Initialise counter with nnn count (n = 0-9). *Dlll Decrement counter and if non zero goto label lll. Echo character to screen (n=0 = off, n=1 = on, default = on).
-
Page 185: Specification & Connection Details
9 Way D-type plug PCMCIA (PC Card) Type III slot Headphone 0.25" (6.3mm) Jack socket, for 32 - 600 ohm stereo headphones. Power XLR-4 socket for car battery or mains adaptor, rechargeable battery pack, AA cell case Courier User Handbook 14-1... -
Page 186: Operational Controls
8 &16 bit linear broadcast .wav 8 & 16 bit linear .aiff DAVE2000 ENCO DADpro32 Other proprietary header formats may be supported – please contact Sonifex for details Batteries 6V standard 8mm NiCd, NiMH camcorder batteries (for use with Sony, JVC, Sharp camcorders) 14-2... -
Page 187: Firmware Versions
Mpeg coding using DSP Encode Plus Signal level indicator on Live connect V2.534 ISDN U-bus connectivity fully implemented. 32 kHz sample rate added for ISDN live connection 56kbps connection added for U and S-bus ISDN live connection. V3.0 USB connectivity implemented. Courier User Handbook 14-3... -
Page 188: Recording Durations For Various Disk Sizes
6hrs 1min 12hrs 2mins 1hr 17mins 2hrs 34mins 5hrs 9mins 10hrs 18mins 1hr 7mins 2hrs 15mins 4hrs 30mins 9hrs 0mins 54 mins 1hr 48mins 3hrs 36mins 7hrs 12mins 45 mins 1hr 30mins 3hrs 0min 6hrs 0mins 14-4 Courier User Handbook... -
Page 189: Accessories
Chapter 14 - Specification & connections 14.1.8. Accessories The following accessories are available for the Courier. For more information, see the Sonifex web-site, or contact your nearest Sonifex distributor. Sonifex Stock Description Code CO-STD Courier portable recorder complete with 1200mAh NiCd battery, carry case and universal voltage PSU/battery charger. - Page 190 PCMCIA to IDE Cardport ISA internal interface for PC (Win 95/98). CO-PCSI PCMCIA to SCSI internal interface for PC (Win 95/98). CO-PCSE PCMCIA to SCSI external interface for PC (Win 95/98). CO-CSNT Cardware services for NT (PCMCIA driver for Win NT). 14-6 Courier User Handbook...
-
Page 191: Connection Details
The RS232 connector is a 9 way male ‘D’ Type socket with the following pin assignments : Pin1 : DCD Pin2 : RXD Pin3 : TXD Pin4 : DTR Pin5 : Signal Ground Pin6 : DSR Pin7 : RTS Pin8 : CTS Pin9 : N/C Courier User Handbook 14-7... -
Page 192: Headphone
Chapter 14 - Specification & connections 14.2.5. Headphone The Courier has a stereo ¼” ( 6.3mm ) jack socket suitable for driving 32 - 600 ohm stereo headphones. : Left Out Ring : Right Out Sleeve : Common 14.2.6. Power... -
Page 193: Appendix A : Upgrading The Firmware
A.1. Format of a firmware download file The files that Courier uses to upgrade the firmware have an extension of .dwn or .DWN (for downloadable) and are of the form : CO_V2534.DWN where V2534 represents V2.534 firmware. -
Page 194: Upgrading The Firmware
Appendix A - upgrading the firmware 2. If you don’t have a PCMCIA slot, you can use the Courier Configuration Manager software to copy a firmware file from your PC via the PC’s serial (COM) port. See Chapter 11 - Communications and file transfer, for more... -
Page 195: Subscribing To The Courier Firmware Updates List
A.4. Subscribing to the Courier firmware updates list We can email you to notify you of major Courier firmware upgrades. All you have to do is send your email address in the body of the email to : courier.support@sonifex.co.uk with the words “ACCEPT COURIER UPDATES LIST”... - Page 196 Appendix A - upgrading the firmware This page is deliberately blank. Courier User Handbook...
-
Page 197: Appendix B : Diagnostics And Troubleshooting
Courier’s features. B.1. Diagnostics Courier’s built-in Diagnostics can be used if you think that there may be a problem with the LCD display, the buttons or switches, the monitor output (speaker and headphones), or the RS232 port. Some simple checks allow you to verify whether the machine is operating correctly. -
Page 198: Checking The Buttons And Switches
Appendix B - diagnostics & troubleshooting B.1.2. Checking the buttons and switches All of the buttons and controls on the Courier can be tested to see if they are functioning. If you have problems with the Courier where a button appears not to... -
Page 199: Checking The Rs232 Port
To check whether the RS232 port is working correctly, you’ll need to connect the Courier, via RS232, to a PC (using Hyper Terminal, or Procomm), or some other communications device. In the RS232 test mode, any characters sent to the Courier over RS232 are displayed on the screen and also echoed back to the sending device. -
Page 200: Show The Charging Parameters On The Battery Display Screen
B.1.6. Show the charging parameters on the battery display screen You can choose to have the Courier show the charging parameters on the battery display – this is mainly used to find potential errors in the battery charging system. Select [Setup], [System],[Diagnostics], [Batt/Disk] : Select the [Parameters] option and then select [Close] to save the setting. - Page 201 Appendix B - diagnostics & troubleshooting Cycle Count - This tells you which stage of the charge cycle the Courier is currently in. Cycle Count Action Internal Cell Internal Cell Internal Cell Internal Cell charge initialisation. charge soft start charge main charge 1 minute pause charge initialisation.
-
Page 202: Troubleshooting
Courier. Get information on the format of the audio file that your editor can use and set this as the Record Style of the Courier. Try a recording and then try to edit it. If it still does not work, contact Sonifex at courier.support@sonifex.co.uk. -
Page 203: Power-Up Problems
12 hour period to ensure that your internal cell is fully charged. Possible The Courier has a problem that looks as if it is not powered Cause Remedy Press the RESET button which is recessed on the left hand side of the Courier. -
Page 204: Recording Problems
Put the disk into a laptop or PC and delete any files that you do not need. (Courier does not need any files on the disk to operate - all firmware is stored in the Courier itself). -
Page 205: Communications Problems
Remedy Check that the lead from the modem or mobile phone is correctly seated in the RS232 connection port on the left-hand side of the Courier. Also check that the other end of the lead, going to your modem or GSM mobile phone, is correctly fitted. - Page 206 Remedy Try sending the audio again, if you keep on getting the same message there could be a problem with transmission or with the host computer. Your mobile phone has lost signal. Possible Cause Remedy Move to a location with better signal and try again. B-10 Courier User Handbook...
-
Page 207: Glossary Of Terms
Advanced Technology Attachment. This is the "official" name for what the computer industry calls IDE (Integrated Drive Electronics). CCM - Courier Configuration Manager software, supplied with your Couirer. CODEC – Coder/Decoder. This is a device is used to convert analogue signals into digital bit streams and vice versa. - Page 208 A connector type which eliminates noise picked up by long cable runs in professional balanced systems. It uses two positive connections and one negative for each channel - at the receiving end, circuitry compares the two positive signals and removes the noise difference. Courier User Handbook...
-
Page 209: Index
AutoStart Recording, 5-3 Boot up sequence, 3-8 Broadcast wave file, 7-9 Broadcast wave format, 7-8, 8-11 Button Test, B-2 BATT/DISK button, 2-7, 5-6, 5-7, 10-1 Buttons Latching or momentary, B-3 Checking with Diagnostics, B-2 Battery, 14-2 Bwf cuts Courier User Handbook... - Page 210 Summary, 14-2 bwf files, 8-11 Top panel, 2-14 Copying a cut, 7-9 Courier Use in other countries, 3-1 Camcorder battery, 3-1 Courier accessories, 14-5 Car charger, 3-2 Courier Config Manager Card-Port, 12-2 Description, 13-1 Carry case, 3-10 Installation, 13-1 Case cleaning, 2-4...
- Page 211 File formats types, 7-9 Cut and Paste, Principles of, 7-13 File locations, 8-8 Display scale, 7-10 File transfer, 12-1 Display waveform options, 5-25 Courier to PC, 13-18 Keys used, 7-2 Courier to PC, 13-12 Non-destructive, 7-1 GSM mobile, 12-11 PhoneBook entry, 11-7...
- Page 212 Type used, 2-13, 3-6 ISDN S-Bus, 12-13 Hardware ISDN U-Bus, 12-13 Nokia 9110 (communicator), 12-11 Headphone connections, 14-8 Headphone socket, 2-11 Headphone volume control, 2-11, 6-4 Headphones, 2-11 KEEP button, 2-16, 7-2, 7-7 Checking with Diagnostics, B-2 Keeping audio, 7-7 Courier User Handbook...
- Page 213 Menu item Monitoring limitations, 5-5 Accepting, 2-7 Link, 5-19 Menu notation, N-1 Live audio, 11-3, 11-10, 12-1 Menu operation, 4-1, 4-2 ISDN, 12-17 Menu option Last number redial, 12-19 Selecting, 4-2 Operation, 12-17, 12-18, 12-19 Menu structure, 4-3 Courier User Handbook...
- Page 214 Password Code, 9-7 mpeg cuts Setting, 9-6 Save As, 7-9 Using to access Setup, 9-7 Multiple file selection, 12-4 Password Code, 9-7 Muting speaker while recording, 5-23 Passwording, 9-6 PAUSE button In Edit, 7-3 Pausing recording, 5-3 Courier User Handbook...
- Page 215 Power PhoneBook, 11-1 Connections, 14-8 Adding an entry, 11-5 POWER button, 2-7, 3-8 Deleting an entry, 11-8 Switching off Courier, 3-9 Editing an entry, 11-7 Power down Renaming an entry, 11-8 Automatic, 10-5 Transferring a file, 12-6 Power indicator, 10-4...
- Page 216 Making a recording, 5-2 Save As mpeg cuts with higher quality, 5-14 Next recording number, 8-3 Edits, 7-9 Overview, 5-1 Record Style, 5-14 Pausing, 5-3 Save edits, 7-8 Saving a setup .ini file, 13-6 Peak level LED, 5-22 Courier User Handbook...
- Page 217 SELECT button, 2-16, 7-2 Summary of features, 2-1 Use like ENTER, 4-1 Switches Select File Checking with Diagnostics, B-2 CCM software, 13-15, 13-18 Switching off Courier, 3-9 Serial Port, 13-14 Automatically, 3-9 Set Date, 9-2 System, 9-1 Set Time, 9-2 System settings, 9-1 Setup .ini file...
- Page 218 Write Setup, 9-4 UP button, 2-7 Use in the menu, 4-1 Updating Disk Structures, 5-3 Upgrade ISDN firmware, 12-14 Zmodem, 11-2 Auto, 11-2 Using with Courier, 12-2 Full, 11-2 Windows Explorer, 12-2 Segment, 11-2 Selecting the type, 11-7 WaitAck, 11-2 Window, 11-2...
Need help?
Do you have a question about the COURIER and is the answer not in the manual?
Questions and answers