
Related Manuals for SENSIT Technologies VMD


Summary of Contents for SENSIT Technologies VMD
- Page 1 SET-UP & OPERATING INSRUCTION MANUAL READ AND UNDERSTAND INSTRUCTIONS BEFORE USE. 851 Transport Drive • Valparaiso, IN 46383 (USA) Phone: 219.465.2700 • www.GasLeakSensors.com...
-
Page 2: Table Of Contents
SPECIFICATION ��������������������������������������������������������������������������������������������������� 6 SENSOR SPECIFICATIONS .....................6 PRODUCT SPECIFICATIONS ....................6 EXPLANATION OF PPM/M ���������������������������������������������������������������������������������� 7 INSTALLATION ���������������������������������������������������������������������������������������������������� 8 INSTALL VMD INSTRUMENT ....................8 INSTALL TABLET COMPUTER ....................10 GETAC TABLET CONNECTIONS .....................11 USER INTERFACE ������������������������������������������������������������������������������������������������� 12 DESCRIPTION OF INTERFACE BUTTONS ..................13 USER SETUP TAB ........................15 OPERATION AND USE �����������������������������������������������������������������������������������������... -
Page 3: For Your Safety
WARNING: When not in use refer to transport position recommendation to prevent potential damage. ⚠ WARNING: While the VMD is weather resistant, it is recommended to remove the instrument and store it in the vehicle when necessary to avoid prolonged exposure to extreme weather (i.e. heavy rain or snow). -
Page 4: Parts And Accessories
PARTS AND ACCESSORIES STANDARD PARTS (INCLUDED) STANDARD MOUNTING KIT (VMD) 360-00481 VMD Bluetooth antenna 870-00052 Mounting kit (includes parts below) 360-00482 Tablet Bluetooth antenna 330-00078 Hitch pins 385-00159 Tablet Bluetooth antenna extension cable 360-00426 Jam bolt (right angle) 360-00427 L-bracket... -
Page 5: Product And Technology Description
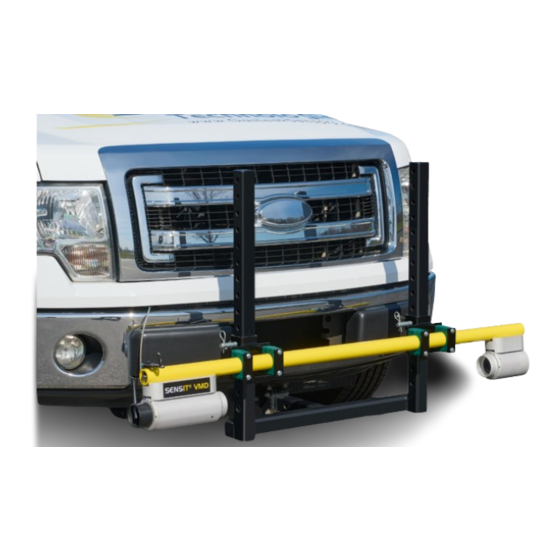
The entire assembly is mounted to the front of a vehicle on a large L-bracket, which is received by a 2” hitch. The SENSIT VMD is powered by a single cable coming from the battery of the vehicle, and can be ®... -
Page 6: Specification
4 ft. to 8 ft. path length (5 ft. Standard) Tablet Weight: 1.94lbs (0.88kg) Tablet Size: 8.93” x 5.94” x 0.94” (227 x 151 x 24mm) VMD Weather Resistance: IP54 Tablet Weather Resistance: IP65 Operating Temperature Range: -20˚F to 122˚F... -
Page 7: Explanation Of Ppm/M
In the case of the VMD, the path length is fixed at slightly more than 1m, which is taken into account in the software, and we therefore say the reading is “per meter”, meaning over the total length, since it never... -
Page 8: Installation
Insert the pin and install and tighten the hitch stabilizer. The hitch stabilizer tightens the L-bracket to the hitch, and therefore the frame of the vehicle. This ensures that no extra vibrations are transferred to the VMD. - Page 9 3. Ensure that the jam bolt is backed out from the bracket that is mounted to the VMD. Slide the VMD and mounting bracket over the L-bracket, low- er the VMD to the desired position, and in- sert the pin. Tighten the jam bolt. It is recom- mended to use an anti-seize compound on the jam bolt.
-
Page 10: Install Tablet Computer
This can either be the full solution (which will mount to the tablet) or can sometimes be used in conjunction with the provided ball-joint and arm. If you need assistance with this, contact SENSIT Technologies. -
Page 11: Getac Tablet Connections
GETAC TABLET CONNECTIONS The provided tablet for the SENSIT VMD is the Getac T800. Also provided is a dock for the tablet, ® which has pass-through connections for the Bluetooth and GPS signals. The antennas for each is attached to SMA connectors on the bottom of the dock. The Bluetooth antenna (8”) will most likely be pre-installed. -
Page 12: User Interface
USER INTERFACE The user interface of the SENSIT VMD is controlled by a tablet computer with a touch screen. The instrument ® streams all data over Bluetooth to the tablet, where it is displayed in real time (200ms sample time). -
Page 13: Description Of Interface Buttons
Function Button (left side of screen) 1. POWER ON / SHUT DOWN 1. CLOSE Shuts off the VMD. Does not close the applica- Closes the application but does not shut off tion or shut off the tablet. the VMD. This allows the user to bypass the warmup period if the application is opened 2. - Page 14 Display Modes/ Menu Tabs (top of screen): Other Buttons (upper right of screen) 1. NORMAL/WARMUP 1. CALIBRATE Initial startup and warmup screen. Only shown Starts the calibration process. The user will be after first power on and while the instrument is prompted to place the calibration cell on the in- warming up.
-
Page 15: User Setup Tab
USER SETUP TAB The user setup tab contains settings and configuration options that are available to the user at any time, as well as calibration information. It is accessed by selecting the user setup tab from the top of the screen. The survey must be stopped in order to access it. -
Page 16: Operation And Use
4. Travel to the area where the survey will begin. 5. If necessary, lower the VMD from the transport position (higher on the L-bracket) to the survey posi- tion (lower on the L- bracket). The L-bracket allows for a broad range of height adjustment. Adjust as needed and tighten the jam bolt. -
Page 17: Calibration
If the instrument is already powered on, calibration cannot be done while a survey is running. The survey must be STOPPED and not PAUSED. 2. Hang the calibration cell on the bar of the VMD, so that the light will pass through it, up against the housing of either module. Tighten the thumbscrew. -
Page 18: Advanced Calibration
WARNING: Calibration must be performed in a gas-free environment. Calibration cycles over 90 days are not recommended. Using calibration kits other than recommended by SENSIT Technologies may cause inaccurate readings. Repairs are required if the instrument fails to calibrate. Consult the factory for details. -
Page 19: Plotting Surveys
VMD does not have to be powered on. 3. On the following screen, select SELECT FILE TO CONVERT. A file select window will appear. 4. Navigate to the location datalog file(s) that you want to convert. By default, the VMD will save log files to the desktop. -
Page 20: Pairing A Pmd
PAIRING A PMD The SENSIT VMD and PMD have the ability to be used as a paired system. In this case, the PMD will ® be used in conjunction with a vacuum system, with cones on the front of the vehicle being drawn from with the aid of a powerful external pump. -
Page 21: Importing Calibration Data Into Scal
USB slots of the tablet. If necessary, there is also an SD card reader under the left hand side IO cover. 3. After the VMD application has loaded, hit the close button in the upper left of the screen. -
Page 22: Pairing Bluetooth Connection
PAIRING BLUETOOTH CONNECTION The SENSIT VMD tablet and instrument are paired together via a Bluetooth connection. This is done ® at the factory, but if the need ever arises to re-pair this connection (or establish a new one), follow these steps, depending on the model of tablet you have. - Page 23 8. Double click the VMD icon on the desktop to restart the application. 9. Select the POWER ON button. The VMD should connect and the warmup process should begin. a. If you still receive a connection error, contact Sensit Technologies for assistance.
-
Page 24: Advantech Tablet
ADVANTECH TABLET... -
Page 25: Notes
NOTES __________________________________________________________________________________________ __________________________________________________________________________________________ __________________________________________________________________________________________ __________________________________________________________________________________________ __________________________________________________________________________________________ __________________________________________________________________________________________ __________________________________________________________________________________________ __________________________________________________________________________________________ __________________________________________________________________________________________ __________________________________________________________________________________________ __________________________________________________________________________________________ __________________________________________________________________________________________ __________________________________________________________________________________________ __________________________________________________________________________________________ __________________________________________________________________________________________ __________________________________________________________________________________________ __________________________________________________________________________________________ __________________________________________________________________________________________ __________________________________________________________________________________________ __________________________________________________________________________________________ __________________________________________________________________________________________... - Page 26 NOTES __________________________________________________________________________________________ __________________________________________________________________________________________ __________________________________________________________________________________________ __________________________________________________________________________________________ __________________________________________________________________________________________ __________________________________________________________________________________________ __________________________________________________________________________________________ __________________________________________________________________________________________ __________________________________________________________________________________________ __________________________________________________________________________________________ __________________________________________________________________________________________ __________________________________________________________________________________________ __________________________________________________________________________________________ __________________________________________________________________________________________ __________________________________________________________________________________________ __________________________________________________________________________________________ __________________________________________________________________________________________ __________________________________________________________________________________________ __________________________________________________________________________________________ __________________________________________________________________________________________ __________________________________________________________________________________________...
- Page 27 NOTES __________________________________________________________________________________________ __________________________________________________________________________________________ __________________________________________________________________________________________ __________________________________________________________________________________________ __________________________________________________________________________________________ __________________________________________________________________________________________ __________________________________________________________________________________________ __________________________________________________________________________________________ __________________________________________________________________________________________ __________________________________________________________________________________________ __________________________________________________________________________________________ __________________________________________________________________________________________ __________________________________________________________________________________________ __________________________________________________________________________________________ __________________________________________________________________________________________ __________________________________________________________________________________________ __________________________________________________________________________________________ __________________________________________________________________________________________ __________________________________________________________________________________________ __________________________________________________________________________________________ __________________________________________________________________________________________...
-
Page 28: Warranty
Units out of warranty will be repaired for a service charge. Internal repair or maintenance must be completed by a SENSIT Technologies authorized technician. Violation will void warranty. Units must be returned postpaid, insured and to the attention of the Service Dept.
Need help?
Do you have a question about the VMD and is the answer not in the manual?
Questions and answers