Table of Contents
Advertisement
Quick Links
SENSIT
G A S D E T E C T I O N I N S T R U M E N T
For use with combustible gases and optionally available oxygen and toxic gases.
INSTRUCTION MANUAL
READ AND UNDERSTAND INSTRUCTIONS BEFORE USE.
710183
UL913
Intrinsically safe for use in:
Class I Div. 1
Groups C, D
Temp Classification: T4, IP64
Hazardous Locations
WARNING:
⚠
or combustible atmosphere, disconnect power before
servicing.
®
To prevent ignition of flammable
851 Transport Drive • Valparaiso, IN 46383 (USA)
Phone: 219.465.2700 • www.gasleaksensors.com
GOLD G3
Advertisement
Table of Contents

Related Manuals for SENSIT Technologies GOLD G3


Summary of Contents for SENSIT Technologies GOLD G3
- Page 1 SENSIT GOLD G3 ® G A S D E T E C T I O N I N S T R U M E N T For use with combustible gases and optionally available oxygen and toxic gases. INSTRUCTION MANUAL READ AND UNDERSTAND INSTRUCTIONS BEFORE USE.
-
Page 3: For Your Safety
FOR YOUR SAFETY NOTICE: ⚠ This safety symbol is used to indicate a potentially hazardous situation which, if not avoided, may result in minor or moderate injury. WARNING: To reduce the risk of ignition of a flammable ⚠ atmosphere, batteries must only be changed and charged in an area known to be nonflammable. -
Page 4: Table Of Contents
CONTENTS FOR YOUR SAFETY ����������������������������������������������������� 3 QUICK START GUIDE �������������������������������������������������� 6 PRODUCT FEATURES: HARDWARE ������������������������������� 7 COMBUSTIBLE GAS SENSORS ............... ELECTROCHEMICAL SMART SENSORS ........... FLEXIBLE WAND AND FLASHLIGHT ............RECHARGEABLE BATTERY AND CHARGING STATION ......TWO-SPEED PUMP AND SAMPLING SYSTEM ........... LED DOME ................... - Page 5 INERT PURGE MODE ................USER MENU �������������������������������������������������������������� 29 SET DATE ..................... SET TIME ....................TIME ZONE ..................FLASHLIGHT ..................BUMP TEST ................... SMART SENSOR ................... CALIBRATION ..................O2 TEST ....................GAS TYPE .................... CAL LOG ..................... SESSION LOG ..................BAR HOLE LOG ..................CO LOG ....................
-
Page 6: Quick Start Guide
NOTE: button until AUTOZERO is air, and attempt the zero again by pressing and holding the shown on the display. Contact SENSIT Technologies if the instrument cannot pass the Autozero. The work display will be shown with gas readings. Up to (5) total gasses can be shown: EX, CO, O2, H2S, and HCN. -
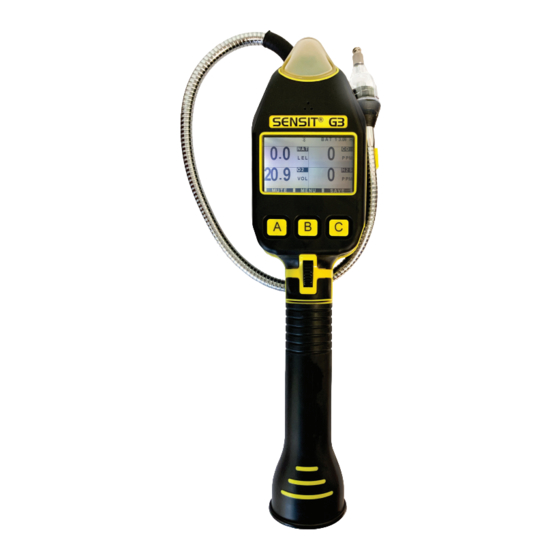
Page 7: Product Features: Hardware
As soon as it is drawn in by the pump, the first thing it hits is the sensor. In addition, the wand in the SENSIT GOLD G3 is now equipped with a flashlight, made up of individual LEDs installed on the sensor circuit board. This flashlight feature can be enabled or disabled whenever the operator desires. -
Page 8: Two-Speed Pump And Sampling System
LED DOME The LED dome on the SENSIT GOLD G3 displays different colors and patterns to alert the operator of various conditions. See the chart below for information on each�... -
Page 9: Product Features: Software
The combustible gas reading will be automatically displayed in one of three scales on the SENSIT GOLD G3: PPM, %LEL, and %VOL. By default, the reading starts in the %LEL scale (from 0%LEL) and will automatically switch to %VOL at ≥100%LEL (equal to 5.0%VOL by default, see the section on LEL Definition), if equipped with a TC sensor. -
Page 10: Lel Definition
H2S RESOLUTION If the SENSIT GOLD G3 is equipped with a hydrogen sulfide (H2S) sensor, it will have a resolution of 1ppm by default (0-100PPM range). There is an optional Expert Menu adjustment for this to increase the resolution to 0.1PPM. -
Page 11: Alarms
ALARMS The SENSIT GOLD G3 has audible and visual alarms to warn the operator when hazardous conditions are being sensed. There are alarm setpoints specific to the work display, leak search mode, and confined space mode. The LED dome on the G3 changes color based on alarm conditions. -
Page 12: Operation And Use
NOTE: SENSIT GOLD G3. This section of the manual outlines the operation and use of the SENSIT GOLD G3 by general categories. Due to the many custom options available, and many different applications the instrument can be used in, there is not one comprehensive sequential set of instructions for using the instrument. -
Page 13: Power-On And Startup Sequence
POWER-ON AND STARTUP SEQUENCE Before powering on the SENSIT GOLD G3, ensure that you are in a gas free environment, and that you have a charged battery pack installed into the battery sleeve, secured with the retaining screw. Press and hold the button until the SENSIT logo appears on the display and the LED dome illuminates. -
Page 14: Bump Testing And Calibration
BUMP TESTING AND CALIBRATION To verify the accuracy of any SENSIT GOLD G3, it must be exposed to a known concentration of test gas that will test any sensor combination included in your model. This is known as “bump testing”. This can be done either by exposing the instrument to gas from the working display or using the bump test feature which specifically tests each sensor and gives a pass or fail message. -
Page 15: Power Off & Battery Charging
POWER OFF & BATTERY CHARGING POWER OFF To power off the SENSIT GOLD G3, ensure you are in a gas free environment, and then press and hold the button until the power off screen is shown. The instrument will purge for 10 seconds (by default) and then power off. -
Page 16: Quick Menu Test Modes
Ensure that both the contacts on the battery pack and pins on the charging base are kept clean. QUICK MENU TEST MODES Depending on what type work the SENSIT GOLD G3 is being used for, there are a variety of test modes available that are designed to be used for specific tasks. For example, using BARHOLE mode for below-grade leak investigation. -
Page 17: Tick
Assist in pinpointing small combustible gas leaks PURPOSE: TICK mode is a default feature in the SENSIT GOLD G3, available on all models. It gives the operator a ticking, audible tone that gets faster as the gas concentration increases. This assists in pinpointing small combustible gas leaks by allowing the operator to rely on the tone and not have to watch the display of the instrument. -
Page 18: Bar Hole Test
2,048 Records LOG SIZE: BAR HOLE MODE is a default feature in the SENSIT GOLD G3 when equipped with the TC sensor (%VOL sensor). It is intended for use when conducting a below grade leak investigation, generally in a hole bored in the ground with a plunger bar or drill. It gives the operator a separate screen from the working display that shows only the combustible gas reading in the %VOL scale (both real time and peak reading). - Page 19 Press and release the button to enter BARHOLE TEST mode. A message will be displayed instructing you to attach hardware. To begin a bar hole test, insert the probe into the location for the survey and then press and release the button.
-
Page 20: Co Test
4,096 Records LOG SIZE: CO TEST in the SENSIT GOLD G3 is an optional feature when equipped with a Carbon monoxide (CO) sensor. It is a timed test (180sec. by default) that shows the operator only the real time and peak CO readings on a separate screen from the work display. It also has a separate log that stores results of all CO TESTS . - Page 21 Follow federal, state, municipal, and/or company procedures to conduct the CO TEST. Insert the probe into the sampling point and press and release the button to start the test. The countdown timer will begin (180 sec by default). The real time CO reading will be shown in the middle of the display and the peak CO reading will be shown on the right side of the display.
-
Page 22: Purge Test
Purging lines into service PURPOSE: PURGE TEST is a default feature in the SENSIT GOLD G3 when equipped with the TC sensor (%VOL sensor). It is intended for use when purging lines into service. It gives the operator a separate screen from the working display that shows only the combustible gas reading in the %VOL scale, as well as the oxygen (O2) reading, if equipped. - Page 23 Attach the purge probe to the fitting on end of the gooseneck and perform a flow block check by blocking the inlet(s) of the probe. Within 10 seconds, FLOW BLOCKED should be shown on the display. This ensures all seals are intact and there are no air leaks in the probe or instrument.
-
Page 24: Leak Search Mode
Combustible gas leak investigations and surveys, where the PPM scale is needed PURPOSE: LEAK SEARCH mode is an optional feature in the SENSIT GOLD G3 intended for use in combustible gas leak investigations or surveys that require the PPM scale. It gives the operator a separate screen from the normal working display that shows only the combustible gas reading. -
Page 25: Standby Mode
The SENSIT GOLD G3 has an optional “standby” mode that allows the operator to put the instrument in a low power state. This can be used if you don’t need to use the instrument for a short amount of time and want to save a little bit of battery life and time over fully powering the instrument off and back on again. -
Page 26: Peak Mode
PURPOSE: observed. Work display peak readings in the SENSIT GOLD G3 is an optional feature that is used to maintain peak readings on the display (in addition to the real-time readings) for each sensor installed. The most common use case for this is when the instrument is being used in a situation where the display cannot be immediately observed, such as monitoring over-head or confined space areas, where the instrument is being raised or lowered away from the operator. -
Page 27: Inert Purge Mode
Purging lines out of service with inert gas. PURPOSE: INERT (PURGE) MODE in the SENSIT GOLD G3 is an optional feature when equipped with an Oxygen (O2) sensor. It is intended for use when purging lines out of service with an inert gas only and requires the dilution tube accessory. - Page 28 tube and block the inlet(s) of the purge probe. Within 10 seconds, FLOW BLOCKED should be shown on the display. This ensures all seals are intact and there are no air leaks in the probe or instrument. Press and release the button to restart the pump and return to the previous screen.
-
Page 29: User Menu
USER MENU The SENSIT GOLD G3 has a user-accessible menu that is used for user-level tasks such as changing the combustible gas type, performing a manual calibration, viewing logs, etc. A brief description of each menu option is listed below, followed by more details for each in the following section(s). -
Page 30: Set Date
If the CAL REQUIRED option is enabled, the SET DATE feature will not be available. NOTE: The SET DATE option allows the user to adjust the clock date saved in the SENSIT GOLD G3’s internal memory. There are two ways in which the clock date can be automatically updated so that this adjustment is never needed: •... -
Page 31: Set Time
G3’s internal memory. Additionally, there are two ways in which the instrument time can be automatically updated so that this adjustment is never needed: • SENSIT GOLD G3 instruments with GPS installed have the option to have the clock time be automatically updated via GPS signal (time is received along with location information). -
Page 32: Flashlight
The BUMP TEST feature is a semi-automated response test for all sensors installed in the SENSIT GOLD G3. This can be done simply by applying gas to the instrument while on the work display, but using the BUMP TEST feature ensures the test is consistently timed and gives the operator a clear pass or fail message for each sensor. -
Page 33: Smart Sensor
10PPM HCN, nitrogen balance sensor: TO PERFORM A BUMP TEST: Power on the SENSIT GOLD G3 and allow it to warmup and arrive at the work display. Prepare the calibration/bump gas necessary based on the sensor configuration of your instrument. -
Page 34: Calibration
(MANUAL CALIBRATION) STANDARD FEATURE The calibration menu in the SENSIT GOLD G3 contains the options for both the (manual) Auto Calibation feature and manual individual sensor calibrations. It does not contain the option for Smart-Cal, if you are calibrating the instrument using a SMART-CAL 360 calibration station. - Page 35 If PASSED is shown, the calibration was successful, and the calibration due date will be automatically reset for that sensor. Remove the calibration gas. If FAILED is shown, leave the calibration gas attached and attempt calibration again. If successful calibration cannot be achieved, remove the instrument from service and contact the factory for assistance.
-
Page 36: O2 Test
the top of the display. button until CALIBRATION is shown. Press and release the Press and release the button to enter the CALIBRATION menu. Press and release the button until CO 100 PPM is shown. Attach CO 100 PPM methane calibration gas to the end of the gooseneck. Ensure gas is flowing. -
Page 37: Gas Type
LOG SIZE: STANDARD FEATURE The SENSIT GOLD G3 stores every manual calibration (including manual Auto Calibration) in a log on the internal memory of the instrument. Both successful and unsuccessful attempts are recorded. When the log memory is full, the oldest record will be overwritten. - Page 38 CALIBRATION LOG EXPLANATION: The record number. The highest number available is the most recent record, and the lower number is the oldest record. Each record is an individual sensor calibration, and not the entire calibration. The time and date the record was created. The date format is MM / DD / YYYY. [The type of record (sensor type), what the result was, and calibration gas.
-
Page 39: Session Log
LOG SIZE: OPTIONAL FEATURE Any time a BAR HOLE test is performed using the SENSIT GOLD G3, a log of that test is automatically saved in the internal memory of the instrument. When the log memory is full, the oldest record will be overwritten. -
Page 40: Co Log
LOG SIZE: OPTIONAL FEATURE Any time a CO TEST is performed using the SENSIT GOLD G3, a log of that test is automatically saved in the internal memory of the instrument. When the log memory is full, the oldest record will be overwritten. -
Page 41: Smart Cal
For more information on the SMART-CAL 360, contact SENSIT Technologies. The SMART-CAL menu is used to put the SENSIT GOLD G3 in a communication mode to calibrate the instrument using the SMART-CAL 360. The instrument must be put in this mode, and then calibration can be completed using the station. -
Page 42: Smart-Link
The calibration next due menu displays the next due date for calibration for all sensor installed in the SENSIT GOLD G3. This is same screen that displays during startup. Both the next due date and the days remaining until that date will be displayed for each sensor. -
Page 43: Co Purge Threshold
CO PURGE THRESHOLD STANDARD FEATURE After a CO TEST is performed using the SENSIT GOLD G3, a built-in purge option lets the user automatically purge the instrument of gas before another test is completed. By default, this purge requires that the reading on-screen reach 0 PPM before another CO TEST can be completed. -
Page 44: Notes
NOTES _________________________________________________________________________________ _________________________________________________________________________________ _________________________________________________________________________________ _________________________________________________________________________________ _________________________________________________________________________________ _________________________________________________________________________________ _________________________________________________________________________________ _________________________________________________________________________________ _________________________________________________________________________________ _________________________________________________________________________________ _________________________________________________________________________________ _________________________________________________________________________________ _________________________________________________________________________________ _________________________________________________________________________________ _________________________________________________________________________________ _________________________________________________________________________________... - Page 45 NOTES _________________________________________________________________________________ _________________________________________________________________________________ _________________________________________________________________________________ _________________________________________________________________________________ _________________________________________________________________________________ _________________________________________________________________________________ _________________________________________________________________________________ _________________________________________________________________________________ _________________________________________________________________________________ _________________________________________________________________________________ _________________________________________________________________________________ _________________________________________________________________________________ _________________________________________________________________________________ _________________________________________________________________________________ _________________________________________________________________________________ _________________________________________________________________________________...
- Page 46 NOTES _________________________________________________________________________________ _________________________________________________________________________________ _________________________________________________________________________________ _________________________________________________________________________________ _________________________________________________________________________________ _________________________________________________________________________________ _________________________________________________________________________________ _________________________________________________________________________________ _________________________________________________________________________________ _________________________________________________________________________________ _________________________________________________________________________________ _________________________________________________________________________________ _________________________________________________________________________________ _________________________________________________________________________________ _________________________________________________________________________________ _________________________________________________________________________________...
-
Page 47: Eu Waste Electrical And Electronic
Sensit Technologies LLC has met its national obligations to the EU WEEE Directive. Sensit Technologies LLC has also elected to join WEEE Compliance Schemes in some countries to help manage customer returns at end-of-life. -
Page 48: Warranty
Internal repair or maintenance must be completed by a SENSIT Technologies authorized technician. Violation will void warranty. Units must be returned postpaid, insured and to the attention of the Service Dept. for warranty or repair.
Need help?
Do you have a question about the GOLD G3 and is the answer not in the manual?
Questions and answers
sensit GOLD G3 fallo pressure test da error