Advertisement
Features of your Sunbeam SteamFry Air Fryer + Steam
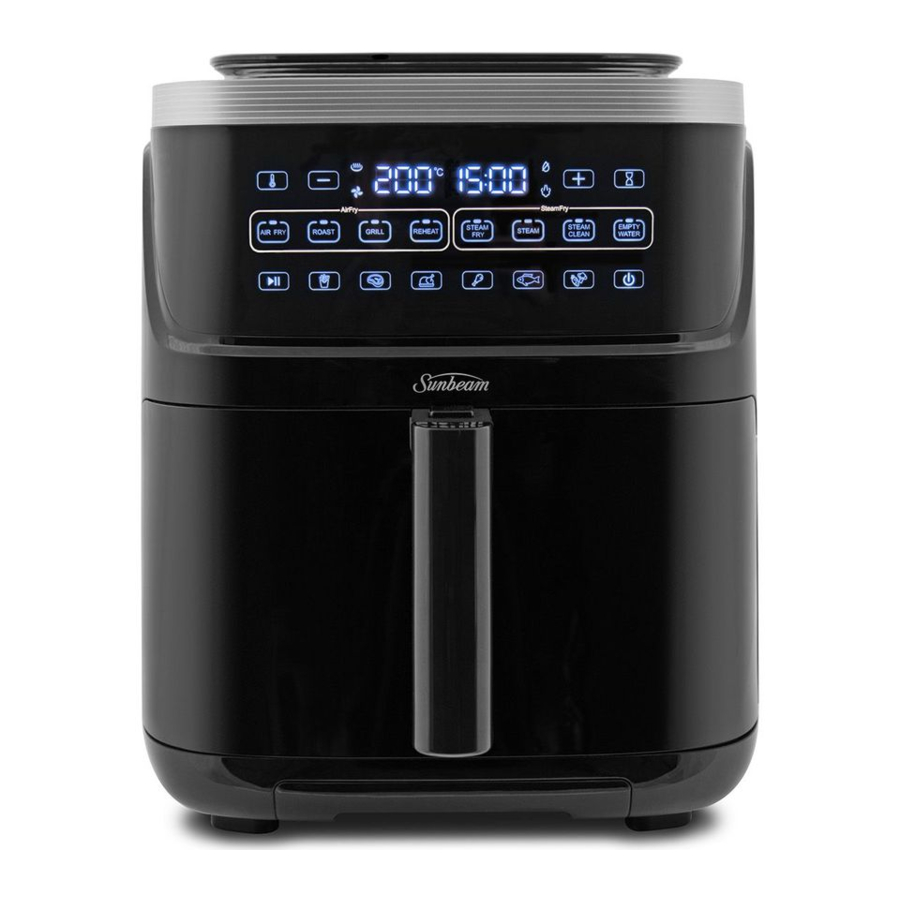
Parts

- Air flow vent (intake)
- Control panel
- Drip tray
- Water tank
- Water tank nozzle
- Non-stick coated air fryer tray
- Cooking drawer
- Handle
- Air flow vent/ steam port (outlet)
- Condensation collector
- Power cord
Control Panel

- Power
- Start/ stop
- Temperature setting
- Timer setting
- Temperature/ timer adjustment
- Cooking functions: air fry, roast, grill, reheat, steamfry, steam
- Presets: fries, steak, whole chicken, drumsticks, fish and vegetables
- Steam clean
- Empty water
Temperature Settings Guide
These tables provide the default time and temperature for each Cooking Function and Air Fry Preset. These can be adjusted using the Temperature and Timer Setting buttons.
Cooking Function Chart
| Functions | Temp. | Time | Note |
| Air Fryer | 200˚C | 15 mins. | |
| Roast | 180˚C | 30 mins. | |
| Grill | 200˚C | 15 mins. | |
| Reheat | 120˚C | 10 mins. | |
| SteamFry | 180˚C | 25 mins. | Ensure water tank is filled |
| Steam | 100˚C | 10 mins. | Ensure water tank is filled |
Preset Chart
| Presets | Functions | Temp. | Time | Note |
| Fries | Air fry | 180˚C | 15 mins. | |
| Steak | Grill | 200˚C | 12 mins. | |
| Whole chicken | SteamFry | 170˚C | 60 mins. | Ensure water tank is filled |
| Drumsticks | SteamFry | 180˚C | 20 mins. | Ensure water tank is filled |
| Fish | SteamFry | 180˚C | 10 mins. | Ensure water tank is filled |
| Vegetables | Steam | 100˚C | 10 mins. | Ensure water tank is filled |
Please note that due to the variations in thickness and size of foods being cooked, cooking results may vary. Always ensure that the food is thoroughly cooked before consuming.
Usage Instructions
Before First Use
Before using your Air Fryer for the first time, unpack the appliance and remove all packaging, promotional materials and stickers from the product. Remove any plastic or cardboard from underneath the air fry basket. Remove all printed documents.
Wash the cooking basket and tray in warm soapy water using a mild household detergent. Rinse thoroughly and dry.
Preparing Your Air Fryer
- Place on a flat, level, heat-resistant surface.
- To open the unit, press the raised button on the cooking drawer handle and pull the handle towards you.
![]()
- Ensure the tray in placed inside the base of the basket with the arrow facing towards the back of the air fryer. Place your desired food inside the basket.
- Slide the basket back into the air fryer. Never use the air fryer without the basket in it.
- If using a cooking function with steam, remove the water tank and unscrew the nozzle on the bottom of the tank. Fill with water, replace nozzle and insert back into the air fryer.
![]()
![]()
Do not touch the basket and tray during and after use, as it gets very hot. - Plug the cord into 230-240V power outlet and turn the power (
![]() ) on.
) on. - Once plugged in and the tray and basket are properly placed in the main housing, the power light will be illuminated.


Cooking In Your Air Fryer
- Select a cooking function or air fryer preset button.
- The default temperature and time will be displayed. Adjust temperature or time if required.
- Press the Start/Stop button. The air fryer will begin to heat up and the time will start counting down.
- Some ingredients require shaking through the cooking process. The unit will beep 3 times halfway through the cooking process to remind you to do this. Pull the handle and gently shake/stir the food. you can use heat-resistant plastic or wooden or silicone utensils. Slide the basket back into the air fryer to continue cooking.
Note: Avoid using sharp or metal objects to prolong the life of your non-stick surface. Do not cut food inside the basket or tray. Do not leave utensils in contact inside the basket or on top of the unit.
Note: When you pull the basket out of the unit, the air fryer will stop and time will pause. Cooking will resume once the basket has been put back in and aligned back to the body of the air fryer. Your setting will only reset when the basket has not been put back in after 5 minutes. - Audible alert will sound once timer is done and "End" will display on the control panel.
- After cooking, carefully pull the basket out completely out of the unit and on to a stable, even, and heat resistant surface.
![]()
Do not turn the basket upside down as any excess oil that has collected on the bottom of the basket housing will leak onto the ingredients. The basket and the ingredients are hot. Depending on the type of ingredients in the air fryer, steam may escape from the basket.
![]()
Oil left on the base on the main housing basket is hot.- Empty the basket into a bowl or onto a plate using heat resistant utensils.
Care and Cleaning
Avoid using sharp or metal objects to prolong the life of your non-stick surface. Do not cut food inside the basket or tray. Do not leave utensils in contact inside the basket or on top of the unit.
To clean after use

Always unplug your air fryer and allow it to cool completely before cleaning it. NEVER immerse the MAIN body, power cord or plug in water or any other liquid.
Drawer and Tray
Empty the air fryer basket and tray frequently to avoid accumulation of crumbs and clean after each use.
The basket and tray are dishwasher safe. Alternatively wash in warm, soapy water then rinse and dry.
The air fryer interior can be wiped with a damp cloth using warm, soapy water.

Do not immerse in water.
Using abrasive cleaners, scrubbing brushes and chemical cleaners will damage the unit.
Descaling
For optimum operation of the air fryer, please descale the air fryer regularly.
- Pour a minimum of 150mL each of water and white vinegar into the water tank. We recommend the use of purified water.
- Make sure the water tank nozzle is in place and locked, then put the water tank back into place.
- Press the Steam Clean function which will run for 15 minutes.
- When the program is finished, remove the water tank and empty any remaining liquid.
- Press the Empty Water function which will run for 5 minutes.
- Rinse the water tank and fill with clean fresh water.
- Complete further Steam Clean cycle to flush through the system.
- When the program is finished, empty the liquid from the drawer and drip tray.
- Wash both the water tank and air fryer drawer in warm soapy water, rinse and dry.
Steam Clean
For easy cleaning, use the Steam Clean function which lifts grease from the basket and interior.
- Fill the water tank with water and ensure the water tank nozzle is in place and locked, then put water tank back into place.
- Press the Steam Clean function which will run for 15 minutes.
- When the program is finished, empty the dirty water from the drawer, clean with soapy water, rinse and dry before inserting back into the unit. Empty the drip tray.
NOTE: Empty the drawer, drip tray and condensation collector after Steam Clean and Empty Water function.
Empty Water
When finished using the air fryer, empty the water tank. Press the EMPTY WATER function then press Start/Stop button. The air fryer will empty all the water within a short cycle.
Once complete, empty the basket and drip tray.
NOTE: Empty the drawer, drip tray and condensation collector after Steam Clean and Empty Water function.
Sunbeam's Safety Precautions
SAFETY PRECAUTIONS FOR YOUR STEAMFRY AIR FRYER + STEAM.
- Use your air fryer at least 200mm away from walls and curtains, and do not use in confined spaces.
- Do not operate the air fryer when placed directly onto a bench top. Place a heat proof mat or chopping board underneath to protect the surface.
- Avoid placing your air fryer on top of stone/stone polymer composite benchtops as this type of benchtop can be susceptible to cracking under heat.
- Do not operate the unit on an inclined surface.
- Do not move or cover the unit whilst in operation.
- Do not immerse the base of the unit in water or any other liquid.
- Do not touch any metal surface of the unit whilst in use as it will be hot.
- Use oven mitts when supporting the base of the basket during basket removal when hot.
- Use only the supplied basket and tray inside the unit.
- Do not plug in or switch on the unit without having the basket inside the air fryer unit.
- Do not place food or liquid inside the unit. Only place inside the basket or top of the supplied tray.
- Do not operate the unit without food or liquid in the basket or supplied tray.
- Do not use the basket or tray on the stovetop, inside a microwave oven or inside an oven.
Sunbeam is very safety conscious when designing and manufacturing consumer products, but it is essential that the product user also exercise care when using an electrical appliance. Listed below are precautions which are essential for the safe use of an electrical appliance:
- Read carefully and save all the instructions provided with an appliance.
- Always turn the power off at the power outlet before you insert or remove a plug. Remove by grasping the plug - do not pull on the cord.
- Turn the power off and remove the plug when the appliance is not in use and before cleaning.
- Do not use your appliance with an extension cord unless this cord has been checked and tested by a qualified technician or service person.
- Always use your appliance from a power outlet of the voltage (A.C. only) marked on the appliance.
- This appliance is not intended for use by persons (including children) with reduced physical, sensory or mental capabilities, or lack of experience and knowledge, unless they have been given supervision or instruction concerning use of the appliance by a person responsible for their safety.
- Children should be supervised to ensure that they do not play with the appliance.
- The temperature of accessible surfaces may be high when the appliance is operating.
- Never leave an appliance unattended while in use.
- Do not use an appliance for any purpose other than its intended use.
- Do not place an appliance on or near a hot gas flame, electric element or on a heated oven.
- Do not place on top of any other appliance.
- Do not let the power cord of an appliance hang over the edge of a table or bench top or touch any hot surface.
- Do not operate any electrical appliance with a damaged cord or after the appliance has been damaged in any manner. If damage is suspected, return the appliance to the nearest Sunbeam Appointed Service Centre for examination, repair or adjustment.
- For additional protection, Sunbeam recommend the use of a residual current device (RCD) with a tripping current not exceeding 30mA in the electrical circuit supplying power to your appliances.
- Do not immerse the appliance in water or any other liquid unless recommended.
- Appliances are not intended to be operated by means of an external timer or separate remote control system.
- This appliance is intended to be used in household and similar applications such as: staff kitchen areas in shops, offices and other working environments; farm houses; by clients in hotels, motels and other residential type environments; bed and breakfast type environments.

Hot Surface
Do Not Touch
This symbol indicates, temperature of accessible surfaces may be high when the appliance is operating and for some time after use.
If you have any concerns regarding the performance and use of your appliance, please visit www.sunbeam.com.au or contact the Sunbeam Consumer Service Line.
Ensure the above safety precautions are understood.
Need help with your appliance?
Contact our customer service team or visit our website for information and tips on getting the most from your appliance.
Australia
www.sunbeam.com.au
1300 881 861
New Zealand
www.sunbeam.co.nz
0800 786 232
Please scan this QR code to access more details and cooking tips using this product.


Documents / Resources
References
Download manual
Here you can download full pdf version of manual, it may contain additional safety instructions, warranty information, FCC rules, etc.
Advertisement


Need help?
Do you have a question about the SteamFry and is the answer not in the manual?
Questions and answers