Gourmia GCM6500 - 1 Touch Automatic Espresso Cappuccino & Latte Maker Manual
- Manual (10 pages)
Advertisement
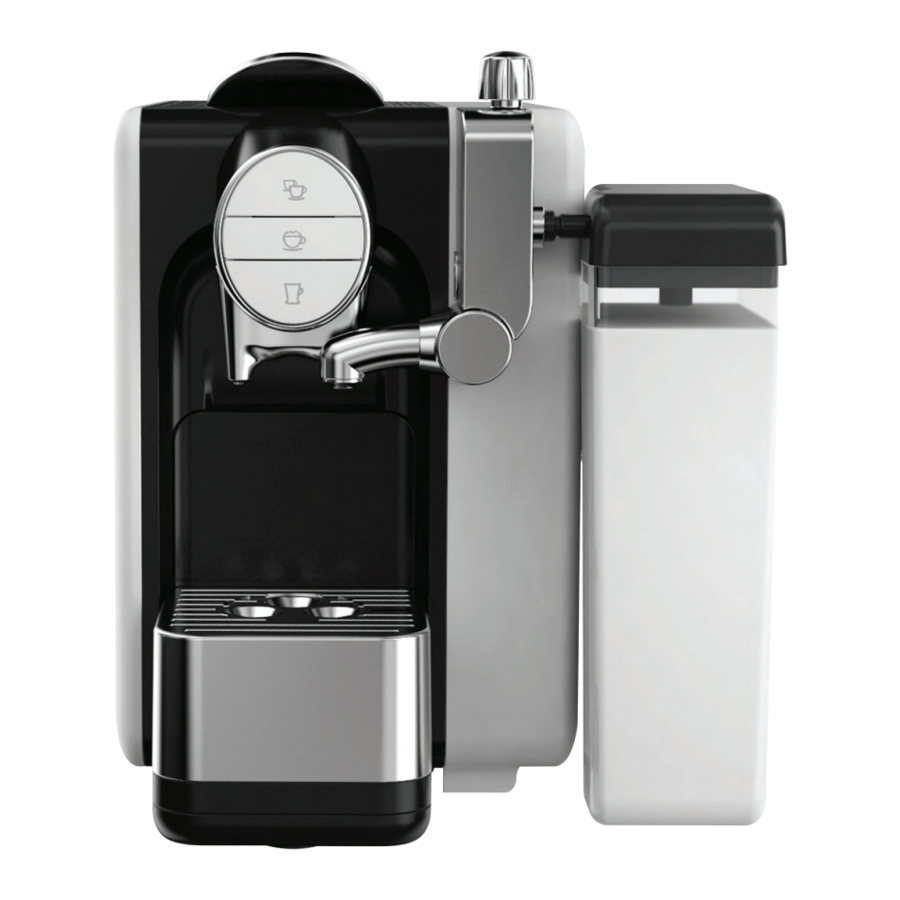
FEATURES AND FUNCTIONS

- Lever For Opening And Closing The Lid
- Frother Pin For Cleaning Purposes Only
- Brew-button, Espresso & Lungo
- Brew-button, Cappuccino
- Brew-button, Café Latte
- Milk Frothing Device
- Removable Milk Tank
- Milk Nozzle
- Capsule Container For 8 Capsules
- Drip Tray Grid / Upper Cup Platform For Small Cups
- Lower Cup Platform For Large Cups
- Removable Water tank
- Coffee Nozzle
- On/off Button
SPECIFICATIONS
| Product Name | Gourmia Coffee Maker |
| Model | 6500 |
| Volt | 220-240V, 50-60Hz |
| Rated Consuming Power | 1500 watt |
| Net weight | 5 kgs |
| Water Tank Capacity | 800 ml |
| Machine Dimension | L350mm x W155mm x H245mm |
| Milk Tank Capacity | 500 ml |
| Cord Length | 150 cm |
OPERATING INSTRUCTIONS
The instructions on this page are valid for the first set-up of the device and for easy cleaning of the espresso nozzle.
- Rinse removable water tank (L) and milk tank (G) with warm water. Rinse thoroughly. Fill water tank (L) with water.
![]()
- Place a container or a large cup under the espresso nozzle (M).
![]()
- Plug in the connection plug.
![]()
- Press the ON/OFF button (N) and wait until the LED on the brew buttons (C+D+E) is on and not flashing.
![]()
- When the control LED is no longer flashing and remains lit (approx. 65 seconds), press brew button (E) to flush system.
![]()
- Wait until the water pours continuously from the espresso nozzle (M) and repeat the process until you have gone through one tank of water.
![]()


AUTOMATIC OPERATION
ESPRESSO / LUNGO
Before espresso/lungo output: Fill the Water tank (L) with water - turn the machine on (N) - open the lever fully (A) - insert the capsule - close the lever (A) fully - wait until the brew buttons (C+D+E) are lit up and the light is not flashing (approx. 65 seconds).
NOTE: There may be slight deviations in the set brew times due to different coffee varieties or water hardness.
ESPRESSO
- Place a small espresso cup on the drip tray grid (J).
![]()
- Press the brew button (C) once. The machine is already programmed for approx. 40-65ml of espresso.
![]()
- For more espressos insert new capsule and repeat previous steps.
![]()


LUNGO
- Place a lungo cup on the lower platform (K).
![]()
- Press brew button (C) twice within 2 seconds. The machine is programmed for approx. 100-130ml of lungo.
![]()
- For more lungos insert new capsule and repeat previous steps.
![]()


CUSTOMIZED COFFEE AMOUNT
- Place a small / big cup on the lower platform (K).
![]()
- Press and hold the brew button (C) until your desired coffee quantity has been reached (the maximum output of coffee/water is 300 ml). The brewing cycle can be stopped at anytime by releasing the brew button (C).
![]()
- NOTE: This amount will be stored in your machine. Please repeat the steps, if you want more coffees with your desired quantity.
![]()


CAPPUCCINO / CAFÉ LATTE
Before cappuccino/café latte output: Fill the Water tank (L) with water and the milk tank (G) with fresh cold milk - turn the Machine on (N) - open the lever fully (A) - insert the capsule - close the lever (A) fully - wait until the brew buttons (C+D+E) are lit up and the light is not flashing (approx. 65 seconds).
NOTE: There may be slight deviations in the set brew times due to different coffee varieties or water hardness.
CAPPUCCINO
- Place a lungo cup on the lower platform (K).
![]()
- Press the brew button (D) once. The machine is already programmed for the perfect cappuccino.
![]()
- For more cappuccinos insert new capsule and repeat the above steps.
![]()


CAFÉ LATTE
- Place a lungo cup on the lower platform (K).
![]()
- Press the brew button (E) once. The machine is already programmed for a perfect café latte.
![]()
- For more café lattes insert new capsule and repeat the above steps.
![]()


NOTE: Please do not use the Cappuccino or Café latte function when dismantling or assembling the milk frothing device (F). There will have steam will be ejected, please avoid burns.
 NOTE: The cup platform is adjustable to accommodate various cup sizes. Remove the upper cup platform (J) and grid and set aside. Place a higher cup or glass directly on the lower cup platform (K).
DAILY USE
The machine is preprogrammed with four default settings. A single press on brew button (C) will deliver approx. 40-65ml of espresso. A double press on brew button (C) will deliver approx. 100-130ml of lungo. You can also customize your drink by holding the brew button to a maximum of 300ml. A single button press on brew button (D) will deliver a delicious cappuccino and a single button press on brew button (E) will deliver a rich cafè latte.
- Fill the water tank (L) with water and the milk tank (G) with fresh, cold milk.
![]()
- Plug in the connection plug.
![]()
- Ensure that the machine has been switched on or in standby mode.
![]()
- To exit standby mode, press brew buttons (C, D, or E) or open the lever (A). Your machine is ready to be used when the brew buttons (C+D+E) are lit up and not flashing.
![]()
- If the machine is turned off, press the ON/OFF button (N) and wait until the small light on the brew buttons (C+D+E) are on and stop flashing.
![]()
- Open the lever (A) fully and insert an capsule. Then, close the lever (A) fully.
![]()
- Espresso or Lungo: Single press on button (C) will deliver an espresso. Double press on button (C) will deliver a lungo. Please note the second press must be done within 2 seconds of the first press. The brewing cycle can be stopped at anytime by pressing the brew button.
![]()
- Cappuccino or Café Latte: Single press on button (D) will deliver a cappuccino and single press on button (E) will deliver a café latte. You can easily shorten the coffee or milk quantity by pressing the brew-button and interrupting the brewing process.
![]()
- The capsule is automatically ejected when the lever (A) is fully opened.
![]()
- The capsule container tray (I) and drip tray (J) must be emptied and rinsed out regularly.
![]()


NOTE: Store the unfinished milk together with milk tank in the refrigerator (3-7˚C) and use within 48 hours. Do not leave the milk in milk tank for more than 20 minutes to prevent condensation to block the milk frothing device.
NOTE: Using the machine when the water tank is empty is not recommended! NOTE: After finished using the Cappuccino or Café latte function, clean the milk frothing device before turning off the power. To prevent the milk frothing parts smell.
MAINTENANCE
STAND-BY MODE
Stand-by mode extends the life of your Coffee Maker. For a longer lifetime of your Coffee Maker machine, it will automatically switch into the stand-by mode after 9 minutes of inactivity or non use after the last espresso output.
- The machine is turned on and one or more espressos are generated.
![]()
- If you do not use the machine within 9 min. it automatically starts the stand-by mode.
![]()
- Exit standby mode by pressing a brew button (C, D or E) or opening the lever (A). Your machine is ready to be used when the brew buttons (C + D + E) are lit up and stop flashing.
![]()
- If you want to switch off the machine completely, then press the ON / OFF button (N).
![]()


EXPRESS CLEANING OF MILK FROTHING DEVICE
- Open the lever (A) fully to eject the used capsules.
![]()
- Remove the milk tank (G).
![]()
- Press the brew button (E) once. The machine will stop automatically after the express cleaning process.
![]()


NOTE: One time per month please clean the milk frothing device (F) thoroughly as described in this manual.
We recommend cleaning the Milk Frothing Device once per month.
Carefully read the instructions. Never use vinegar.
- Open the lever (A) fully to eject the used capsules.
- Remove the milk tank (G) and carefully hand wash and rinse out the tank thoroughly.
- Disassemble the milk tank lid into 3 parts and wash them carefully with warm water or by dish washer (top rack). Place the milk tank (G) filled with drinking water onto the machine.
- Press the brew button (E) once. The machine will stop automatically after the cleaning process.
- Pull out the frother pin (B) and clean it carefully with a wet sponge and warm water and then replace Frother Pin back into unit.
NOTE: Always keep the Frother Pin (B) clean and dry.
CLEANING THE ESPRESSO MACHINE

Any traces of lime (naturally present in the water) may seriously compromise correct operation of the machine. Carefully read the instructions. Never use vinegar.
- Press the Power switch (N) to turn the unit OFF "o".
![]()
- Remove the water tank (L) and the milk tank (G) and carefully hand wash and rinse out the tank thoroughly and fill with fresh drinking water. Install back the water tank (L) and milk tank (G) on the system.
![]()
- Empty and rinse out the used capsule container (I), upper cup (J) and the lower cup (K).
![]()
- Make sure there are no capsules in the capsule container (I).
![]()
- Make sure the leer is lowered (A).
![]()
- Press the power switch (N) to turn the unit ON "I".
![]()
- Press and hold brew button (D) until water tank is empty to flush system. (Please note that machine will dispense 300ml at one time.)
![]()


DESCALING PROCEDURE

The company will not be held responsible for intervention covered by a warranty for machines that are broken or do not work correctly due to the fact that the user has not carried out the descaling procedure. Do not interrupt the decalcification procedure until it has been completed.
- Press the Power switch (N) to turn the unit OFF "o".
![]()
- Fill the water tank (L) with 0.8 L warm water (30-40°C) and place back onto the machine.
![]()
- Take a mild decalcifying tablet/liquid (purchase at your local retailer) and put into the water tank.
![]()
- Place a large cup on the lower cup platform (K). Press the brew-button (C). Repeat the process until you go through half of the water (approx. 0.4 L) in the water tank.
![]()
- After 20 minutes the machine will go into Stand-By Mode, press the brew button (C) or open the lever to activate. Run the remainder of the water through the machine.
![]()
- Remove the water tank (L) and rinse thoroughly. Fill the water tank (L) with 0.8 L warm water (30-40°C) and place back onto the machine.
![]()
- Run one full tank of water through the machine to rinse.
![]()


Any traces of lime scale (naturally present in the water) may seriously compromise correct operation of the machine. The manufacturer recommend descaling regularly, at least once a month (for high hardness water area).
CLEANING IF MILK FROTHING DEVICE IS BLOCKED
If you cannot prepare cappuccino or café latte because no milk frothing is possible, see the beginning of the 'Cleaning & Maintenance' section. Please use following instruction to clean the device and it parts thoroughly.

- Milk frothing device housing upper part
- Frothing part
- Frothing pin
- Milk frothing device housing lower part
- Inner part foaming part
- Pull out the frothing pin (C).
![]()
- Remove the main frothing device.
![]()
- Pull out frothing part of the milk frothing device housing.
![]()
- Remove inner part of the frothing part.
![]()
- Separate milk frothing device housing in upper and lower part.
![]()
- Wash all parts by hand with warm water or wash by dish washer (top rack).
![]()
- Do not remove the silicone tube. If blocked, rinse thoroughly with warm water.
![]()
- Assemble all parts in proper order.
![]()
- Install housing assembly onto the unit and insert frother pin correctly for proper operation.
![]()


TROUBLESHOOTING
| No function. | Make sure the power cord is properly inserted into the unit and wall outlet and the On/Off button (E) on the left of the machine is tuned "ON". |
| The indicator light will illuminate, but espresso does not flow. | The Espresso coffee nozzle (J) is clogged. To clean, follow the instructions in the cleaning section. The loaded capsule can be damaged, try with a new capsule. Make sure, that lever (A) is closed. The capsule container (H) may be full and should be removed from the unit for at least 5 seconds to reset the counter and empty the used capsules. |
| Water under the machine. | Make sure that the water tank (C) is installed correctly.
|
| The machine is whistling quietly. | This is not a fault, but normal setting of the pressure control valve. |
| Produced little coffee or no Crema. After brew several times There is no milk foam, only hot milk | Coffee has natural occurring oils which may clog the espresso nozzle (J). To clean, regularly run a brew cycle with water only. Please clean the frother pin (C) or clean all frother parts. Make sure the milk is cool milk about 5°. |
| The water does not flow through the espresso dispensing nozzle (J). | Coffee has natural occurring oils which may clog the espresso nozzle (J). To clean, regularly run a brew cycle with water only. |
| The brew button (N+O+q+P) starts flashing for a long time. When is the machine ready for use? | The machine takes approximately 65 seconds to heat up. |
| The capsule does not fall automatically into the capsule container (H), when I open the lever (A). | The capsule container (H) may be full. Please empty it or make sure the capsule lever (A) is fully open. |
| The capsule does not insert correctly. | The capsule container (H) may be full. Please empty it or make sure the capsule lever (A) is fully open. |
| Machine beeps and all brew buttons (N,O & P) lights are flashing. | Missing water tank (C) or no water is in the water tank. Make sure the water tank is properly inserted and filled to a minimum of 100 ml. |
| What happens if another key is pressed during distribution of the brew cycle? | Coffee distribution is interrupted in advance. |

IMPORTANT SAFEGUARDS
When operating this electric appliance, basic safety instructions should always be followed. Refer to the following for these instructions
- READ ALL SAFETY & USAGE INSTRUCTIONS BEFORE USING.
- Do not use appliance on wet or hot surfaces, or near a heat source.
![shock hazard]() To protect against electric shock, do not immerse any part of appliance, power cord or plug in water or other liquid. Unplug from outlet when not in use and before cleaning.
To protect against electric shock, do not immerse any part of appliance, power cord or plug in water or other liquid. Unplug from outlet when not in use and before cleaning.- To disconnect, unplug power cord from electrical outlet. Do not disconnect by pulling on cord.
- Do not operate appliance with a damaged power cord or plug. Do not operate appliance if it malfunctions or is in any way damaged. For details, contact Customer Service.
- Use appliance only for its intended use.
- Closely supervise children when using any electrical appliance. Do not allow appliance to be used as a toy.
![shock hazard]() The appliance has a polarized plug (one blade is wider than the other). To reduce risk of electrical shock, this plug is intended to fit in a polarized outlet only one way. If plug does not fit fully in the outlet, reverse plug. If it still does not fit, contact a qualified electrician. Do not modify plug in any way.
The appliance has a polarized plug (one blade is wider than the other). To reduce risk of electrical shock, this plug is intended to fit in a polarized outlet only one way. If plug does not fit fully in the outlet, reverse plug. If it still does not fit, contact a qualified electrician. Do not modify plug in any way.![]()
A short power cord is provided to reduce risks from entanglement or tripping over a longer cord. An extension cord may be used when marked electrical rating is no less than electrical rating of this appliance. All cords should not drape over counter or tabletop where cords can be tripped over or pulled on unintentionally, especially by children.- Do not place on or near a hot gas or electric burner, or heated oven. Extreme caution must be used when moving products containing hot liquids.
- Only use fresh (potable) and cold (moderate) water. Do not use water contained in bathtubs, wash basins or other recipients.
- Never touch the hot parts of the appliance (be careful, also the warming plate is a hot part!), only touch the plastic parts and pot by the handle.
- Be careful not to get burned by the steam evaporating from the coffee filter.
- Never use the appliance if the pot shows any signs of cracks. Only use the pot with this appliance.
- Handle with care as the glass is very fragile.
- Never use your coffee machine without water in it if you have a programmable coffee machine, make sure to fill it with water before programming it.
- Never place the empty (or almost empty) coffee pot on the hotplate when the coffee machine is running, or on any other hot surfaces.
- Always be sure to install the water tank securely back in the unit with its lid closed after filling with water at the minimum before turning appliance on.
- DO NOT remove the water tank until unit is turned off.


SAVE THESE INSTRUCTIONS
FOR HOUSEHOLD USE ONLY
Electrical 3-conductor Cord Set:
Appliance equipped with a 3-conductor cord set that has a 3 prong grounding-type plug. It should be properly connected to a grounding-type outlet. The plug is designed to fit ONLY a 3-grounding outlet unit, and as such, the grounding prong should never be removed. If needed, purchase a 2-prong adapter and ground it to the outlet. Consult a qualified electrician if in doubt. Do not use an adapter unless you are confident it is grounded. Do not modify this plug. IF the plug does not fit the outlet securely, call a qualified electrician for assistance.

DISPOSAL OF THE DEVICE
PROTECTION OF THE ENVIRONMENT
At the end of the life of your product, it should go to a specially adapted waste-recycling center.

ENVIRONMENT PROTECTION FIRST
![]() The symbol on the product or on its packaging indicates that this product may not be treated as household waste. Instead it should be handed over to the applicable. Collection point for the recycling of electrical and electronic equipment.
The symbol on the product or on its packaging indicates that this product may not be treated as household waste. Instead it should be handed over to the applicable. Collection point for the recycling of electrical and electronic equipment.- By ensuring this product is disposed of correctly, you will help prevent potential negative consequences for the environment and human health, which could otherwise be caused by inappropriate waste handling of this product. For more detailed information about the recycling of this product, Please contact your local council office or your household waste disposal service.

For Customer Service or questions, Please call: 888-552-0033
www.gourmia.com
© 2016 Gourmia
www.Gourmia.com
The Steelstone Group
Brooklyn, NY

Documents / Resources
References
Download manual
Here you can download full pdf version of manual, it may contain additional safety instructions, warranty information, FCC rules, etc.
Download Gourmia GCM6500 - 1 Touch Automatic Espresso Cappuccino & Latte Maker Manual
Advertisement


Need help?
Do you have a question about the GCM6500 and is the answer not in the manual?
Questions and answers