Gourmia GCM3350 - POUR OVER POURISTA COFFEE MAKER MANUAL
- User manual (11 pages)
Advertisement
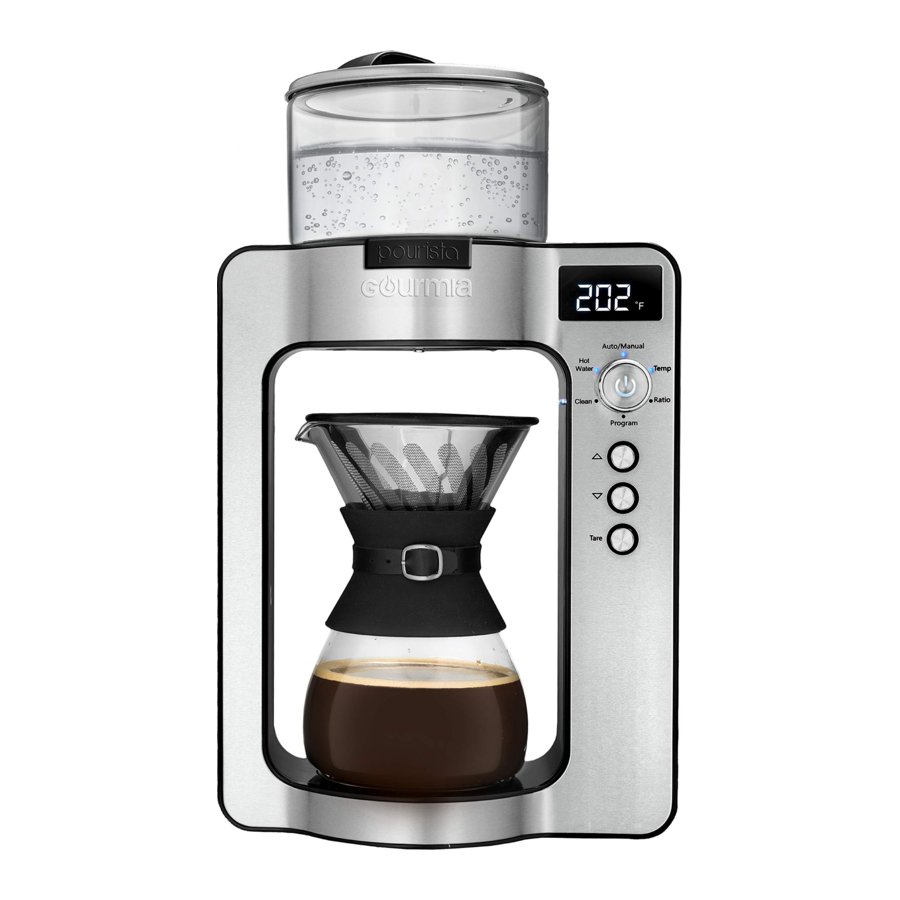
KNOW YOUR POURISTA

- Water Reservoir Lid
- Water Reservoir
- Display Screen
- Dial/ Power Button Functions
- Adjustment Buttons
- Tare Button
- Carafe
- Built In Scale
- Stainless Steel Filter
- Filter Stand
SETTING THE CLOCK
- Plug the Pourista into an outlet, or turn the dial to "Program" and hold down the power button for 3 seconds.
- Display will show 0:00.
- Use arrow buttons to adjust the hour. Press the Power button to confirm.
- Use the arrow buttons to adjust the minutes. Press the Power button to confirm.
- The clock time will now be set.
Unplugging will reset the clock time to 0:00. See the chart below for reference.

WEIGHING THE GROUNDS
A TRUE BARISTA spends years learning to pour the perfect pour over – adjusting elements such as the grinds-to-water ratio, water temperature and pour time based on a variety of factors including where the coffee was grown, where it was roasted and your coffee flavor preference. The Pourista was designed to give you maximum control, if you desire, or a fully automated pour over process to give you the cup of coffee of your dreams. In the auto mode, once you scoop the desired amount of grinds into the filter, the Pourista will calculate the ideal amount of water to pour and the ideal temperature and pour speed. In the manual mode, once you scoop the desired amount of grinds into the filter, you can set your preferred grinds-to-water ratio and water temperature for a truly delicious custom brew.
How Much Grounds Do I Need?
Note: Auto mode brews according to a 1/12 ratio.
1 tablespoon equals approximately 5 grams
| Ratio | 1 cup | 2 cup | 3 cup | 4 cup |
| 1/10 | 25 g | 50 g | 75 g | 100 g |
| 1/11 | 22 g | 44 g | 66 g | 88 g |
| 1/12 | 20 g | 40 g | 60 g | 80 g |
| 1/13 | 19 g | 38 g | 57 g | 76 g |
| 1/14 | 17.8 g | 35.6 g | 53.4 g | 71.2 g |
| 1/15 | 16.6 g | 33.2 g | 49.8 g | 66.4 g |
| 1/16 | 15.6 g | 31.2 g | 46.8 g | 62.4 g |
| 1/17 | 14.7 g | 29.4 g | 44.1 g | 58.8 g |
| 1/18 | 13.8 g | 27.6 g | 41.4 g | 55.2 g |
| 1/19 | 13 g | 26 g | 39 g | 52 g |
| 1/20 | 12.5 g | 25 g | 37.5g | 50 g |
AUTO MODE
Authentic barista-quality at the touch of a button.

- Fill the Water Reservoir to the MAX line.
- Place the stainless steel filter on top of the carafe (with paper filter if desired) and place the carafe onto the base.
- Press the "Tare" button. Display will show "0g".
- Remove the carafe and pour desired amount of grounds into the filter. Replace carafe on base.
- The display will now show the weight of the grounds loaded. Add or remove grounds to your desired amount.
- Turn dial to "Auto/Manual" mode. Use the arrows to select "Auto".
- Press the power button to begin brewing.
Watch the Pourista do its magic.
MANUAL MODE
Automatic precision brewing, with customization for every blend.

- Fill the Water Reservoir to the MAX line.
- Place the stainless steel filter on top of the carafe (with paper filter if desired) and place the carafe onto the base.
- Press the "Tare" button. Display will show "0g".
- Remove the carafe and pour desired amount of grounds into the filter. Replace carafe on base.
- Turn dial to "Auto/Manual" mode. Use the arrows to select "Manual".
- Turn dial to "Temp". Use the arrows to adjust the water temperature, from 176˚F-208˚F.
- Turn the dial to "Ratio". Use the arrows to adjust the water: grounds ratio, from 1:10-1:20
- Press the Power button twice to begin brewing
Watch the Pourista do its magic.
DELAY START
Preset a time for a hot, fresh brew- exactly when you want it.

- Ensure the clock is set properly.
- Fill the Water Reservoir to the MAX line.
- For Auto Mode, follow Auto Mode directions 2-4. For Manual Mode, follow Manual Mode directions 2-7.
- To program the time for your coffee to be ready, rotate the dial to "Program".
- Use the arrows to select the hour. Press the Power button to confirm.
- Use the arrows to select the minutes. Press the Power button twice to confirm programmed brewing time.
- The display will now show "Prog" in the top right corner.
- The Pourista will brew the coffee when your programmed time has been reached.
Note: The Pourista operates according to a 24 hour clock system. See chart for reference.
HOT WATER DISPENSER
- Fill the water reservoir with desired amount of water, above the MIN line.
- Rotate the dial to "Hot Water".

- Using the arrows, adjust desired water temperature.
- Press the Power button to begin heating.
- Water will dispense without rotation until the tank is empty.

Note: Press the Power button at any time to stop dispensing.
CLEANING
After about 200 uses, the "Clean" light will illuminate. We recommend de-scaling before resuming use.
- Fill the water reservoir with clean water and de-scaling solution to the MAX line.
- Rotate the dial to "Clean".
- Press the Power button.
- Water will heat to 212˚F, and then dispense.
- The Pourista is now clean and ready for use.
Note: Vinegar, lemon juice, citric acid, and baking soda are all great de-scaling solutions.
TROUBLE SHOOTING
TROUBLE SHOOTING:
If either the carafe or coffee grinds are not in the appliance, the display will show "NOC"/"NULL," and water will not dispense. If the carafe is removed during brewing, water will stop dispensing. Brewing will resume if the carafe is returned within 30 seconds.
AUTO STANDBY:
After 10 minutes the display screen will turn off, and the appliance will enter standby mode. To exit, simply rotate the dial or press any button. The Pourista will once again be ready for use.

Do not touch the water reservoir or carafe while in use. Allow them to cool down after brewing.
IMPORTANT SAFEGUARDS

- Read all instructions.
- Do not touch hot surfaces. Use handles or knobs. When the cooler / warmer is in it's HOT function, use care when handling hot items to avoid burns.
- Make sure that your outlet voltage corresponds to the voltage stated on the rating label of the coffee maker.
- To protect against fire, electric shock, and injury do not immerse cord, plug or unit in water or other liquid.
- Close supervision is necessary when any appliance is used by or near children.
- Unplug from outlet when not in use and before cleaning. Allow to cool before putting on or taking off parts and cleaning the appliance.
- Do not operate any appliance with a damaged cord or plug, after the appliance malfunctions, or has been damaged in any manner. Return appliance to an authorized service facility for examination, repair or adjustment.
- The use of an accessory not recommended by the appliance manufacturer may cause injury.
- Do not use outdoors.
- Do not let cord hang over edge of table or counter or touch hot surfaces.
- Do not place on or near a burner or in a heated oven.
- Only fill the water reservoir with clean and cold water. Never fill it with mineral water, milk or other liquids.
- Do not let the coffee maker operate without water to avoid damaging the heating elements.
- Do not use appliance for other than it's intended use. This appliance should only be used for coffee.
- Some parts of appliance are hot when operated - do no touch.
- Do not leave the appliance unattended while in use.
- Always operate the appliance with cover in place.
- To disconnect, turn off the unit then remove plug from wall outlet. Scalding may occur if the lid is removed during the brewing cycles.
- Cleaning and maintenance should not be done by children without supervision.
- The glass container is designed for use with this appliance. It must never be used on a range top.
- Do not set the hot glass container on a wet or cold surface.
- Do not use a cracked glass container or a container having a loose or weakened handle.
- Do not clean glass container with cleansers, steel wool pads, or other abrasive material.
FOR HOUSEHOLD USE ONLY
This appliance has a polarized plug (one blade is wider than the other). To reduce the risk of electric shock, this plug will fit in a polarized outlet only one way. If the plug does not fit fully in the outlet, reverse the plug. If it still does not fit, contact a qualified electrician. Do not modify the plug in any way.
FOR CUSTOMER SERVICE
QUESTIONS OR COMMENTS
VISIT US @GOURMIA.COM
INFO@GOURMIA.COM
OR CALL 888.552.0033

Documents / Resources
References
Download manual
Here you can download full pdf version of manual, it may contain additional safety instructions, warranty information, FCC rules, etc.
Download Gourmia GCM3350 - POUR OVER POURISTA COFFEE MAKER MANUAL
Advertisement


Need help?
Do you have a question about the GCM3350 and is the answer not in the manual?
Questions and answers