TESTO 550 - Digital Manifold Quick Start Guide
- Instruction manual (20 pages) ,
- Quick start manual (2 pages) ,
- Instruction manual (26 pages)
Advertisement
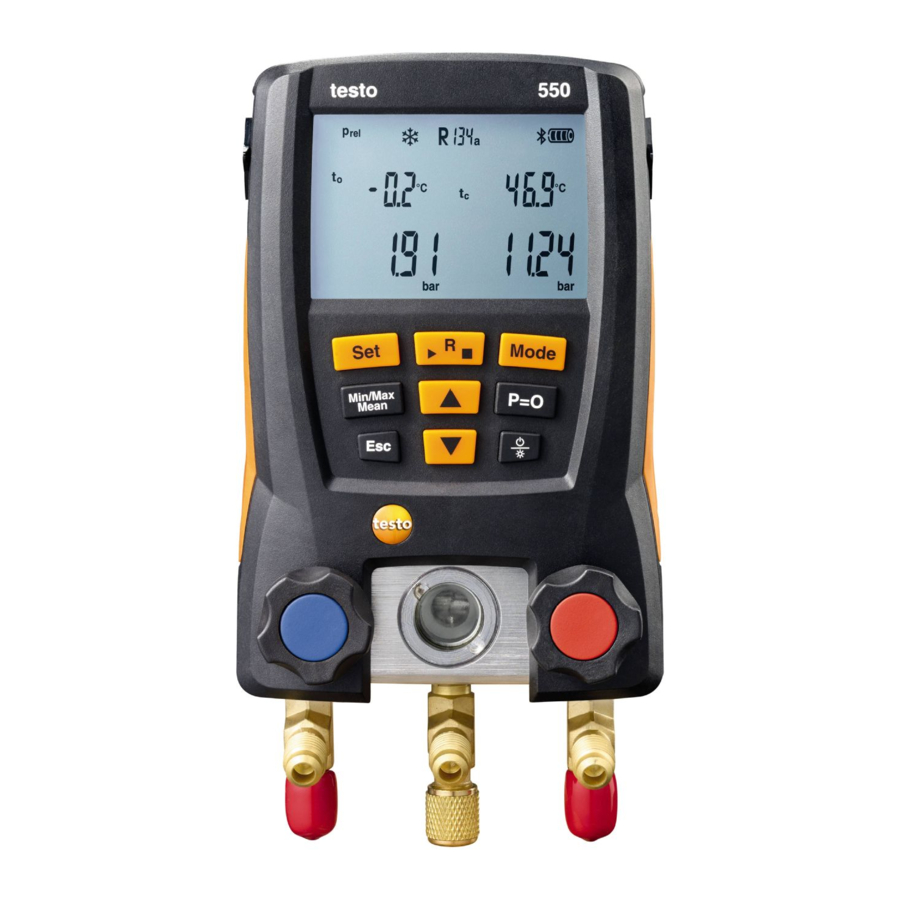
Overview

Changing the batteries
Testo 550 uses 4x 1.5 V, AA batteries. To replace the batteries please follow these few steps below:
- Fold out the hook.
![]()
- Grab the clip and squeeze it together and remove the cap.
![]()
- Insert/Change the batteries. Observe the polarity.


Power ON / OFF
- Connect probes to the testo 550 prior to powering it up.
- Press the power button [
![]() ] to turn testo 550 on.
] to turn testo 550 on. - All display segments are lit (2 s.)
- Measurement view is displayed
- Press the power button to turn the testo 550 off.
Set the refrigerant
- Press the [R, Start/Stop] button so you can choose the required refrigerant.
![]()
- Use the arrow keys [
![]() ] to scroll through the choices.
] to scroll through the choices. - Press the [R, Start/Stop] button to set the chosen refrigerant.

 ] to scroll through the choices.
Set the Units / Altitude / Mode
- Press the [Set] button once to get to temperature units menu.
![]()
- Choose the required units with the arrow keys [
![]() ].
]. - Press the [Set] button for the second time to be able to chose the pressure units.
![]()
- Choose the desired units with the arrow keys.
- Press the [Set] button for the third time so you select absolute or relative pressure.
![]()
- Press the [Set] button four times, so you can set the barometic pressure in inHg.
![]()
- Press the [Set] button five times to select the AC/R [
![]() ], heat pump [
], heat pump [ ![]() ], or Auto [
], or Auto [ ![]() ]. Auto mode senses if the Low pressure side is 15 psi higher than the High pressure side, and will automatically reserve the display of the High / Low side pressures
]. Auto mode senses if the Low pressure side is 15 psi higher than the High pressure side, and will automatically reserve the display of the High / Low side pressures
![]()
- Press the [Set] button six times to exit the [Set]-menu.


Backlight
Testo 550 has a backlight to improve viewing in dark or daylight conditions. Press the backlight [  ] button to turn the backlight on. Press it once again to turn the backlight off.
Note: rP could be different from starting and final test pressure rP as the true rp is calculated from the gas laws.
Pressure zeroing
Please zero the pressure sensors before every use of the testo 550.
- Loosen the hose connections
- Open the valve knobs to confirm no pressure in the manifold
- Press the [p=0] button
The sensors are now zeroed and ready for measurement.
Superheat / Subcooling
The testo 550 calculates superheat and subcooling in real time.
- Connect the temperature probes to testo 550.
- Connect testo 550 and the probes to the air conditioning, refrigeration or heat pump system.
- Switch on testo 550.
- You will now see the calculated evaporation and condensation and temperature (Ev and Co) and system pressures at the bottom of the display.
![]()
- Press the UP-arrow [
![]() ] once to see the temperature difference (
] once to see the temperature difference ( ![]() ).
).
![]()
- Press the UP-arrow [
![]() ] twice to see the real time superheating and subcooling (SH and SC).
] twice to see the real time superheating and subcooling (SH and SC).
![]()
- Press the UP-arrow [
![]() ] for the third time to see the real time measured temperature (T1 and T2).
] for the third time to see the real time measured temperature (T1 and T2).
![]()
- Press the UP-arrow again to get to back to the calculated evaporation and condensation temperature. You can also use the DOWN-arrow to switch between the menus but the order will be reversed.

 ] once to see the temperature difference (
  ).
).


Leak Test
The temperature compensated leak test is used to indicate leaks in an AC/R or heat pump system.
- Plug in the temperature probe into the high side of the instrument.
- With the instrument off, simultaneously press the Set and Mode while turning on the 550. This will turn off the surface compensation to provide an accurate ambient air temperature. Temperature surface compensation is turned back on the next time that the 550 is turned on.
- Zero the pressure sensors.
- Connect testo 550 to the system.
- Press the [Mode] button once to get to the leak test mode.
![]()
- Now press the [R, Start/Stop] button to start the test.
- Press arrow keys [
![]() ,
, ![]() ] to see the measured temperature.
] to see the measured temperature.
![]()
- The test duration depends on the system size.
- Press [R, Start/Stop] again to stop the test.
- The results will be displayed.
- Press the [Mode] button twice to return to the normal measurement mode.

 ] to see the measured temperature.
Vacuum Indication
Testo 550 is capable of gross vacuum indication. The measurement is performed on the low-pressure side.
- Press the [Mode] button twice to get to the vacuum indication menu.
![]()
- Start the evacuation.
- The 550 will indicate the vacuum on the low-pressure side.

Remember, vacuum indication is performed in inHg.
The testo 550 does not have the resolution to read microns and a separate vacuum gauge is recommended for vacuum measurement.
1 inHg = 25,400 microns
Warranty
The testo 550 has a two year warranty


Testo INC., 40 White Lake Road, Sparta, NJ 07871
(800) 227-0729, email: info@testo.com,
www.testoUSA.com/refrigeration

Documents / Resources
References

Download manual
Here you can download full pdf version of manual, it may contain additional safety instructions, warranty information, FCC rules, etc.
Advertisement


Need help?
Do you have a question about the 550 and is the answer not in the manual?
Questions and answers