Sunbeam DT5600 - Healthy Food Dryer with 5 Drying Racks Manual
- Instruction/recipe booklet (36 pages)
Advertisement
- 1 Sunbeam's Safety Precautions
- 2 Features of your Food Dehydrator
- 3 Using your Dehydrator
- 4 Care and Cleaning
- 5 Important Guidelines and Hints
- 6 Storage of Dried Foods
- 7 Rehydrating Dried Foods
- 8 Use of Dried Food
- 9 Drying Fruits
- 10 Drying Chart for Fruit
- 11 Drying Vegetables
- 12 Fruit Rolls
- 13 Drying Herbs and Spices
- 14 Drying Chart for Herbs and Spices
- 15 Drying Meat
- 16 Beef jerky
- 17 Drying Flowers
- 18 Documents / Resources
Sunbeam's Safety Precautions
SAFETY PRECAUTIONS FOR YOUR SUNBEAM DEHYDRATOR.
- Ensure your dehydrator is used at least 50cm (half a metre) away from a gas flame or electric element.
- Do not operate the dehydrator on an inclined surface.
- Do not move or cover the dehydrator while in operation.
- Do not immerse the top of the dehydrator in water or any other liquid.
- Use your dehydrator well away from walls, curtains and cupboards that may be affected by steam.
- Do not use your dehydrator in confined spaces.
Sunbeam is very safety conscious when designing and manufacturing consumer products, but it is essential that the product user also exercise care when using an electrical appliance. Listed below are precautions which are essential for the safe use of an electrical appliance:
- Read carefully and save all the instructions provided with an appliance.
- Always turn the power off at the power outlet before you insert or remove a plug. Remove by grasping the plug - do not pull on the cord.
- Turn the power off and remove the plug when the appliance is not in use and before cleaning.
- Do not use your appliance with an extension cord unless this cord has been checked and tested by a qualified technician or service person.
- Always use your appliance from a power outlet of the voltage (A.C. only) marked on the appliance.
- This appliance is not intended for use by persons (including children) with reduced physical, sensory or mental capabilities, or lack of experience and knowledge, unless they have been given supervision or instruction concerning use of the appliance by a person responsible for their safety.
- Children should be supervised to ensure that they do not play with the appliance.
- The temperature of accessible surfaces may be high when the appliance is operating.
- Never leave an appliance unattended while in use.
- Do not use an appliance for any purpose other than its intended use.
- Do not place an appliance on or near a hot gas flame, electric element or on a heated oven.
- Do not place on top of any other appliance.
- Do not let the power cord of an appliance hang over the edge of a table or bench top or touch any hot surface.
- Do not operate any electrical appliance with a damaged cord or after the appliance has been damaged in any manner. If damage is suspected, return the appliance to the nearest Sunbeam Appointed Service Centre for examination, repair or adjustment.
- For additional protection, Sunbeam recommend the use of a residual current device (RCD) with a tripping current not exceeding 30mA in the electrical circuit supplying power to your appliances.
- Do not immerse the appliance in water or any other liquid unless recommended.
- Appliances are not intended to be operated by means of an external timer or separate remote control system.
- This appliance is intended to be used in household and similar applications such as: staff kitchen areas in shops, offices and other working environments; farm houses; by clients in hotels, motels and other residential type environments; bed and breakfast type environments.
If you have any concerns regarding the performance and use of your appliance, please visit www.sunbeam.com.au or contact the Sunbeam Consumer Service Line. Ensure the above safety precautions are understood.
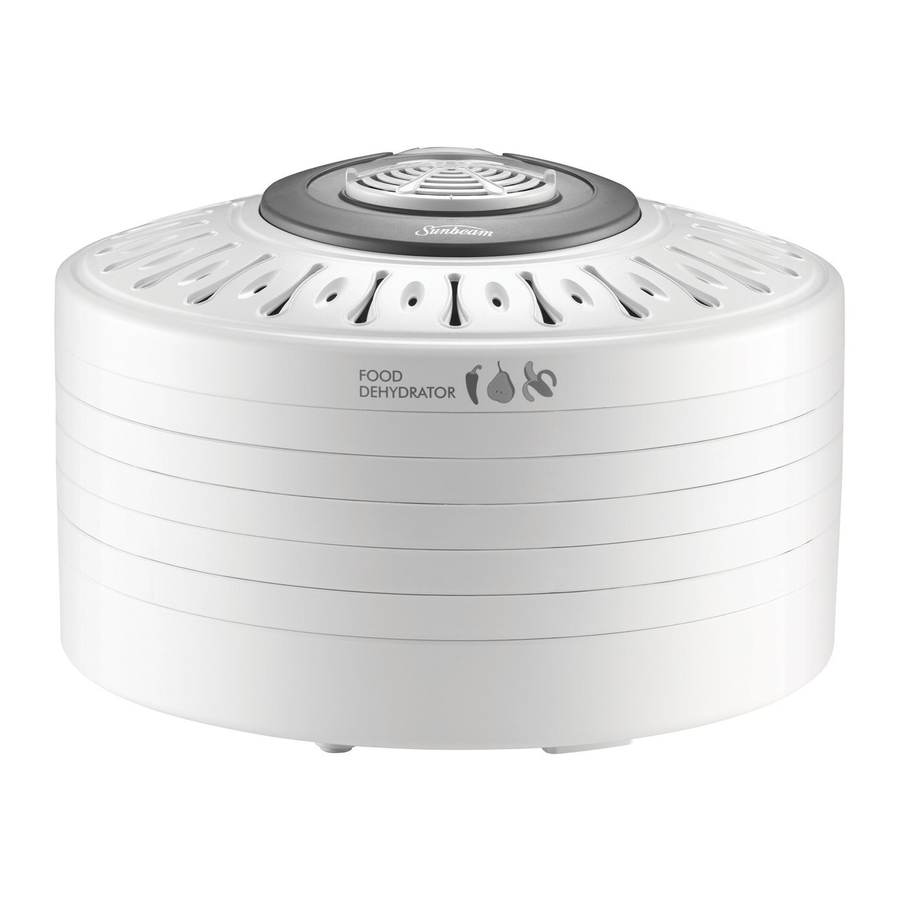
Features of your Food Dehydrator

Lid with drying motor
Acts as a lid for the Food Dehydrator and contains the motor and power switch. Air vents on the lid allow air to be circulated.
5 large drying racks
Holds the food in place for easy drying. Your unit includes 5 drying racks. You can purchase more drying racks from retail outlets and Sunbeam service centre.
Rubber feet
Holds the Food Dehydrator in place and prevents it from scratching the bench top.

On/Off switch with three heat settings
Enable the user to choose the type of drying needed with three heat settings.
Removable Filter
The filter is removable for easy cleaning.
Fruit Roll Tray
Makes delicious fruit rolls naturally.
Using your Dehydrator
How it works
Dehydrating food is an ancient method of preserving food. It is a gentle, natural process which removes moisture from food.
Using a controlled heat temperature, air is circulated from the top of the unit to each of the five trays and base. This method of drying seals in the flavours and nutrients of the food, leaving a high food nutrient and vitamin content.
Storage of dried food
Drying fresh, ripe fruit and vegetables allows you to enjoy these luxuries all year round. Storing of food is easy and takes up little storage space. Dried foods have a longer shelf life of approximately 3-6 months when stored in air-tight storage jars depending on type of food and climate.
No preservatives added
Fruit and vegetables dried using your Food dehydrator, will differ in colour and appearance from produce purchased from Health food stores and supermarkets. This is due to these stores adding artificial colouring and preservatives to the produce. Whereas your Food dehydrator uses no preservatives and only natural additives.
Versatility
You can dry herbs and spices and flowers to make potpourri. You can even enjoy the advantages of rehydrating foods to make instant additions to soups, sauces and casseroles. The choice is endless.
Healthy snacks
Natural healthy snacks can easily be created using your Food dehydrator. A variety of fruit rolls such as pear, berry and apple rolls, to name a few. You can make tasty, muesli bars, using all natural ingredients. These snacks are great for picnics, camping and at snack time.
Before using your Food Dehydrator
- Wash the drying racks, base and fruit roll tray in warm water using a mild detergent. Rinse and dry each part thoroughly before use.
- Before you assemble the food dehydrator ensure that the power cord is unplugged.
Using your Food dehydrator
- A rrange the food on the drying racks, ensuring the pieces of food are not quite touching, to allow air to circulate freely. Place drying racks onto the base, ensuring that all racks are securely positioned in the grooves.
- P lace the lid on the top drying rack.
- P lug the power cord into a 230/240V AC power outlet, and push the power to the desired heat setting.
NOTE: If only using base of Food Dryer ensure an empty drying rack is inserted between the Lid and Base, to avoid restriction of air flow.
| Settings | Approximate Temperatures | Uses |
| Setting 1 | 35ºC | Herbs, Flowers |
| Setting 2 | 55ºC | Fruits, vegetables, muesli bars, fruit rolls |
| Setting 3 | 75ºC | Drying meats |
Care and Cleaning
Drying racks, fruit roll trays and base
To clean the drying racks, fruit roll trays and the base, soak in warm soapy water. A soft bristle brush can be used to loosen stubborn food particles.
Lid
Do not immerse the Lid with Drying Motor in water. To clean, use a damp, soft sponge with a mild detergent.
Do not use steel wool, scouring pads or abrasive cleaners.
Do not place any parts in a dishwasher.
Important Guidelines and Hints
Use quality food
Best results are achieved when quality food is used. Select produce at the peak of ripeness, colour and flavour, for the highest nutritional content.
You can dry overripe produce successfully, as long as you remove any spoiled areas.
Wash food
Food should be washed and dried thoroughly, removing soft or spoiled areas. Be certain that your hands, cutting utensils and food preparation areas are clean.
Cut food uniformly
Produce can be shredded, sliced or diced, 5mm slices are best for efficient drying.
Variation in drying times
Check produce drying chart times can vary. Drying times are affected by the size of the load, thickness of the sliced produce, humidity, air temperature and the moisture content of the food itself. (Therefore, broad drying times have been given in the drying tables).
NOTE: The food dryer may be left on overnight, however this may not achieve optimum result.
We recommend the rotation of drying racks every 3-4 hours throughout drying time to achieve even drying.
Fruit Roll Trays
Non-stick baking paper can be cut to fit rocks, if you want more roll up trays.
Rotate Racks
Rotate racks while drying foods, this ensures even drying of produce and air circulation.
Testing for dryness
Be sure to let the produce cool before testing for dryness. To test for dryness, cut a piece open – there should be no visible moisture inside.
Uneven drying
If you notice uneven drying, rotate the drying racks, i.e. move the bottom rack to the top and the top racks down.
Keep records
Records of humidity, weight of produce before and after drying times, will be helpful in improving your drying techniques for the future. Use the Drying Record Chart provided.
Storage of Dried Foods
- Containers should be moisture and insect free.
- Glass jars with metal screw lids are ideal containers. Food stored in plastic bags, should be stored inside an insect proof container.
- The storage area should be cool, dry and as dark as possible. The ideal temperature for storing dehydrated food is 5-20ºC.
- Dried food can be covered in plastic wrap and stored in a container in the freezer.
See tips on Beef jerky for correct storage.
Important
Check for moisture by shaking the content of your storage container several times during the first week after the food has been dried. If moisture appears on the inside, the food has not been sufficiently dried and should be returned to the food dehydrator, for further drying.
Do not place warm produce into storage containers, as condensation will form causing mould and mildew. Allow food to cool on racks before storing.
Rehydrating Dried Foods
Rehydration is the process of putting the moisture back into foods that have been dried.
- Dried foods can be partially rehydrated by soaking in water or cooking.
- To conserve the nutritional value of the rehydrated food, use the liquid remaining after soaking or cooking, in the rehydration recipes.
- One cup of dried vegetables generally reconstitutes to two cups of vegetables. See soup mix.
- One cup of dried fruit reconstitutes to one and a half cups of fruit.
Use of Dried Food
Dehydrated fruits and vegetables can be used in a variety of dishes that can be used to make: sauces, casseroles, marinated vegetables, cakes, salads, pies, soups, cereals, pasta dishes and poultry dishes stuffing.
Foods such as garlic, chillies and tomatoes can be bottled in olive oil and stored in a cool dry place for several months.
Drying Fruits
- Wash food and pat dry with paper towels.
- Remove any blemishes, pips and stones.
- Slice as recommended.
- Pre-treat where recommended.
NOTE: Food may be peeled or unpeeled when drying. Try drying both ways to distinguish preferred outcome. Unpeeled fruits will take longer to dry.
Pre-Treatment
The pre-treatment of food where recommended helps retard browning while the food is drying.
- Where recommended use a natural pre treatment of pineapple or lemon juice. Soak fruit for 3-4 minutes in the juice before placing on drying racks.
Blanching
- Some fruits with natural protective wax coatings e.g. figs, grapes and prunes, need to be blanched to speed the drying process.
To Blanch
- Soak fruits in boiling water for 1-2 minutes.
- Plunge into ice cold water. Dry well.
- Slice and commence drying.
Dryness Test
- Cool fruit before testing for the final degree of dryness.
- Most fruit will be soft and pliable when properly dried.
Drying Chart for Fruit
Expect a variance in the time needed to dry different foods. Drying times are affected by the size of the load, thickness of slices, humidity and temperature in your home.
NOTE: Times stated are based on drying using five racks. Times will vary depending on number of racks used.
| Food type | Pre treatment | Setting/drying time | Suggested Use |
| Fruit | |||
| Apples, core, peel, cut into.5mm slices | None | 8-10 hours | Eat as is or add to cakes and slices |
| Apricot halves, de-stoned | None | 12-14 hours | Add to slices, biscuits and muesli |
| Banana halves | Soak in lemon juice | 12 hours | Eat as is, add to cakes, puddings and slices |
| Baby figs, halved | Blanch | 6-8 hours | Add to fruit cake and bread mixtures, slices and muesli |
| Grapes, Muscatel On vine | Blanch | 16-18 hours | Eat as part of a cheese platter |
| Grapes, Muscatel Off vine, deseeded, flattened slightly | Blanch | 14-16 hours | Add to biscuit doughs, fruit cake mixtures and muesli |
| Kiwifruit, peeled, 5mm slices | None | 6 hours | Eat as is or add to muesli |
| Lemon, skin on, 5mm slices | Scrub whole fruit under warm water | 8 hours | Add to pasta sauces, chicken dishes, cakes and puddings |
| Limes, skin on, 5mm slices | Scrub whole fruit under warm water | 8-10 hours | Add to curries and potpourri mixes |
| Oranges, Naval, skin on, halved, cut into 0.5mm slices | Scrub whole fruit under warm water | 6-8 hours | Add to potpourri mixes and dip in chocolate and serve with coffee |
| Paw Paw, peeled, deseeded, 0.5mm slices | None | 10-12 hours | Eat as is, add to muffin mixtures, slices and muesli |
| Peaches, halved, de-stoned | Wash under water | 8-10 hours | Eat as is, chop and add to cake and muffin mixtures or add to muesli |
| Pear large 1cm-thick slices | Soak in lemon juice | 12-14 hours | Eat as is, chop and add to salads, cakes and muesli |
| Pear small halves | Soak in lemon juice | 10-12 hours | Eat as is, chop and add to salads, cakes and muesli |
| Pineapple, .5mmthick slices | None | 8-10 hours | Eat as is, chop and add to muffin mixtures, slices and muesli |
Drying Vegetables
Preparation
- Wash vegetables thoroughly and remove blemishes.
- Pre-treat where recommended.
Pre-Treatment
- Steam Blanching: is needed to speed up drying process for certain vegetables.
- Blanching: Preserves the colour, stops the ripening process and generally makes the produce dry faster.
To Blanch
- Soak vegetables in boiling water for 1-2 minutes.
- Plunge into ice cold water.
- Slice and commence drying.
Dryness Test
- Cool vegetables before attempting the final test for dryness.
- Vegetables should feel hard and firm with no soft spots.
Expect a variance in the time needed to dry different foods. Drying times are affected by the size of the load, thickness of slices, humidity and temperature in your home.
| Food type | Pre treatment | Setting/drying time | Suggested Use |
| Vegetables | |||
| Carrot, peeled, 1cm dice | None | 6-8 hours | Add to cake, bread and scone mixtures |
| Celery, 1cm dice | None | 4-5 hours | Add to soup mixes and casseroles |
| Eggplant, 5mm slices | Blanch in hot water | 6-8 hours | Add to tomato sauces |
| Ginger, peeled, .5mm slices | Scrub under warm water | 8-10 hours | Add to curries, fruit cake and muffin mixtures |
| Mushrooms, button, cut into 1cm thick slices | None | 6-8 hours | Add to risottos and pasta sauces |
| Tomatoes, regular, cut into 2cm-thick wedges (dried) | None | 6 hours | Add to risottos and pasta sauces |
| Tomatoes, Roma (egg) cut in half semi-dried | None | 8 hours | Add to antipasto platters, sandwich fillings, pies and tarts |
| Tomato, Roma (egg) cut in half dried | None | 10-12 hours | Add to pasta sauces |
| Onion, Brown, halved, cut into 1cm dice | None | 14-16 hours | Add to bread mixtures, curries and muffin mixtures |
| Pea, green, shelled | None | 6-8 hours | Add to soups and rice dishes |
| Pumpkin, peeled, deseeded, cut into 1cm dice | None | 8-10 hours | Add to curries, scones and bread mixtures |
| Orange sweet potato (Kumara) peeled, cut into 1cm dice or cut into 1cm thick slices | None | 8 hours | Curries, soups |
Fruit Rolls
Fruit rolls make delicious snacks ready to have on hand. Here are some steps to ensure perfect fruit rolls:
- Fresh or canned fruit can be used to make fruit rolls, simply substitute weight for weight. However, do not combine a mixture of canned and fresh fruit in the same roll up. If using fresh fruit, make sure it is of good quality without soft or discoloured patches.
- If using fresh fruit, you will need to peel and cook it first so that it can be pureed in a blender for the preparation required to make rolls.
- The prepared fruit must be evenly spread over the fruit roll trays to ensure even drying times.
- The fruit should be spread to an even thickness of about.5mm. The fruit, once pureed, needs to be a spoonable consistency. If the mixture is too runny the end result will be affected.
- If mixture is too runny, you can add pureed apple or pear to the mixture to make up the desired consistency.
- Make sure the fruit rolls are dried continuously at the recommended temperature/setting and time.
- Once dried, the fruit rolls should be pliable and without any soft or sticky patches on top or underneath.
- Remove fruit rolls from trays when still warm and roll up to form logs.
- Wrap in non-stick baking paper and store in an airtight container in a cool, dark place for up to 1 week. Do not store in the fridge as the fruit rolls need to be stored in moisture-free area to maintain a pliable, chewy texture.
- Suitable fruits for rolls include: Apple, apricot, berries, cherries, mango, peaches, pears, and plums.
Additional packs of three fruit rolls available separately (DT0300).
Drying Herbs and Spices
Drying your own herbs and spices is an easy, economical way to make the most from your herb garden.
Hints
- Pick leaves, when young and tender.
- Pick seed pods before they open.
- Most herbs and spices can be dried on the plant stalk or stem.
- The leaves and seeds are easily stripped off once they are dry.
- Use the lowest heat setting to retain as much flavour and aroma from herbs.
- Do not store herbs in paper bags as the oils will be absorbed by the paper leading to less flavour.
- Store in a cool, dark place in an airtight container.
Drying Chart for Herbs and Spices
| Herb/Spice | Preparation | Drying time | Use |
| Basil | Wash, pat dry with paper towel. Place leaves onto drying racks. | 2-4 hours | Soups and sauces. |
| Chives | Wash, pat dry with paper towel. Slice into desired lengths. | 2-4 hours | Salads, casseroles and soups. |
| Chilli, long fresh red, halved, deseeded | None | 6-8 hours | Add to curries and stirfries, pound in a mortar and pestle and sprinkle over bread mixtures |
| Coriander | Wash, pat dry with paper towel. Place whole stems onto drying racks. | 2-4 hours | Curries, Thai dishes and soups. |
| Garlic | Peel and chop, dry in the base | 4-6 hours | Casseroles, soups and pasta. |
| Ginger | Grate or slice, place onto drying racks | 4-6 hours | Cakes and curries. |
| Marjoram | Wash, pat dry with paper towel. Place whole stems onto drying racks. | 2-4 hours | Casseroles and soups. |
| Mint | Wash, pat dry with paper towel. Place whole stems onto drying racks. | 2-4 hours | Thai dishes and sauces |
| Oregano | Wash, pat dry with paper towel. Place whole stems onto drying racks. | 2-4 hours | Soups, casseroles and pasta |
| Parsley | Wash, pat dry with paper towel. Place whole stems onto drying racks. | 2-4 hours | Soups and casseroles |
| Rosemary | None | 3 hours | Add to scone and bread mixes and casseroles |
| Thyme | Wash, pat dry with paper towel. Place whole stems onto drying racks. | 2-4 hours | Soups and casseroles |
Drying Meat
Dehydrating Meat
Here are some steps to ensure meat is dehydrated safely:
- Meats should be dried at 75ºC (Setting 3).
- Choose lean meat without much marbling (fat distributed throughout meat).
![]()
Meat must be of the highest quality and marinated on day of purchase. - Marinate the meat in its whole form and slice after marinating. The marinade needs to be salty (see Beef jerky recipe) as this helps draw moisture from the meat reducing the water content and making the meat safe to consume.
- Store the marinated meat in the fridge for up to 12 hours. Drain well.
- The meat needs to be sliced thinly and each slice needs to be of equal thickness, preferably.5mm. You can achieve this with deli-style meat slicer.
- Sometimes partially freezing the meat first, and then slicing it makes slicing easier. Then thaw meat before arranging on trays to dry.
- Always slice the meat across the grain. Meat sliced with the grain falls apart and can have a chewy texture.
- Dehydrated meat needs to be stored in an airtight container in the fridge for up to 3-4 weeks. If wanting to store for a longer period, label, date and freeze for up to 3 months. Thaw in fridge overnight.
- Once the drying time is complete, cool beef to room temperature and pat surface dry with a paper towel to remove any excess surface moisture and ensure keeping times are safe.
![]()
Meat must be stored in the fridge or freezer only. Storing meat at room temperature could promote the growth of bacteria if not dried thoroughly.

Beef jerky
Makes: 250g
Preparation: 10 mins (+ 12 hours marinading time)
Drying: 5 hrs
500g beef fillet or sirloin, excess fat trimmed
½ cup soy sauce
½ cup Worcestershire sauce
1 teaspoon salt
- P lace beef in a shallow glass dish. Pour over combined sauces and salt. Cover with plastic wrap and place in the fridge, turning occasionally, for 12 hours to marinade. Drain. Discard marinade.
- U se a large sharp knife to cut beef fillet across the grain into.5mm-thick slices. Arrange beef on drying racks. Dry on setting 3 (75ºC), rotating racks halfway through drying process, for 5 hours.
Drying Flowers
Using your Food Dehydrator, you are able to dry your own flowers, blossoms and petals.
Hints
- As flowers darken when they dry, try to select flowers which are several shades lighter.
Preparation Directions
- C ut flowers when they are dry and cool.
- C hoose flowers that are firm but only half open. Full bloom flowers tend to lose their petals.
- P osition flowers and petals sparsely on the drying racks and base.
- D ry for 8-10 hours until flowers are brittle.
Potpourri
To make potpourri: use handful of flowers, blossoms and petals and combine with 3- 4 drops of perfumed oil e.g. tea rose or lavender.
Preparation Directions
- A rrange flowers, blossoms and petals sparsely on the Drying Racks and Base.
- D ry for 6-8 hours.
- P lace in a large air-tight glass container with 3-4 drops of perfumed oil, to enliven the fragrance. After a month, shake the petals or sprinkle more oil into the container.

Documents / ResourcesDownload manual
Here you can download full pdf version of manual, it may contain additional safety instructions, warranty information, FCC rules, etc.
Download Sunbeam DT5600 - Healthy Food Dryer with 5 Drying Racks Manual
Advertisement


Need help?
Do you have a question about the DT5600 and is the answer not in the manual?
Questions and answers