Table of Contents
Advertisement
Quick Links
7929 Lincoln Ave. Riverside, CA 92504
Phone: 951.689.ICON | Fax: 951.689.1016
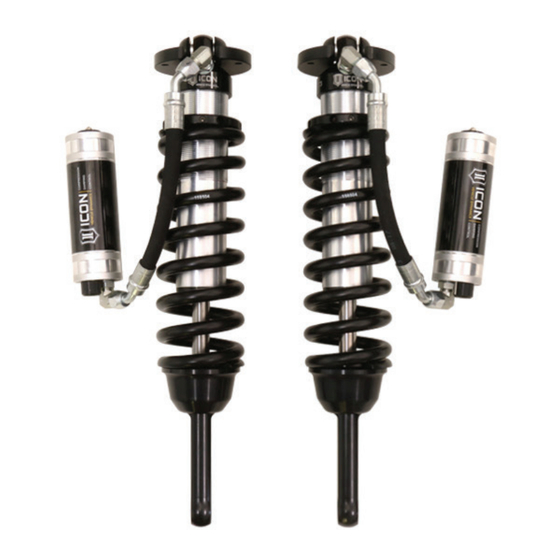
COMPONENTS INCLUDED
(1) 154004 05+ TACO / FJ RESI MOUNT (PASS)
(1) 154005 05+ TACO / FJ RESI MOUNT (DRVR)
(1) 154953CD 07+ FJ/03+ 4RUNNER EXT TRAVEL
CO RR CDCV (DRVR)
(1) 154953CP 07+ FJ/03+ 4RUNNER EXT TRAVEL
CO RR CDCV (PASS)
HARDWARE INCLUDED
(6) 605101 3/8-16 X 1.000 BOLT
(2) 157110 10+ SWAYBAR BRACKET
(14) 605432 9/16 WASHER THICK 1.18 X .585 X .18
(4) 605100 3/8-16 X .750 BOLT
(4) STAINLESS STEEL HOSE CLAMP
TOOLS REQUIRED
JACK
JACK STANDS
TORQUE WRENCH
HAMMER
DRILL (KDSS ONLY)
11/32" DRILL BIT (KDSS ONLY)
5/16" NUT DRIVER
9/16" SOCKET / WRENCH
TECH NOTES
1. YOUR ICON COILOVER ASSEMBLIES COME FACTORY CHARGED TO 150 PSI. RELEASING NITROGEN
PRESSURE MAY LEAD TO SHOCK MALFUNCTION AND REDUCED RIDE QUALITY. FAILURE CAUSED BY
LOW NITROGEN PRESSURE IS NOT COVERED UNDER ICON'S WARRANTY POLICY.
2. YOUR ICON COILOVER ASSEMBLIES COME SHIPPED AT ICON'S RECOMMENDED RIDE HEIGHT. DO
NOT PRELOAD THE COIL BEYOND 2.13" (1.13" FOR 700LB COIL #158508) OF EXPOSED THREADS
BETWEEN THE BOTTOM OF THE TOP CAP AND THE TOP OF THE COIL ADJUSTER NUT. A REDUCTION
IN RIDE QUALITY WILL BE EXPERIENCED IF COILOVERS ARE ADJUSTED TO ALLOW FOR LESS THAN
2" OF DROOP TRAVEL FROM STATIC RIDE HEIGHT.
3. KDSS EQUIPPED VEHICLES WILL REQUIRE THE SYSTEM TO BE DEACTIVATED BEFORE
INSTALLATION, AND REACTIVATED AFTER INSTALLATION IS COMPLETE. REFER TO FACTORY
SERVICE MANUAL FOR MORE INFORMATION.
4. KDSS EQUIPPED VEHICLES WILL NOT USE SWAYBAR RELOCATION KIT (611031).
5. REQUIRES USE OF ICON TUBULAR UPPER CONTROL ARM (58451) OR ICON BILLET UPPER
CONTROL ARM (58551).
INSTALLATION
1.
If your vehicle is equipped with Kinetik Dynamic Suspension System (KDSS), deactivate the system before performing ANY work
to the vehicle. Refer to the factory service manual for information on how to deactivate this system. KDSS will need to be reactivated
once the installation is complete.
2.
Using a properly rated jack, raise the front of the vehicle and support the frame rails with jack stands. Ensure the jack stands are
secure and set properly before lowering the jack. NEVER WORK UNDER AN UNSUPPORTED VEHICLE. Remove the front wheels.
3.
Disconnect the outer tie rod end on both sides. Remove the cotter pin and loosen the nut until it is flush with the end of the
threads. Strike the end of the steering knuckle arm with a large hammer to dislodge the taper. Remove the nut and swing the tie rod
out of the way.
(4) 605144 3/8-12 X .750 FLANGED SELF TAP
BOLTS
(1) 611019 COILOVER HARDWARE KIT (PAIR)
(1) 611031 10+ SWAYBAR RELOCATION KIT
(1) 611051 HOSE CLAMP KIT
611019 HARDWARE KIT
(6) 605131 3/8" SPLIT LOCK WASHER
611031 HARDWARE KIT
(4) 605133 3/8" FLAT WASHER
(4) 605808 M10-1.25 X 25MM
(2) 605853 M10-1.25 X 25MM FLANGED BOLT
611051 HARDWARE KIT
ANGLE GRINDER (KDSS ONLY)
8MM ALLEN WRENCH
10MM SOCKET / WRENCH
13MM SOCKET / WRENCH
14MM SOCKET / WRENCH
15MM SOCKET / WRENCH
18MM SOCKET / WRENCH
21MM SOCKET / WRENCH
58747C/58747C-700 INSTALLATION INSTRUCTIONS
PART #
10-UP FJ/4RNR/10-UP GX EXT TRAVEL 2.5
58747C
** READ ALL INSTRUCTIONS THOROUGHLY FROM START TO FINISH
BEFORE BEGINNING INSTALLATION! IF THESE INSTRUCTIONS ARE
NOT PROPERLY FOLLOWED SEVERE FRAME, SUSPENSION AND TIRE
DAMAGE MAY RESULT TO THE VEHICLE!
** ICON VEHICLE DYNAMICS RECOMMENDS THAT YOU EXERCISE
EXTREME CAUTION WHEN WORKING UNDER A VEHICLE THAT IS
SUPPORTED WITH JACK STANDS.
**ICON VEHICLE DYNAMICS RECOMMENDS ALL INSTALLATION TO
BE PERFORMED BY A PROFESSIONAL SHOP/SERVICE TECHNICIAN.
PRODUCT FAILURE CAUSED BY IMPROPER INSTALLATION WILL NOT BE
COVERED UNDER ICON'S WARRANTY POLICY.
DESCRIPTION
VS RR CDCV COILOVER KIT
WARNING!
2-17-2020 REV.D
1
Advertisement
Table of Contents

Subscribe to Our Youtube Channel
Summary of Contents for ICON 58747C
- Page 1 COVERED UNDER ICON’S WARRANTY POLICY. SERVICE MANUAL FOR MORE INFORMATION. 4. KDSS EQUIPPED VEHICLES WILL NOT USE SWAYBAR RELOCATION KIT (611031). 5. REQUIRES USE OF ICON TUBULAR UPPER CONTROL ARM (58451) OR ICON BILLET UPPER CONTROL ARM (58551). INSTALLATION If your vehicle is equipped with Kinetik Dynamic Suspension System (KDSS), deactivate the system before performing ANY work to the vehicle.
- Page 2 Remove the plastic upper skid plate using a 10mm and a flat head screwdriver. Remove the lower skid plate using a 12mm. Remove the skid plate braces using a 15mm. [FIGURE 1 - 3] FIG.1 FIG.2 FIG.3 (NON KDSS VEHICLES ONLY) Disconnect the sway bar from the frame on both sides. Remove bolts using a 14mm socket/wrench and remove the bracket from the sway bar.
- Page 3 Install the reservoir mount and sway bar relocation block. Using the supplied socket head, bolt the block to the frame with the reservoir mount sandwiched between the relocation block and frame as shown. The heads will be recessed in the block. Make sure the block is positioned so that the new threaded holes are forward of the countersunk holes.
- Page 4 Install wheels and lower vehicle back to the ground. [Torque lugs to factory spec] Have the vehicle professionally aligned. FOR KDSS EQUIPPED VEHICLES: After completing installation of ICON components, refer to factory Toyota service manual to reset the KDSS system.
- Page 5 ICON VEHICLE DYNAMICS SHOCK ABSORBER WARRANTY This shock absorber has a 1 year warranty against any manufacturer’s defects. If a shock fails within the initial year of ownership, the shock must be shipped to ICON Vehicle Dynamics for inspection and service. If a shock is inspected and it has been determined the shock failed due to neglect, damage caused by improper installation or any other reason besides “normal wear and tear”, the owner of said shock is responsible for all service costs.

Need help?
Do you have a question about the 58747C and is the answer not in the manual?
Questions and answers