Table of Contents

Related Manuals for Datalogic Joya Touch A6 HC


Summary of Contents for Datalogic Joya Touch A6 HC
- Page 1 Questo manuale d’istruzione è fornito da trovaprezzi.it. Scopri tutte le offerte per Datalogic Joya Touch A6 HC cerca il tuo prodotto tra le migliori offerte di Palmari e Barcode Scanner Multi-Purpose Device for Retail User’s Manual...
- Page 2 U.S.A. and the E.U. The Joya logo is a trade- mark of Datalogic S.p.A. and/or its affiliates, registered in the U.S. and the E.U. All other trademarks and brands are property of their respective owners.
-
Page 3: Table Of Contents
Table of Contents Introduction ............... 1 Conventions ..................1 Product Presentation ..............2 Available Models ................3 Out of the Box ................7 General View .................8 Front View ................8 Back View ................9 Top View ................10 Side View ................10 Accessories ................12 Battery ................15 Install the Battery .............. - Page 4 Power Menu ................34 Suspend ................35 Power Off ................35 Reboot .................36 Ship Mode ................36 Long Press Power Menu ............37 Take Screenshot ..............37 Adjust Volume ..............37 Re-scan Filesystem ............37 Pair Device ................38 Quick Settings Menu ..............41 Applications ................42 Touch Gestures ................46 Using the Stylus Pen ............46 Resetting the Device ..............47 Configuration Reset ............47 Device Reset ...............49...
- Page 5 Charging Mode ..............90 Cradle Update ..............90 Wake-Up Configuration ............ 91 Low Power Options ............92 Input Configuration ............93 Datalogic Applications ..........103 DL Battery Manager ..............103 Battery Info ..............105 Charging Profile ............... 109 Data Logging ..............111 Application ...............
- Page 6 USB ADB Driver & USB CD-ROM ........... 137 SDK Add-on ................138 Install ADB Driver ............138 Create a New Application with Android Studio .... 140 Datalogic SDK ................140 Avalanche ................. 141 CSIPSimple ................141 SureLock ................... 142 SureFox ..................142 MobiControl ................
- Page 7 Laser Safety ................176 LED Class .................. 185 Marking and European Economic Area (EEA) ...... 185 Simplified EU Declaration of Conformity ...... 186 Statement of Compliance ............186 Information for the User ............188 Radiofrequency Radiation Exposure Information ....189 Radio Technologies and Frequency Bands ......
- Page 8 NOTES JOYA™ TOUCH...
-
Page 9: Introduction
Introduction Conventions This manual uses the following conventions: "Device" and "Joya Touch A6" refer to the Joya Touch A6. "Dock" refers to the Joya Touch Single Slot Dock Locking. "3-Slot Cradle" refers to the Joya Touch 3-Slot Cradle. The label artworks may be only a draft. Refer to the product labels for more precise information. -
Page 10: Product Presentation
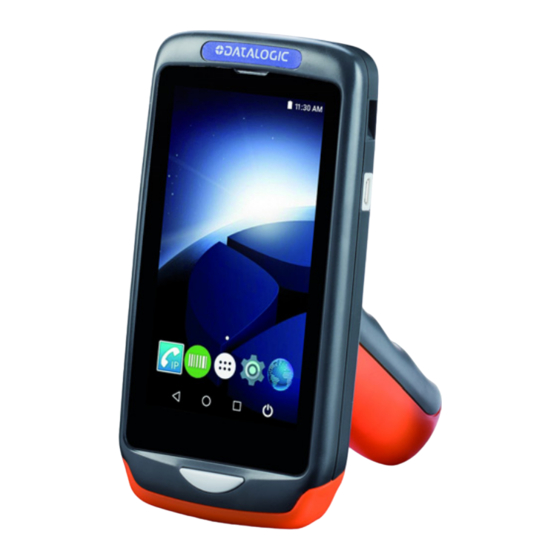
Introduction Product Presentation The Datalogic Joya Touch A6 is a pocket-sized Android™ 7.1 powered mobile computer, available in two form factors. This compact, lightweight, and versatile device, combines fully integrated automatic data capture (2D barcode), a wireless charging system and wireless communication capabilities, supporting nearly any application. -
Page 11: Available Models
Introduction Available Models The Datalogic Joya Touch A6 is available in different models depending on the features it is equipped with. All options are listed below. EU models: • 911350036 Joya Touch A6 Pistol-Grip, 802.11 a/b/g/n, BT 4, 2D Imager w/ white illum. & Green Spot, 4.3" Full Touch, VoIP,... - Page 12 Introduction Presentation mode, Android6, 2GB RAM/16 GB Flash, White/Green, HC, EU • 911350040 Joya Touch A6 Pistol-Grip, 802.11 a/b/g/n, BT 4, 2D Imager w/ red illum. & Green Spot, 4.3" Full Touch, VoIP, Presentation mode, Android6, 2GB RAM/16 GB Flash, Grey/Blue/Blue, EU •...
- Page 13 Introduction North America models: • 911350061 Joya Touch A6 Pistol-Grip, 802.11 a/b/g/n, BT 4, 2D Imager w/ white illum. & Green Spot, 4.3" Full Touch, VoIP, Presentation mode, Android6, 2GB RAM/16 GB Flash, Grey/Blue/Blue, FCC • 911350062 Joya Touch A6 Handheld, 802.11 a/b/g/n, BT 4, 2D Imager w/ white illum.
- Page 14 MegaPixel Imager w/ white illum. & Green Spot, 4.3" Full Touch, VoIP, Presentation mode, Android7.1, 2GB RAM/16 GB Flash, Grey/Blue FCC - colors combination (upper case / battery cover). For further details about the Datalogic Joya Touch A6 models refer to the web site: www.datalogic.com. JOYA™ TOUCH A6...
-
Page 15: Out Of The Box
Introduction Out of the Box The Joya Touch A6 package contains: • Joya Touch A6 (device) • Rechargeable battery • Quick Start Guide • Safety & Regulatory Addendum Remove all the components from their packaging; check their integrity and compare them with all the packing documents. Keep the original packaging for use when sending products to the technical assistance center. -
Page 16: General View
Introduction General View Front View Touch Panel Display Scan Key JOYA™ TOUCH A6... -
Page 17: Back View
Introduction Back View Laser Safety Label Product Label Power Key User’s Manual... -
Page 18: Top View
Introduction Top View Data Capture Window Side View Pistol Grip Models Handheld Models Micro USB Port Scan Trigger JOYA™ TOUCH A6... - Page 19 Introduction Do not apply any sticker to the Joya Touch A6 (see the picture below). CAUTION User’s Manual...
-
Page 20: Accessories
Introduction Accessories Cradles 91ACC0043 Joya Touch 3-Slot Cradle for Wall Mounting; requires power supply, line cord and wall bracket. 91ACC0069 Joya Touch 3-Slot Cradle for General Purpose. It contains 1 unlocking key and 1 pair of desktop feet; requires power supply and line cord. 91ACC0072 Joya Touch Single slot cradle, locking (light gray);... - Page 21 91ACC0086 Joya Touch Trolley Holder (60 pcs) – pistol grip only, display orientation 45 degrees. Use only Datalogic-approved power supply and cables. Use of an alternative power supply will invalidate any approval given to this device and may be dangerous.
- Page 22 Introduction NOTES JOYA™ TOUCH A6...
-
Page 23: Battery
Battery Install the Battery To install the battery pack, follow the steps below: 1. Unscrew the battery cover and remove it: Pistol Grip Models Handheld Models 2. Connect the battery contacts to the battery clip located in the battery slot: Pistol Grip Models Handheld Models User’s Manual... - Page 24 Battery 3. Insert the battery pack into the slot as shown in the figures below: Handheld Models Pistol Grip Models 4. Insert the battery cover and fix the screws: Pistol Grip Models Handheld Models Required torque of the screws is 35 Ncm. NOTE JOYA™...
-
Page 25: Charge The Battery
Use only the Datalogic power supply included in the box to power the Joya Touch Single Slot Dock Charge Only. CAUTION Insert the device into the dock with the screen facing front and the head facing down. -
Page 26: Charge With The Single Slot Dock Locking
Use only the Datalogic power supply 91ACC0048 to power the Joya Touch Single Slot Dock Locking. The Single Slot Dock Locking cannot be daisy-chained to a Joya Touch 3-Slot Cradle. - Page 27 Battery Single Slot Dock Locking LED Indicators Status Power On (Green LED) Solid green for 3 seconds Dock bootstrap: cradle application started. Dock standby (if the standby LED is enabled): the dock is powered and ready, no Short blink every few seconds device inserted.
- Page 28 Battery Status Maintenance LED (Red LED) - Continued FOD (Foreign Object Detection). It’s a WLC error related to metallic parts between transmitter and receiver coils. The power Blink red, 3 quick pulses transfer is suspended. Solution: remove the device from the cradle, then remove the metallic part causing the problem.
-
Page 29: Charge With The 3-Slot Cradle
Plug the power supply cable into the power connector on the back of the cradle, then plug the power supply into the AC/DC plug using a Datalogic power cable. Please see below an example of how to insert the power supply... - Page 30 Battery 3. Plug the power supply into the AC/DC plug using a Datalogic power cable. Use only the Datalogic power supply 91ACC0048 to power the Joya Touch 3-Slot Cradle. CAUTION Insert the device into the dock with the screen facing front and the head facing down.
- Page 31 Battery 3-Slot Cradle LED Indicators Status Power On (Blue LED) Solid blue Dock is powered. User LED (Green LED) Green dimming animation Cradle application start. (all slots in sequence) Flash green for 300 ms Device properly locked in. (single slot) Could notify that the slot is unlocked (if programmed to use green led to notify unlock Solid green (single slot)
- Page 32 For further information on the Joya Touch 3-Slot Cradle, refer to the Joya Touch 3-Slot Cradle Quick Start Guide, included in the cradle’s box, and to the Joya Touch 3-Slot Cradle Installation Guide, downloadable from our website NOTE www.datalogic.com. JOYA™ TOUCH A6...
-
Page 33: Charge With Usb
Do not put any foreign object such as, but not limited to, coins, paper clips, stickers inside the slot of any of the docks (see the examples below). CAUTION Charge with USB Use the Datalogic micro-USB power supply (p/n 94ACC1380) to charge the terminal from a power outlet. User’s Manual... -
Page 34: Battery Information
Battery Battery Information By default, the main battery pack is disconnected at the factory to avoid damage due to excessive draining. Rechargeable battery pack is less than half of full charge when delivered. The battery pack autonomy varies according to many factors, such as the frequency of barcode scanning, RF usage, battery life, storage, environmental conditions, etc. - Page 35 Use specified charger only. Risk of explosion if the battery is replaced by an incorrect type. Dispose of CAUTION batteries as required by local authorities. Use only Datalogic approved batteries and accessories for battery charging. Risk of explosion if battery is replaced by an incorrect type.
-
Page 36: Battery Safety Guidelines
To power the cradle, use only a Datalogic approved power supply. The use of an alternative power supply will void the product warranty, may cause product damage and may cause heat, an explosion, or fire. - Page 37 Battery Immediately discontinue use of the battery pack if, while using, charging or storing the battery pack, the battery pack emits an unusual smell, feels hot, changes color or shape, or appears abnormal in any other way. WARNING Do not short-circuit the battery pack contacts connecting the positive terminal and negative terminal.
- Page 38 Battery Avoid any knocks or excessive vibrations. If the device or the battery is dropped, especially on a hard surface, you should take it to the nearest Authorised Repair Centre for inspection before continuing to use it. WARNING If your device stops working for any reason, do not use its battery on other electronic devices without a prior check and approval by an Authorised Repair Centre.
-
Page 39: Getting Started
Getting Started Turn on the Device To turn on the Joya Touch A6, press and hold the Scan Key or the Scan Trigger (for Pistol Grip models) for at least 4 seconds. Home Screen Notification/ Status Bar SoftSpot Icon Settings Icon CSIPSimple Icon Firefox Icon Favorites Tray... -
Page 40: Home Screen Items
Getting Started Home Screen Items Notification/ Displays the time, status icons (right side), and Status Bar notification icons (left side). It is like a dock for your home screen. By default, it Favorites Tray includes commonly used apps, but you can customize it. CSIPSimple Icon Launch the CSIPSimple App SoftSpot Icon... -
Page 41: Status Bar Icons
Getting Started Status Bar Icons Wi-Fi is on. Wi-Fi not connected. Wi-Fi connected no internet. Connected to a Wi-Fi network. Bluetooth is on. Battery is low. External power source is connected. Battery is full. Battery is partially drained. Airplane mode. Vibrate mode. -
Page 42: Power Menu
Getting Started Power Menu Tap the Power button on the Navigation Bar to display the Power Menu. Alternatively, you can access the Power Menu by pressing the power key on the back of the device with a metallic clip: JOYA™ TOUCH A6... -
Page 43: Suspend
Getting Started Suspend Select Suspend to turn the screen off and lock the terminal in order to save battery power. Also, the Joya Touch A6 automatically enters suspend mode when inactive for a programmed period of time. To set the timeout limit, see Suspend Timeout on page To wake the device from suspend, press the Scan Key or the Scan Trigger (for Pistol Grip models). -
Page 44: Reboot
Getting Started Reboot Select Reboot to perform a Soft Reset (see Soft Reset on page 49). Ship Mode Select Ship Mode to perform a complete shutdown of the device, after which the battery will be detached. In the battery pack, undesired current consumption is reduced during a shipping period to extend the charge keeping time of the battery pack. -
Page 45: Long Press Power Menu
Getting Started Long Press Power Menu Long press the Power button on the Navigation Bar until the Long Press Power Menu displays. Take Screenshot Select Take Screenshot to capture a screenshot of the current screen. Adjust Volume Select Adjust Volume to adjust the volume. Re-scan Filesystem When the Joya Touch A6 is connected to a host PC, you may need to refresh the file system to get changed files to show up in the File... -
Page 46: Pair Device
Pair Device Select Pair device to start a pairing session with a PC via DXU software. DXU is the Datalogic system application for device configuration and firmware upgrade from a Windows PC. (see Desktop Configuration Utility (DXU) on page 128 for further information). - Page 47 Getting Started If you select Print, the barcode displays on the screen: User’s Manual...
- Page 48 Getting Started From the Joya Touch A6’s Long Press Power Menu, select Pair device. Tap Scan to read the barcode: JOYA™ TOUCH A6...
-
Page 49: Quick Settings Menu
Getting Started Quick Settings Menu You can use this menu to toggle settings such as Wi-Fi, Bluetooth, auto-rotation and more. To display the Quick Settings Menu, drag your finger twice from the top of your screen downward. User’s Manual... -
Page 50: Applications
Getting Started Applications The All Apps screen displays icons for all installed applications. The table below lists the default applications installed on the Joya Touch Icon Description Agent - Device management solution that enables you to secure, monitor, manage and support your device. For more details, refer to the following link: https://www.air-watch.com/. - Page 51 Getting Started Icon Description Contacts - Use to manage contact information. CSipSimple - Voice over Internet Protocol (VoIP) application for Google Android operating system using the Session Initiation CSIPSimple on page 141 Protocol (SIP). See DL Battery Manager - Provides information on the battery type, charge, status and temperature, allows to set the charging profile DL Battery Manager on page 103 and to log battery data (see...
- Page 52 Getting Started Icon Description Firefox - Use it to access the Internet or intranet. Gallery - Use to view photos stored on the internal storage memory. Led Effects Editor - Allows to create and store LED effects (see Effects Editor on page 129 MobiControl - An enterprise mobility management solution that secures and manages the Joya Touch A6 and controls all aspects of MobiControl on page 143...
- Page 53 Getting Started Icon Description Settings on Settings - Use to configure the Joya Touch A6 (see page 53 SoftSpot - A configurable application meant to provide easy access SoftSpot™ on page 133 to frequently used functionalities (see Sound Recorder - Use to record audio. SureFox SureFox - Use to controls web access for the users (see on page 142...
-
Page 54: Touch Gestures
Getting Started Touch Gestures Tap the screen with your finger or with the stylus to open items and select options. Hold your finger or the stylus on the screen and drag across Drag the screen to scroll or pan. Drag in a list to select multiple items. -
Page 55: Resetting The Device
Getting Started Resetting the Device Configuration Reset Configuration reset sets the configuration of the device (all its settings) to a known status: the factory status or an enterprise-user-defined status. Factory Data Reset Brings the device to the default configuration, clearing your device’s internal storage and all the user-customized settings. - Page 56 Getting Started Enterprise Reset Enterprise Reset brings the device to an enterprise-user-defined configuration, clearing all data and settings except the ones persisted by the enterprise system applications in the enterprise flash partition and in the splash flash partition. The Enterprise folder is a file system storage that is used for deployment and device-unique data.
-
Page 57: Device Reset
Getting Started Device Reset Device reset restarts the device. Soft Reset Restarts Android Operative System through an Android API function. It is generally used when some applications stop responding, or it is automatically issued by Android after a Configuration reset. 1. - Page 58 Getting Started Hard Reset Restarts the device resetting all the hardware components. This procedure guarantees the safe reboot of the device in any condition, without causing damage to the device and without data loss. It is generally used when the device stops responding or after a critical failure that compromises its usability.
-
Page 59: Led Indicators
Getting Started LED Indicators The LEDs illuminate to indicate various functions or errors on the reader. Joya Touch A6 LEDs are fully customizable through the SDK, the Settings app or the Led Effects Editor app. See Led Notifications on page 62 Led Effects Editor on page 129 for more details. -
Page 60: Magnetic Sensor Calibration
Getting Started Magnetic Sensor Calibration Joya Touch A6 is a compass-enabled device. Its magnetic sensor allows you to use any compass application to determine north and south and display cardinal directions, no matter which orientation the phone is in. To calibrate the magnetic sensor, hold the device in front of you and wave it through the air in a figure 8 pattern as shown in the picture below: JOYA™... -
Page 61: Settings
Settings Overview The Settings app allows you to set system parameters to customize your device. Tap the Settings icon on the Favorites Tray or on the All Apps screen to open the Settings screen. User’s Manual... -
Page 62: Wi-Fi Settings
Settings Wi-Fi Settings Connect to Wi-Fi Network 1. To turn on the Wi-Fi, tap Settings > Wi-Fi and switch right to the On position. The Joya Touch A6 scans for available Wi-Fi networks within range and lists them. If the device finds a network that you connected to previously, it will connect to it automatically. - Page 63 Settings 4. If the network is secured, a dialog box appears requesting information relevant to the network security protocol (e.g., password, key, or certificate). Enter the required information, then tap Connect: User’s Manual...
-
Page 64: Add A Wi-Fi Network
Settings Add a Wi-Fi Network 1. Tap Settings > Wi-Fi and verify that the Wi-Fi is turned on. 2. Tap Add network at the end of the available network list: 3. Enter the Network SSID (Wi-Fi network name). For secure Wi-Fi network connections, tap None under Security, and then select the type of security protocol required from the pop-up menu (e.g., WEP, WPA/WPA2 PSK or 802.1xEAP). - Page 65 Settings 4. Tap Save. User’s Manual...
-
Page 66: Bluetooth Settings
Settings Bluetooth Settings To create a Bluetooth® pairing between your device and another device that has Bluetooth® capabilities, ensure that the two devices are turned on, discoverable, and within close range. Enable Bluetooth® 1. To turn on the Bluetooth®, tap Settings > Bluetooth and switch right to the On position. -
Page 67: Connect To Other Bluetooth@ Devices
Settings Connect to Other Bluetooth@ Devices 1. Tap Settings > Bluetooth to search for available Bluetooth® devices. Flick the list and select a device. The Bluetooth pairing request dialog box displays on the screen: 2. Make sure both devices show the same passkey and tap Pair. 3. -
Page 68: Configure, Rename Or Unpair Bluetooth@ Devices
Settings Configure, Rename or Unpair Bluetooth@ Devices Tap Settings > Bluetooth. Select a device from the Paired Devices list and tap the settings icon next to its name. The Paired devices window displays on the screen. Type in the Name field to rename the paired device. Tap FORGET to unpair: JOYA™... - Page 69 Settings To rename your device, tap the Menu icon at the right top of the screen and select Rename this device. Tap Rename to confirm. User’s Manual...
-
Page 70: Led Notifications
Settings Led Notifications The Led notification settings allows to configure the LED indicators (see LED Indicators on page 51). Tap Settings > Led notifications. The first window lists the events/states the LED should signal. Select the desired event. Tap Led ID to select the LED you want to assign to the event. JOYA™... - Page 71 Settings Tap Led Action to configure the LED behaviour. Use the Blink window to configure the blink frequency and duration: Tap Apply to confirm the settings. User’s Manual...
- Page 72 Settings If the Bottom LED is selected, the Led Action list will include two more options: Set Brightness allows to configure the LED’s brightness. Tap Apply to confirm the settings. JOYA™ TOUCH A6...
- Page 73 Settings Dim allows to adjust the LED’s brightness through an editor. Select Dim and the tap Dimming Sequence to draw the dimming curve: Tap CONFIRM. User’s Manual...
-
Page 74: Scanner Settings
Settings Scanner Settings Before you start reading barcodes, use the Settings app to view and configure all settings for the scanner. From the applications menu, tap Settings > Scanner Settings. Select the desired configuration from the following options: JOYA™ TOUCH A6... -
Page 75: Notification
Settings Notification Use it to configure the good read tone and display notification: Good Read Duration Sets the duration of the notification (LED, green spot or beep) the scanner emits on a good read. Good Read Interval Sets the interval between each notification (LED, green spot or beep) the scanner emits on a good read. - Page 76 Enable Display Notification Enables display notifications (toasts) and is enabled by default. If cleared, the scanner is disabled until you launch a scanner listener application developed using the Datalogic SDK or enable a keyboard/intent wedge. Good Read Audio Mode Sets the audio tone to: •...
-
Page 77: Good Read
Settings Good Read Audio Volume Sets the volume of beep tone or audio file (if enabled). Good Read Use it to enable good read notifications (LED, Green Spot): Tap Enable good read to enable/disable notifications (main enabler), then select the notification you want to use. User’s Manual... -
Page 78: Formatting
Settings Formatting Allows to format the barcode text by enabling and configuring the use of prefix, suffix, group separator and code identifier: Label Prefix Tap Label prefix to enter the characters you will be using as prefix. Tap Add special to select a special character to be added in the current cursor position: JOYA™... - Page 79 Settings Label Suffix Tap Label suffix to enter the characters you will be using as suffix. Tap Add special to select a special character to be added in the current cursor position: Group Separator Replacement The Group Separator replacement is a non printable data separator character (ASCII code 1D hex).
- Page 80 When AIM identifier before is enabled, the AIM ID is inserted at the beginning of the decoded barcode. DLM identifier is a Datalogic specific character identifier. User defined identifier is a user specific character identifier you can set in the related symbology settings menu.
-
Page 81: Scanner Options
Settings Scanner Options Tap Scanner Options to customize the Joya Touch A6 scanning behavior. Enable Picklist If selected, it allows you to pick and decode a barcode from multiple barcodes printed close together, when the scan illumination intersects more than one barcode. Only the targeted barcode will be returned. - Page 82 Settings Target Mode If enabled, when the scan button is pressed, the scanner will project an aiming pattern to assist in centering over the barcode before scanning. Tap Target mode to select the desired targeting behavior: No Delay Target mode is disabled. Spot Timeout Scanning takes place after a programmable time upon pressing the scan button.
- Page 83 Settings Release Scan Scanning takes place after the scan button is released. Tap Release scan timeout to set the scanning timeout after releasing the scan button: Decode Timeout Drag the Decode timeout slider to set the maximum amount of time the scanner attempt to decode after target timeout (in case Spot Timeout is enabled) or after the scan button is pressed (in case Target mode is disabled):...
- Page 84 Settings Enable Multi Scan If enabled, it allows you to capture multiple labels sequentially. Number of Required Labels Drag the slider to indicate how many barcodes you want to collect. Enable Single Notification If enabled, it enables indicators for each label, in order to get an intermediate notification for each label decoded.
-
Page 85: Wedge
Settings Wedge Use it to enable or disable the keyboard wedge and the intent wedge: User’s Manual... - Page 86 Settings Enable Keyboard Wedge Enables/disables the keyboard wedge mode. Keyboard Wedge Only on Focus If selected, the scanner is enabled whenever a text area is in focus and can receive text. It provides a safer way to input keystrokes into the foreground application, allowing to send captured data in the form of key events only to the current text area with active keyboard input.
-
Page 87: Symbology Settings
Settings Enable Web Wedge Enables direct data input into internet browsing applications, in the form of a valid URL. Symbology Settings Each barcode symbology can be customized with additional settings that may affect that specific barcode decoding. Tap Symbology settings to configure symbology decoding options: User’s Manual... - Page 88 Settings Refer to the sample symbology control panels for examples of the types of fields and options you can modify. The example below shows the settings of a Code 128 barcode symbology: JOYA™ TOUCH A6...
-
Page 89: Global Settings
Settings Global Settings Use this section to change symbologies settings globally and to persist them. Enable All Symbologies Enables all barcode symbologies. Disable All Symbologies Disables all barcode symbologies. Reset Configuration Resets back to default scanner configuration settings. Commit Saves the configuration settings to a persistent storage. Any change you make is temporary and will be lost when the system restarts, unless you tap Commit. -
Page 90: System Upgrade
Settings System Upgrade Allows you to upgrade your operative system to the latest version. Local Upgrade From the Settings menu, tap System upgrade > Local upgrade. Navigate the file system and select a pre-charged update package. Select the update package you want to install: JOYA™... - Page 91 Settings The following window displays on screen, showing information about the device and the update package components: User’s Manual...
- Page 92 Settings The PROPERTIES section shows information about the device model and OS version and the update package version. The FIRMWARE section shows information about each single update component. The ACTIONS section allows to: • reset the device configuration after the update (see Resetting the Device on page •...
- Page 93 Settings During the update, ensure that: • battery level is more than 10% if the Joya Touch A6 is not connected to a power source; NOTE • battery level is more than 5% if the Joya Touch A6 is connected to a power source (USB or dock). Recovery Update is always done in recovery mode (see Mode on page 86...
-
Page 94: Recovery Mode
Settings Recovery Mode Recovery is an independent, runtime environment that’s included on a separate bootable partition from the main Android OS. It contains tools to help repair your installations as well as install official OS updates by using a combination of key presses. Its main purpose is to reset the device, wipe data or perform system updates when the system crashes and the screen is unresponsive. - Page 95 Settings In Recovery mode, you can only apply updates from Local Upgrade on page 82 external storage (see NOTE User’s Manual...
-
Page 96: Advanced Settings
Settings Advanced Settings Suspend Timeout You have two options to set the suspend timeout (see Suspend on page 35 for more information on Suspend Mode): 1. Tap Settings > Advanced settings: • Suspend on external power sets the number of seconds without user input activity before the system is suspended while running on external power. - Page 97 Settings 2. Tap Settings > Display > Sleep to set the number of seconds without user input activity before the system is suspended while running on either battery power or external power. User’s Manual...
-
Page 98: Charging Mode
Settings timeouts, the Display page’s Sleep control will display the Suspend on internal battery if no external power is connected; if the device is connected to an external power source (USB or dock), it will display the Suspend on external power. If you set the Display page’s Sleep control to a new value, it will override both timeouts for external power and internal battery. -
Page 99: Wake-Up Configuration
Settings Wake-Up Configuration The default wake-up source is the Scan Key. Tap Settings > Advanced settings > Configure wake-up sources to configure other wake-up sources. Possible wake-up buttons are Front trigger (Scan Key), Pistol trigger (Scan Trigger) and Motion (see Triggers on page for more details). -
Page 100: Low Power Options
Settings Low Power Options You can configure the Battery saver mode (see Quick Settings Menu on page 41) by setting CPU number and frequency: JOYA™ TOUCH A6... -
Page 101: Input Configuration
Settings Input Configuration Lock Keyboard Input Select Lock keyboard input to lock user input from the keyboard. The following pop up window displays on screen asking for confirmation: To unlock the keyboard, clear the Lock keyboard input check box. Key Remapping Tap Key remapping to remap an input key, then press the key you want to remap. - Page 102 Settings The following window displays on screen: • Scancode represents the physical location of a keyboard key. • Keycode represents the value that is mapped to a specific key. Tap Remap type to select the remapping type: JOYA™ TOUCH A6...
- Page 103 Settings Keycode Select Keycode to map the selected key to a new function: • Tap the second menu (default = DISABLE KEY) to select the new function you want to assign to the selected key. • Tap the last menu (default = None) to add a modifier key (such as Ctrl, Shift or Alt).
- Page 104 Settings Unicode Select Unicode to remap a key to display Unicode characters (such as symbol "$"): Press the Back Button on the navigation bar and then tap ADD A NEW MAPPING. A window displays showing the new keymap: JOYA™ TOUCH A6...
- Page 105 Settings Start Activity Select Start activity to remap a key to launch an application loaded on your device. Tap SELECT APPLICATION: User’s Manual...
- Page 106 Settings Select the desired application and then tap ADD A NEW MAPPING. A window displays showing the new keymap: JOYA™ TOUCH A6...
- Page 107 Settings View All Remapped Keys Tap View all remapped keys to display all remapped keys: Swipe left to edit an entry. Swipe right to remove an entry and reset the key mapping back to default. User’s Manual...
- Page 108 Settings Triggers Tap Triggers to enable/disable the trigger keys. The physical triggers are enabled by default. Auto Scan Trigger If Auto Scan Trigger is enabled, the device will automatically scan barcodes without a trigger being pressed. Tap Auto Scan Trigger Range to select the maximum distance at which the device will automatically start scanning barcodes.
- Page 109 Settings Motion Trigger If Motion Trigger Enable is selected, the scan engine will be enabled as vigorous motion is detected. A vibration notifies you that the scan engine is enabled and ready to scan a barcode. Select/clear the Vibrate When Motion Detected check box to enable/disable this notification.
- Page 110 Settings NOTES JOYA™ TOUCH A6...
-
Page 111: Datalogic Applications
Datalogic Applications DL Battery Manager This application provides information about the battery features and status, allows to configure the battery charging profile and to log battery data. Tap All Apps > DL Battery Manager icon, then tap the menu icon on the top left corner of the screen, or swipe right to display the menu. - Page 112 Datalogic Applications JOYA™ TOUCH A6...
-
Page 113: Battery Info
Datalogic Applications Battery Info The Battery Info section provides information about the battery’s health, capacity, manufacturer, level and charging status. Battery Info - Realtime This window provides real-time information about the battery. Charge Mode Discharge Mode The top section shows the battery level and the time left to full discharge (when in discharge mode) and to full charge (when in charge mode). - Page 114 Datalogic Applications Temperature Displays the real-time temperature. Voltage Displays the real-time voltage. Current Displays the real-time current. Charge Left Shows how much battery power is left. JOYA™ TOUCH A6...
- Page 115 Datalogic Applications Battery Info - Lifetime This window displays information and statistics about battery life, health and usage over its whole life cycle. Health Shows the current battery health and signals potential errors. State of Health Shows the current battery's health level.
- Page 116 Datalogic Applications Voltage Shows the maximum and minimum voltage reached by the battery. Charge Current Shows the maximum charge current. Discharge Current Shows the maximum discharge current. Battery Info - Manufacturer This window displays the model name, the type, the nominal capacity, the serial number and the manufacture date of the battery.
-
Page 117: Charging Profile
Datalogic Applications Charging Profile Charging Profile - Setup This window allows to customize the charging process according to the user's needs and priorities. To configure a charging profile, select 1 or 2 of the following preferences: • Battery Lifetime. •... - Page 118 Datalogic Applications Once you have set your profile, it will be applied by default whenever you charge the device. You can change your profile at any time, even during charging. JOYA™ TOUCH A6...
-
Page 119: Data Logging
Datalogic Applications Data Logging The data logging feature allows to collect, store, display and analyze minute-by-minute battery data. Setup Use the Setup window to select the data you want to log. The data logging is disabled by default. To enable it, tap Enable Data Logging. - Page 120 Datalogic Applications Graphs The Graphs window provides a graphical display of selected data on a specific date. Select Date Select Data JOYA™ TOUCH A6...
- Page 121 Datalogic Applications Logs The Logs window displays data details by date. Manage The Manage window allows to remove or export logs. User’s Manual...
- Page 122 Datalogic Applications Select one or more logs and tap Remove to remove them. Tap OK to confirm: Select one or more logs and tap Export to export data and store them for extended periods. Tap Allow to confirm: The selected log files will be saved in the "battery" folder in the internal storage of your device.
-
Page 123: Application
Datalogic Applications Application Settings The Settings section allows to set the value ranges that will be used to create the graphs. Info The Info section displays information about the device name and the software version. User’s Manual... - Page 124 Datalogic Applications If you charge the Joya Touch A6 with a wireless charging pad, you’re not allowed to customize the charging profile. If the Show Wireless Pad Notification check box is selected, the system displays a warning message saying that the charging profile won’t be applied.
-
Page 125: Dl Cradle Manager
Datalogic Applications DL Cradle Manager This application provides information about the cradle you’re currently using and allows to enable/disable some of its properties. Below are some screenshots showing the different cradle options: User’s Manual... - Page 126 Datalogic Applications If the Joya Touch A6 is inserted into the Single Slot Dock Locking or into the 3-Slot Cradle, you can unlock and lock the device without using the unlock key, by tapping the UNLOCK and LOCK buttons. In addition, you have further details and options. Tap the menu icon on the right top of the screen JOYA™...
-
Page 127: Auto Calibration
Datalogic Applications Auto Calibration Tap to re-calibrate the cradle levers in case of a bad calibration failure notification (See Single Slot Dock Locking LED Indicators on page 19 3-Slot Cradle LED Indicators on page 23). Firmware Update The DL Cradle Manager window displays the cradle firmware version and the number of insertions made. -
Page 128: Get Slot Failure
Datalogic Applications Get Slot Failure In case of a failure notification, it displays the reason of the failure. (See Single Slot Dock Locking LED Indicators on page 19 3-Slot Cradle LED Indicators on page 23). Settings JOYA™ TOUCH A6... - Page 129 Datalogic Applications Unlock Notification If enabled, it allows you to unlock the cradle from the Power Menu and the Status Bar: Power Menu Status Bar User’s Manual...
- Page 130 Datalogic Applications Wrong Insertion Timeout You can set the time lapse after which a "wrong insertion" notification is sent. Tap Wrong insertion timeout [ms] and digit your desired insertion timeout: Favourite Cradle Firmware Tap Favourite cradle firmware to select the cradle firmware:...
- Page 131 Datalogic Applications Unlock Timeout You can set the time available to the user to unlock the cradle after tapping the UNLOCK button. Tap Unlock timeout [s] and digit your desired unlock timeout: The 3-Slot Cradle screen has 3 more fields: •...
-
Page 132: Dl Ringtone Editor
Datalogic Applications DL Ringtone Editor DL Ringtone Editor allows to create, edit and save your own ringtones and notifications. Enter the name for the new ringtone in the Ringtone Name field and to add the first note. Set the note, the duration and the octave by selecting the desired options. - Page 133 Datalogic Applications Tap the menu icon on the right top of the screen for more options: Effects Allows to add the following effects to the ringtone: Note auto-increment If enabled, you can add a new note without tapping the button Play single note Select to play notes while editing.
- Page 134 Datalogic Applications Set as Good Read Set the ringtone as good read notification. Save When the ringtone is ready, tap Save on the menu list to save the ringtone. The audio file will be saved in the "Ringtones" folder in the internal storage of your device.
-
Page 135: Dl Stager
Datalogic Applications DL Stager DL Stager is a configuration tool that uses special barcode labels. Contact our technical support for more details (see Support Through the Website on page 197). User’s Manual... -
Page 136: Desktop Configuration Utility (Dxu)
Datalogic Applications Desktop Configuration Utility (DXU) Datalogic DXU is a unified device configuration utility and firmware update utility. DXU can connect directly to the Joya Touch A6 that connects either directly to a PC via USB or remotely over a network via Wi-Fi. -
Page 137: Led Effects Editor
Datalogic Applications Led Effects Editor This application allows to create and save customized LED effects. Tap Led ID to select the LED you want to assign to the effect. User’s Manual... - Page 138 Datalogic Applications Tap Led Action to configure the LED behaviour. Tap Save to name and save the effect. JOYA™ TOUCH A6...
-
Page 139: Proximitycalibrate
Datalogic Applications ProximityCalibrate The proximity sensor measures the distance of a surface from the Joya Touch A6’ data capture window (see the picture below). ProximityCalibrate is a wizard that helps you to calibrate the sensor’s distance measurement. User’s Manual... -
Page 140: Scan2Deploy
Datalogic Applications Scan2Deploy Scan2Deploy is a configuration tool that uses special barcode labels. For more details, visit the website: https://datalogic.github.io/dxu/scan2deploy/. JOYA™ TOUCH A6... -
Page 141: Softspot
Datalogic Applications SoftSpot™ Datalogic’s SoftSpot technology is a user-definable "floating soft trigger" meant to provide easy access to the barcode scanner application and other frequently used functionalities on mobile scanning devices. Tap the SoftSpot icon on the favorites tray or on the All Apps screen to launch SoftSpot: Tap the SoftSpot to scan barcodes. - Page 142 Datalogic Applications Enable swipe to hide Allows to hide the SoftSpot from the screen by swiping it up in the Notification/Status bar. Enable vibrator Enables the vibrator. Enable auto-transparency If selected, the SoftSpot turns transparent automatically when it is not used.
- Page 143 Datalogic Applications To enable the Continuous Scan mode and scan barcodes consecutively, tap SCAN and select the Enable on double tap check box: Then double-tap the SoftSpot. Tap one more time to stop laser emission. You can also configure the SoftSpot from the DXU. For more details...
- Page 144 Datalogic Applications NOTES JOYA™ TOUCH A6...
-
Page 145: Tools
USB from a computer, copy files back and forth, install and uninstall apps and run shell commands. Use the USB CD-ROM to install the Windows drivers and then launch ADB to run a shell using the following tool command prompt: Start/Datalogic Android/Support/Device. User’s Manual... -
Page 146: Sdk Add-On
Before installing the Google USB Driver, ensure you have installed the Datalogic plug-in. NOTE 3. In order to use ADB with your device connected over USB, you must enable USB debugging in the device system settings. To enable Android Developer options, go to Settings >... - Page 147 Tools 4. Use a CD-Rom Installer to debug the ADB driver and read the Joya Touch A6 as an ADB device. User’s Manual...
-
Page 148: Create A New Application With Android Studio
Create a New Application with Android Studio For information and instructions to configure Datalogic SDK Add-on in Android Studio, refer to the website https://datalogic.github.io/quick-start/android-studio.html. Datalogic SDK For information on the Datalogic SDK APIs, visit the web site: https://datalogic.github.io/android-sdk-docs/reference/packages. html. JOYA™ TOUCH A6... -
Page 149: Avalanche
Tools Avalanche Avalanche is an infrastructure and mobile device management system. From a central console, you can locate and manage devices, including monitoring and distributing software and firmware. Network security features allow you to manage wireless settings (including encryption and authentication), and apply those settings on demand throughout the network. -
Page 150: Surelock
You can use DXU Desktop to remotely accept the SureFox and SureLock EULAs for all devices consuming a.dxu configuration file. A Datalogic Standard version of SureLock is preloaded on the Joya Touch A6. You have the option to upgrade to the Advanced version by contacting 42Gears: http://www.42gears.com/contact.html. -
Page 151: Mobicontrol
Tools A Datalogic Standard version of SureFox is preloaded on the Joya Touch A6. You have the option to upgrade to the Advanced version by contacting 42Gears: http://www.42gears.com/contact.html. Refer to the SureFox Documentation for Android on the 42Gears website for further details on SureFox. - Page 152 Tools NOTES JOYA™ TOUCH A6...
-
Page 153: Data Capture
Data Capture The Joya Touch A6 has an integrated imager that collects data by scanning barcodes. Scanner Settings on page 66 for instructions on configuring the scanner settings. Imager Data Capture The imager uses digital camera technology to take a digital picture of a barcode, the image is stored in memory and software decoding algorithms are executed to extract the data from the image. - Page 154 Data Capture 3. Center the symbol in any orientation within the aiming pattern. Ensure the entire symbol is within the rectangular area formed by the brackets in the aiming pattern, then either wait for the timeout or release the Scan Key to capture the image. A red beam illuminates the symbol, which is captured and decoded.
- Page 155 Data Capture • If enabled, the good read beep plays. • If enabled, the Green Spot projects a green spot onto the barcode image. • The barcode type and content data display on the screen. The field of view changes its size as you move the reader closer or farther away from the barcode.
- Page 156 Data Capture NOTES JOYA™ TOUCH A6...
-
Page 157: Connections
Connections USB Connection USB Direct Connection You can use any standard micro USB cable to directly connect the Datalogic Joya Touch A6 to a host computer to transfer data through the USB interface. Host Computer Joya Touch A6 Standard Micro USB cable type USB A –... - Page 158 Connections To enable file transfer after you connected your device, scroll down the notification bar and tap the USB charging this device notification: Tap File transfers if you want to transfer all types of media to and from the Joya Touch A6, or tap Photo transfer (PTP) if you just want to transfer the pictures.
-
Page 159: Wi-Fi Connection
Connections Wi-Fi Connection The Joya Touch A6 Wi-Fi 802.11 a/b/g/n radio models can communicate with the host using the on-board radio frequency component and an Access Point connected to the host computer. To launch this utility you can tap the specific icon if it' s visible on the taskbar or you can open Connections folder or Control Panel from desktop. - Page 160 Connections Suspending the terminal powers off the 802.11 a/b/g/n radio and drops the radio connection. When the terminal resumes, depending on the radio power mode and security protocol selected, it may take up to 30 seconds for the NOTE 802.11 a/b/g/n radio driver to re-associate the radio to the network.
-
Page 161: Bluetooth® Serial Connection
Connections Bluetooth® Serial Connection Joya Touch A6 models can communicate with a Bluetooth® printer, using the on-board Bluetooth® module. Bluetooth® is only available in Joya Touch A6 plus models. NOTE In order to extend battery life, the Bluetooth® module is off by default. - Page 162 Connections Area coverage and Bluetooth® radio performance may vary, due to environmental conditions or interference caused by other devices (microwave ovens, radio transmitters, etc.). NOTE JOYA™ TOUCH A6...
-
Page 163: Wireless And Radio Frequencies Warnings
WARNING Most modern electronic equipment is shielded from RF signals. However, certain electronic equipment may not be shielded against the RF signals generated by Joya Touch A6. Datalogic recommends persons with pacemakers or other medical devices follow same... - Page 164 Connections Turn this device OFF in health care facilities when any regulations posted in these areas instruct you to do so. Hospitals or health care facilities may use equipment that could be sensitive to external RF energy. WARNING RF signals may affect improperly installed or inadequately shielded electronic systems in motor vehicles.
- Page 165 Connections Turn off the device when in any area with a potentially explosive atmosphere. Observe restrictions and follow closely any laws, regulations, warnings and best practices on the use of radio equipment near fuel WARNING storage areas or fuel distribution areas, chemical plants or where any operation involves use of explosive materials.
- Page 166 Connections NOTES JOYA™ TOUCH A6...
-
Page 167: Technical Features
Technical Features Technical Data Physical Characteristics Enclosures: White Colors (standard) Battery Covers: Blue Topcase and battery covers (both handheld and pistol grip models), and Scan Trigger (pistol grip Color Customization models) are available in various standard or custom colors 4.3 inch full touch TFT-LCD color display; Display FWVGA: 854 x 480 pixels;... - Page 168 User Interfaces Accelerometer 3-Axis accelerometer SoftSpot Technology Virtual trigger/Scan Key Trigger Pistol grip models only Vibration Software programmable - Haptic Effects Software Configuration and Datalogic X Platform Configuration Utility (DXU) Maintenance Development Java and Xamarin SDK available JOYA™ TOUCH A6...
- Page 169 Technical Features System System RAM: 2 GB; Memory System Flash: 16 GB Flash Disk Qualcomm Snapdragon 210 Operating System Google Android 7.1.2 Nougat Wireless Communications IEEE 802.11 a/b/g/n; Wi-Fi Security Standards: WEP, WPA/WPA2 PSK, Local Area Network 802.1x EAP Methods: PEAP/MSCHAPV2, PEAP/GTC, (WLAN) TLS, TTLS/PAP, TTLS/MSCHAP, TTLS/MSCHAPV2, TTLS/GTC, PWD...
- Page 170 5 mils codes at 6,6 mils Illumination: White or red LEDs (depending on model) Light Source Aiming: 650 nm VLD Loudspeaker (Polyphonic); Datalogic’s patented "Green Reading Indicators Spot" technology for visual good-read feedback; Vibrator; Good read LED Print Contrast...
- Page 171 Technical Features Safety & Regulatory The product meets necessary safety and regulatory Agency Approvals approvals for its intended use Enviromental Complies to EU RoHS Compliance Warranty Warranty 1-Year Factory Warranty User’s Manual...
- Page 172 Technical Features NOTES JOYA™ TOUCH A6...
-
Page 173: Test Codes
Test Codes High Density Codes - 0.25 mm (10 mils) Code 39 17162 Interleaved 2/5 $P,HA13,P 0123456784 Code 128 test User’s Manual... - Page 174 Test Codes High Density Codes (continued) - 0.25 mm (10 mils) EAN 13 EAN 8 JOYA™ TOUCH A6...
- Page 175 Test Codes Medium Density Codes - 0.38 mm (15 mils) Code 39 17162 Interleaved 2/5 0123456784 Code 128 test User’s Manual...
- Page 176 Test Codes Medium Density Codes (continued) - 0.38 mm (15 mils) 100% EAN 13 100% EAN 8 JOYA™ TOUCH A6...
- Page 177 Test Codes Low Density Codes - 0.50 mm (20 mils) Code 39 17162 Interleaved 2/5 0123456784 Code 128 test User’s Manual...
- Page 178 Test Codes Low Density Codes (continued) - 0.50 mm (20 mils) 120% EAN 13 120% EAN 8 JOYA™ TOUCH A6...
- Page 179 Test Codes 2D Codes Datamatrix ECC200 Example Inverse Datamatrix ECC200 Example User’s Manual...
- Page 180 Test Codes NOTES JOYA™ TOUCH A6...
-
Page 181: Maintenance
Maintenance Cleaning the Device Periodically clean the Joya Touch A6 device, the Joya Touch Single Slot Docking and the Joya Touch 3-Slot Cradle using a soft cloth slightly dampened with only water, or alternatively with Isopropyl Alcohol (70%), Bleach (diluted 10:1) or Hydrogen Peroxide (stabilized, 3%). -
Page 182: Ergonomic Recommendations
Maintenance Ergonomic Recommendations In order to avoid or minimize the potential risk of ergonomic injury follow the recommendations below. Consult with your local Health & Safety Manager to ensure that you are adhering to your company’s safety CAUTION programs to prevent employee injury. •... -
Page 183: Safety And Regulatory Information
Joya Touch A6, disposal must be performed in compliance with the laws in force in your jurisdiction. • Do not submerge the Joya Touch A6 in liquid products. • For further information or support, refer to this manual and to the Datalogic web site: www.datalogic.com. User’s Manual... -
Page 184: Power Supply
Power Unit LPS/SELV rating 12V, min 5A power source which supplies power via the power connector of the cable. Any changes or modifications to equipment, not expressly approved by Datalogic could void the user's authority to operate the equipment. Laser Safety The following information applies to Laser Aiming System, used on Joya Touch A6 Imager. - Page 185 Safety and Regulatory Information Scan Window Laser Warning Label Data Label User’s Manual...
- Page 186 Safety and Regulatory Information ITALIANO DEUTSCH FRANÇAIS ESPAÑOL LA LUCE LASER È LASER-STRAHLU LE RAYON LASER A LUZ LÁSER ES VISIBILE NG IST FÜR DAS EST VISIBLE À VISIBLE AL OJO ALL' O CCHIO MENSCHLICHE L' O EIL NU ET IL HUMANO Y ES UMANO E VIENE AUGE SICHTBAR...
- Page 187 Safety and Regulatory Information ENGLISH The following information is provided to comply with the rules imposed by international authorities and refers to the correct use of your device. STANDARD LASER SAFETY REGULATIONS This product conforms to the applicable requirements of both CDRH 21 CFR 1040 and EN 60825-1 at the date of manufacture.
- Page 188 Safety and Regulatory Information Use of optical systems with the scanner will increase eye hazard. Optical instruments include binoculars, microscopes, eye glasses and magnifying glasses. WARNING ITALIANO Le seguenti informazioni vengono fornite dietro direttive delle autorità internazionali e si riferiscono all’uso corretto del terminale. NORMATIVE STANDARD PER LA SICUREZZA LASER Questo prodotto risulta conforme alle normative vigenti sulla sicurezza laser alla data di produzione: CDRH 21 CFR 1040 e EN...
- Page 189 Safety and Regulatory Information Il prodotto utilizza un diodo laser a bassa potenza. Sebbene non siano noti danni riportati dall’occhio umano in seguito ad una esposizione di breve durata, evitare di fissare il raggio laser così come si eviterebbe qualsiasi altra sorgente di luminosità intensa, ad esempio il sole.
- Page 190 Safety and Regulatory Information Unter keinen Umständen darf versucht werden, die Komponenten im Optikhohlraum zu öffnen oder auf irgendwelche andere Weise zu warten. Das Öffnen bzw. Warten der Komponenten im Optikhohlraum ACHTUNG durch unbefugtes Personal verstößt gegen die Laser-Sicherheitsbestimmungen. Das Optiksystem darf nur werkseitig repariert werden.
- Page 191 Safety and Regulatory Information FRANÇAIS Les informations suivantes sont fournies selon les règles fixées par les autorités internationales et se réfèrent à une correcte utilisation du terminal. NORMES DE SECURITE LASER Ce produit est conforme aux normes de sécurité laser en vigueur à sa date de fabrication: CDRH 21 CFR 1040 s et EN 60825-1.
- Page 192 Safety and Regulatory Information L’utilisation d’instruments optiques avec le scanneur augmente le danger pour les yeux. Les instruments optiques comprennent les jumelles, les microscopes, les lunettes et les verres grossissants. ATTENTION ESPAÑOL Las informaciones siguientes son presentadas en conformidad con las disposiciones de las autoridades internacionales y se refieren al uso correcto del terminal.
-
Page 193: Led Class
Safety and Regulatory Information El aparato utiliza un diodo láser a baja potencia. No son notorios daños a los ojos humanos a consecuencia de una exposición de corta duración. Eviten de mirar fijo el rayo láser así como evitarían cualquiera otra fuente de luminosidad intensa, por ejemplo el sol. Además, eviten de dirigir el rayo láser hacia los ojos de un observador, también a través de superficies reflectantes como los espejos. -
Page 194: Simplified Eu Declaration Of Conformity
English provisions of Directive 2014/53/EU and 2011/65/EU. Por medio de la presente Datalogic S.r.l. declara que el Joya Touch A6 cumple con los requisitos esenciales y cualesquiera otras Español disposiciones aplicables o exigibles de la Directiva 2014/53/EU - [Spanish] 2011/65/EU. - Page 195 Ελληνική ΛΟΙΠΕΣ ΣΧΕΤΙΚΕΣ ΔΙΑΤΑΞΕΙΣ ΤΗΣ ΟΔΗΓΙΑΣ 2014/53/EU - [Greek] 2011/65/EU. Par la présente Datalogic S.r.l. déclare que l' a ppareil Joya Touch A6 est conforme aux exigences essentielles et aux autres Français dispositions pertinentes de la directive 2014/53/EU - [French] 2011/65/EU.
-
Page 196: Information For The User
Safety and Regulatory Information Datalogic S.r.l. izjavlja, da je ta Joya Touch A6 v skladu z bistvenimi Slovensko zahtevami in ostalimi relevantnimi določili direktive 2014/53/EU - [Slovenian] 2011/65/EU. Datalogic S.r.l. týmto vyhlasuje, že Joya Touch A6 spĺňa základné Slovensky požiadavky a všetky príslušné ustanovenia Smernice 2014/53/EU [Slovak] - 2011/65/EU. -
Page 197: Radiofrequency Radiation Exposure Information
More information about the relevant Standards for SAR measurement methods and procedures may be found in the CE DoC included in the product user manual available at www.datalogic.com website and at the FCC public listing www.fcc.gov under the FCC IDs specified in the FCC/IC labeling section. -
Page 198: Radio Technologies And Frequency Bands
Safety and Regulatory Information Radio Technologies and Frequency Bands Joya Touch A6 incorporates the following radio technologies and supports the corresponding Frequencies and Radio-Frequency transmitted power, as specified below: Europe Radio Technology Frequency Bands Radio-Frequency Transmitted Power WLAN IEEE 2.4GHz Frequency Bands: 18.64 dBm 802.11b/g/n (HT-20) 2.412 - 2.472 MHZ... -
Page 199: Fcc/Ic Labeling
This device is restricted to indoor use when operated in the 5.15 to 5.25 GHz frequency range. Changes or modifications made to this equipment not expressly approved by Datalogic S.r.l. may void the FCC authorization to operate this equipment. NOTE:... -
Page 200: Ised Compliance
Safety and Regulatory Information radio or television reception, which can be determined by turning the equipment off and on, the user is encouraged to try to correct the interference by one or more of the following measures: • Reorient or relocate the receiving antenna. •... -
Page 201: Radiofrequency Radiation Exposure Information
More information about the relevant Standards for SAR measurement methods and procedures may be found in the CE DoC included in the product user manual available at www.datalogic.com website and at the FCC public listing www.fcc.gov under the FCC IDs specified in the FCC/IC labeling section. - Page 202 Safety and Regulatory Information Europe This device compliant with limits general population/uncontrolled exposure specified Council Recommendation 1999/519/EC Annex II. US and Canada For body worn operation, this device has been tested and meets the FCC/ISED RF exposure guidelines for use with an accessory that contains no metal and the positions the handset a minimum of 0 cm from the body.
-
Page 203: Weee Compliance
For more detailed information about disposal, contact the supplier that provided you with the product in question or consult the dedicated section at the website http://www.datalogic.com. Informazione per gli utenti L’apparecchiatura che riporta il simbolo del bidone barrato deve essere smaltita, alla fine della sua vita utile, separatamente dai rifiuti urbani. - Page 204 Am Ende des Gerätelebenszyklus darf das Produkt nicht über den städtischen Hausmüll entsorgt werden. Eine entsprechende Mülltrennung ist erforderlich. Weitere Informationen zu dieser Richtlinie erhalten sie von ihrem Lieferanten über den sie das Produkt erworben haben, oder besuchen sie unsere Hompage unter http://www.datalogic.com. JOYA™ TOUCH A6...
-
Page 205: Support Through The Website
Support Through the Website Datalogic provides several services as well as technical support through its website. Log on to www.datalogic.com. For quick access, from the home page click on the search icon and type in the name of the product you’re looking for. This allows you access to download Data Sheets, Manuals, Software &... - Page 206 Support Through the Website NOTES JOYA™ TOUCH A6...
-
Page 207: Glossary
Glossary Access Point A networking hardware device that allows a Wi-Fi device to connect to a wired network. The AP usually connects to a router (via a wired network) as a standalone device, but it can also be an integral component of the router itself. - Page 208 Glossary Bluetooth@ A standard radio technology using a proprietary protocol. The onboard Bluetooth@ module in the device is compatible with the 2.1 protocol with Enhanced Data Rate (EDR). Boot The process a computer goes through when it starts. During boot, the computer can run self-diagnostic tests and configure hardware and software.
- Page 209 Glossary Density (Barcode Density) The number of characters represented per unit of measurement (e.g., characters per inch). Depth of Field (DOF) The portion of a scene that appears acceptably sharp in the image. Although a lens can precisely focus at only one distance, the decrease in sharpness is gradual on each side of the focused distance, so that within the DOF, the unsharpness is imperceptible under normal viewing conditions.
- Page 210 Glossary IEEE 802.11 A set of standards carrying out wireless local area network (WLAN) computer communication in the 2.4, 3.6 and 5 GHz frequency bands. They are created and maintained by the IEEE LAN/MAN Standards Committee. Internet Protocol. The IP part of the TCP/IP communications protocol.
- Page 211 Glossary Laser Diode A gallium-arsenide semiconductor type of laser connected to a power source to generate a laser beam. This laser type is a compact source of coherent light. Light Emitting Diode (LED) A low power electronic light source commonly used as an indicator light.
- Page 212 Glossary Radio Frequency. Scanner An electronic device used to scan barcode symbols and produce a digitized pattern that corresponds to the bars and spaces of the symbol. Its three main components are: • Light source (laser or photoelectric cell) - illuminates a barcode. •...
- Page 213 Glossary telecommunications companies, supports data-transfer speeds up to 12 megabits per second, multiple data streams, and up to 127 peripherals. Voice over IP (VOIP) Voice over Internet Protocol (also voice over IP, VoIP or IP telephony) is a methodology and group of technologies for the delivery of voice communications and multimedia sessions over Internet Protocol (IP) networks, such as the Internet.
- Page 214 ©2019 Datalogic S.p.A. and/or its affiliates. All rights reserved. Datalogic and the Datalogic logo are registered trademarks of Datalogic S.p.A. in many countries, including the U.S. and the E.U. Datalogic S.r.l. Via S. Vitalino, 13 Lippo di Calderara di Reno...
Need help?
Do you have a question about the Joya Touch A6 HC and is the answer not in the manual?
Questions and answers