Advertisement
Instructions-Parts
Air Compressor Kit
Air compressor and receiver tank for Reactor® E-30i and E-XP2i integrated plural component
proportioning systems. For professional outdoor use only. Not for use in explosive atmospheres.
Important Safety Instructions
Read all warnings and instructions in this manual. Save these
instructions.
24K335
PROVEN QUALITY. LEADING TECHNOLOGY.
Get other manuals https://www.bkmanuals.com
3A1902C
EN
Advertisement
Table of Contents

Related Manuals for Graco 24K335


Summary of Contents for Graco 24K335
- Page 1 Air compressor and receiver tank for Reactor® E-30i and E-XP2i integrated plural component proportioning systems. For professional outdoor use only. Not for use in explosive atmospheres. Important Safety Instructions Read all warnings and instructions in this manual. Save these instructions. 24K335 PROVEN QUALITY. LEADING TECHNOLOGY. Get other manuals https://www.bkmanuals.com...
-
Page 2: Table Of Contents
Connect Power Cable ......... 5 Install Air Tank ........... 3 Parts..............7 Connect Air Lines ..........3 Graco Standard Warranty........10 Install Air Compressor Reference parts illustration, Parts, page 7 . 8. Lift side of gusset (5) to ensure top plate (3) is level before tightening. -
Page 3: Install Air Tank
Install Air Tank Install Air Tank Connect Air Lines Reference parts illustration, Parts, page 8. Reference Fig. 1, page 4. 1. Connect nipple (26), water drain valve (16), 1. Cut tube (36) to the following lengths (see next connector (15), and connector (31) to bulkhead page): (30). - Page 4 Connect Air Lines Connect all air hoses as shown. 25 in. (635 mm) 48 in. (1219 mm) 9 in. (228.6 mm) ti18580a 48 in. (1219 mm) Air Hose Connections Figure 1 Tighten compression nut 3/4 turn past finger tight. 3A1902C Get other manuals https://www.bkmanuals.com...
-
Page 5: Connect Power Cable
Connect Power Cable Connect Power Cable 7. Tighten the bottom nut on the cord grip (35). Note 8. Replace cover. See Fig. 4, page 5. Reference wiring diagram. See Fig. 4, page 6. 9. Loosen the bolts and remove the back panel of the Reactor electrical enclosure. - Page 6 Connect Power Cable ELECTRICAL ENCLOSURE BOUNDARY CIRCUIT BREAKER ASS’Y, 24J728 AIR COMPRESSOR ELECTRICAL ENCLOSURE TB18 TB17 TB16 TB15 TB14 TB13 1/L1 3/L2 5/L3 2/T1 4/T2 6/T3 TO AIR COMPRESSOR POWER CABLE, 16M827 CORD GRIP, CT02 16M826 CORD GRIP, 16M826 GB02 Ground Bar 122313 Air Compressor Wiring Diagram...
-
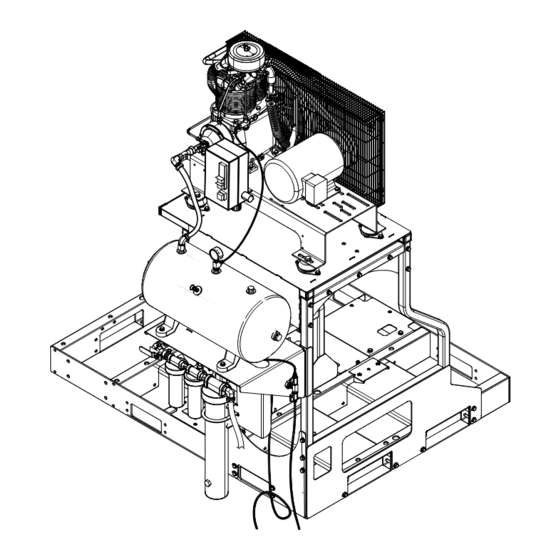
Page 7: Parts
Parts Parts 24K335, Complete Air Compressor Kit ti18539b Apply anaerobic sealant to all non-swivel pipe threads. 3A1902C Get other manuals https://www.bkmanuals.com... - Page 8 Parts 30 26 ti18540b Apply anaerobic sealant to all non-swivel pipe threads. 3A1902C Get other manuals https://www.bkmanuals.com...
- Page 9 Parts Part Description Part Description 24M147 105324 RACK, compressor, rear SCREW, cap, hex hd; 1.18 in. (30 mm), M12 x 1.75 24M146 RACK, compressor, front 109570 WASHER, plain 24M145 RACK, compressor, top 16N177 BULKHEAD, brass, 3/8 24M125 TANK, ASM, 12 gal, air 115671 CONNECTOR, male;...
-
Page 10: Graco Standard Warranty
With the exception of any special, extended, or limited warranty published by Graco, Graco will, for a period of twelve months from the date of sale, repair or replace any part of the equipment determined by Graco to be defective. This warranty applies only when the equipment is installed, operated and maintained in accordance with Graco’s written recommendations.
Need help?
Do you have a question about the 24K335 and is the answer not in the manual?
Questions and answers