
Related Manuals for Schaller humimeter RH5.1


Summary of Contents for Schaller humimeter RH5.1
- Page 1 User manual paper moisture meter RH5.1 with sword-sensor version 2.0_en © Schaller GmbH 2012...
-
Page 2: Positioning The Instrument
User manual Positioning the instrument Insert the sword-sensor into the stack for only approx. 10 cm, and push it a few more centimetres into the stack every 10 seconds. Let your humimeter RH5 adequately adjust to the material (at least five minutes) before you start to measure, particularly when the material pile was stored at a different temperature than the device. -
Page 3: Application Range
Description of definitions Relative air humidity: indicates the relation between the current water vapour pressure and the maximal possible water vapour pressure (called saturation vapour pressure) The relative humidity shows the degree the air is saturated with water vapour. For example: 50% relative humidity indicates that at the current temperature and the current pressure the air is saturated with water vapour for half of its value, 100% relative humidity means that the air is totally saturated. -
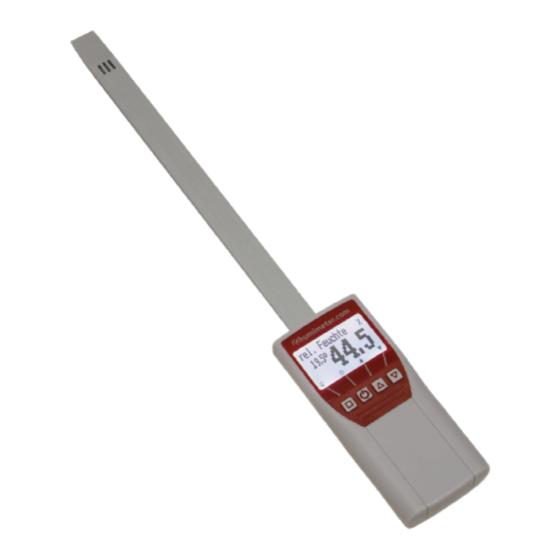
Page 4: Design Of The Device
Design of the device air humidity and temperature sensor measuring value selection of calibration curves calibration curve temperature ON button batteries slot (flipside) page 4 version 2.0_... -
Page 5: Menu Level Overview
Menu level overview Keypad symbols Measuring window: Rolling Menu type selection menu Power ON / OFF Switch upper next calibration curve Switch lower previous calibration curve Power off Save Hold store menu Autolog show last log Watch saved data store new log Enter suppliers Power off data... -
Page 6: Operating The Instrument
Operating the instrument Switching on: Press for three seconds. Changing the calibration curve: Setting date and time: 2 times - Options – date / time Set date and time using the button , according to the format indicated (JJ.MM.TT). After entering the year, press the button for entering the month and again for entering the day. - Page 7 Proceedings Preparation To ensure as good as possible inspection results it is essential that the measuring device, the calibration equipment and the calibration ampoules have approximately the same temperature. This temperature has to be between 20° C and 26° C. The best way to ensure the same temperature of the different components is to store all components together in a room with only small temperature fluctuations minimum over night –...
-
Page 8: Offset Adjustment
8. Pick up the RH5 together with the calibration device STRAIGHT and DON´T TURN IT AROUND. Screw it up like shown in the picture. Then put the RH5 with the calibration device down on a table carefully and proceed as follows. Conditioning the sensor To achieve best results, let the sensor adjust for two hours. -
Page 9: Care Instructions
If you made a mistake during the setting, you can reset to the factory calibration as follows: Reset to factory calibration 1. Press the button 2 times to reach the menu point Options. 2. Select the menu item Reset using the button and confirm by pressing 3. -
Page 10: Changing The Batteries
0.5 % per year. You can check humimeter RH5.1 instruments by yourself using the calibration equipment (see optional accessories). For a fee, Messtechnik Schaller GmbH can also carry out a calibration at their factory. On demand you will also receive a calibration certificate. -
Page 11: Technical Data
Technical data Measurement: Measuring range / resolution / accuracy rel. humidity: 0 to 100% rh / 0.1% calibration 10 to 90% / ±2.0% rh (at 25° C) temperature ° C: -10 to +60° C / 0.1° C / ±0.3° C (at 25° C) temperature °... -
Page 12: Important! Please Read
!IMPORTANT! Please read! Common reasons for incorrect measurements • Sunlight or other sources of heat or cold that doesn´t correspond to the surrounding temperature • Dripping or sprayed water • Irreversible damage of the sensor due to aggressive gases • Danger of condensation because of changing temperature •...
Need help?
Do you have a question about the humimeter RH5.1 and is the answer not in the manual?
Questions and answers