
Related Manuals for Sage the Bit More STA720BSS2EEU1


Summary of Contents for Sage the Bit More STA720BSS2EEU1
- Page 1 SAGE GRILLE PAIN STA720BSS2EEU1 MANUEL D'UTILISATION PROLINE REFRIGERATEUR BRF40 Besoin d'aide ? Rendez-vous sur https://sav.darty.com...
- Page 2 ‘Bit More’ ™ BTA720/STA720 BTA730/STA730 QUICK GUIDE KURZANLEITUNG GUIDE RAPIDE SNELSTARTGIDS GUIDA RAPIDA GUÍA RÁPIDA MANUAL RÁPIDO...
-
Page 3: Table Of Contents
SAFETY FIRST • Position the appliance on a stable, heat resistant, level, At Sage we are very safety ® dry surface away from the conscious. We design and edge and do not operate on... -
Page 4: We Recommend Safety First
• Metal utensils such as a knife, of space from the surrounding should not be inserted into the sides and 20cm above. toaster to remove jammed toast, • Sage does not recommend ® bagels or any other items from placing the toaster in the toaster. - Page 5 • The use of attachments not sold in a safe way and understand or recommended by Sage ® the hazards involved. cause fire, electric shock or injury. • Children should not play with the appliance.
- Page 6 It should be cleaning is required, please taken to a local authority waste contact Sage Customer Service collection centre designated for or go to sageappliances.com. this purpose or to a dealer providing this service. For more •...
-
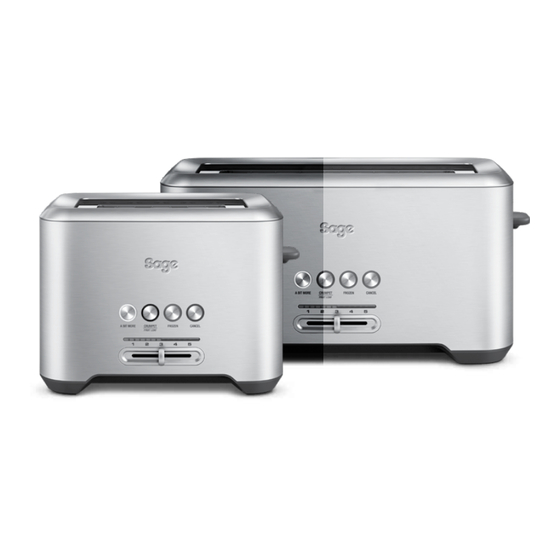
Page 7: Getting To Know Your New Appliance
GETTING TO KNOW YOUR NEW APPLIANCE A. A BIT MORE button. G. Variable browning control slide ™ H. Full stainless steel body B. CRUMPET/FRUIT LOAF button. Slide out crumb tray C. FROZEN button. J. Concealed cord storage D. CANCEL button. K. -
Page 8: Operating Your New Appliance
OPERATING YOUR NEW APPLIANCE A BIT MORE BUTTON 1. Insert the power plug into a 220-240V ™ power outlet. If your toast comes up too light, one press of this button adds a little extra toasting time. This feature NOTE can be selected before, during or after the toasting When using the toaster for the first time, we cycle and can be used with the CRUMPET/FRUIT... - Page 9 OPERATING YOUR NEW APPLIANCE HIGH LIFT LEVER To toast fruit loaf: 1. Place the fruit loaf into the toasting slots. The lever can be lifted approximately 1cm above 2. To select the FRUIT LOAF setting, press the starting position. This raises the carriage the CRUMPET/FRUIT LOAF button twice making it easier to remove smaller items such as and the button will illuminate blue.
-
Page 10: Care, Cleaning & Storage
CARE, CLEANING & STORAGE CARE AND CLEANING STORAGE Remove the power plug from the power outlet Remove the power plug from the power outlet and and allow the toaster to cool completely before allow the toaster to cool completely before storing. cleaning. -
Page 11: Guarantee
GUARANTEE 2 YEAR LIMITED GUARANTEE Sage Appliances guarantees this product for domestic use in specified territories for 2 years from the date of purchase against defects caused by faulty workmanship and materials. During this guarantee period Sage Appliances will repair, replace, or refund any defective product (at the sole discretion of Sage Appliances). - Page 12 ‘Bit More ’ ™ KURZANLEITUNG...
- Page 13 ® • Vor dem ersten Gebrauch SICHERHEIT alle Verpackungsmaterialien abnehmen und sicher entsorgen. GEHT VOR • Schutzhülle am Netzstecker sicher Wir bei Sage sind sehr entsorgen, da sie für Kleinkinder ® sicherheitsbewusst. Beim eine Erstickungsgefahr Design und bei der Herstellung darstellen könnte.
- Page 14 Toasters mindestens 10 cm des Betriebs und danach Abstand nach allen Seiten heiß. Zur Vermeidung und 20 cm nach oben lassen. von Verbrennungen und • Sage empfiehlt, den Toaster ® Verletzungen immer Topflappen nicht in geschlossene Bereiche oder Ofenhandschuhe zu stellen.
- Page 15 Pflegeanweisungen in dieser Lebensmittel aus dem Gerät zu Broschüre befolgen. entfernen. • Die Verwendung nicht von • Niemals übergroße Lebensmittel, Sage vertriebener oder Folienverpackungen oder empfohlener Aufsätze kann Utensilien aus Metall in den Brand, Stromschlag oder Toaster einlegen, da dies Verletzung nach sich ziehen.
- Page 16 Schäden oder zur Entsorgung abgegeben Wartung (außer Reinigung) werden. Weitere Einzelhei- bitte unter 0808 178 1650 an ten erfahren Sie von Ihrer den Sage -Kundendienst. ® Kommunalbehörde. • Dieses Gerät ist nur für den Haushaltsgebrauch bestimmt. Zum Schutz gegen Gerät nur bestimmungsgemäß...
- Page 17 MACHEN SIE SICH MIT IHREM NEUEN GERÄT VERTRAUT A. A BIT MORE -Taste G. Variabler Schieberegler für Bräunung ™ B. CRUMPET/FRUIT LOAF-Taste H. Voller Edelstahlkörper Herausnehmbare Krümeltasse C. FROZEN-Taste J. Verborgene Kabelaufbewahrung D. CANCEL-Taste E. Toaster-Schlitze K. A Quick Look / high lift lever (Heber) ™...
- Page 18 BETRIEB IHRES NEUEN GERÄTS A BIT MORE -TASTE 1. Schließen Sie den Netzstecker an eine ™ 220-240V Steckdose. Wenn Ihr Toast etwas zu hell ist, drücken Sie einmal auf diese Taste um die Toast-Zeit ein wenig HINWEIS zu verlängern. Diese Funktion steht Ihnen vor, Wenn Sie den Toaster zum ersten Mal während, oder nach dem Toasten zur Verfügung benutzen, schlagen wir vor, dass Sie zuerst...
- Page 19 BETRIEB IHRES NEUEN GERÄTS A QUICK LOOK HEBEL Um Früchtebrot zu toasten: ™ 1. Stellen Sie die Früchtebrotscheiben in die Mit dieser Einrichtung heben und senken Sie Toaster-Schlitze. den Toast-Korb, damit Sie prüfen können, wie 2. Um die CRUMPET/FRUIT LOAF weit der Toast-Vorgang fortgeschritten ist, ohne Einstellung zu wählen, drücken Sie dabei den Vorgang zu unterbrechen und/oder...
- Page 20 PFLEGE, REINIGUNG & LAGERUNG PFLEGE UND REINIGUNG VERSTAUEN Ziehen Sie den Netzstecker aus der Steckdose Ziehen Sie den Netzstecker aus der Steckdose und lassen Sie den Toaster vollständig abkühlen, und lassen Sie den Toaster vollständig abkühlen, bevor Sie ihn reinigen. bevor Sie ihn verstauen.
- Page 21 GARANTIE 2 JAHRE BESCHRÄNKTE GARANTIE Sage Appliances gibt auf dieses Produkt für den häuslichen Gebrauch in bestimmten Gebieten eine Garantie über 2 Jahre ab Kaufdatum für Mängel, die durch fehlerhafte Verarbeitung und Materialien verursacht wurden. Während dieser Garantiezeit wird Sage Appliances jedes fehlerhafte Produkt reparieren, ersetzen oder das Geld zurückerstatten...
- Page 22 ‘Bit More ’ ™ GUIDE RAPIDE...
- Page 23 TABLE DES MATIÈRES • Une version téléchargeable 2 Sage recommande la sécurité ® de ce document est avant tout 6 Apprendre à connaître votre nouvel également disponible sur appareil sageappliances.com 7 Fonctionnement de votre nouvel • Avant une première utilisation,...
- Page 24 20 cm au-dessus blessures corporelles, utilisez de l’appareil. toujours des maniques ou • Sage déconseille de mettre le ® des gants de cuisine isolants, grille-pain dans des endroits clos. ou utilisez les poignées ou les •...
- Page 25 • N’essayez pas de déloger un aliment lorsque le grille-pain • L’utilisation d’accessoires non est branché. fabriqués ou non indiqués par • N’introduisez pas dans le Sage peut entraîner un risque ® grille-pain des aliments d’incendie, de choc électrique surdimensionnés, des films ou de blessure.
- Page 26 Sage ou consultez le site sageappliances.com À des fins de protection contre les chocs • Cet appareil est destiné à un électriques, ne plongez pas...
- Page 27 DÉCOUVERTE DE VOTRE NOUVEL APPAREIL A. Bouton A BIT MORE ™ . F. Voyant DEL de progression du grillage B. Bouton CRUMPET / FRUIT LOAF G. Bouton de contrôle du brunissage (CRUMPET/PAIN AUX FRUITS). H. Corps entièrement en acier inoxydable C.
- Page 28 FONCTIONNEMENT DE VOTRE NOUVEL APPAREIL BOUTON A BIT MORE™ 1. Branchez le cordon d’alimentation à une prise de courant de 220 à 240 V. Si votre pain n’est pas très bien grillé, appuyez sur ce bouton pour ajouter une durée de grillage REMARQUE supplémentaire.
- Page 29 FONCTIONNEMENT DE VOTRE NOUVEL APPAREIL LEVIER DE SURÉLEVAGE Pour griller du pain aux fruits : 1. Mettez le pain aux fruits dans les fentes Le levier peut être soulevé à environ 1 cm de grillage. au-dessus de la position de départ. Cela 2.
- Page 30 ENTRETIEN, NETTOYAGE ET RANGEMENT ENTRETIEN ET NETTOYAGE RANGEMENT Débranchez le cordon d’alimentation de la Débranchez le cordon d’alimentation de la prise murale et laissez le grille-pain refroidir prise murale et laissez le grille-pain refroidir complètement avant de le nettoyer. complètement avant de le ranger. Suivez les instructions de nettoyage et rangez-le en position Pour enlever les miettes du grille-pain, retirez le verticale sur une surface plane, un plan de travail...
- Page 31 GARANTIE GARANTIE LIMITÉE 2 ANS Sage Appliances garantit ce produit pour un usage domestique sur les territoires spécifiés pendant 2 ans à compter de la date d’achat, contre les défauts de fabrication et de matériaux. Au cours de cette période de garantie, Sage Appliances s’engage à...
- Page 32 DÉCLARATION À L'INTENTION DU CONSOMMATEUR SAGE FRANCE - GARANTIE LIMITÉE Sage Appliances garantit ce produit pour un usage Article L. 217-4 du Code de la consommation : domestique sur les territoires spécifiés pendant 2 « Le vendeur livre un bien conforme au contrat et ans à...
- Page 33 REMARQUES...
- Page 34 ‘Bit More ’ ™ SNELSTARTGIDS...
- Page 35 • Verwijder voor het VEILIGHEID eerste gebruik het VOOROP verpakkingsmateriaal en gooi het op een veilige manier weg. Bij Sage gaan we ® • Gooi het beschermkapje op de veiligheidsbewust te stekker op een veilige manier werk. Bij het ontwerpen...
- Page 36 De oppervlakken van heeft aan de zijkanten en 20 cm de broodrooster zijn heet tijdens aan de bovenkant. en na het gebruik. Gebruik altijd • Sage raadt af de broodrooster beschermende ovenlappen ® in een afgesloten ruimte te of -wanten, of gebruik de gebruiken.
- Page 37 • Het gebruik van accessoires die is aangesloten. niet door Sage zijn verkocht ® • Grote stukken brood, of aangeraden, kan risico op verpakkingen van metaalfolie of...
- Page 38 Neem contact op uw gemeente. met de klantenservice van Sage of ga naar sageappliances.com Dompel het netsnoer, de als er sprake is van schade of er stekker of het apparaat niet...
- Page 39 UW NIEUWE APPARAAT LEREN KENNEN A. Knop A BIT MORE G. Schuifregelaar voor kleurinstelling ™ B. Knop CRUMPET/FRUIT LOAF. H. Volledig roestvrijstalen behuizing C. Knop FROZEN. Uitschuifbare kruimellade D. Knop CANCEL. J. Verborgen snoeropbergruimte E. Sleuven K. A Quick Look -/optilhendel.
- Page 40 UW NIEUWE APPARAAT GEBRUIKEN KNOP A BIT MORE 1. Steek de stekker in een stopcontact van ™ 220–240 V. Als uw toast er te licht uitkomt, voegt u met een druk op deze knop een beetje extra tijd toe. Deze OPMERKING functie kan vóór, tijdens of na het roosteren worden Wanneer u de broodrooster voor het...
- Page 41 UW NIEUWE APPARAAT GEBRUIKEN OPTILHENDEL Vruchtenbrood roosteren: 1. Plaats het vruchtenbrood in de sleuven. De hendel kan ongeveer 1 cm boven de 2. Druk tweemaal op de knop CRUMPET/ beginpositie worden opgetild. Dit brengt de FRUIT LOAF om de FRUIT LOAF- brooddrager omhoog, waardoor u gemakkelijker instelling te selecteren.
- Page 42 ONDERHOUD, REINIGING EN OPSLAG ONDERHOUD EN REINIGING OPBERGEN Haal de stekker uit het stopcontact en laat de Haal de stekker uit het stopcontact en laat de broodrooster volledig afkoelen voordat u deze broodrooster volledig afkoelen voordat u deze reinigt. opbergt. Volg de reinigingsinstructies en bewaar de broodrooster op een vlak oppervlak rechtop op een Om kruimels uit de broodrooster te halen, haalt aanrecht of in een gemakkelijk bereikbare kast.
- Page 43 GARANTIE BEPERKTE GARANTIE VAN 2 JAAR Sage Appliances biedt een garantie op dit product voor huishoudelijk gebruik in genoemde gebieden gedurende 2 jaar vanaf de datum van aankoop tegen defecten veroorzaakt door gebrekkige afwerking en materialen. Gedurende deze garantieperiode zal Sage Appliances defecte producten repareren, vervangen of terugbetalen (naar eigen goeddunken van Sage Appliances).
- Page 44 ‘Bit More ’ ™ GUIDA RAPIDA...
- Page 45 • Rimuovere e smaltire in sicurezza tutti i materiali di PRIMA DI TUTTO imballaggio prima di utilizzare l'apparecchio per la prima volta. In Sage abbiamo molto a ® • Per eliminare il rischio di cuore la sicurezza. Creiamo soffocamento per i bambini,...
-
Page 46: Il Nostro Consiglio: La Sicurezza Prima Di Tutto
Durante e dopo minima di 10 cm dai lati il funzionamento le superfici circostanti e 20 cm sopra. del tostapane sono calde. • Sage sconsiglia di posizionare ® Per evitare ustioni o lesioni il tostapane in spazi chiusi. - Page 47 • Alimenti troppo grandi, fogli di stagnola o utensili non devono • L'utilizzo di prolunghe essere inseriti nel tostapane o accessori non venduti poiché potrebbero causare o consigliati da Sage può ® incendi o il rischio di scosse provocare incendi, scosse elettriche.
- Page 48 Per proteggersi dalle intervento di manutenzione scariche elettriche, non diverso dalla pulizia, contattare immergere il cavo, la spina il Servizio clienti Sage o visitare o l'elettrodomestico in acqua il sito Web sageappliances.com. o in qualsiasi altro liquido. • Questo apparecchio è...
-
Page 49: Componenti Del Nuovo Apparecchio
COMPONENTI DEL NUOVO APPARECCHIO A. Pulsante A BIT MORE G. Cursore di controllo del grado di tostatura ™ B. Pulsante CRUMPET/FRUIT LOAF H. Corpo in acciaio inossidabile C. Pulsante FROZEN Vassoio raccoglibriciole estraibile D. Pulsante CANCEL J. Avvolgicavo a scomparsa E. -
Page 50: Utilizzo Del Nuovo Apparecchio
UTILIZZO DEL NUOVO APPARECCHIO PULSANTE A BIT MORE 1. Inserire la spina di alimentazione in una ™ presa di corrente da 220–240 V. Se il toast risulta troppo chiaro, la pressione di questo pulsante aggiunge un po' di tempo in più NOTA alla tostatura. - Page 51 UTILIZZO DEL NUOVO APPARECCHIO LEVA DI SOLLEVAMENTO IN ALTO Per tostare pane alla frutta: 1. Inserire la fetta di pane alla frutta nelle La leva può essere sollevata di circa 1 cm sopra fessure di tostatura. la posizione di partenza. Ciò solleva il carrello, 2.
-
Page 52: Manutenzione, Pulizia E Conservazione
MANUTENZIONE, PULIZIA E CONSERVAZIONE MANUTENZIONE E PULIZIA CONSERVAZIONE Scollegare la spina dalla presa di alimentazione Scollegare la spina dalla presa di alimentazione e lasciare che il tostapane si raffreddi e lasciare che il tostapane si raffreddi completamente prima di pulirlo. completamente prima di riporlo. -
Page 53: Garanzia
GARANZIA GARANZIA LIMITATA DI 2 ANNI Sage Appliances offre una garanzia per l’utilizzo domestico di questo prodotto in specifiche aree geografiche, per 2 anni dalla data di acquisto. La garanzia copre eventuali malfunzionamenti causati da difetti di fabbricazione o dei materiali. Durante il periodo coperto dalla garanzia, Sage Appliances sarà... - Page 54 ‘Bit More ’ ™ GUÍA RÁPIDA...
- Page 55 • Retira y desecha de forma SEGURIDAD apropiada los materiales de ANTE TODO embalaje antes del primer uso. • Para evitar riesgos de asfixia En Sage nos preocupa ® de niños pequeños, desecha mucho la seguridad. Para correctamente la cubierta el diseño y la fabricación...
- Page 56 10 cm de tes durante y después de su los lados circundantes y 20 cm fun cionamiento. Para evitar por encima. quemaduras o lesiones • Sage no recomienda colocar ® personales, utiliza siempre la tostadora en áreas cerradas. agarradores o manoplas •...
- Page 57 • No deben introducirse alimentos • El uso de accesorios no demasiado grandes, envases vendidos o recomendados de aluminio u otros utensilios por Sage puede provocar ® en la tostadora porque pueden incendios, descargas provocar un incendio o una eléctricas o lesiones.
- Page 58 Para evitar descargas en contacto con el Servicio eléctricas, no sumerjas de atención al cliente de Sage el cable, el enchufe o el electro o visita sageappliances.com. doméstico en agua ni en ningún otro líquido.
- Page 59 CONOCE TU NUEVO ELECTRODOMÉSTICO A. Botón A BIT MORE G. Control deslizante de tostado variable ™ B. Botón CRUMPET/FRUIT LOAF H. Cuerpo de acero inoxidable completo C. Botón FROZEN Bandeja recogemigas extraíble D. Botón CANCEL J. Compartimento oculto para cable E.
- Page 60 MANEJO DE TU NUEVO ELECTRODOMÉSTICO BOTÓN A BIT MORE 1. Conecta el enchufe en una toma de corriente ™ de 220 –240 V. Si la tostada no está lo suficientemente tostada, pulsando el botón A BIT MORE (un poquito NOTA ™...
- Page 61 MANEJO DE TU NUEVO ELECTRODOMÉSTICO PALANCA A QUICK LOOK Para tostar pan de frutas: ™ 1. Coloca el pan de frutas en las ranuras. Esta función permite subir y bajar la carga para 2. Para seleccionar el ajuste FRUIT LOAF, que puedas comprobar el progreso del tostado sin pulsa el botón CRUMPET/FRUIT LOAF interrumpir o cancelar el ciclo de tostado.
- Page 62 CUIDADO, LIMPIEZA Y ALMACENAMIENTO CUIDADO Y LIMPIEZA ALMACENAMIENTO Desenchufa el cable de la toma de corriente y deja Desenchufa el cable de la toma de corriente y deja que la tostadora se enfríe completamente antes que la tostadora se enfríe completamente antes de limpiarla.
- Page 63 GARANTÍA GARANTÍA LIMITADA DE 2 AÑOS La garantía de Sage Appliances cubre este producto para uso doméstico en territorios específicos durante 2 años a partir de la fecha de compra contra fallos causados por mano de obra y materiales defectuosos. Durante el plazo de la garantía, Sage Appliances reparará...
- Page 64 ‘Bit More ’ ™ MANUAL RÁPIDO...
- Page 65 ÍNDICE • Está disponível uma versão A Sage recomenda a segurança ® como máxima prioridade transferível deste documento Introdução ao aparelho em sageappliances.com Funcionamento do aparelho • Antes de utilizar pela primeira Cuidados, limpeza vez, certifique-se de que e armazenamento a sua fonte de alimentação...
- Page 66 As superfícies da em ambos os lados do aparelho torradeira estão quentes durante e 20 cm acima do aparelho. e após o funcionamento. • A Sage não recomenda ® Para impedir a ocorrência colocar a torradeira em áreas de queimaduras ou lesões fechadas.
- Page 67 • Não deve inserir alimentos • O uso de acessórios não com um tamanho excessivo, vendidos ou recomendados embalagens de papel de alumínio pela Sage pode provocar ® ou utensílios na torradeira porque incêndios, choque elétrico pode provocar um incêndio ou lesões.
- Page 68 Câmara Municipal local para danificados de qualquer obter mais informações. maneira. Contacte o serviço de atendimento ao cliente da Sage Não coloque o cabo de ou aceda a sageappliances. alimentação, a ficha ou com se o aparelho estiver o aparelho dentro de água...
- Page 69 INTRODUÇÃO AO APARELHO A. Botão A BIT MORE G. Controlo de deslize variável da cor ™ de tostadura B. Botão CRUMPET/FRUIT LOAF (Panqueca/Pão de frutas) H. Corpo de aço inoxidável C. Botão FROZEN (Congelado) Tabuleiro de migalhas deslizante D. Botão CANCEL (Cancelar) J.
- Page 70 FUNCIONAMENTO DO APARELHO BOTÃO A BIT MORE 1. Insira a ficha numa tomada elétrica ™ de 220-240 V. Se a torrada estiver demasiado clara, prima este botão para adicionar mais algum tempo. NOTA Pode selecionar esta funcionalidade antes, Quando tostar pão pela primeira vez, durante ou depois do ciclo de tostadura e pode sugerimos que toste na definição máxima utilizá-la com as funções CRUMPET/FRUIT...
- Page 71 FUNCIONAMENTO DO APARELHO ALAVANCA DE LEVANTAMENTO Para tostar pão de frutas: 1. Coloque o pão de frutas nas ranhuras. Pode levantar a alavanca aproximadamente 1 cm 2. Para cancelar a definição FRUIT LOAF acima da posição inicial. Isto levanta o suporte (Pão de frutas), prima o botão CRUMPET/ tornando mais fácil remover pequenos itens, FRUIT LOAF (Panqueca/Pão de frutas)
- Page 72 2 anos a partir da data de compra contra avarias provocadas por defeitos na mão- de-obra e nos materiais. Durante este período da garantia, a Sage Appliances irá reparar, substituir ou reembolsar qualquer produto defeituoso (a exclusivo critério da Sage Appliances).
- Page 73 Deutschland Deutschland: 08005053104 Switzerland Österreich: 0800 80 2551 0800 009 933 Spain Sage Appliances France SAS 0900 838 534 Siège social : 66 avenue des Champs Elysées – 75008 Paris 879 449 866 RCS Paris Portugal France: 0800 903 235 0800 180 243 www.sageappliances.com...
Need help?
Do you have a question about the the Bit More STA720BSS2EEU1 and is the answer not in the manual?
Questions and answers