Table of Contents
Advertisement
Available languages
Available languages
Quick Links
USA office: Fontana
AUS office: Truganina
GBR office: Ipswich
If you're having difficulty, our friendly
customer team is always here to help.
FRA office: Saint Vigor d'Ymonville
USA:cs.us@costway.com
AUS:cs.au@costway.com
GBR:cs.uk@costway.com
FRA:cs.f r @costway.com
Electric Fireplace
Cheminée Électrique
FP10357US
THIS INSTRUCTION BOOKLET CONTAINS IMPORTANT SAFETY INFORMATION. PLEASE READ AND KEEP FOR FUTURE REFERENCE.
Advertisement
Table of Contents

Subscribe to Our Youtube Channel
Related Manuals for Costway FP10357US


Summary of Contents for Costway FP10357US
- Page 1 GBR office: Ipswich FRA office: Saint Vigor d'Ymonville USA:cs.us@costway.com If you're having difficulty, our friendly AUS:cs.au@costway.com customer team is always here to help. GBR:cs.uk@costway.com THIS INSTRUCTION BOOKLET CONTAINS IMPORTANT SAFETY INFORMATION. PLEASE READ AND KEEP FOR FUTURE REFERENCE. FRA:cs.f r @costway.com...
-
Page 2: Before You Start
Before You Start Please read all instructions carefully. Retain instructions for future reference. Separate and count all parts and hardware. Read through each step carefully and follow the proper order. We recommend that, where possible, all items are assembled near to the area in which they will be placed in use, to avoid moving the product unnecessarily once assembled. -
Page 3: Important Safety Information
11.Do not insert or allow foreign objects to enter any ventilation or 1.IMPORTANT SAFETY INFORMATION exhaust openings as this may cause an electric shock or fire, or damage the appliance. WARNING: Any use of this appliance other than that recommended by the 12.To prevent a possible fire, do not block air intakes or exhausts in manufacturer in this owners manual may cause fire, burns, electric shock any manner. -
Page 4: Installation Information
2.1 Attaching the metal trims 2. INSTALLATION INFORMATION ● Align and attach two side trims (Y) to both sides of the fireplace insert (W) respectively with the right angle side facing the front of the PACKAGE CONTENTS unit, using two screws (18) per trim. Part Description Quantity... -
Page 5: Installing The Fireplace Insert
2.2 Installing the fireplace insert 3. OPERATING INSTRUCTIONS ● Carefully set the fireplace insert (W into the back of the mantel and center it in the opening. Use care not to scratch the wood. ELECTRICAL SPECIFICATIONS Check the alignment, and then attach the fireplace insert (W) to the ●... - Page 6 US 3-Pin POLARIZED PLUG A 15 AMP circuit is required to operate this appliance. If the breaker trips when the appliance is running, you may need to This product is equipped with a 3-pin polarized plug as shown Fig move the appliance to another location or unplug other Connect to properly grounded outlets only.
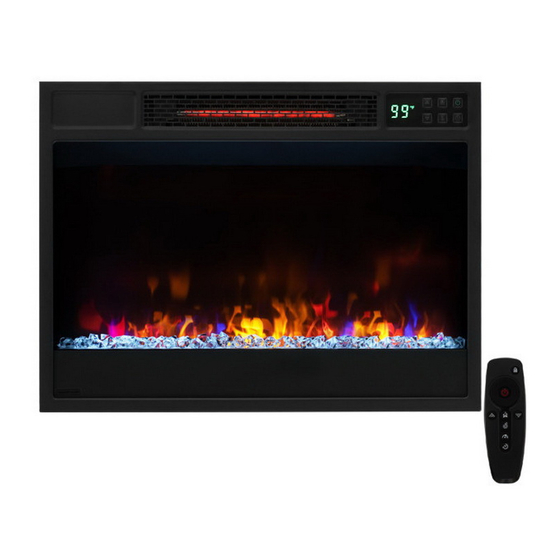
- Page 7 3a. Manual Control Panel Display Flame Color Flame Brightness Display Amber 5 levels Violet 5 levels Blue 5 levels Polar Breathing 5 levels Flame off, 5 levels only log light Figure 3 PWOER (Figure 3.A): ● Press the UP (Figure 3.E) or DOWN (Figure 3.F) to adjust the flame brightness, not including Polar flame.
-
Page 8: Remote Control Batteries
3b. Remote Control Fahrenheit 99°F 95°F 90°F 85°F 80°F 75°F 70°F 65°F 60°F Celsius 37°C 35°C 32°C 29°C 27°C 24°C 21°C 18°C 16°C The remote control can be used up to 13 feet (4 meters) away Display shown shown shown shown shown shown... -
Page 9: Temperature Limiting Control
Temperature Limiting Control Warning: Changes or modifications to this unit not expressly approved by the party responsible for compliance could void the user’s authority to operate the equipment. This heater is equipped with a Temperature Limiting Control. Should the heater reach an unsafe temperature, the heater will automatically turn OFF. -
Page 10: Troubleshooting Guide
The blower motor and flame motor are pre-lubricated for a durable 6. TROUBLESHOOTING GUIDE using time and need no further lubrication or maintenance.To remove any accumulation of dust or debris, the soft brush WARNING: Turn off the appliance, unplug and let cool for at least 10 minutes attachment of a vacuum cleaner should occasionally be used to before attempting to service. - Page 11 1. INFORMATIONS IMPORTANTES EN MATIÈRE DE SÉCURITÉ AVERTISSEMENT : Toute utilisation de cet appareil autre que celle recommandée par le fabricant dans ce manuel du propriétaire peut provoquer un incendie, des brûlures, un choc électrique et/ou d'autres blessures graves ou la mort. Lors de l'utilisation d'un appareil électrique, des précautions de base doivent toujours être suivies pour éviter les risques d'incendie, d'électrocution et de blessures, notamment :...
-
Page 12: Informations Sur L'installation
"OFF", puis retirez la fiche de la prise électrique. 2. INFORMATIONS SUR L'INSTALLATION 10. Ne branchez l'appareil que sur des prises de courant correctement mises à la terre. CONTENU DE L'EMBALLAGE 11. N'insérez pas ou ne laissez pas pénétrer de corps étrangers dans les ouvertures de ventilation ou d'évacuation, car cela pourrait provoquer un choc électrique ou un incendie, ou endommager l'appareil. -
Page 13: Instructions D'utilisation
2.1 Fixation des garnitures métalliques 2.2 Installation de l'insert de cheminée ● l Alignez et fixez deux garnitures latérales (Y) sur les deux côtés ● l Placez soigneusement l'insert de cheminée (W) à l'arrière de la de l'insert de cheminée (W) respectivement avec le côté à angle cheminée et centrez-le dans l'ouverture. - Page 14 Fiche américaine polarisée à 3 broches Cet appareil est équipé d'une fiche polarisée à 3 broches, comme illustré à la Fig. Ne branchez l'appareil que sur des prises correctement mises à la terre. Cet appareil ne peut être utilisé qu'avec une tension de 120 volts. Pour votre sécurité, branchez toujours l'appareil dans une prise murale.
- Page 15 Un circuit de 15 ampères est nécessaire pour faire fonctionner 3a. Panneau de Commande Manuelle cet appareil. Si le disjoncteur se déclenche lorsque l'appareil fonctionne, il peut être nécessaire de déplacer l'appareil ou de débrancher d'autres appareils qui se trouvent sur le même circuit.
- Page 16 Couleur de Luminosité de Afficher Afficher Fahrenheit 99°F 95°F 90°F 85°F 80°F 75°F 70°F 65°F 60°F la flamme la flamme (DÉSACTIVÉ) Celsius 37°C 35°C 32°C 29°C 27°C 24°C 21°C 18°C 16°C ambre 5 niveaux Afficher affiché affiché affiché affiché affiché affiché...
-
Page 17: Verrouillage Enfant
3b. Télécommande AVERTISSEMENT : Les changements ou modifications apportés à cet appareil sans l'approbation expresse de la partie responsable de la La télécommande peut être utilisée jusqu'à 4 mètres de conformité peuvent annuler le droit de l'utilisateur à faire fonctionner l'équipement. -
Page 18: Entretien Et Maintenance
Le moteur du ventilateur et le moteur de la flamme sont pré-lubrifiés Contrôle de Limitation de la Température pour une utilisation durable et ne nécessitent pas d'autre lubrification ou entretien. Pour éliminer toute accumulation de poussière ou de Cet appareil est équipé d'une commande de limitation de la débris, la brosse douce d'un aspirateur doit être utilisée de temps en température. -
Page 19: Guide De Dépannage
6. GUIDE DE DÉPANNAGE AVERTISSEMENT : Éteignez l'appareil, débranchez-le et laissez-le refroidir pendant au moins 10 minutes avant de tenter de le réparer. Seul un Return / Damage Claim Instructions professionnel qualifié doit tenter d'entretenir ou de réparer l'appareil. DO NOT discard the box / original packaging. PROBLÈME CAUSE POSSIBLE SOLUTION...
Need help?
Do you have a question about the FP10357US and is the answer not in the manual?
Questions and answers