Table of Contents
Advertisement
Quick Links
Advertisement
Table of Contents

Related Manuals for Audio Technica AT2020USB-XP


Summary of Contents for Audio Technica AT2020USB-XP
- Page 1 AT2020USB-XP Cardioid Condenser USB Microphone User Manual English...
-
Page 2: Safety Precautions
Safety precautions Although this product was designed to be used safely, failing to use it correctly may result in an accident. To ensure safety, observe all warnings and cautions while using the product. Cautions for the product • Do not subject the product to strong impact to avoid malfunction. •... -
Page 3: For Customers In Canada
For customers in Canada ISED statement CAN ICES-3(B)/NMB-3(B) -
Page 4: Notes On Use
Notes on use • Be sure to read the connected device’s user manual before use. • When the product is used for a long time, the product may become discolored due to ultraviolet light (especially direct sunlight) and wear. • Use the included USB cable for connection. •... -
Page 5: Part Names And Functions
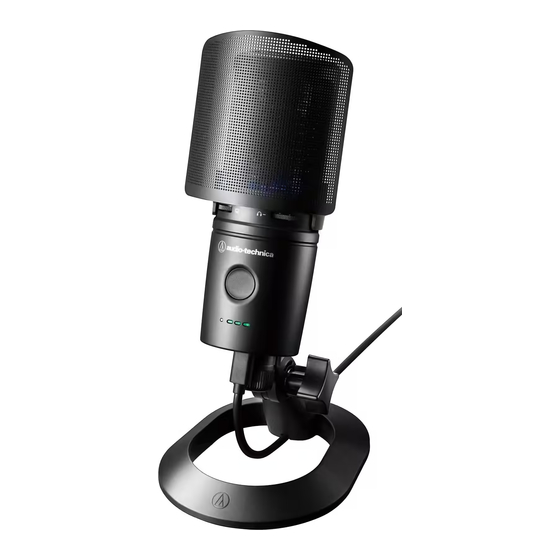
Part names and functions Microphone ➊ Microphone ➋ Mute indicator lamp Lights blue when audio input is enabled. It lights red when the microphone is muted. ➌ Mix control dial Adjusts the balance of the volume level of the sound coming from the computer and the monitored volume level of the audio being input (voice). - Page 6 ❼ Noise-reduction indicator lamp When the noise-reduction function is on, the noise-reduction indicator lamp lights in three levels depending on the level. ❽ Automatic gain control button Turns the automatic gain control function on/off. When the function is turned on, the gain is automatically corrected when the input signal is excessive to prevent output distortion.
-
Page 7: Included Accessories
Included accessories ➊ Stand ➋ USB cable (USB Type-C to USB Type-A) ➌ 3/8"-16 to 5/8"-27 threaded adapter ➍ USB conversion adapter (USB Type-A to USB Type-C) ➎ Pop filter (AT8175) -
Page 8: Setting Up The Product
Setting up the product For best results, set up the product so that it is facing the sound source. When using it to record voices, place it directly in front of the speaker/singer. Do the same thing when recording sound such as acoustic guitar, drums, or piano. Before using the product, try setting it up in various positions, to discover how best to record sound in your current environment. - Page 9 Attaching the pop filter Install the pop filter while slightly widening the mounting area to avoid damaging the microphone.
-
Page 10: Connection Procedure
Connection procedure ➊ USB conversion adapter (USB Type-A to USB Type-C) ➋ USB Type-A ➌ Headphone input plug ➍ USB Type-C ➎ Audio-Technica logo Connect the USB cable (USB Type-C side) to the USB terminal on the underside of the product. Connect the USB cable (USB Type-A side) to the computer. -
Page 11: For Windows
Computer settings (Windows) For Windows 11 Use the USB cable to connect the product to a computer. Confirm that the mute indicator lamp on the product lights. • The computer automatically recognizes the product and the driver is installed on the computer. In the lower right part of the screen, a message appears indicating that new hardware has been found or a notification appears indicating that the driver software has been installed. - Page 12 Select "Sound". Under "Output" and "Input", confirm that the product is selected. • If a device other than the product is being used as the output device, select this other device from "Choose where to play sound". • If you are using commercially available recording software to record audio, refer to "Microphone privacy settings"...
- Page 13 Microphone privacy settings If you are using commercially available recording software, check the microphone privacy settings. Click "Start Menu" and select "Settings". Select "Privacy & security".
- Page 14 Under "App permissions", select "Microphone". Check that "Microphone access" is set to "On".
- Page 15 Check that "Let apps access your microphone" is set to "On", and then check the list to confirm that the recording software you are using is set to "On". • If it is not set to "On", change the setting of the recording software you are using to "On". Check that "Let desktop apps access your microphone"...
- Page 16 Microphone property settings To change the microphone level and sample rate of the microphone, configure the following settings. Click "Start Menu" and select "Settings". Select "System".
- Page 17 Select "Sound". Under "Advanced", select "More sound settings".
- Page 18 In the "Playback" tab, confirm that the product is selected. • If the product is not selected, select the product, and then click "Set Default". Double-click the product's icon, and open the properties window.
- Page 19 Select the "Levels" tab, check that the microphone speaker icon is on, and then click "OK". • If it is not on, click the microphone speaker icon to turn it on.
- Page 20 In the "Recording" tab, confirm that the product is selected. • If the product is not selected, select the product, and then click "Set Default". Double-click the product's icon, and open the "Microphone Properties" window.
- Page 21 Select the "Levels" tab to adjust the microphone level. • To adjust the microphone level after you start recording, make the adjustments from this window. • This setting is different from the "Volume" setting in the "Sound" window.
- Page 22 To change the microphone sample rate, select the "Advanced" tab, select the sample rate and bit depth under "Default Format", and then click "OK". • With this product, you can select a sample rate of up to 192 kHz. Selecting a high sample rate may result in high-quality recorded audio data but will also make these files large.
- Page 23 Select the "Advanced" tab under the "Playback" tab, select the same sample rate and bit rate that you changed in step 11, and click "OK". • If you change the sample rate of the microphone, the sampling frequency setting in "Playback/Record" must be the same.
- Page 24 For Windows 10 Use the USB cable to connect the product to a computer. Confirm that the mute indicator lamp on the product lights. • The computer automatically recognizes the product and the driver is installed on the computer. In the lower right part of the screen, a message appears indicating that new hardware has been found or a notification appears indicating that the driver software has been installed.
- Page 25 Select "Sound". Under "Output" and "Input", confirm that the product is selected. • If a device other than the product is being used as the output device, select this other device from "Choose your output device". • If you are using commercially available recording software to record audio, refer to "Microphone privacy settings"...
- Page 26 Microphone privacy settings If you are using commercially available recording software, check the microphone privacy settings. In the "Sound" window, select "Microphone privacy settings".
- Page 27 Check that "Allow apps to access your microphone" is set to "On". Check that the recording software you are using is set to "On" under "Choose which Microsoft Store apps can access your microphone". • If it is not set to "On", change the setting of the recording software you are using to "On".
- Page 28 Check that "Allow desktop apps to access your microphone" is set to "On". • Changing this setting to "On" allows the recording software to access the product.
- Page 29 Microphone property settings To change the microphone level and sample rate of the microphone, configure the following settings. In the "Sound" window, select "Sound Control Panel".
- Page 30 In the "Playback" tab, confirm that the product is selected. • If the product is not selected, select the product, and then click "Set Default". Double-click the product's icon, and open the properties window.
- Page 31 Select the "Levels" tab, check that the microphone speaker icon is on, and then click "OK". • If it is not on, click the microphone speaker icon to turn it on.
- Page 32 In the "Recording" tab, confirm that the product is selected. • If the product is not selected, select the product, and then click "Set Default". Double-click the product's icon, and open the properties window.
- Page 33 Select the "Levels" tab to adjust the microphone level. • To adjust the microphone level after you start recording, make the adjustments from this window. • This setting is different from the "Master volume" setting in the "Sound" window.
- Page 34 To change the microphone sample rate, select the "Advanced" tab, select the sample rate and bit depth under "Default Format", and then click "OK". • With this product, you can select a sample rate of up to 192 kHz. Selecting a high sample rate may result in high-quality recorded audio data but will also make these files large.
- Page 35 Select the "Advanced" tab under the "Playback" tab, select the same sample rate and bit rate that you changed in step 8, and click "OK". • If you change the sample rate of the microphone, the sampling frequency setting in "Playback/Record" must be the same.
- Page 36 Computer settings (macOS) macOS Ventura Use the USB cable to connect the product to a computer. Confirm that the mute indicator lamp on the product lights. • The computer automatically recognizes the product and the driver is installed on the computer. From the Apple icon, select "System Preferences".
- Page 37 In the "Input" tab, confirm that the product is selected.
- Page 38 Use "Input volume" to adjust the microphone level. • Speaking into the microphone will cause the "Input level" indicator to move, so you can adjust the input volume while viewing this indicator.
- Page 39 In the "Output" tab, confirm that the product is selected. • If a device other than the product is being used to output sound, select the other device from lists. • Use "Output volume" to adjust the playback level from the computer. •...
- Page 40 Privacy and Security settings • If you are using commercially available recording software, check the privacy and security settings. • If you are using commercially available recording software, use software that is compatible with macOS. In the "System Preferences" window, select "Privacy & Security".
- Page 41 In "Privacy", select "Microphone". Check that the recording software you are using is enabled. • If it is not enabled, select the check box next to this software.
- Page 42 Match the sample rate to the value set with the recording software. Failing to do so may result in noise. Select the one that shows "AT2020USB-XP 1 (0 in / 2 outs)" and select the sample rate and bit rate from "Format"...
- Page 43 • If the mute indicator lamp is blinking, the sample rate setting differs from that set in the "Output" or "Input" tab on the Mac you are using. Match the sample rate settings. • Automatic gain control is available only when the sampling frequency is 44.1 kHz, 48 kHz, 88.2 kHz, or 96 kHz.
- Page 44 macOS Catalina, macOS Big Sur, and macOS Monterey Use the USB cable to connect the product to a computer. Confirm that the mute indicator lamp on the product lights. • The computer automatically recognizes the product and the driver is installed on the computer. From the Apple icon, select "System Preferences".
- Page 45 In the "Input" tab, confirm that the product is selected.
- Page 46 Use "Input volume" to adjust the microphone level. • Speaking into the microphone will cause the "Input level" indicator to move, so you can adjust the input volume while viewing this indicator. • Use "Output volume" to adjust the volume of the computer's speakers and headphone jack. This is different from adjusting the microphone level.
- Page 47 In the "Output" tab, confirm that the product is selected. • If a device other than the product is being used to output sound, select this other device from "Select a device for sound output". • You can use "Balance" to set the balance between the left and right volumes. •...
- Page 48 Security and privacy settings • If you are using commercially available recording software, check the security and privacy settings. • If you are using commercially available recording software, use software that is compatible with macOS. In the "System Preferences" window, select "Security & Privacy".
- Page 49 In the "Privacy" tab, select "Microphone". Check that the recording software you are using is enabled. • If it is not enabled, select the check box next to this software. • To change the "Security & Privacy" settings, you have to unlock them with the icon in the lower-left corner of the screen.
- Page 50 Match the sample rate to the value set with the recording software. Failing to do so may result in noise. Select the one that shows "AT2020USB-XP 2 (0 in / 2 outs)" and select the sample rate and bit rate from "Format"...
- Page 51 • If the mute indicator lamp is blinking, the sample rate setting differs from that set in the "Output" or "Input" tab on the Mac you are using. Match the sample rate settings. • Automatic gain control is available only when the sampling frequency is 44.1 kHz, 48 kHz, 88.2 kHz, or 96 kHz.
-
Page 52: Using The Product
Using the product Microphone orientation • To use the product, face towards the side that has the Audio-Technica logo while speaking. • Set this product and the sound source nearby. It is more difficult to pick up noise other than the target sound source. •... - Page 53 Connecting and using the headphones You can monitor sounds being recorded by connecting headphones to the headphone jack. Also, you can directly monitor your own voice from the product while listening to a sound source from your computer. Connect the headphones to the headphone jack. Turn the headphone level control dial to adjust the volume.
-
Page 54: Muting The Microphone
Muting the microphone Turn the muting of the microphone on/off. Touch the touch sensor for mute. • Each time you touch this control, muting turns on (lights red) or off (lights blue). -
Page 55: Automatic Gain Control
Automatic gain control This auxiliary function is used to correct the gain automatically and prevent distortion of the output when the input signal is excessive. This function optimizes microphone gain setting automatically. Press the automatic gain control button. • When the automatic gain control button is pressed, the automatic gain control indicator lamp lights and turns the function on. -
Page 56: Noise Reduction
Noise-reduction This function reduces the constant ambient noise. Press the noise-reduction button. • Each time you press the button, the function level increases and the noise reduction indicator lamp lights in three levels. • For best sound quality, use the least amount of noise-reduction function required for your environment. ➊... - Page 57 Cleaning Get into the habit of regularly cleaning the product to ensure that it will last for a long time. Do not use alcohol, paint thinners, or other solvents for cleaning purposes. • Wipe dirt off the product with a dry cloth. •...
-
Page 58: Troubleshooting
Troubleshooting ? The mute indicator lamp is blinking • The sampling rate setting differs from that set in the "Playback" or "Recording" tab on the Windows PC you are using or in the "Output" or "Input" tab on the Mac you are using. Match the sampling rate settings. For details on the settings, refer to "Computer settings (Windows)"... - Page 59 ? Recorded audio is played back at twice the normal speed • The sampling rate setting differs from that set in the "Playback" or "Recording" tab on the Windows PC you are using or in the "Output" or "Input" tab on the Mac you are using. Match the sampling rate settings. For details on the settings, refer to "Computer settings (Windows)"...
- Page 60 Supported bit depths and sampling rates The product supports the following bit depths and sampling rates. Recording (output) Playback (input) 1 channel, 16 bit, 44100 Hz 2 channel, 16 bit, 44100 Hz 1 channel, 16 bit, 48000 Hz 2 channel, 16 bit, 48000 Hz 1 channel, 16 bit, 88200 Hz 2 channel, 16 bit, 88200 Hz 1 channel, 16 bit, 96000 Hz...
- Page 61 Dimensions...
-
Page 62: Specifications
Specifications System requirements USB 2.0 compliant Supported OS Windows 10, Windows 11 macOS Catalina, macOS Big Sur, macOS Monterey, macOS Ventura (Please check the product's web page for the latest information.) Element Fixed-charge back plate, permanently polarized condenser Polar pattern Cardioid Frequency response 20-20,000 Hz... -
Page 63: Polar Pattern / Frequency Response
Polar pattern / Frequency response Polar pattern Frequency response... - Page 64 Trademarks • USB Type-C ™ is a trademark of USB Implementers Forum. • Microsoft® and Windows® are registered trademarks of Microsoft Corporation in the United States and/or other countries. • Microsoft Windows operating system is indicated in its abbreviated form as Windows. •...
- Page 65 株式会社オーディオテクニカ 〒194-8666 東京都町田市西成瀬2-46-1 www.audio-technica.co.jp Audio-Technica Corporation 2-46-1 Nishi-naruse, Machida, Tokyo 194-8666, Japan www.audio-technica.com ©2023 Audio-Technica Corporation Global Support Contact: www.at-globalsupport.com 142420940-02-01 ver.1 2023.08.15...
Need help?
Do you have a question about the AT2020USB-XP and is the answer not in the manual?
Questions and answers