Table of Contents
Advertisement
Quick Links
Advertisement
Table of Contents

Related Manuals for Audio Technica AT2020USB+


Summary of Contents for Audio Technica AT2020USB+
- Page 1 AT2020USB + User Manual Cardioid Condenser USB Microphone...
-
Page 2: Safety Precautions
Safety precautions Although this product was designed to be used safely, failing to use it correctly may result in an accident. To ensure safety, observe all warnings and cautions while using the product. Cautions for the product • Do not subject the product to strong impact to avoid malfunction. •... -
Page 3: Notes On Use
Notes on use • Be sure to read the connected device’s user manual before use. • When the product is used for a long time, the product may become discolored due to ultraviolet light (especially direct sunlight) and wear. • Use the included USB cable for connection. •... -
Page 4: Part Names And Functions
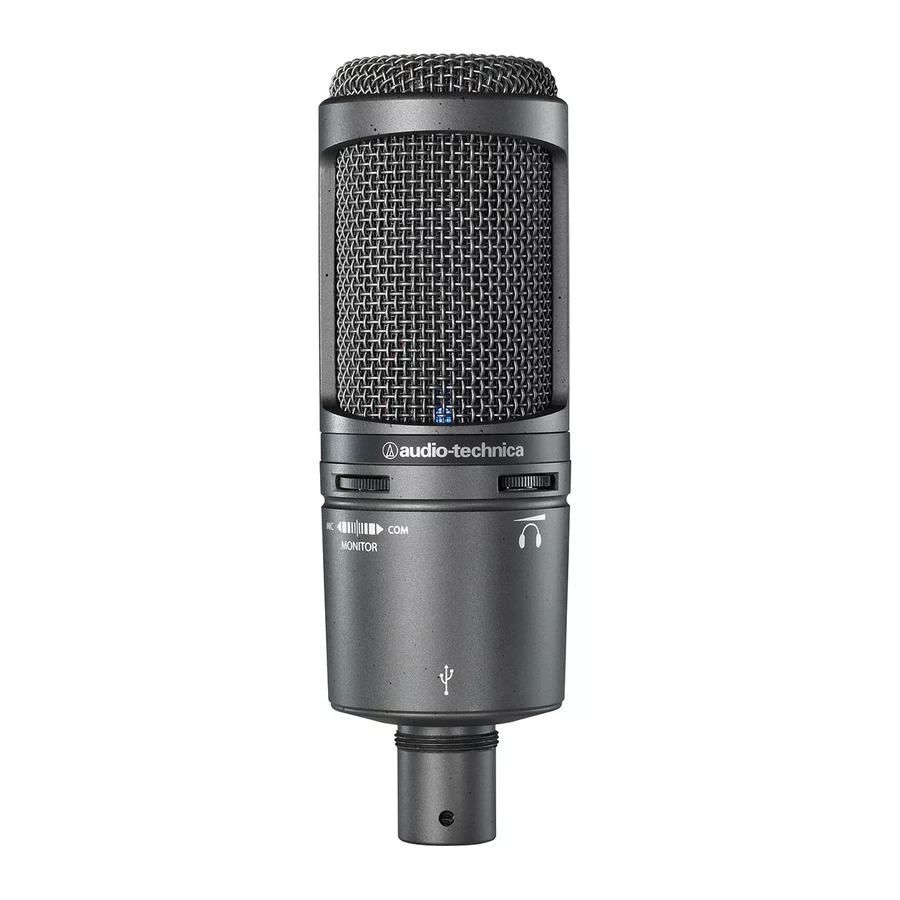
Part names and functions Front Rear Microphone Headphone jack (3.5 mm (1/8") stereo mini-jack) Indicator lamp Use to connect the headphones. Lights blue to show that the microphone is USB cable receiving power via USB. (3.1 m (10'), USB Type-A - USB Type-B) Mix control dial Adjusts the balance of the volume level of the sound source stored on the computer and the... -
Page 5: Setting Up The Product
Setting up the product For best results, set up the microphone so that it is facing the sound source. When using it to record voices, place it directly in front of the speaker/singer. Do the same thing when recording sound sources such as acoustic guitar, drums, or piano. - Page 6 Using the product Computer settings (Windows 8.1/10) 1. Use the USB cable to connect the product to a computer. 2. Confirm that the indicator lamp on the product lights. • Indicator lamp lights blue to show that the microphone is receiving power via USB. •...
- Page 7 Using the product • For Windows 8.1 Right click "Start Menu", and select "Control Panel". 4. Select "Sound".
- Page 8 Using the product 5. In the "Playback" tab, confirm that the product is selected. • If the product is not selected, select the product, and then click "Set Default". 6. In the "Recording" tab, confirm that the product is selected. •...
- Page 9 Using the product 7. Double-click the product's icon, and open the "Microphone Properties" window. 8. Select the "Levels" tab to adjust the microphone level. • To adjust the microphone level after you start recording, do the adjustments from this window.
- Page 10 Using the product Computer settings (Mac OS X) 1. Use the USB cable to connect the product to a computer. 2. Confirm that the indicator lamp on the product lights. • Indicator lamp lights blue to show that the microphone is receiving power via USB. •...
- Page 11 Using the product 5. In the "Input" tab, select the product. 6. In the "Output" tab, select the product.
-
Page 12: Microphone Orientation
Using the product Microphone orientation To use the product, face towards the side that has the Audio-Technica logo while speaking. Audio-Technica logo Using software for recording Software for recording is not included with the product. To use the product to record audio, use commercially available recording software. - Page 13 Using the product Connecting and using the headphones You can monitor sounds being recorded by connecting headphones to the headphone jack. Also, you can directly monitor your own voice from the product while listening to a sound source from your computer. 1.
- Page 14 Cleaning Regularly clean the product to ensure that it will last for a long time. Do not use alcohol, paint thinners, or other solvents for cleaning purposes. • Wipe dirt off the product with a dry cloth. • If the cables become dirty because of sweat, etc., wipe them with a dry cloth immediately after use. Failure to clean the cables may cause them to deteriorate and harden over time, resulting in a malfunction.
-
Page 15: Specifications
Specifications System requirements USB 1.0 or 2.0, and 64 MB or more of RAM Supported OS Windows 8.1, Windows 10, and Mac OS X or later (Please check the product's web page for the latest information.) Element Fixed-charge back plate, permanently polarized condenser Polar pattern Cardioid Frequency response... -
Page 16: Polar Pattern
Specifications Polar pattern 0˚ 330˚ 30˚ 60˚ 300˚ 90˚ 270˚ 120˚ 240˚ 210˚ 150˚ 180˚ SCALE IS 5 DECIBELS PER DIVISION LEGEND 200 Hz 1 kHz 5 kHz 8 kHz Frequency response 10 dB Frequency in Hertz LEGEND 0°, 50 cm Audio-Technica Corporation 2-46-1 Nishi-naruse, Machida, Tokyo 194-8666, Japan www.audio-technica.com...
Need help?
Do you have a question about the AT2020USB+ and is the answer not in the manual?
Questions and answers