
Subscribe to Our Youtube Channel
Related Manuals for Planet Networking & Communication WGS-804HP


Summary of Contents for Planet Networking & Communication WGS-804HP
- Page 1 Industrial 8-port 10/100/1000T Wall-mounted Gigabit Ethernet Switch with 4-port PoE+ WGS-804HP User's Manual...
-
Page 2: Table Of Contents
Table of Contents 1. Package Contents ................. 3 2. Hardware Description ................4 2.1 Terminal Block Connector Pinouts ............ 4 2.2 LED Indicators ................5 2.3 Product Specifications ..............7 2.4 Physical Dimensions ..............10 3. Installation ..................11 3.1 Wall-mount Installation ..............11 3.2 DIN-rail Mounting Installation ............ -
Page 3: Package Contents
Thank you for purchasing PLANET WGS-804HP Industrial 8-port 10/100/1000T Wall-mounted Gigabit Ethernet Switch with 4-port PoE+. “Wall-mounted PoE+ Switch” mentioned in this Guide refers to the WGS-804HP. Open the box of the Wall-mounted PoE+ Switch and carefully unpack it. The... -
Page 4: Hardware Description
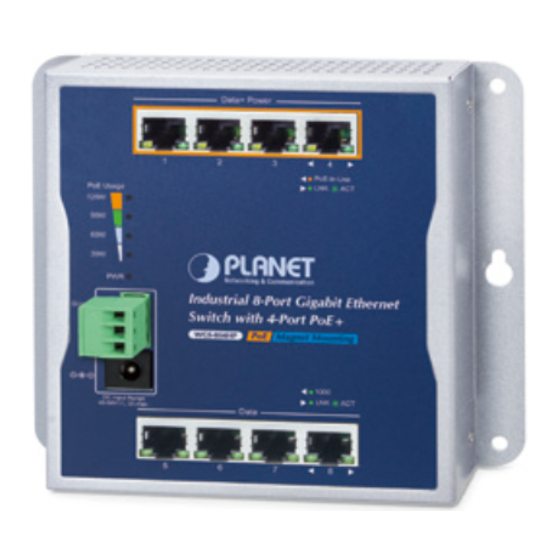
2. Hardware Description The front panel of the WGS-804HP Wall-mounted PoE+ Switch consists of 8 auto-sensing 10/100/1000Mbps Ethernet RJ45 ports. The LED indicators are also located on the RJ45 ports of the Wall-mounted PoE+ Switch. 802.3at PoE+ 10/100/1000BASE-T RJ45 Port... -
Page 5: Led Indicators
Step 2: Tighten the wire-clamp screws for preventing the wires from loosening and plug into the Wall-mounted PoE+ Switch. 1. The wire gauge should be in the range from 12 to 24 AWG. 2. The device must be grounded. 3. The DC power input range is 48V ~ 54V DC. 2.2 LED Indicators ... - Page 6 10/100/1000BASE-T Interfaces (Ports 5 to 8) Color Function To indicate the link through that port is Lights successfully established. To indicate that the switch is actively sending LNK/ACT Blinks Green or receiving data over that port. If LNK/ACT LED is off, it indicates that the port is link-down. To indicate that the port is operating at Lights 1000Mbps.
-
Page 7: Product Specifications
2.3 Product Specifications Product WGS-804HP Hardware Specifications Copper Ports 8 10/100/1000BASE-T RJ45 auto-MDI/MDI-X ports 4-Port with 802.3af/802.3at PoE injector function PoE Inject Port (Ports 1 to 4) Removable 3-pin terminal block for power input - Pin 1/2 for Power (Pin 1: V+ / Pin 2: V-) - Page 8 Switch Specifications Switch Architecture Store-and-Forward Switch Fabric 16Gbps/non-blocking Switch Throughput@64 11.9Mpps @64 bytes bytes MAC Address Table 8K entries Shared Data Buffer 1Mbit IEEE 802.3x pause frame for full duplex Flow Control Back pressure for half duplex Jumbo Frame Power over Ethernet PoE Standard IEEE 802.3af/802.3at Power over Ethernet PSE PoE Power Supply End-span...
- Page 9 IEC 60068-2-32 (free fall) Stability Testing IEC 60068-2-27 (shock) IEC 60068-2-6 (vibration) IEEE 802.3 10BASE-T Standards IEEE 802.3u 100BASE-TX Compliance IEEE 802.3ab Gigabit 1000BASE-T IEEE 802.3x Flow Control and Back Pressure Environment Temperature: -40 ~ 75 degrees C Operating Relative Humidity: 5 ~ 95% (non-condensing) Temperature: -40 ~ 85 degrees C Storage Relative Humidity: 5 ~ 95% (non-condensing)
-
Page 10: Physical Dimensions
148.00 133.00 Data+ Power PoE-in-Use PoE Usage 120W 6.00 Industrial 8-Port Gigabit Ethernet Ground Switch with 4-Port PoE+ PoE Magnet Mounting WGS-804HP 1000 DC Input Range 48-56V , 3A max. Data 118.00 24.20 PoE-in-Use 6.00 ort Gigabit Ethernet 4-Port PoE+... -
Page 11: Installation
Step 2: Install a conductor pipe inside the board hole and flush the edge of the conductor pipe with the wall surface. Step 3: Screw the bolts into the conductor pipe. The WGS-804HP is between bolts and conductor pipe, as shown below. -
Page 12: Din-Rail Mounting Installation
The DIN-rail kit is included in the WGS-804HP package. When the wall-mount application for the WGS-804HP needs to be replaced with DIN-rail application, please refer to the following figures to screw the DIN-rail on the WGS-804HP. To hang up the WGS-804HP, follow the steps below: Step 1: Screw the DIN-rail on the WGS-804HP. -
Page 13: Magnet Installation
E + S w i t c h D a t 1 0 0 L N K A C T 3.3 Magnet Installation To install the WGS-804HP on a magnetic surface, simply follow the following diagram:... -
Page 14: Customer Support
4. Customer Support Thank you for purchasing PLANET products. You can browse our online FAQ resource and User’s Manual on PLANET Web site first to check if it could solve your issue. If you need more support information, please contact PLANET switch support team.
Need help?
Do you have a question about the WGS-804HP and is the answer not in the manual?
Questions and answers