Table of Contents
Advertisement
Quick Links
Advertisement
Table of Contents

Related Manuals for AUTOTERM PU-27


Summary of Contents for AUTOTERM PU-27
- Page 1 Control Panel PU-27 Operating Manual Ver. 1.0.0.1.
-
Page 2: Table Of Contents
Contents Introduction Warranty and liability Safety Purpose Control panel description Starting control panel operation Main menu Timers settings menu Fast access to startup timers activation menu Hydronic pre-heaters settings menu Air heaters settings menu Parameters settings menu Time settings menu Language settings menu Software version display menu Operation Time settings menu... -
Page 3: Introduction
Planar 44D Planar 8D For detailed information on product models supported, please visit www.autoterm- europe.com In case of any problems, we strongly recommend that you contact authorized service centers, the addresses and phone numbers of which you can obtain from the seller or on the www.autoterm-europe.com... -
Page 4: Safety
- failure to follow the rules for installation, operation, storage, and transportation specified in the Operating Manual; - use of the control panel for purposes other than intended. Safety Do not switch on and operate the product in locations where combustible vapors or gases or large amounts of dust can form and accumulate (for example, filling stations or petroleum, fuel, coal, timber or grain storage facilities). -
Page 5: Starting Control Panel Operation
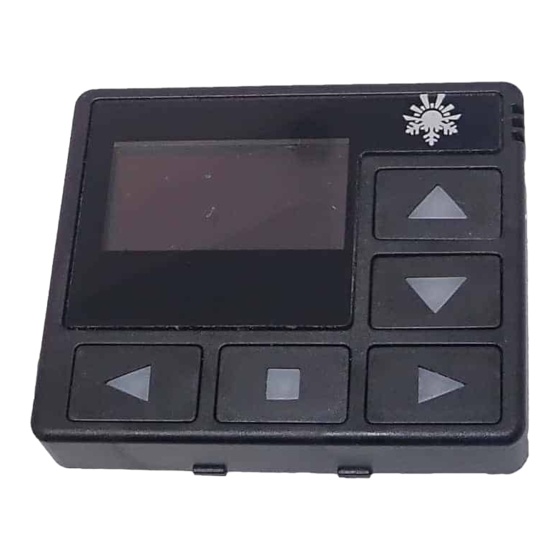
The control panel interface depends on the product it is connected to. Control panel external view 1 – activated startup timer. 2 - power supply voltage. 3 – LED indicator. 4 – control keys. Starting control panel operation After connecting the control panel to the product, the control panel software version and the process of establishing connection with the product will be displayed. -
Page 6: Main Menu
Main menu Switch to the main menu from the main screen by clicking the Menu icon Description Startup timers menu. Product operating parameters setting menu. (*this menu cannot be used for products without settings). Control panel settings menu. Current time and day settings menu. Language settings menu. -
Page 7: Timers Settings Menu
Timers settings menu The control panel allows the startup timers to be programmed. For startup timer setting, the following data must be indicated: startup time in 24-hour format; day of week (Monday - Sunday) or select daily startup (ED); ... -
Page 8: Fast Access To Startup Timers Activation Menu
Fast access to startup timers activation menu For fast access to the timer activation menu from the control panel main screen, press and hold the key. This menu is only intended for timer activation. Timers cannot be edited in this menu. Action of timers activation menu keys: Action Keys... - Page 9 Additional heater mode is OFF. Additional heater automatic operation. If the pre-heater is off, after the vehicle engine starts, the pre-heater will start automatically. After the engine stops, the pre-heater will А shut off automatically. If the pre-heater is on, after the vehicle engine starts it will switch to additional heater mode automatically.
-
Page 10: Air Heaters Settings Menu
Pump tupe Pump selection depending on configuration, pre-heater Bosch pump ADVERS pump Setting of pre-heater control with the alarm channel. provided the pre-heater is connected to the alarm system and a free channel is Sign channel available). Pre-heater control OFF ... -
Page 11: Parameters Settings Menu
Heater power value in the 0 to 9 range, where 0 is minimum and 9 Power value is maximum power. The value at which the heater will switch to standby mode. The heater will switch from standby mode when the temperature of the T setpoin sensor used to control heater operation drops 5 °C below the “Set temperature”... -
Page 12: Time Settings Menu
Setting of indicator lighting during operation. - the indicator is dimmed while the pre-heater is on. During run the indicator is constantly lit while the pre-heater is on. Setting of indicator light brightness. Indicator light brightness Brightness is set in the 0 to 4 range. The brightness default value is 4. Setting of start by clicking key for pre-heater/heater start. -
Page 13: Language Settings Menu
Action of Time menu keys: Keys Action Navigation through the menu items Change menu item value Save changes and exit from this menu to the main screen Language settings menu This menu is intended for interface language selection. Action of Language menu keys: Keys Action Navigation through the menu items... -
Page 14: Software Version Display Menu
Software version display menu In this menu, the information on software versions is displayed. - control panel software version; - product control unit software version; - Product serial number. Press any key to exit. Operating Time settings menu This menu is intended for setting pre-heater operating time with a 5 minute step. -
Page 15: Air Heater Start
Full-screen display of current coolant temperature and power supply voltage. When the pre-heater is operating, enter the pre-heater operating time editing menu. Pre-heater shutoff. Air heater start Start of heater from the main screen or from the temperature sensors screen. The indicator will appear as follows. - Page 16 Temperature sensors display. When the air-heater is operating, enter the air-heater operating time editing menu. Heater shutoff. Economy mode ON / OFF. (for 14ТС-mini and 14ТС-10) *for PLANAR Pre-heater shutoff.
-
Page 17: Malfunctions
ATTENTION! Maintenance and repair should only be performed by trained, qualified personnel! Acceptance and packing certificate PU-27 control panel, serial number _________________ Is manufactured and accepted in accordance with the applicable technical documentation and found suitable for operation. Packing performed...
Need help?
Do you have a question about the PU-27 and is the answer not in the manual?
Questions and answers