Table of Contents
Advertisement
Quick Links
Advertisement
Table of Contents

Related Manuals for Zline RK62342


Summary of Contents for Zline RK62342
- Page 1 ange Installation Guide and Users Manual...
- Page 2 ZLINE is fueled by a passion for innovation; A relentless pursuit of bringing the highest end luxury designs and professional features into everyone's homes. Because we continually strive to improve our products, we may change specifications and designs without prior notice.
- Page 3 Often the center attraction of a kitchen, ZLINE range hoods can add surprising value to your property, by providing both an impressive, aesthetic look to your home, excellent ventilation, and additional kitchen lighting. ZLINE range hoods blend superior performance with elegant design.
- Page 4 8” metal transition piece without a backdraft damper and a piece of 4’ metal ducting. Our ZLINE single motor units come with a plastic 6” plastic transition piece with a backdraft damper and a 4’ long piece of flexible ducting.
- Page 5 WARRANTY THIS WARRANTY WILL BE VOID WHEN Product damaged through negligence, improper installation, accident, abuse, misuse, and natural disaster, insufficient or excessive electrical supply. Abnormal mechanical or environmental conditions or any unauthorized disassembly repair, modifications or failure to follow the installation instructions or when product is used commercially or other than its intended purpose or damaged because of improper connection with equipment of other manufacturers.
- Page 6 DISCLAIMER Carefully inspect all items for damages before accepting delivery. Customer should note any damages on the freight bill or express receipt. Request the name and signature of the carrier’s agent and keep a copy to support your claim. Upon acceptance of items, owner assumes responsibility for its safe arrival.
-
Page 8: Table Of Contents
TABLE OF CONTENTS IMPORTANT SAFETY INSTRUCTIONS WALL RANGE HOOD INSTALLATION WALL CROWN MOLDING INSTALLATION DESIGNER WALL RANGE HOOD INSTALLATION WALL CROWNSOUND INSTALLATION ® ISLAND RANGE HOOD INSTALLATION DESIGNER ISLAND RANGE HOOD INSTALLATION ISLAND CROWNSOUND INSTALLATION ® UNDER CABINET INSTALLATION RANGE HOOD INSERT INSTALLATION REMOTE BLOWER INSTALLATION BUTTON/CONTROL PANEL OPERATION HOW TO CHANGE PARTS... -
Page 9: Important Safety Instructions
SAFETY INSTRUCTIONS This is the safety alert symbol. This symbol alerts you to potential hazards that can hurt you and others. All safety messages will follow the safety alert WARNING symbol. READ ALL INSTRUCTIONS BEFORE INSTALLING AND OPERATING THIS APPLIANCE. •... - Page 10 SAFETY INSTRUCTIONS • Ducted fans MUST ALWAYS be vented to the outdoors. At the point where the duct work ends, add an external damper to prevent air from entering the home when the hood is not in use. This also prevents small animals and rain water from entering the duct work.
- Page 11 SAFETY INSTRUCTIONS • All ZLINE range hoods are ETL and UL listed, ensuring all parts were tested for safety and meet industry standards and regulations. NOTE: This ensures all included plastic ducting pieces were tested for safety and are flame retardant.
-
Page 12: Wall Range Hood Installation
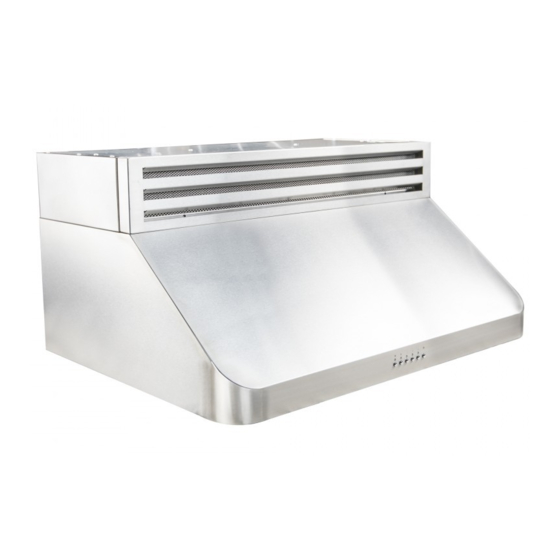
WALL HOOD INSTALLATION Installation Tutorial Video... - Page 13 WALL HOOD INSTALLATION Please unpack your range hood when it is delivered and inspect to ensure all parts are included. Main Hood with All Lights and 4. Baffle Filters Button Banks Pre-Installed 5. Flexible Duct (for 6” or 8”) 2. Adjustable Stainless Steel 6.
- Page 14 WALL HOOD INSTALLATION The recommended height to install your hood is 30˝ minimum and 36˝ maximum above the cooktop. For Outdoor (304 Series) hood installation, the unit must be installed at a minimum of 36˝ and a maximum of 42” above the grill. Find the center of the wall where you are installing the hood.
- Page 15 Attach the ducting to the range hood. Before installing baffle filters, make sure that you insert the clear, plastic grease cup under the motor blower. ZLINE provides a ducting ring for the 8” metal ductwork. The ring for the PVC NOTE: 6”...
- Page 16 WALL HOOD INSTALLATION 8. Install the two part chimneys on top of the hood. Slide the inside section up until the vertical vent slots are visible, attach top portion to mounting bracket with screws. Secure lower chimney portion to the hood with screws provided. Figure 6 Install the grease cup by sliding into brackets located at the bottom of the motor.
-
Page 17: Wall Crown Molding Installation
WALL CROWN MOLDING INSTALLATION If using a crown molding, follow instructions before attaching ducting and chimney sections. Attach crown molding bracket to ceiling using hardware provided. 2. Attach ducting and electrical connections. 3. Attach chimney sections to the range hood, then connect to crown molding bracket. -
Page 18: Designer Wall Range Hood Installation
DESIGNER WALL HOOD INSTALLATION Installation Tutorial Video... - Page 19 DESIGNER WALL HOOD INSTALLATION Please unpack your range hood when it is delivered and inspect to ensure all parts are included. PARTS SUPPLIED Main Hood with All Lights and 5. Flexible Duct (for 6” or 8”) Button Banks Pre-Installed 6. Packet of Screws and Anchors 2.
- Page 20 DESIGNER WALL HOOD INSTALLATION The recommended height to install your hood is 30˝ minimum and 36˝ maximum above the cooktop. For Outdoor (304 Series) hood installation, the unit must be installed at a minimum of 36˝ and a maximum of 42” above the grill. Find the center of the wall where you are installing the hood.
- Page 21 DESIGNER WALL HOOD INSTALLATION 5. Make your electrical and ducting connections. Try and minimize the use of elbows. More elbows and longer runs create higher static pressure. The hood comes with a grounded three prong plug that can either be direct wire or plugged into a 20amp.
- Page 22 DESIGNER WALL HOOD INSTALLATION 8. Find the center of the wall where you are installing the hood. Make sure there is sufficient bracing to hold the weight of the hood. Mark your center line and measure out from the center to find your two mounting points. Make sure your mounting points are level when you mark them.
-
Page 23: Wall Crownsound ® Installation
WALL CROWNSOUND INSTALLATION ® ELECTRIC POWER RATING Frequency: 1 10V/50 Hz Power: 10W Installation Tutorial Video Attach crown molding bracket to ceiling using hardware provided. Figure 1 Figure 1 2. Attach ducting and electrical connections. Plug the speakers into an outlet behind the chimney. - Page 24 The crown should cover the gap. Ensure that it installs properly and is level. Figure 3 Figure 3 4. Open the phone’s Bluetooth settings and find “ZLINE Audio.“ When the connection is successful, a chime will sound. Figure 4 Input Figure 4 Bluetooth crown moldings carry a one year parts warranty.
-
Page 25: Island Range Hood Installation
ISLAND HOOD INSTALLATION Installation Tutorial Video... - Page 26 ISLAND HOOD INSTALLATION Please unpack your range hood when it is delivered and inspect to ensure all parts are included. PARTS SUPPLIED Main Hood with All Lights and 6. Packet of Screws and Anchors Button Banks Pre-Installed Top Mounting Bracket 2.
- Page 27 ISLAND HOOD INSTALLATION The recommended height to install your hood is 30˝ minimum and 36˝ maximum above the cooktop. For Outdoor (304 Series) hood installation, the unit must be installed at a minimum of 36˝ and a maximum of 42” above the grill. Locate the center above the stove where the hood is to be installed.
- Page 28 ISLAND HOOD INSTALLATION Slide chimney pieces over the angle iron on the hood. Pull the electrical plug to the top of the chimney sections. Figure 4 2. Lift the hood to attach the angle iron to the ceiling bracket. Use screws provided to attach.
-
Page 29: Designer Island Range Hood Installation
DESIGNER ISLAND HOOD INSTALLATION Installation Tutorial Video... - Page 30 DESIGNER ISLAND HOOD INSTALLATION Please unpack your range hood when it is delivered and inspect to ensure all parts are included. PARTS SUPPLIED Main Hood with All Lights and 6. Packet of Screws and Anchors Button Banks Pre-Installed Top Mounting Bracket 2.
- Page 31 DESIGNER ISLAND HOOD INSTALLATION The recommended height to install your hood is 30˝ minimum and 36˝ maximum above the cooktop. For Outdoor (304 Series) hood installation, the unit must be installed at a minimum of 36˝ and a maximum of 42” above the grill. Locate the center above the stove where the hood is to be installed.
- Page 32 DESIGNER ISLAND HOOD INSTALLATION 6. Slide chimney pieces over the angle iron on the hood. Pull the electrical plug to the top of the chimney sections. Figure 4 Lift the hood to attach the angle iron to the ceiling bracket. Use screws provided to attach.
-
Page 33: Island Crownsound ® Installation
ISLAND CROWNSOUND INSTALLATION ® ELECTRIC POWER RATING Frequency: 1 10V/50 Hz Power: 10W Installation Tutorial Video Attach crown molding bracket to ceiling using hardware provided. Figure 1 Screw:A/C/D Screw:E Figure 1 Screw:A/C/D 2. Attach ducting and electrical connections. Plug the speakers into an outlet behind the chimney. - Page 34 The crown should cover the gap. Ensure that it installs properly and is level. Figure 3 Figure 3 4. Open the phone’s Bluetooth settings and find “ZLINE Audio.“ When the connection is successful, a chime will sound. Figure 4 110V / 60Hz...
-
Page 35: Under Cabinet Installation
UNDER CABINET INSTALLATION Installation Tutorial Video... - Page 36 UNDER CABINET INSTALLATION PREPARATION • Decide the location of the venting pipe from the hood to the outside. • Check hood for clearance. • A straight, short vent run will allow the hood to perform more efficiently. • Try to avoid as many transitions, elbows, and long runs as possible. This may reduce the performance of the hood.
- Page 37 UNDER CABINET INSTALLATION If you need to convert your under cabinet range hood to rear ducting, use the following instructions. Please note that converting the undercab to rear ducting is a modification of the standard hood and part of the installation process.
-
Page 38: Range Hood Insert Installation
INSERT INSTALLATION Installation Tutorial Video... - Page 39 INSERT INSTALLATION When installing a range hood insert, it is recommended to install the unit at a minimum of 30˝ from the cooktop. For outdoor range hood inserts it is recommended to install the unit at a minimum of 36˝ and a maximum of 42” from the grill top. Unpack contents of the hood.
-
Page 40: Remote Blower Installation
REMOTE BLOWER INSTALLATION When installing your new remote blower type range hood, follow the instructions for the type of hood you are installing. Remote blowers are available with wall, island, under cabinet, and insert range hoods. Make certain to connect the electrical cord to the hood and plug the blower motor in to test the unit. - Page 41 REMOTE BLOWER INSTALLATION The Remote Blower is designed for our Remote Range Hoods. This unit is installed remotely in the interior of your home. This provides venting, but with reduced noise. T85 Remote Blower—Single Motor (This Blower must be used with Remote Blower Hood) Airflow: 400 (CFM) Noise Level: 1.2 / 2.6 / 4.2 / 6.5 (Sones) Dimensions: 26.14 x 14.6 x 13...
-
Page 42: Button/Control Panel Operation
Button Control Panel Operational Manual OPERATION Button functions Power: Turn ON/OFF the range hood and activate power-off delay timer. Light: Turn ON/OFF (Some models will have bright, dim, and OFF settings.) Blower Speed Indicator: Shows current blower (motor) speed (1-4). 1- Low Speed: Light frying/boiling. -
Page 43: How To Change Parts
CHANGING PARTS HOW TO CHANGE OUT THE BUTTON PANEL Remove baffle/aluminum filters. 2. Locate back of button panel. 3. Remove screws from each side of the button panel. 4. Disconnect button panel from cord connecting to circuit board. NOTE: Never work on or clean the range hood while power is ON. Always unplug the unit or switch the electrical breaker to the off position. - Page 44 CHANGING PARTS HOW TO REPLACE THE CIRCUIT BOARD Turn the power off at the breaker and unplug the Range Hood. 2. Remove all screws from the top of the circuit board cover. 3. Take a picture of the wiring layout (this will help you put the circuit board back together properly).
- Page 45 CHANGING PARTS REPLACING THE LIGHT BULBS IN YOUR RANGE HOOD Remove baffles. 2. Squeeze the old LED light casting out until it falls out of the socket. 3. Disconnect the plug wires from the light wire. 4. Reconnect the LED plug into the light wire. 5.
- Page 46 CHANGING PARTS PROFESSIONAL SERIES BAFFLE FILTER CHANGE Covering Models 696, 697, 697i (Island), KECOM, KECOMi (Island), 695, 698, and 721 Inserts Professional series hoods are equipped with 2 removable dishwasher safe baffle channels (one for series 695 and 698 inserts) that the baffle filters rest in. To install the channels, place inside the hood, right under the front and back edges of the hood.
- Page 47 CHANGING PARTS BAFFLE FILTER The baffle filter is equipped with a knob. To remove from the hood, pull back toward the wall and down.
- Page 48 CHANGING PARTS CHANGE/REPLACE CAPACITOR: Remove screws from the circuit board cover. 2. Remove screws from compactor. 3. Remove both wired connections from the capacitor. 4. Connect new capacitor with wire connectors. 5. Replace screws in cover. 6. Repeat operation if dual motor. NOTE: Some units have more than one motor.
- Page 49 CHANGING PARTS REPLACE OR CHANGE CHARCOAL FILTERS: It is recommended to direct vent the hood whenever possible. If your situation does not allow for a direct vent install, carbon filters are available to recirculate the air through your hood. Filter Support Screws Remove the stainless steel or aluminum filters from the bottom of the hood.
- Page 50 CHANGING PARTS HOW TO CLEAN, INSTALL, OR REPLACE THE GREASE CUP: A removable grease cup is provided to catch any excess grease at the bottom of the motor. Remove it every 2 to 3 months, wash it, then re-install it. NOTE: Never work on or clean the range hood while power is ON.
- Page 51 CHANGING PARTS REPLACE OR CHANGE TRANSFORMER: Remove the screws from the transformer. 2. Remove the two connections to the lights. 3. Remove the two wired connections from the circuit board (you must remove the circuit board cover). 4. Install the new connections from your new transformer (be certain the correct wires are connected).
- Page 52 CHANGING PARTS SINGLE MOTOR ELECTRICAL DIAGRAM...
- Page 53 CHANGING PARTS DUAL MOTOR ELECTRICAL DIAGRAM...
-
Page 54: Troubleshooting And Faq
TROUBLESHOOTING Where are ZLINE products manufactured? All ZLINE products are manufactured in ZLINE facilities overseas, including: Germany, Italy, and China. Are ZLINE range hoods considered type 1 or type 2? Type 1 - Range hoods that are used with appliances that produce grease and smoke. - Page 55 TROUBLESHOOTING How loud is the range hood? A sone is measure of loudness, the higher the sone rating, the louder the sound of the hood. The sound of one sone is comparable to that of a quiet refrigerator. Keep in mind that other factors such as the size of the blowers can affect the loudness of the range hood.
- Page 56 TROUBLESHOOTING What type of motor is in the range hoods? Our hoods have a squirrel cage motor. Is the width of my range hoods description, the actual size? No, the actual size of the range hood will be slightly less than the generic description of the range hood.
- Page 57 “ZLINE Audio” won’t appear in the Bluetooth settings. Check if the electrical connections are secure. A chime will sound if the connection is successful. If “ZLINE Audio” still will not appear, call ZLINE at 1-614-5004 for a replacement.
- Page 58 TROUBLESHOOTING My range hood will not operate. Check that there is power to the range hood. The most common issue is that the circuit breaker is off or the fuse has blown. 2. Make sure the speed has been selected at the range hood controls. 3.
- Page 59 TROUBLESHOOTING My range hood is not pulling. • Was the unit plugged in and was the fan checked before installation? • What distance is the hood mounted above the cook top? • Indoor (30”-36”), outdoor (36”-40”) • Is the range hood width the correct size for the cook top? •...
- Page 60 TROUBLESHOOTING Noisy Motor • Were the fan speeds checked fan speeds prior to installation? • Is the ducting clear? • Check to make sure motor is attached to housing • Is the 6” back draft damper on transition piece functioning properly (760 CFM hood?) Does it open when the hood is engaged? •...
-
Page 61: Mounting Specifications
MOUNTING SPECIFICATIONS Model Numbers 19 1 16 " 20 11 16 " 29 3 4 " 432-30 8 " 19 1 16 " 26 11 16 " 35 3 4 " 432-36 8 " 19 1 16 " 32 11 16 " 41 3 4 "... - Page 62 MOUNTING SPECIFICATIONS Model Numbers 19 1 16 " 20 11 16 " 29 3 4 " 433-30 8 " 19 1 16 " 26 11 16 " 35 3 4 " 433-36 8 " 19 1 16 " 32 11 16 " 41 3 4 "...
- Page 63 MOUNTING SPECIFICATIONS Model Numbers 19 1 16 " 20 11 16 " 29 3 4 " 435-30 8 " 19 1 16 " 26 11 16 " 35 3 4 " 435-36 8 " 19 1 16 " 20 11 16 " 29 3 4 "...
- Page 64 MOUNTING SPECIFICATIONS Model Numbers 17 11 16 " 9 11 16 " 13 5 16 " 455-30 6 " 17 11 16 " 9 11 16 " 13 5 16 " 455-36 8 " 9 11 16 " 17 11 16 " 13 5 16 "...
- Page 65 MOUNTING SPECIFICATIONS Model Numbers 17 11 16 " 9 11 16 " 13 5 16 " 476-30 6 " 17 11 16 " 9 11 16 " 13 5 16 " 476-36 8 " 17 11 16 " 9 11 16 " 13 5 16 "...
- Page 66 MOUNTING SPECIFICATIONS Model Numbers 17 11 16 " 9 11 16 " 13 5 16 " 477-30 6 " 17 11 16 " 9 11 16 " 13 5 16 " 477-36 8 " 9 11 16 " 17 11 16 " 13 5 16 "...
- Page 67 MOUNTING SPECIFICATIONS Model Numbers 19 1 16 " 20 11 16 " 29 3 4 " 488-30 8 " 19 1 16 " 26 11 16 " 35 3 4 " 488-36 8 " 19 1 16 " 32 11 16 " 41 3 4 "...
- Page 68 MOUNTING SPECIFICATIONS Model Numbers 15 3 16 " 9 9 16 " 11 11 16 " 587-R-30 8 " 9 9 16 " 15 3 16 " 11 11 16 " 587-R-36 8 " 9 9 16 " 15 3 16 " 11 11 16 "...
- Page 69 MOUNTING SPECIFICATIONS Model Numbers 15 3 16 " 9 9 16 " 11 11 16 " 587-30 6 " 9 9 16 " 15 3 16 " 11 11 16 " 587-36 6 " 15 3 16 " 9 9 16 " 11 11 16 "...
- Page 70 MOUNTING SPECIFICATIONS Model Numbers 15 3 16 " 9 9 16 " 11 11 16 " 597-R-30 8 " 9 9 16 " 15 3 16 " 11 11 16 " 597-R-36 8 " 9 9 16 " 15 3 16 " 11 11 16 "...
- Page 71 MOUNTING SPECIFICATIONS Model Numbers 15 3 16 " 9 9 16 " 11 11 16 " 597-30 6 " 9 9 16 " 15 3 16 " 11 11 16 " 597-36 6 " 15 3 16 " 9 9 16 " 11 11 16 "...
- Page 72 MOUNTING SPECIFICATIONS MOUNTING SPECIFICATIONS Model Numbers 17 11 16 " 9 11 16 " 13 5 16 " 655-R-30 8 " 17 11 16 " 9 11 16 " 13 5 16 " 655-R-36 8 "...
- Page 73 MOUNTING SPECIFICATIONS Model Numbers 17 11 16 " 9 11 16 " 13 5 16 " 655-30 6 " 17 11 16 " 9 11 16 " 13 5 16 " 655-36 8 " 17 11 16 " 9 11 16 " 13 5 16 "...
- Page 74 MOUNTING SPECIFICATIONS Model Numbers 17 11 16 " 9 11 16 " 13 5 16 " 667-30 6 " 17 11 16 " 9 11 16 " 13 5 16 " 667-36 8 " 17 11 16 " 9 11 16 " 13 5 16 "...
- Page 75 MOUNTING SPECIFICATIONS Model Numbers 19 1 16 " 20 11 16 " 29 3 4 " 685-30 8 " 19 1 16 " 26 11 16 " 35 3 4 " 685-36 8 " 19 1 16 " 32 11 16 " 41 3 4 "...
- Page 76 MOUNTING SPECIFICATIONS Model Numbers 19 1 16 " 20 11 16 " 29 3 4 " 686-30 8 " 19 1 16 " 26 11 16 " 35 3 4 " 686-36 8 " 19 1 16 " 32 11 16 " 41 3 4 "...
- Page 77 MOUNTING SPECIFICATIONS Model Numbers 19 5 16 " 17 7 8 " 14 1 4 " 687-R-30 8 " 19 5 16 " 17 7 8 " 14 1 4 " 687-R-36 8 " 19 5 16 " 14 1 4 " 17 7 8 "...
- Page 78 MOUNTING SPECIFICATIONS Model Numbers 19 5 16 " 14 1 4 " 17 7 8 " 687-30 8 " 19 5 16 " 17 7 8 " 14 1 4 " 687-36 8 " 19 5 16 " 17 7 8 " 14 1 4 "...
- Page 79 MOUNTING SPECIFICATIONS Model Numbers 7 11 16 " 14 1 8 " 11 1 4 " 696-36 6 " 7 11 16 " 14 1 8 " 11 1 4 " 696-R-36 8 "...
- Page 80 MOUNTING SPECIFICATIONS Model Numbers 17 11 16 " 9 11 16 " 13 5 16 " 697-R-30 8 " 17 11 16 " 9 11 16 " 13 5 16 " 697-R-36 8 " 17 11 16 " 9 11 16 " 13 5 16 "...
- Page 81 MOUNTING SPECIFICATIONS Model Numbers 17 11 16 " 9 11 16 " 13 5 16 " 697-30 6 " 17 11 16 " 9 11 16 " 13 5 16 " 697-36 8 " 9 11 16 " 17 11 16 " 13 5 16 "...
- Page 82 MOUNTING SPECIFICATIONS Model Numbers 27 7 8 " 9 1 2 " 11 13 16 " 632-30 6 " 27 7 8 " 9 1 2 " 11 13 16 " 632-36 8 " 27 7 8 " 15 11 16 " 632-42 18 "...
- Page 83 MOUNTING SPECIFICATIONS MOUNTING SPECIFICATIONS Model Numbers 17 1 16 " 9 5 8 " 13 5 16 " 654-30 6 " 17 1 16 " 9 5 8 " 13 5 16 " 654-36 8 " 17 1 16 " 9 5 8 "...
- Page 84 MOUNTING SPECIFICATIONS Model Numbers 17 11 16 " 9 11 16 " 13 5 16 " 656-30 6 " 17 11 16 " 9 11 16 " 13 5 16 " 656-36 8 " 9 11 16 " 17 11 16 " 13 5 16 "...
- Page 85 MOUNTING SPECIFICATIONS Model Numbers 15 3 16 " 9 9 16 " 11 11 16 " 9597-30 6 " 9 9 16 " 15 3 16 " 11 11 16 " 9597-36 6 "...
- Page 86 MOUNTING SPECIFICATIONS Model Numbers 17 11 16 " 9 11 16 " 13 5 16 " 9667-30 6 " 17 11 16 " 9 11 16 " 13 5 16 " 9667-36 8 "...
- Page 87 MOUNTING SPECIFICATIONS Model Numbers 17 11 16 " 9 11 16 " 13 5 16 " 9697-30 6 " 17 11 16 " 9 11 16 " 13 5 16 " 9697-36 8 "...
- Page 88 MOUNTING SPECIFICATIONS Model Numbers 15 3 16 " 9 7 16 " 11 11 16 " ART2-30 6 " 9 7 16 " 15 3 16 " 11 11 16 " ART2-36 6 "...
- Page 89 MOUNTING SPECIFICATIONS Model Numbers 17 11 16 " 9 11 16 " 13 5 16 " BS655N-30 6 " 17 11 16 " 9 11 16 " 13 5 16 " BS655N-36 8 " 17 11 16 " 9 11 16 " 13 5 16 "...
- Page 90 MOUNTING SPECIFICATIONS Model Numbers BSKBN-24 " " " 6 " BSKBN-30 " " " 6 " BSKBN-36 " " " 6 " BSKBN-42 " " " 6 " BSKBN-48 " " " 6 "...
- Page 91 MOUNTING SPECIFICATIONS Model Numbers 9 9 16 " 11 5 8 " BSKEN-30 " 6 " 9 9 16 " 11 5 8 " BSKEN-36 6 " " 9 9 16 " 11 5 8 " BSKEN-42 " 6 " 9 9 16 "...
- Page 92 MOUNTING SPECIFICATIONS Model Numbers KB-24 " " " 6 " KB-30 " " " 6 " KB-36 " " " 6 " KB-42 " " " 6 " KB-48 " " " 6 "...
- Page 93 MOUNTING SPECIFICATIONS Model Numbers 13 3 8 " KB2-30 " " 6 " 13 3 8 " KB2-36 " " 6 " 13 3 8 " KB2-42 " " 6 " 13 3 8 " KB2-48 " " 6 "...
- Page 94 MOUNTING SPECIFICATIONS Model Numbers 9 9 16 " 11 5 8 " KE-30 " 6 " 9 9 16 " 11 5 8 " KE-36 " 6 " 9 9 16 " 11 5 8 " 6 " KE-42 " 9 9 16 "...
- Page 95 MOUNTING SPECIFICATIONS Model Numbers 7 1 16 " 9 1 8 " KF-36 12 " 6 " 13 5 8 " 8 1 2 " 10 1 2 " KF1-30 6 " 13 5 8 " 8 1 2 " 10 1 2 "...
- Page 96 MOUNTING SPECIFICATIONS Model Numbers 11 7 16 " KL2-30 " " 6 " 11 7 16 " KL2-36 " " 6 " 11 7 16 " KL2-42 " " 6 " 11 7 16 " KL2-48 " " 6 "...
- Page 97 MOUNTING SPECIFICATIONS Model Numbers 12 3 4 " KL3-30 " " 6 " 12 3 4 " KL3-36 " " 6 " 12 3 4 " KL3-42 " " 6 " 12 3 4 " KL3-48 " " 6 "...
- Page 98 MOUNTING SPECIFICATIONS Model Numbers 9 9 16 " 12 3 4 " 11 5 8 " KN-30 6 " 9 9 16 " 13 7 16 " 11 5 8 " KN-36 6 "...
- Page 99 MOUNTING SPECIFICATIONS Model Numbers 12 7 8 " 9 9 16 " 11 5 8 " KN6-30 6 " 9 9 16 " 13 9 16 " 11 5 8 " KN6-36 6 "...
- Page 100 MOUNTING SPECIFICATIONS Model Numbers 9 9 16 " 12 7 16 " 11 5 8 " KZ-30 6 " 9 9 16 " 13 5 16 " 11 5 8 " KZ-36 6 "...
- Page 101 MOUNTING SPECIFICATIONS 11 7 16 " CMBI-6 9 3 8 " 4 11 16 " 4 11 16 " 20 3 16 " CMBI-8 18 1 8 " 9 1 16 " 9 1 16 " 13 1 4 " 9 3 8 "...
- Page 102 MOUNTING SPECIFICATIONS 13 1 4 " 9 3 8 " CMBI-655i 4 11 16 " 4 11 16 " 11 7 16 " CMBI-6 9 3 8 " 4 11 16 " 4 11 16 "...
- Page 104 Three Locations: 350 Parr Circle Reno, NV 89512 916 Delaware Avenue Marysville, OH 43040 427 Rowland Mill Road Bruceton, TN 38317 www.zlinekitchen.com 1-614-777-5004 1.1.0...
Need help?
Do you have a question about the RK62342 and is the answer not in the manual?
Questions and answers