
Related Manuals for Netgate Netgate-2100


Summary of Contents for Netgate Netgate-2100
- Page 1 Security Gateway Manual Netgate-2100 © Copyright 2023 Rubicon Communications LLC Jul 18, 2023...
-
Page 2: Table Of Contents
2 Initial Configuration 3 pfSense Plus Software Overview 4 Input and Output Ports 5 Safety and Legal 6 Netgate 2100 Wall Mount 7 Connecting to the USB Console Port 8 Reinstalling pfSense Plus Software 9 Optional M.2 SATA Installation 10 Configuring the Switch Ports 11 Configuring an OPT interface as an additional WAN... - Page 3 Security Gateway Manual Netgate-2100 This Quick Start Guide covers the first time connection procedures for the Netgate® 2100 Firewall Appliance. It will provide the information needed to keep the appliance up and running. Tip: Before getting started, a good practice is to download the...
-
Page 4: Getting Started
CHAPTER GETTING STARTED The basic firewall configuration begins with connecting the Netgate® appliance to the Internet. The Netgate appliance should be unplugged at this time. Connect one end of an Ethernet cable to the WAN port (shown in the Input and Output Ports section) of the Netgate appliance. - Page 5 Connecting to the USB Console Port. Warning: The default IP Address on the LAN subnet on the Netgate firewall is 192.168.1.1/24. The same subnet cannot be used on both WAN and LAN, so if the default IP address on the ISP-supplied modem is also 192.168.1.1/24, disconnect the WAN interface until the LAN interface on the firewall has been renumbered...
-
Page 6: Initial Configuration
If the CPE on WAN (e.g. Fiber or Cable Modem) has a default IP Address of 192.168.1.1, disconnect the Ethernet cable from the WAN port on the Netgate 2100 Security Gateway before proceeding. Change the default LAN IP Address of the device during a later step in the configuration to avoid having conflicting subnets on the WAN and LAN. - Page 7 Security Gateway Manual Netgate-2100 Fig. 2: Example certificate warning message © Copyright 2023 Rubicon Communications LLC...
- Page 8 1. Click Next to start the Setup Wizard. Fig. 3: Setup Wizard starting page 2. Click Next after reading the information on Netgate Global Support. 3. Use the following items as a guide to configure the options on the General Information page: Hostname Any desired hostname name can be entered to identify the firewall.
- Page 9 Security Gateway Manual Netgate-2100 DNS Servers For purposes of this setup guide, use the Google public DNS servers (8.8.8.8 and 8.8.4.4). Note: The firewall defaults to acting as a resolver and clients will not utilize these forwarding DNS servers. However, these servers give the firewall itself a way to ensure it has working DNS if resolving the default way does not work properly.
- Page 10 Security Gateway Manual Netgate-2100 Fig. 5: Time Server Information page in the Setup Wizard Fig. 6: Configure WAN Interface page in the Setup Wizard © Copyright 2023 Rubicon Communications LLC...
- Page 11 Plus dashboard, click Finish. Note: This step of the wizard also contains several useful links to Netgate resources and methods of obtaining assistance with the product. Be sure to read through the items on this page before finishing the wizard.
- Page 12 Security Gateway Manual Netgate-2100 Fig. 7: Copyright and Trademark Notices © Copyright 2023 Rubicon Communications LLC...
-
Page 13: Pfsense Plus Software Overview
firewall. ® Fig. 1: The pfSense Plus Dashboard Section 1 Important system information such as the model, Serial Number, and Netgate Device ID for this Netgate firewall. ® Section 2 Identifies what version of pfSense Plus software is installed, and if an update is available. - Page 14 Click Download configuration as XML and save a copy of the firewall configuration to the computer con- nected to the Netgate firewall. This backup (or any backup) can be restored from the same screen by choosing the backed up file under Restore Configuration.
- Page 15 Security Gateway Manual Netgate-2100 Fig. 3: Backup & Restore Fig. 4: Click Download configuration as XML © Copyright 2023 Rubicon Communications LLC...
- Page 16 See also: Connecting to the USB Console Port. Cable is required. Tip: To learn more about getting the most out of a Netgate appliance, sign up for a pfSense Plus Software Training course or browse the extensive Resource Library.
-
Page 17: Input And Output Ports
CHAPTER FOUR INPUT AND OUTPUT PORTS 4.1 Rear Side Fig. 1: Rear view of the Netgate 2100 Firewall Appliance The items in this image are described by entries in Routed Ethernet, Switched Ethernet, and Other Ports. 4.1.1 Routed Ethernet The WAN Combo-Port is shared between an RJ-45 port and an SFP port. Only one port can be used. - Page 18 Security Gateway Manual Netgate-2100 4.1.2 Switched Ethernet Interface Name Port Name LAN1 mvneta1 LAN2 mvneta1 LAN3 mvneta1 LAN4 mvneta1 The four LAN Ethernet ports are switched ports. By default all of these ports act as a single switch uplinked to the LAN interface on the firewall.
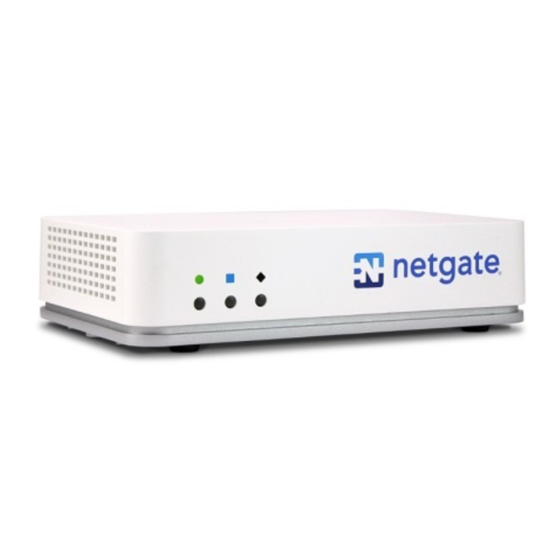
- Page 19 For example, UPS/Battery Backups, Cellular modems, GPS units, and storage devices. Though the operating system also supports wired and wireless network devices, these are not ideal and should be avoided. 4.2 Front Side Fig. 2: Front view of the Netgate 2100 Firewall Appliance 4.2.1 LED Patterns Description...
-
Page 20: Safety And Legal
CHAPTER FIVE SAFETY AND LEGAL 5.1 Safety Notices 1. Read, follow, and keep these instructions. 2. Heed all warnings. 3. Only use attachments/accessories specified by the manufacturer. Warning: Do not use this product in location that can be submerged by water. Warning: Do not use this product during an electrical storm to avoid electrical shock. - Page 21 (UPS) or a combination of those devices. Failure to take such precautions could result in premature failure, and/or damage to your Netgate appliance, which is not covered under the product warranty. Such an event may also present the risk of electric shock, fire, or explosion.
- Page 22 Security Gateway Manual Netgate-2100 more detailed information about the disposal of your old equipment, please contact your local authorities, waste disposal service, or the shop where you purchased the product. 5.7.2 Deutsch Die Europäische Richtlinie 2002/96/EC verlangt, dass technische Ausrüstung, die direkt am Gerät und/oder an der Verpackung mit diesem Symbol versehen ist, nicht zusammen mit unsortiertem Gemeindeabfall entsorgt werden darf.
- Page 23 Netgate-2100 5.8 Declaration of Conformity 5.8.1 ˇ Cesky[Czech] NETGATE tímto prohla uje, e tento NETGATE device, je ve shod se základními po adavky a dal ími p íslu n mi ustanoveními sm rnice 1999/5/ES. 5.8.2 Dansk [Danish] Undertegnede NETGATE erklærer herved, at følgende udstyr NETGATE device, overholder de væsentlige krav og øvrige relevante krav i direktiv 1999/5/EF.
- Page 24 Alulírott, NETGATE nyilatkozom, hogy a NETGATE device, megfelel a vonatkozó alapvetõ követelményeknek és az 1999/5/EC irányelv egyéb elõírásainak. 5.8.10 Íslenska [Icelandic] Hér me l sir NETGATE yfir ví a NETGATE device, er í samræmi vi grunnkröfur og a rar kröfur, sem ger ar eru í tilskipun 1999/5/EC. 5.8.11 Italiano [Italian] Con la presente NETGATE dichiara che questo NETGATE device, è...
- Page 25 Security Gateway Manual Netgate-2100 5.8.16 Slovensky [Slovak] NETGATE t mto vyhlasuje, e NETGATE device, sp a základné po iadavky a v etky príslu né ustanovenia Smernice 1999/5/ES. 5.8.17 Svenska [Swedish] Härmed intygar NETGATE att denna NETGATE device, står I överensstämmelse med de väsentliga egenskapskrav och övriga relevanta bestämmelser som framgår av direktiv 1999/5/EG.
- Page 26 Security Gateway Manual Netgate-2100 4616 West Howard Lane, Suite 900 Austin, Texas 78728 legal@netgate.com The arbitration will be conducted by the American Arbitration Association (AAA) under its rules. The AAA’s rules are available at www.adr.org. Payment of all filing, administration and arbitrator fees will be governed by the AAA’s rules.
- Page 27 Security Gateway Manual Netgate-2100 5.13 Limited Warranty DISCLAIMER OF WARRANTIES AND LIMITATION OF LIABILITY THE PRODUCTS/SERVICES AND ALL INFORMATION, CONTENT, MATERIALS, PRODUCTS (INCLUD- ING SOFTWARE) AND OTHER SERVICES INCLUDED ON OR OTHERWISE MADE AVAILABLE TO YOU THROUGH THE PRODUCTS/SERVICES ARE PROVIDED BY US ON AN “AS IS” AND “AS AVAILABLE” BA- SIS, UNLESS OTHERWISE SPECIFIED IN WRITING.
-
Page 28: Netgate 2100 Wall Mount
CHAPTER NETGATE 2100 WALL MOUNT The Netgate 2100 has built in wall-mount keyholes on the bottom of the appliance. This page provides an overview and a PDF template for attaching the system to the wall. - Page 29 Netgate-2100 The Netgate 2100 can be mounted vertically or horizontally. If mounted horizontally, the ports and cables should face up to reduce the pull from the weight of the cables on the ports. Click on the button below to download the Wall Mount Template.
- Page 30 Security Gateway Manual Netgate-2100 Follow the pictured instructions on the PDF to complete the wall mount installation. © Copyright 2023 Rubicon Communications LLC...
-
Page 31: Connecting To The Usb Console Port
CHAPTER SEVEN CONNECTING TO THE USB CONSOLE PORT This guide shows how to access the serial console which can be used for troubleshooting and diagnostics tasks as well as some basic configuration. There are times when directly accessing the console is required. Perhaps GUI or SSH access has been locked out, or the password has been lost or forgotten. - Page 32 Security Gateway Manual Netgate-2100 Tip: Be certain to gently push in the USB Mini-B (5-pin) connector on the device side completely. With most cables there will be a tangible “click”, “snap”, or similar indication when the cable is fully engaged.
- Page 33 Security Gateway Manual Netgate-2100 macOS The device associated with the system console is likely to show up as, or start with, /dev/cu.usbserial-<id>. Run ls -l /dev/cu. * from a Terminal prompt to see a list of available USB serial devices and locate the ap- propriate one for the hardware.
- Page 34 Security Gateway Manual Netgate-2100 7.5 Launch a Terminal Program Use a terminal program to connect to the system console port. Some choices of terminal programs: Windows For Windows the best practice is to run PuTTY in Windows or SecureCRT. An example of how to configure PuTTY is below.
- Page 35 Security Gateway Manual Netgate-2100 Fig. 1: An example of using PuTTY in Windows © Copyright 2023 Rubicon Communications LLC...
- Page 36 Security Gateway Manual Netgate-2100 Fig. 2: An example of using PuTTY in Linux GNU screen In many cases screen may be invoked simply by using the proper command line, where <console-port> is the console port that was located above. sudo screen <console-port>...
- Page 37 Some devices expose multiple ports, so using the incorrect port may lead to no output or unexpected output. Hardware Failure There could be a hardware failure preventing the serial console from working. Contact Netgate TAC for assistance.
- Page 38 Security Gateway Manual Netgate-2100 7.7.2 No Serial Output If there is no output at all, check the following items: USB Cable Not Plugged In For USB consoles, the USB cable may not be fully engaged on both ends. Gently, but firmly, ensure the cable has a good connection on both sides.
- Page 39 Security Gateway Manual Netgate-2100 Character Encoding Ensure the terminal program is configured for the proper character encoding, such as UTF-8 or Latin-1, depending on the operating system. (See Screen) 7.7.5 Serial Output Stops After the BIOS If serial output is shown for the BIOS but stops afterward, check the following items: Terminal Speed Ensure the terminal program is configured for the correct speed for the installed operating system.
-
Page 40: Reinstalling Pfsense Plus Software
1. Please open a TAC ticket Problem and then select Netgate 2100 for the platform. Include the Netgate Device ID (NDI) and serial number in the ticket to expedite access. Once the ticket is processed, the latest stable version of the firmware will be attached to the ticket, with a name such as: pfSense-plus-Netgate-2100-recovery-23.05.1-RELEASE-aarch64.img.gz... - Page 41 Security Gateway Manual Netgate-2100 © Copyright 2023 Rubicon Communications LLC...
- Page 42 10. Type y then press the Enter key if prompted to confirm the filesystem choice. 11. Wait for the recovery process to complete. 12. Once the install has completed, remove the memstick, and cycle the power (unplug the Netgate 2100 and plug it back in) to reboot the Netgate 2100.
- Page 43 Security Gateway Manual Netgate-2100 © Copyright 2023 Rubicon Communications LLC...
- Page 44 Security Gateway Manual Netgate-2100 Caution: If this device contains multiple disks, such as when adding an SSD to an existing system which previously used MMC, additional steps may be necessary to ensure the device boots from and uses the correct disk.
-
Page 45: Optional M.2 Sata Installation
CHAPTER NINE OPTIONAL M.2 SATA INSTALLATION The Netgate® 2100 has built-in onboard eMMC storage. Optionally, a M.2 SATA drive could be installed as an upgrade or to bypass the onboard eMMC flash memory. Warning: Before proceeding: 1. Backup the configuration file, if possible. - Page 46 Security Gateway Manual Netgate-2100 Fig. 1: Removing the Netgate 2100 Case Screws 2. Turn system upright and carefully remove the cover. Set the cover off to the side and keep it upright so the top is not scratched. Identify where the M.2 SATA drive slot is located and remove the screw from the standoff.
- Page 47 4. Gently push down the M.2 SATA card and replace the screw into the standoff. 5. Place the cover back on and turn the Netgate 2100 over. Replace the four (4) T10 Torx case screws. Be careful not to crossthread the screws or overtighten them.
- Page 48 Security Gateway Manual Netgate-2100 Fig. 4: The M.2 SATA Drive Installed © Copyright 2023 Rubicon Communications LLC...
-
Page 49: Configuring The Switch Ports
This optional guide shows the steps required to configure the 4 switched Ethernet ports as discrete ports. The following attributes are used in this configuration guide but can be changed to suit other requirements: • Netgate 2100 Ethernet Port: LAN4 • IP Address Assignment: 192.168.100.1/24 •... - Page 50 Security Gateway Manual Netgate-2100 4. In the lower right-hand corner of the screen, click + Add. 5. Choose mvneta1 (MAC Address) - lan from the Parent Interface drop-down menu. 6. Set the VLAN Tag to 4084. Type Lan port 4 as the Description. Click Save.
- Page 51 Security Gateway Manual Netgate-2100 Click on + Add. 9. Click on OPT1. This is the Interface that matches the new VLAN being created. 10. Check the Enable Interface check-box. 11. Change the IPv4 Configuration Type from None to Static IPv4.
- Page 52 Security Gateway Manual Netgate-2100 13. Click Save. 14. Click Apply Changes. 15. Go to Interfaces > Switches. 16. Go to the VLANs tab. Click in the Enable 802.1q VLAN mode check-box and click Save. The table will change to reflect the new mode.
- Page 53 Security Gateway Manual Netgate-2100 18. Type 4084 for the VLAN Tag and 4 for Member(s). This represents LAN4 (port 4) and tagged should be unchecked. 19. Click + Add Member to add the LAN Uplink, 5. This member should be tagged as shown.
- Page 54 25. Click on Port VID 1 beside LAN4. Backspace through 1 and insert 4084, the new VLAN ID. 26. Click Save. This completes the configuration of a discrete port on the Netgate 2100. By default all traffic is blocked. Create the appropriate firewall rules...
-
Page 55: Configuring An Opt Interface As An Additional Wan
CHAPTER ELEVEN CONFIGURING AN OPT INTERFACE AS AN ADDITIONAL WAN Note: By default the Netgate 2100 is not configured with OPT interfaces. To reconfigure one or more of the LAN switch ports as an OPT interface, see Switch Overview. This guide configures an OPT port as an additional WAN type interface. These interfaces connect to upstream networks providing connectivity to the Internet or other remote destinations. - Page 56 Security Gateway Manual Netgate-2100 11.1 Requirements • This guide assumes the underlying interface is already present (e.g. physical port, VLAN, etc). • The WAN configuration type and settings must be known before starting. For example, this might be an IP address, subnet mask, and gateway value for static addresses or credentials for PPPoE.
- Page 57 Security Gateway Manual Netgate-2100 Gateway IPv4 The IPv4 address of the gateway inside the same subnet. Description Optional text describing the purpose of the gateway. – Click – Ensure the new gateway is selected as the IPv4 Upstream Gateway • Check Block private networks This will block private network traffic on the interface, though if the firewall rules for this WAN are not permis-...
- Page 58 Security Gateway Manual Netgate-2100 Source Network, and fill in the LAN subnet, e.g. 192.168.1.0/24. If there is more than one LAN subnet, create rules for each or use other methods such as aliases or CIDR summarization to cover them all.
- Page 59 Security Gateway Manual Netgate-2100 • Click Save • Click Add to create another gateway group • Configure the group as follows: Group Name LoadBalance Gateway Priority Gateways for WAN and WAN2 both on Tier 1 Description Prefer WAN2, fail to WAN Note: This performs connection-based load balancing, not per-packet load balancing.
- Page 60 Security Gateway Manual Netgate-2100 • Uncheck DNS Server Override This will tell the firewall to use the DNS servers entered on this page and to ignore servers provided by dynamic WANs such as DHCP or PPPoE. Occasionally these providers may push conflicting DNS server information so the best practice is to assign the DNS servers manually.
- Page 61 Security Gateway Manual Netgate-2100 11.9 Dynamic DNS Dynamic DNS provides several benefits for multiple WANs, particularly with VPNs. If the firewall does not already have one or more Dynamic DNS hostnames configured, consider signing up with a provider and creating one or more.
-
Page 62: Configuring An Opt Interface As An Additional Lan
CHAPTER TWELVE CONFIGURING AN OPT INTERFACE AS AN ADDITIONAL LAN Note: By default the Netgate 2100 is not configured with OPT interfaces. To reconfigure one or more of the LAN switch ports as an OPT interface, see Switch Overview. This guide configures an OPT port as an additional LAN type interface. These local interfaces can perform a variety of tasks, such as being a guest network, DMZ, IOT isolation, wireless segment, lab network, and more. - Page 63 Security Gateway Manual Netgate-2100 12.1 Requirements • This guide assumes the underlying interface is already present (e.g. physical port, VLAN, etc). • Choose a new local subnet to use for the additional LAN type interface. This example uses 192.168.2.0/24. 12.2 Assign the Interface The first step is to assign an OPT interface.
- Page 64 Security Gateway Manual Netgate-2100 • Click Apply Changes The lack of a selected gateway in the interface configuration causes the firewall to treat the interface as a LAN type interface. The firewall uses LAN type interfaces as sources of outbound NAT traffic but does not apply outbound NAT on traffic exiting a LAN.
- Page 65 Security Gateway Manual Netgate-2100 Source Network, and fill in the new LAN subnet, e.g. 192.168.2.0/24. Destination Any Translation Address Interface Address Description Text describing the rule, e.g. Guest LAN outbound on WAN • Click Save • Click Apply Changes Alternately, clone existing NAT rules and adjust as needed to match the new LAN.
- Page 66 Security Gateway Manual Netgate-2100 12.6.2 Isolated In an isolated local network, hosts on the network cannot contact hosts on other networks unless explicitly allowed in the rules. Hosts can still contact the Internet as needed in this example, but that can also be restricted by more complicated rules.
- Page 67 Security Gateway Manual Netgate-2100 Description Text describing the rule, e.g. Allow clients to resolve DNS through the firewall • Click Save Add rule to pass ICMP to firewall • Click to add a new rule at the bottom of the list.
- Page 68 Security Gateway Manual Netgate-2100 • Click Save Add rule to pass from this interface network to any destination: • Click to add a new rule at the bottom of the list. • Configure the rule as follows: Action Pass Interface OPTx (or the custom name)
- Page 69 Security Gateway Manual Netgate-2100 12.7 Other Services In most cases the above configuration is sufficient and clients on the new LAN can now obtain an address and get out to the Internet. However, there may be other custom settings which need accounted for when adding a new local interface: •...
-
Page 70: Factory Reset Procedure
CHAPTER THIRTEEN FACTORY RESET PROCEDURE This procedure performs a factory reset using the hardware button on the Netgate 2100. See also: • Factory Reset Video • Factory Reset from GUI or Console 1. Remove power from the device. 2. Gently use a paper clip or similar tool to depress the reset button. -
Page 71: Switch Overview
14.1 Interface Links The four LAN ports on the Netgate 2100 are connected internally to a switch. In addition to the four physical ports there is also an internal switch port (Port 5) which acts as an uplink, and the mvneta1 interface which is the corresponding operating system interface for the switch uplink. - Page 72 Security Gateway Manual Netgate-2100 14.3 802.1q VLAN Mode It is also possible to enable 802.1q VLAN mode instead of the default port mode. Using VLANs, these four switch ports are customizable and each can be configured to act as independent interfaces.
-
Page 73: Additional Resources
Netgate training has got you covered. https://www.netgate.com/training 15.2 Resource Library To learn more about how to use Netgate appliances and for other helpful resources, make sure to browse the Netgate Resource Library. https://www.netgate.com/resources 15.3 Professional Services Support does not cover more complex tasks such as CARP configuration for redundancy on multiple firewalls or... -
Page 74: Warranty And Support
CHAPTER SIXTEEN WARRANTY AND SUPPORT • One year manufacturer’s warranty. • Please contact Netgate for warranty information or view the Product Lifecycle page. • All Specifications subject to change without notice For support information, view support plans offered by Netgate.
Need help?
Do you have a question about the Netgate-2100 and is the answer not in the manual?
Questions and answers