
Subscribe to Our Youtube Channel
Related Manuals for Netgate SG-4860


Summary of Contents for Netgate SG-4860
- Page 1 Security Gateway Manual SG-4860 © Copyright 2002 - 2019 Rubicon Communications LLC Dec 06, 2019...
- Page 2 OUT OF THE BOX 1 Getting Started 2 Input and Output Ports 3 Safety and Legal 4 Connecting to the Console Port 5 Reinstalling pfSense Software 6 mSATA Installation 7 BIOS Flash Procedure 8 Additional Resources 9 Warranty and Support...
- Page 3 Security Gateway Manual SG-4860 This Quick Start Guide covers the first time connection procedures for the Netgate® SG-4860 Firewall Appliance will provide the information needed to keep the appliance up and running. © Copyright 2002 - 2019 Rubicon Communications LLC...
-
Page 4: Getting Started
CHAPTER GETTING STARTED The basic firewall configuration begins with connecting the pfSense® appliance to the Internet. Neither the modem nor the pfSense appliance should be powered on at this time. Establishing a connection to an Internet Service Provider (ISP) starts with connecting one end of an Ethernet cable to the WAN port (shown in the Input and Output Ports section) of the pfSense appliance. - Page 5 Security Gateway Manual SG-4860 At the login page enter the default pfSense password and username: Username admin Password pfsense Click Login to continue 1.3 Wizard Upon successful login, the following is displayed. © Copyright 2002 - 2019 Rubicon Communications LLC...
-
Page 6: Configuring Hostname, Domain Name And Dns Servers
Security Gateway Manual SG-4860 1.4 Configuring Hostname, Domain Name and DNS Servers 1.5 Hostname For Hostname, any desired name can be entered as it does not affect functionality of the firewall. Assigning a hostname to the firewall will allow the GUI to be accessed by hostname as well as IP address. -
Page 7: Time Server Configuration
Security Gateway Manual SG-4860 connections and the ISP automatically assigns DNS server IP addresses. When using a static IP on WAN, DNS server IP addresses must be entered here for name resolution to function if the default DNS Resolver settings are not used. -
Page 8: Mac Address
Security Gateway Manual SG-4860 This depicts the four possible WAN interface types. Static, DHCP, PPPoE and PPTP. One must be selected from the drop-down list. Further information from the ISP is required to proceed when selecting Static, PPPoE and PPTP such as login name and password or as with static addresses, an IP address, subnet mask and gateway address. -
Page 9: Configuring Dhcp Hostname
Security Gateway Manual SG-4860 1.14 Configuring DHCP Hostname Some ISPs specifically require a DHCP Hostname entry. Unless the ISP requires the setting, leave it blank. 1.15 Configuring PPPoE and PPTP Interfaces Information added in these sections is assigned by the ISP. Configure these settings as directed by the ISP... - Page 10 Security Gateway Manual SG-4860 1.16 Block Private Networks and Bogons When enabled, all private network traffic originating on the internet is blocked. Private addresses are reserved for use on internal LANs and blocked from outside traffic so these address ranges may be reused by all private networks.
-
Page 11: Configuring Lan Ip Address & Subnet Mask
Security Gateway Manual SG-4860 1.17 Configuring LAN IP Address & Subnet Mask A static IP address of 192.168.1.1 and a subnet mask (CIDR) of 24 was chosen for this installation. If there are no plans to connect this network to any other network via VPN, the 192.168.1.x default is sufficient. -
Page 12: Save Changes
Security Gateway Manual SG-4860 1.19 Save Changes Click Reload to save configuration. 1.20 Basic Firewall Configured To proceed to the webConfigurator, make the selection as highlighted. The Dashboard display will follow. 1.21 Backing Up and Restoring At this point, basic LAN and WAN interface configuration is complete. Before proceeding, backup the firewall con- figuration. - Page 13 Security Gateway Manual SG-4860 Click Download Configuration and save a copy of the firewall configuration. This configuration can be restored from the same screen by choosing the backup file under Restore configuration. © Copyright 2002 - 2019 Rubicon Communications LLC...
-
Page 14: Connecting To The Console
Security Gateway Manual SG-4860 1.22 Connecting to the Console There are times when accessing the console is required. Perhaps GUI console access has been locked out, or the password has been lost or forgotten. See also: Connecting to the Console Port Connect to the console. -
Page 15: Input And Output Ports
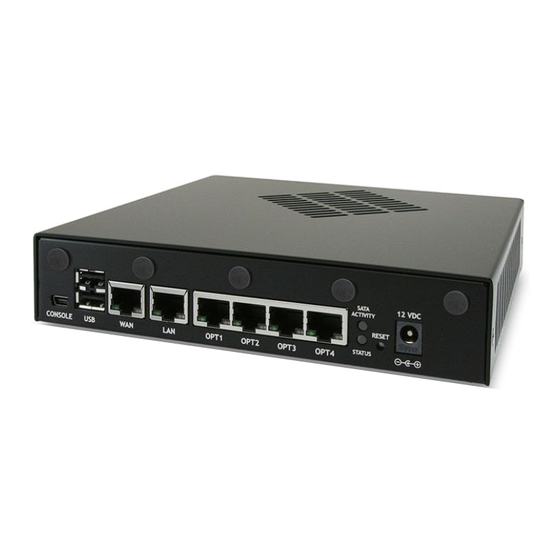
Note: The rubber caps across the top are antenna ports for available wireless options. The SG-4860 supports six 1000/100/10Base-T Ethernet ports. Two Ethernet ports are connected to the CPU through an Intel i211 Gbps PCIe MAC/PHY integrated circuit. Four Ethernet ports are connected to the CPU’s on-chip Intel i354 Gbps MACs through a Marvell 88E1543 quad SGMII/PHY. -
Page 16: Safety And Legal
CHAPTER THREE SAFETY AND LEGAL • Safety Notices • Electrical Safety Information • FCC Compliance • Industry Canada • Australia and New Zealand • CE Marking • RoHS/WEEE Compliance Statement – English – Deutsch – Español – Français – Italiano •... -
Page 17: Safety Notices
Security Gateway Manual SG-4860 – Malti [Maltese] – Norsk [Norwegian] – Slovensky [Slovak] – Svenska [Swedish] – Español [Spanish] – Polski [Polish] – Português [Portuguese] – Român˘ a [Romanian] • Disputes • Applicable Law • Site Policies, Modification, and Severability •... -
Page 18: Fcc Compliance
Security Gateway Manual SG-4860 b) The equipment requires the use of the ground wire as a part of the safety certification, modification or misuse can provide a shock hazard that can result in serious injury or death. c) Contact a qualified electrician or the manufacturer if there are questions about the installation prior to connecting the equipment. - Page 19 Security Gateway Manual SG-4860 disposal and recycling will help prevent potential negative consequences to the environment and human health. For more detailed information about the disposal of your old equipment, please contact your local authorities, waste disposal service, or the shop where you purchased the product.
-
Page 20: Declaration Of Conformity
SG-4860 3.8 Declaration of Conformity 3.8.1 ˇ Cesky[Czech] NETGATE tímto prohla uje, e tento NETGATE device, je ve shod se základními po adavky a dal ími p íslu n mi ustanoveními sm rnice 1999/5/ES. 3.8.2 Dansk [Danish] Undertegnede NETGATE erklærer herved, at følgende udstyr NETGATE device, overholder de væsentlige krav og øvrige relevante krav i direktiv 1999/5/EF. - Page 21 Alulírott, NETGATE nyilatkozom, hogy a NETGATE device, megfelel a vonatkozó alapvetõ követelményeknek és az 1999/5/EC irányelv egyéb elõírásainak. 3.8.10 Íslenska [Icelandic] Hér me l sir NETGATE yfir ví a NETGATE device, er í samræmi vi grunnkröfur og a rar kröfur, sem ger ar eru í tilskipun 1999/5/EC. 3.8.11 Italiano [Italian] Con la presente NETGATE dichiara che questo NETGATE device, è...
-
Page 22: Español [Spanish]
Security Gateway Manual SG-4860 3.8.18 Español [Spanish] Por medio de la presente NETGATE declara que el NETGATE device, cumple con los requisitos esenciales y cua- lesquiera otras disposiciones aplicables o exigibles de la Directiva 1999/5/CE. 3.8.19 Polski [Polish] Niniejszym, firma NETGATE o wiadcza, e produkt serii NETGATE device, spełnia zasadnicze wymagania i inne istotne postanowienia Dyrektywy 1999/5/EC. -
Page 23: Applicable Law
Security Gateway Manual SG-4860 3.10 Applicable Law By using any Products/Services, you agree that the Federal Arbitration Act, applicable federal law, and the laws of the state of Texas, without regard to principles of conflict of laws, will govern these terms and conditions of use and any dispute of any sort that might arise between you and RCL and/or ESF. - Page 24 Security Gateway Manual SG-4860 ON OR OTHERWISE MADE AVAILABLE TO YOU THROUGH THE PRODUCTS/SERVICES, RCL’S OR ESF’S SERVERS OR ELECTRONIC COMMUNICATIONS SENT FROM RCL OR ESF ARE FREE OF VIRUSES OR OTHER HARMFUL COMPONENTS. RCL AND ESF WILL NOT BE LIABLE FOR ANY DAMAGES OF ANY...
-
Page 25: Connecting To The Console Port
CHAPTER FOUR CONNECTING TO THE CONSOLE PORT There are times when directly accessing the console is required. Perhaps webGUI or SSH access has been locked out, or the password has been lost or forgotten. This guide shows how to regain access directly through the console. 4.1 Simple Configuration Below are the simple instructions for connecting to the console port with Microsoft Windows. - Page 26 Security Gateway Manual SG-4860 Note: The first time you connect your computer to the pfSense appliance, it may take up to 3 minutes for the driver to install. It should install automatically for Windows 7 and above. Open PuTTY and locate the Session display as shown below. Set Serial line to the COM Port that is displayed in Windows Device Manager, COM3 for this example, and the Speed to 115200 bits per second, the speed of the BIOS in this case.
-
Page 27: Advanced Configuration
Security Gateway Manual SG-4860 Click the Open button and the console screen will be displayed. 4.2 Advanced Configuration A Silicon Labs CP210x USB-to-UART bridge driver is used to provide access to the console, which is exposed via the USB Mini-b (5-pin) port on the appliance. -
Page 28: Connect A Usb Cable
Security Gateway Manual SG-4860 4.2.2 Connect a USB Cable Next, locate an appropriate USB cable that has a USB Mini-b (5-pin) connector on one end and a regular USB (Type A) plug on the other end. These cables are commonly used with smaller USB peripherals such as GPS units, cameras, and so on. - Page 29 Security Gateway Manual SG-4860 4.2.4 Launch a Terminal Program Use a terminal program to connect to the system console port. PuTTY is a popular terminal program that is available on various operating systems. Some other choices of terminal programs: • Linux: screen, PuTTY, minicom, dterm •...
-
Page 30: Troubleshooting
Security Gateway Manual SG-4860 Window > Translation Remote Character Set = Use font encoding or UTF-8 Window > Translation Handling of line drawing characters = Use font in both ANSI and OEM modes or Use Unicode line drawing code points Window >... - Page 31 Security Gateway Manual SG-4860 4.3.3 Serial Output Stops After the BIOS If serial output is shown for the BIOS but stops afterward, check the following items: • Ensure the terminal program is configured for the correct speed for the installed operating system. (See “No Serial Output”...
- Page 32 1. Please open a support ticket General Problem and then select Netgate SG-4860 Desktop for the platform. Make sure to include the serial number in the ticket to expedite access. Once the ticket is processed, the latest stable version of the firmware will be attached to the ticket, with a name such as: pfSense-netgate-memstick-ADI-2.4.4-RELEASE-p3-amd64.img.gz...
- Page 33 Security Gateway Manual SG-4860 Dec 21 22:41:37 Waiting (max 60 seconds) for system process `vnlru` to stop... d Waiting (max 60 seconds) for system process `bufdaemon` to stop... done Waiting (max 60 seconds) for system process `syncer` to stop... Syncing disks, vnodes remaining... 0 0 done All buffers synced.
-
Page 34: Msata Installation
The mSATA slot is located on the top of the SG-4860 system board. The mSATA slot is directly behind the Ethernet ports. There are two other similar ports on the top of the board, but they are mPCIe ports. The mSATA drives are not electically compatible with mPCIe connectors. - Page 35 Security Gateway Manual SG-4860 Fig. 1: SG-4860 mSATA Location Fig. 2: Case Screws © Copyright 2002 - 2019 Rubicon Communications LLC...
- Page 36 Security Gateway Manual SG-4860 Fig. 3: SG-4860 Open © Copyright 2002 - 2019 Rubicon Communications LLC...
- Page 37 Security Gateway Manual SG-4860 Fig. 4: Remove the mSATA Standoff Screws © Copyright 2002 - 2019 Rubicon Communications LLC...
- Page 38 Security Gateway Manual SG-4860 Fig. 5: mSATA Drive Properly Inserted into the Slot © Copyright 2002 - 2019 Rubicon Communications LLC...
- Page 39 Security Gateway Manual SG-4860 Fig. 6: Secure the mSATA Drive © Copyright 2002 - 2019 Rubicon Communications LLC...
- Page 40 Security Gateway Manual SG-4860 Fig. 7: mSATA Drive Installed © Copyright 2002 - 2019 Rubicon Communications LLC...
- Page 41 Security Gateway Manual SG-4860 6. Replace the lid and case screws. Use a hand screwdriver and be careful not to crossthread the screws. 7. Reinstall the pfSense software on the new mSATA drive. 8. Restore your configuration backup if you have one.
-
Page 42: Bios Flash Procedure
4. When the installation is complete a message will appear saying: pfSense-pkg-Netgate_Coreboot_Upgrade installation successfully completed 5. Now that the package is installed, navigate to System > Netgate Coreboot Upgrade. 6. This page will show you the latest version of Coreboot available and the current version that is running on the system. -
Page 43: Additional Resources
ADDITIONAL RESOURCES 8.1 Netgate Training Netgate training offers training courses for increasing your knowledge of pfSense® products and services. Whether you need to maintain or improve the security skills of your staff or offer highly specialized support and improve your customer satisfaction;... -
Page 44: Warranty And Support
CHAPTER NINE WARRANTY AND SUPPORT • One year manufacturer’s warranty. • Please contact Netgate for warranty information or view our Product Lifecycle page. • All Specifications subject to change without notice For support information, view our support plans. See also: For more information on how to use pfSense®...
Need help?
Do you have a question about the SG-4860 and is the answer not in the manual?
Questions and answers