Denon AVR-S670H Owner's Manual
Integrated network av receiver
Hide thumbs
Also See for AVR-S670H:
- Quick start manual (17 pages) ,
- Diagnostics and troubleshooting manual (55 pages)

Related Manuals for Denon AVR-S670H


Summary of Contents for Denon AVR-S670H
- Page 1 Contents Connections Playback Settings Tips Appendix AVR-S670H INTEGRATED NETWORK AV RECEIVER Owner’s Manual Front panel Display Rear panel Remote Index...
- Page 2 Contents Connections Playback Settings Tips Appendix Accessories Connecting a TV Connection 1 : TV equipped with an HDMI connector and Inserting the batteries compatible with the ARC / eARC Operating range of the remote control unit Connection 2 : TV equipped with an HDMI connector and Features incompatible with the ARC / eARC High quality sound...
- Page 3 Contents Connections Playback Settings Tips Appendix Playback Listening to FM/AM broadcasts Listening to FM/AM broadcasts Basic operation Tuning in by entering the frequency (Direct Tune) Turning the power on Changing the tune mode (Tune Mode) Selecting the input source Tuning in to stations and presetting them automatically (Auto Adjusting the volume Preset Memory) Turning off the sound temporarily (Muting)
- Page 4 Contents Connections Playback Settings Tips Appendix AirPlay function Selecting a sound mode Playing songs from your iPhone, iPod touch or iPad Selecting a sound mode Playing iTunes music with this unit Direct playback Play a song from your iPhone, iPod touch or iPad on multiple Pure Direct playback synced devices (AirPlay 2) Auto surround playback...
-
Page 5: Input Assign
Contents Connections Playback Settings Tips Appendix Remote lock function Video Disabling the sensor function of the remote control unit HDMI Setup Enabling the remote sensor function HDMI Upscaler Web control function On-Screen Display Controlling the unit from a web control Screensaver 4K/8K Signal Format Settings... - Page 6 Contents Connections Playback Settings Tips Appendix Manual Setup HEOS Speaker Layout You have not signed in Front/Center/Surround You have already signed in Subwoofer General View Terminal Config. Language Distances Owner's Manual Levels Crossovers Bluetooth Transmitter Advanced Quick Select Subwoofer Output Front Display Low Pass Filter Firmware...
- Page 7 Contents Connections Playback Settings Tips Appendix Tips Resetting factory settings Resetting network settings Tips Factory Restore Troubleshooting Appendix Power does not turn on / Power is turned off Operations cannot be performed through the remote control unit About HDMI Display on this unit shows nothing Relationship between video signals and TV output No sound comes out Playing back a USB memory devices...
- Page 8 Playback Settings Tips Appendix Thank you for purchasing this Denon product. To ensure proper operation, please read this owner’s manual carefully before using the product. After reading this manual, be sure to keep it for future reference. Accessories Check that the following parts are supplied with the product.
- Page 9 Contents Connections Playback Settings Tips Appendix Inserting the batteries NOTE 0 To prevent damage or leakage of battery fluid: 0 Do not use a new battery together with an old one. Remove the rear lid in the direction of the arrow and 0 Do not use two different types of batteries.
- Page 10 Contents Connections Playback Settings Tips Appendix Features High quality sound High performance Powerful 5-channel Amplifier with the Latest Home Cinema Specs 8K 60Hz input/output supported Featuring discrete high-current amplifiers on all channels, this unit delivers high-power performance of 75 watts per channel (8 Ω/ohms, 20 Hz - 20 kHz, T.H.D.: 0.08 %, 2ch.
- Page 11 Contents Connections Playback Settings Tips Appendix Digital video processor upscales 1080p / 4K to 8K HDMI connections enable connection to various digital AV devices (6 inputs, 1 output) 8K Ultra HD up scaling 1080p/4K 60Hz This unit is equipped with a 8K video upscaling function that allows 1080p/4K video to be output via HDMI at 8K (7680 ×...
- Page 12 Contents Connections Playback Settings Tips Appendix Playback of DSD and FLAC files via USB and networks The device is equipped with a AirPlay ® function in addition to network functions such as Internet radio etc. (v p. 87) This unit supports the playback of high resolution audio formats such as DSD (5.6 MHz) and FLAC 192 kHz files.
- Page 13 Playback can be performed using connected speakers and Bluetooth headphones simultaneously, or only using Bluetooth headphones. The Denon AVR Remote app gives you full control of this unit as well as access to its setup menu for detailed adjustments from your phones or tablets.
- Page 14 Contents Connections Playback Settings Tips Appendix HEOS provides streaming music from your favorite online music Easy operation sources “Setup Assistant” provides easy-to-follow setup instructions First select the language when prompted. Then simply follow the instructions displayed on the TV screen to set up the speakers, network, etc.
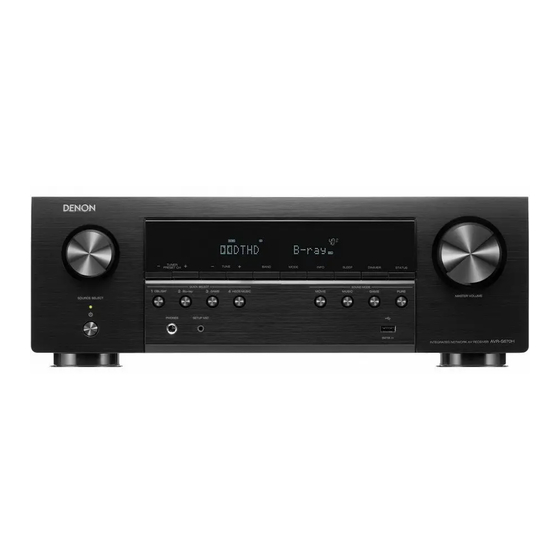
- Page 15 Contents Connections Playback Settings Tips Appendix Part names and functions Front panel Q1 1 For details, see the next page. Front panel Display Rear panel Remote Index...
- Page 16 Contents Connections Playback Settings Tips Appendix C SOURCE SELECT knob This selects the input source. (v p. 50) D Remote control sensor This receives signals from the remote control unit. (v p. 9) E Display This displays various pieces of information. (v p. 18) F MASTER VOLUME knob This adjusts the volume level.
- Page 17 Contents Connections Playback Settings Tips Appendix O Headphones jack (PHONES) This is used to connect headphones. When the headphones are plugged into this jack, audio will no longer be output from the connected speakers or from the SUBWOOFER Q1 1 Q2 Q3 Q4 connectors.
- Page 18 Contents Connections Playback Settings Tips Appendix Display A Input mode indicators D Tuner reception mode indicators These light according to the audio input mode settings of each input These light up according to the reception conditions when the input source. (v p. 148) source is set to “Tuner”.
- Page 19 Contents Connections Playback Settings Tips Appendix F Volume indicator G MUTE indicator This blinks while the sound is muted. (v p. 51) H Information display The input source name, sound mode, setting values and other information are displayed here. I Input signal indicators The respective indicator will light corresponding to the input signal.
- Page 20 Contents Connections Playback Settings Tips Appendix Rear panel For details, see the next page. Front panel Display Rear panel Remote Index...
- Page 21 Contents Connections Playback Settings Tips Appendix 0 The antenna clip can be removed from the rear panel. A Rotate the antenna clip 90 degrees to the left. B Pull the antenna clip out towards yourself. 0 The antenna clip is needed when transporting this unit. Keep it in a safe place.
- Page 22 Contents Connections Playback Settings Tips Appendix G HDMI connectors Used to connect devices equipped with HDMI connectors. “Connection 1 : TV equipped with an HDMI connector and compatible with the ARC / eARC” (v p. 35) “Connection 2 : TV equipped with an HDMI connector and incompatible with the ARC / eARC”...
- Page 23 Contents Connections Playback Settings Tips Appendix Remote control unit A Input source select buttons These selects the input source. (v p. 50) B Channel/page search buttons (CH/PAGE df) These select radio stations registered to presets or switch pages. (v p. 68) C MUTE button (:) This mutes the output audio.
- Page 24 Contents Connections Playback Settings Tips Appendix F BACK button This returns to the previous screen. G System buttons These perform playback related operations. Tuning up / Tuning down buttons (TUNE +, –) These select either FM broadcast or AM broadcast. (v p. 65) H QUICK SELECT buttons (1 –...
- Page 25 Contents Connections Playback Settings Tips Appendix L POWER button (X) This turns the power on/off. (v p. 50) M VOLUME buttons (df) These adjusts the volume level. (v p. 51) N OPTION button This displays the option menu on the TV screen. O ENTER button This determines the selection.
- Page 26 Contents Connections Playback Settings Tips Appendix o Contents o Cables used for connections Provide necessary cables according to the devices you want to Speaker installation connect. Connecting speakers Connecting a TV Speaker cable Connecting a playback device Connecting a USB memory device to the USB port Connecting FM/AM antennas Subwoofer cable Connecting to a home network (LAN)
- Page 27 Contents Connections Playback Settings Tips Appendix Speaker installation Determine the speaker system depending on the number of speakers you Place the FRONT left and right speakers an are using and install each speaker and subwoofer in the room. FL/FR equal distance from the main listening position. Speaker installation is explained using this example of a typical (Front speaker left/ The distance between each speaker and your TV...
- Page 28 Contents Connections Playback Settings Tips Appendix o When 5.1-channel speakers are installed 0 Use the illustration below as a guide for how high each speaker should be installed. The height does not need to be exactly the same. Surround speaker SW C 2 - 3 ft/ 60 - 90 cm...
- Page 29 Contents Connections Playback Settings Tips Appendix Connecting speakers Here we connect the speakers in the room to this unit. Before connecting speakers NOTE NOTE 0 Disconnect this unit’s power plug from the power outlet before connecting the 0 Carry out the following settings when using a speaker with an impedance of 4 – 6 speakers.
- Page 30 Contents Connections Playback Settings Tips Appendix o Connecting the speaker cables o Connecting the subwoofer Carefully check the left (L) and right (R) channels and + (red) and – Use a subwoofer cable to connect the subwoofer. Two subwoofers can (black) polarities on the speakers being connected to this unit, and be be connected to this unit.
- Page 31 Contents Connections Playback Settings Tips Appendix o About the cable labels (supplied) for channel The supplied cable labels include labels for the speaker and HDMI cables. Attach a cable label to each cable that matches the speakers identification and HDMI devices being connected, as shown below. This makes it easy to identify and properly connect the cables between your The channel display section for speaker terminals on the rear panel is components.
- Page 32 Contents Connections Playback Settings Tips Appendix Connecting speakers to the speaker terminals You can connect 5.2 channel speakers to this unit. Connect each speaker according to the speakers you are using. Front panel Display Rear panel Remote Index...
- Page 33 Contents Connections Playback Settings Tips Appendix Connecting 5.1-channel speakers This serves as a basic 5.1-channel surround system. For each speaker connection, refer to “Connecting speakers to the speaker terminals” (v p. 32). Front panel Display Rear panel Remote Index...
- Page 34 Contents Connections Playback Settings Tips Appendix Connecting a TV Connect a TV to this unit so that the input video is output to the TV. You can also enjoy audio from the TV on this unit. How to connect a TV depends on the connectors and functions equipped on the TV. Is the TV equipped with an HDMI connector? Is the TV compatible with the ARC / eARC? “Connection 1 : TV equipped with an HDMI...
- Page 35 Contents Connections Playback Settings Tips Appendix Connection 1 : TV equipped with an HDMI connector and compatible with the ARC / eARC Using a high quality HDMI cable , connect one end to the HDMI port labeled “eARC” or “ARC” on your TV. Connect the other end to the HDMI OUT port on this unit.
- Page 36 Contents Connections Playback Settings Tips Appendix Connection 2 : TV equipped with an HDMI connector and incompatible with the ARC / eARC Use an HDMI cable to connect the TV to this unit. To listen to audio from TV on this unit, use an optical cable to connect the TV to this unit. OPTICAL HDMI Front panel...
- Page 37 Contents Connections Playback Settings Tips Appendix Connecting a playback device This unit is equipped with HDMI video input connectors and three types of audio input connectors (HDMI, digital audio and audio). Select input connectors on this unit according to the connectors equipped on the device you want to connect. If the device connected to this unit is equipped with an HDMI connector, it is recommended to use HDMI connections.
- Page 38 Contents Connections Playback Settings Tips Appendix Connecting a set-top box (Satellite tuner/cable TV) This explanation uses the connection with a satellite tuner/cable TV STB as an example. Select the input connectors on this unit to match the connectors on the device that you want to connect to. (HDMI incompatible device) Satellite tuner / Satellite tuner /...
- Page 39 Contents Connections Playback Settings Tips Appendix Connecting a media player This explanation uses the connection with a media player as an example. Select the input connectors on this unit to match the connectors on the device that you want to connect to. (HDMI incompatible device) Media player Media player...
- Page 40 Contents Connections Playback Settings Tips Appendix Connecting a Blu-ray Disc player or DVD player This explanation uses the connection with a Blu-ray Disc player or DVD player as an example. Select the input connectors on this unit to match the connectors on the device that you want to connect to. Blu-ray Disc player / DVD player HDMI...
- Page 41 Contents Connections Playback Settings Tips Appendix Connecting a game console or player device compatible with 8K This unit supports 8K HDMI video signals. If your game console or player device supports 8K, connect it to the HDMI 4, HDMI 5 or HDMI 6 connector on your device. Game console 8K player HDMI...
- Page 42 Contents Connections Playback Settings Tips Appendix Connecting a turntable This unit is compatible with turntables equipped with a moving magnet (MM) phono cartridge. When you connect to a turntable with a low output moving coil (MC) cartridge, use a commercially available MC head amp or a step-up transformer. If you set this unit’s input source to “Phono”...
- Page 43 USB memory device 0 Denon does not guarantee that all USB memory devices will operate or receive power. When using a portable USB hard disk drive (HDD) which came with an AC adapter, use that device’s supplied AC adapter. 0 The USB port on the rear panel can only be used to supply power (5 V/1.5 A). It cannot be used to play music files. (v p. 22) NOTE 0 USB memory devices will not work via a USB hub.
- Page 44 Contents Connections Playback Settings Tips Appendix Connecting FM/AM antennas Connect the antenna, tune in to a broadcast and then move the antenna to AM loop antenna the location where there is least noise. Then use tape, etc. to fix the (supplied) antenna in this location.
- Page 45 Contents Connections Playback Settings Tips Appendix o AM loop antenna assembly o Using the AM loop antenna Suspending on a wall Put the stand section through the bottom of the loop Suspend directly on a wall without assembling. antenna from the rear and bend it forward. Insert the projecting part into the square hole in the stand.
- Page 46 Contents Connections Playback Settings Tips Appendix Connecting to a home network (LAN) This unit can connect to a network using a wired LAN or wireless LAN. Wired LAN You can connect this unit to your home network (LAN) to enable various types of playback and operations as described below.
- Page 47 Contents Connections Playback Settings Tips Appendix Wireless LAN 0 When using this unit, we recommend you use a router equipped with the following When connecting to the network via wireless LAN, connect the external functions: antennas for Bluetooth/wireless connectivity connection to the rear panel 0 Built-in DHCP server and stand them upright.
- Page 48 Contents Connections Playback Settings Tips Appendix Connecting the power cord After completing all the connections, insert the power plug into the power outlet. Power cord To household power outlet (AC 120 V, 60 Hz) Front panel Display Rear panel Remote Index...
- Page 49 Contents Connections Playback Settings Tips Appendix o Contents Playback network audio/service Listening to Internet Radio Basic operation Playing back files stored on a PC or NAS Turning the power on Getting the HEOS App Selecting the input source AirPlay function Adjusting the volume Spotify Connect function Turning off the sound temporarily (Muting)
-
Page 50: Input Source
Contents Connections Playback Settings Tips Appendix Basic operation Turning the power on Press POWER X to turn on power to the unit. POWER X 0 You can press the input source select button when the unit is in standby mode to Input source turn on the power. - Page 51 Contents Connections Playback Settings Tips Appendix Adjusting the volume Playback a Blu-ray Disc player/DVD player Use VOLUME df to adjust the volume. The following describes the procedure for playing Blu-ray Disc player/DVD player. 0 The variable range differs according to the input signal and channel level setting. Prepare for playback.
- Page 52 Contents Connections Playback Settings Tips Appendix Playing a USB memory device Playing back music files stored on a USB memory device. Only USB memory devices conforming to mass storage class standards can be played on this unit. This unit is compatible with USB memory devices in “FAT32” or “NTFS” format.
- Page 53 Contents Connections Playback Settings Tips Appendix Playing files stored on USB memory Browse the music on your USB memory device and devices select something to play. Insert a “FAT32” or “NTFS” formatted USB memory 0 When you select something to play you will be asked how you want to device into the USB port.
- Page 54 NOTE Nature 01 - Various Artists 0 Note that Denon will accept no responsibility whatsoever for any problems arising with Nature the data on a USB memory device when using this unit in conjunction with the USB...
- Page 55 Contents Connections Playback Settings Tips Appendix o Operations accessible through the option menu “Adjusting the audibility of dialog and vocals (Dialog Enhancer)” (v p. 93) “Adjusting the volume of each channel to match the input source (Channel Level Adjust)” (v p. 94) “Adjusting the tone (Tone)”...
- Page 56 Contents Connections Playback Settings Tips Appendix Listening to music on a Bluetooth device Music files stored on Bluetooth devices such as smartphones, digital music players, etc. can be enjoyed on this unit by pairing and connecting this unit with the Bluetooth device. Communication is possible up to a range of about 98.4 ft/30 m.
- Page 57 Contents Connections Playback Settings Tips Appendix Playing music from Bluetooth device Select this unit when its name appears in the list of devices displayed on the screen of the Bluetooth In order to enjoy music from a Bluetooth device on this unit, the Bluetooth device.
- Page 58 Contents Connections Playback Settings Tips Appendix Pairing with other Bluetooth devices NOTE 0 To operate the Bluetooth device with the remote control of this unit, the Bluetooth Pair a Bluetooth device with this unit. device needs to support the AVRCP profile. 0 The remote control of this unit is not guaranteed to work with all Bluetooth devices.
- Page 59 Contents Connections Playback Settings Tips Appendix Reconnecting to this unit from a Bluetooth device After pairing is completed, the Bluetooth device can be connected without performing any operations on this unit. This operation also needs to be performed when switching the Bluetooth device for playback.
- Page 60 Contents Connections Playback Settings Tips Appendix Listening to audio on Bluetooth headphones You can listen to audio playing through this unit on Bluetooth headphones. Output audio from connected speakers and Bluetooth headphones simultaneously, or only using Bluetooth headphones. (Output Mode: Bluetooth + Speakers) (Output Mode: Bluetooth Only) Front panel Display...
- Page 61 Contents Connections Playback Settings Tips Appendix Listening to audio on Bluetooth headphones 0 “Output Mode” can also be set from “Bluetooth Transmitter” in the option menu. 0 A2DP profile-compatible Bluetooth speakers can be connected following the same steps used to connect Bluetooth headphones. Set “Transmitter”...
- Page 62 Contents Connections Playback Settings Tips Appendix Adjusting the volume of Bluetooth Reconnecting to a Bluetooth headphones headphones If you are using Bluetooth headphones that do not have volume control, or Follow any of the steps below to reconnect the most recently used if the volume is insufficient, you can control the volume by adjusting the Bluetooth headphones: “Level”...
- Page 63 Contents Connections Playback Settings Tips Appendix Disconnecting Bluetooth headphones Complete any of the following steps to disconnect your Bluetooth headphones: Turn off your Bluetooth headphones. Go to “Bluetooth Transmitter” and then select “Disconnect” within the options menu. In the setup menu, go to “General” - “Bluetooth Transmitter”, and set “Transmitter”...
- Page 64 Contents Connections Playback Settings Tips Appendix Listening to FM/AM broadcasts You can use the built-in tuner of this unit to listen to FM broadcasts and AM broadcasts. Make sure the FM antenna and AM loop antenna are connected to this unit first.
- Page 65 Contents Connections Playback Settings Tips Appendix Listening to FM/AM broadcasts Use cursor Left/Right to select “FM” or “AM”, then press ENTER. Connect the antenna. (“Connecting FM/AM When listening to an FM broadcast. antennas” (v p. 44)) When listening to an AM broadcast. Press TUNER to switch the input source to “Tuner”.
- Page 66 Contents Connections Playback Settings Tips Appendix o Operations accessible through the option Tuning in by entering the frequency menu (Direct Tune) “Tuning in by entering the frequency (Direct Tune)” (v p. 66) You can enter the receiving frequency directly to tune in. “Changing the tune mode (Tune Mode)”...
- Page 67 Contents Connections Playback Settings Tips Appendix Changing the tune mode (Tune Mode) Tuning in to stations and presetting them automatically (Auto Preset You can change the mode for tuning into FM and AM broadcasts. If you Memory) cannot tune in automatically with “Auto” mode, change the mode to “Manual”...
- Page 68 Contents Connections Playback Settings Tips Appendix Presetting the current broadcast Channel Default settings 92.10 / 92.30 / 92.50 / 92.70 / 93.10 / 93.50 / 93.70 / 94.10 station (Preset Memory) 1 – 8 94.30 / 94.50 / 94.70 / 94.90 / 95.10 / 95.30 / 95.50 / 95.70 Your favorite broadcast stations can be preset so that you can tune them 9 –...
- Page 69 Contents Connections Playback Settings Tips Appendix Specify a name for the preset Use cursor Up/Down to select a name label, then press broadcast station (Preset Name) ENTER. The screen that lets you edit the Preset Name is displayed. You can set the name to the preset broadcast station or change it. If you select “Set Defaults”, then the unit returns to displaying the Up to 8 characters can be input.
- Page 70 Contents Connections Playback Settings Tips Appendix Skipping preset broadcast stations To set the stations you want to skip by stations (Preset Skip) A Use cursor Left/Right to select the group of broadcast stations you want to skip. Perform auto preset memory to save all the broadcasting stations that can B Use cursor Up/Down to select the broadcast station you be received in the memory.
- Page 71 Contents Connections Playback Settings Tips Appendix Cancelling Preset Skip While the “Preset Skip” screen is displayed, use cursor Left/Right to select a group containing a broadcast station to cancel the skip for. Use cursor Up/Down to select a broadcast station to cancel the skip for.
- Page 72 Contents Connections Playback Settings Tips Appendix Listening to Internet Radio Internet Radio refers to radio broadcasts distributed over the Internet. Internet Radio stations from around the world can be received. The Internet Radio station list on this unit the database service provided by TuneIn Radio service.
- Page 73 Contents Connections Playback Settings Tips Appendix Listening to Internet Radio 0 The display switches between track title and radio station name etc. each time the main unit’s STATUS is pressed. Press INTERNET RADIO. You can also press R (HEOS Music). Use cursor Up/Down to NOTE select “TuneIn Internet Radio”, then press ENTER.
- Page 74 Contents Connections Playback Settings Tips Appendix Playing back files stored on a PC or NAS This unit can play back music files and playlists (m3u, wpl) from DLNA compatible servers including PCs and NAS devices on your network. Supported file formats: For details, see “Playing back a file saved on a PC or NAS”...
- Page 75 Contents Connections Playback Settings Tips Appendix Playing back files stored on a PC or Browse the music on your PC/NAS and select something to play. Use this procedure to play music files or playlists stored on DLNA files servers on your local network. 0 When you select something to play you will be asked how you want to queue up your music.
- Page 76 Contents Connections Playback Settings Tips Appendix Use cursor Up/Down to select the “Play Now” or “Play 0 The display switches between track title, artist name, and album title each time the Now & Replace Queue”, then press ENTER. main unit’s STATUS is pressed. Playback starts.
- Page 77 Contents Connections Playback Settings Tips Appendix o Operations accessible through the option menu “Adjusting the audibility of dialog and vocals (Dialog Enhancer)” (v p. 93) “Adjusting the volume of each channel to match the input source (Channel Level Adjust)” (v p. 94) “Adjusting the tone (Tone)”...
- Page 78 Contents Connections Playback Settings Tips Appendix Getting the HEOS App You can use many online music streaming services from the HEOS App. Depending upon your geographical location, there are several options to choose from. Download the HEOS App for iOS or Android by searching App Store, Google Play store or Amazon Appstore for “HEOS”. Front panel Display Rear panel...
- Page 79 Contents Connections Playback Settings Tips Appendix o Changing your HEOS Account HEOS Account HEOS Accounts can be registered by tapping “Music” tab - “Settings” icon Tap the “Music” tab. in the HEOS App. Select the Settings icon in the upper left corner of Once you create or sign into your HEOS Account, you can use the HEOS Favorites feature to save and recall your favorite streaming radio stations the screen.
- Page 80 Some services may be added or discontinued from time to time based on decisions of the music service providers or others. o Selecting a room/device Tap the “Rooms” tab, and select “Denon AVR-S670H” if Rooms Music Now Playing there are multiple products with HEOS Built-in.
- Page 81 Contents Connections Playback Settings Tips Appendix o Selecting the music track or station from music sources Music Tap the “Music” tab and select a music source. 0 All music services displayed may not be available in your location. Rooms Music Now Playing Front panel Display...
- Page 82 Contents Connections Playback Settings Tips Appendix Browse the music to play. Album Now Playing After selecting a music track or radio station the app will Artist Album automatically change to the “Now Playing” screen. 10 Tracks,60 Mins.,2014 1 Track 1 0:20 0 When you select a music track to play you will be asked how you want to 0:50...
- Page 83 Contents Connections Playback Settings Tips Appendix Listening to the same music in multiple Rooms Rooms rooms Drag one room into another to group them Drag one room into another to group them Dining Dining Song Name 1 This system is a true multi-room audio system. You can create one or Song Name 1 more HEOS groups to automatically synchronize audio playback between Living...
- Page 84 Contents Connections Playback Settings Tips Appendix o Ungrouping rooms Rooms Rooms Drag one room into another to group them Drag one room into another to group them Press and hold your finger on room that you want to Dining remove from the group. Dining Song Name 1 Song Name 1...
- Page 85 Contents Connections Playback Settings Tips Appendix o Grouping all rooms (party mode) Rooms Rooms You can easily group 16 rooms together into Party Mode by using a Drag one room into another to group them Drag one room into another to group them "pinch"...
- Page 86 Contents Connections Playback Settings Tips Appendix o Ungrouping all rooms Rooms Rooms You can easily ungroup all of your rooms and exit Party Mode by using Drag one room into another to group them Drag one room into another to group them a "spread"...
- Page 87 Contents Connections Playback Settings Tips Appendix AirPlay function Music files stored on your iPhone, iPod touch, iPad or iTunes can be Router played on this unit via the network. This unit 0 Source input will be switched to “HEOS Music” when AirPlay playback is started. 0 You can stop AirPlay playback by choosing other input source.
- Page 88 Contents Connections Playback Settings Tips Appendix Playing songs from your iPhone, iPod Playing iTunes music with this unit touch or iPad Install iTunes 10, or later, on a Mac or Windows PC that If you update your “iPhone/iPod touch/iPad” to iOS 10.0.2 or later, you can is connected to the same network as this unit.
- Page 89 Speakers & TVs Songs from an iPhone, iPod touch or iPad operating iOS 11.4 or later can Living Room be synced with multiple AirPlay 2 supported devices for simultaneous Denon xxxxxxxx Song - Artist playback. Bedroom Play the song on your iPhone, iPod touch or iPad.
- Page 90 Contents Connections Playback Settings Tips Appendix Spotify Connect function Spotify is all the music you’ll ever need. Millions of songs available Playing Spotify music with this unit instantly. Just search for the music you love, or let Spotify play you something great.
- Page 91 Contents Connections Playback Settings Tips Appendix Convenience functions This section explains how to use convenient functions that can be used for each input source. (HEOS Music) OPTION Cursor Up/Down/ Left/Right ENTER Front panel Display Rear panel Remote Index...
- Page 92 Contents Connections Playback Settings Tips Appendix Playing back HEOS Favorites Browse the content and select something to play. When using the HEOS Favorites function for the first time on this unit, create a HEOS Account on the HEOS App or sign in to your account. 0 “HEOS Favorites - Use HEOS app”...
- Page 93 Contents Connections Playback Settings Tips Appendix Adjusting the audibility of dialog and Adding to HEOS Favorites vocals (Dialog Enhancer) While content is playing, press OPTION. This function adjusts the center channel frequency band to enhance the The option menu screen is displayed. dialog in the movies and vocals in music for easier listening.
- Page 94 Contents Connections Playback Settings Tips Appendix Adjusting the volume of each channel Use cursor Left/Right to adjust the volume. to match the input source (Channel –12.0 dB – +12.0 dB (Default: 0.0 dB) Level Adjust) Use cursor Up/Down/Left/Right to select “Exit”, then The volume of each channel can be changed while listening to music.
- Page 95 Contents Connections Playback Settings Tips Appendix Adjusting the tone (Tone) Select “On” in step 3 and press cursor Down to select the sound range to be adjusted. Adjusts the tonal quality of the sound. Bass: Adjust bass. Press OPTION. Treble: Adjust treble.
- Page 96 Contents Connections Playback Settings Tips Appendix Adjusting audio delay (Audio Delay) Press cursor Down to select “Adjust” if the timing mismatch between the picture and sound need to be Compensates for incorrect timing between video and audio. corrected manually, then use cursor Left/Right to adjust the timing.
- Page 97 Contents Connections Playback Settings Tips Appendix Displaying your desired video during If you selected “On” in step 3, press cursor Down and audio playback (Video Select) select “Source”. Use cursor Left/Right to select the input source for This unit can display video from a different source on TV during audio video you want to play back, then press ENTER.
- Page 98 Contents Connections Playback Settings Tips Appendix Selecting a sound mode This unit allows you to enjoy various kinds of surround and stereo playback modes. Disc formats such as Blu-ray Disc and DVD, as well as being supported by digital broadcasting, and even by streaming movies and music from internet-based subscription services.
- Page 99 Contents Connections Playback Settings Tips Appendix o Switching the sound mode Selecting a sound mode Press MOVIE, MUSIC or GAME to display a list of the sound modes that can be selected. Each time you press MOVIE, MUSIC or GAME, Press MOVIE, MUSIC or GAME to select a sound mode.
- Page 100 Contents Connections Playback Settings Tips Appendix [Example] When MOVIE is pressed Direct playback MOVIE SOUND Sound recorded in source is played as is. Stereo Dolby Pro Logic II Movie Press PURE to select “Direct”. DTS Neo:6 Cinema Multi Ch Stereo Direct playback begins.
- Page 101 Contents Connections Playback Settings Tips Appendix Pure Direct playback Auto surround playback This mode detects the type of input digital signal, and automatically This mode is for playback with higher sound quality than in Direct playback selects the corresponding mode for playback. mode.
- Page 102 Contents Connections Playback Settings Tips Appendix Description of sound mode types Dolby sound mode Sound mode type Description Dolby PLg This mode can be selected when the Dolby PLg decoder is used to play back 2-channel sources in 5.1-channel surround sound with an enveloping surround sound experience.
-
Page 103: Original Sound Mode
Contents Connections Playback Settings Tips Appendix PCM multi-channel sound mode Sound mode type Description Multi Ch In This mode can be selected when playing multi-channel PCM sources. Original sound mode Sound mode type Description Multi Ch Stereo This mode is for enjoying stereo sound from all speakers. Rock Arena This mode simulates the expansive sound of a live concert in an arena. -
Page 104: Pure Direct
Contents Connections Playback Settings Tips Appendix Auto sound mode Sound mode type Description Auto In this mode, the type of digital signal input, such as Dolby Digital, Dolby TrueHD, Dolby Digital Plus, DTS, DTS-HD, PCM (multi-channel) is detected, and the playback mode switches automatically to the corresponding mode. If the input signal is analog or PCM (2-channel), stereo playback is used. - Page 105 Contents Connections Playback Settings Tips Appendix Sound mode that can be selected for each input signal The following sound modes can be selected using the MOVIE, MUSIC and GAME buttons. Adjust the sound field effect with the menu “Surround Parameter” to enjoy surround sound the way you like it. (v p. 125) Input signal Sound mode MOVIE button...
- Page 106 Contents Connections Playback Settings Tips Appendix Input signal Sound mode MOVIE button MUSIC button GAME button Multi-channel z3 Stereo Dolby Digital Dolby Digital Dolby Digital Plus Dolby Digital Plus Dolby TrueHD Dolby TrueHD DTS Surround DTS-HD DTS-HD PCM multi-channel Multi Ch In Multi Ch Stereo Mono Movie Rock Arena...
- Page 107 Contents Connections Playback Settings Tips Appendix o Views on the display A Shows a decoder to be used. A Dolby Digital Plus decoder is displayed as “X”. B Shows the name of the input source being played back. Front panel Display Rear panel Remote...
- Page 108 Contents Connections Playback Settings Tips Appendix HDMI Control function A recent addition to the HDMI standard is CEC (Consumer Electronics Control), which allows control signals from one device to communicate with another device via the HDMI cable connection. Setting procedure Enable the HDMI Control function of this unit.
- Page 109 Contents Connections Playback Settings Tips Appendix Sleep timer function You can have the power automatically switched to standby once a set time has elapsed. This is convenient for viewing and listening while going to sleep. SLEEP 0 The sleep timer can be set by pressing SLEEP on the main unit. Front panel Display Rear panel...
- Page 110 Contents Connections Playback Settings Tips Appendix o Checking the remaining time Using the sleep timer Press SLEEP when the sleep timer is in operation. The remaining time appears on the display. Press SLEEP and display the time you want to set. o To cancel the sleep timer The SLEEP indicator lights up on the display and the sleep timer starts.
-
Page 111: Quick Select Plus
Contents Connections Playback Settings Tips Appendix Quick select plus function Settings such as the input source, volume level and sound mode can be registered to the QUICK SELECT 1 - 4 buttons. You can simply press one of the registered QUICK SELECT buttons in subsequent playbacks to switch to the group of saved settings in a batch. - Page 112 Contents Connections Playback Settings Tips Appendix Calling up the settings Press QUICK SELECT. The Quick Select settings registered to the button you pressed are called up. The default settings for the input source are as shown below. Button Input source QUICK SELECT 1 CBL/SAT QUICK SELECT 2...
- Page 113 Contents Connections Playback Settings Tips Appendix Changing the settings Press and hold the desired QUICK SELECT until “Quickz Memory” appears on the display. The current settings will be memorized. Set the items below to the settings you want to register. z is displayed the number for the QUICK SELECT button you pressed.
- Page 114 Contents Connections Playback Settings Tips Appendix Panel lock function To prevent accidental operation of this unit, you can disable operation of Disabling all key button operations the buttons on the front panel. TUNE – STATUS Press X while you press and hold TUNER PRESET CH + and TUNE + with the unit in standby mode.
-
Page 115: Remote Control Unit
Contents Connections Playback Settings Tips Appendix Canceling the Panel lock function Press X while you press and hold TUNER PRESET CH + and TUNE + with the unit in standby mode. Press TUNE + or TUNE – to select “FP LOCK zOff”. (z The currently set mode.) Press STATUS to enter the setting. - Page 116 Contents Connections Playback Settings Tips Appendix Remote lock function When connecting an IR receiver, enable the Remote lock function. When Disabling the sensor function of the the function is enabled, you can not perform operations with the remote remote control unit control unit.
- Page 117 The web control screen supports the following functions. Router A Setup Menu This unit B Power ON/OFF C MAIN ZONE input source switching Web control screen Top menu Denon XXXXXXXXXX Setup Menu Denon XXXXXXXXXX Audio MAIN ZONE Video CBL/SAT Inputs...
- Page 118 (v p. 165) http://192.168.100.19 File Edit View Favorites Tools Help Network/Information When the top menu is displayed on the web browser, Friendly Name Denon AVR-S670H click on the menu item you want to operate. Connection Wireless (Wi-Fi) SSID SSID SSID-01 DHCP...
- Page 119 Contents Connections Playback Settings Tips Appendix Menu map When using menu operations, connect this unit to a TV and operate this unit while viewing the TV. The recommended settings are configured for this unit by default. You can customize this unit based on your existing system and your preferences. Setting items Detailed items Description...
- Page 120 Contents Connections Playback Settings Tips Appendix Setting items Detailed items Description Page Input Assign Changes input connector assignment and the audio input mode. Source Rename Changes the display name for input source. Hide Sources Selects source inputs to hide on the user interface and front panel displays. Source Level Adjusts the input level for the current source.
- Page 121 Contents Connections Playback Settings Tips Appendix Setting items Detailed items Description Page [When the user is signed out of the HEOS account] “–” A guidance to download the HEOS app. [When the user is signed in to the HEOS account] Signed in as Displays your HEOS account.
- Page 122 Information Shows information about this unit settings, input signals, etc. Usage Data Selects whether or not to send anonymous usage data to Denon. Save & Load Save and restore device settings by using a USB memory device. Setup Lock Protects settings from inadvertent changes.
- Page 123 Contents Connections Playback Settings Tips Appendix Setting items Detailed items Description Page Begin Setup... Performs basic installation/connections/settings from the beginning according to the Page 9 of guidance indicated on the TV screen. the separate manual Language Select Sets individual setting items according to the guidance displayed on the TV screen. “Quick Start Speaker Setup Guide”...
- Page 124 Contents Connections Playback Settings Tips Appendix Menu operations Press SETUP. The menu is displayed on the TV screen. Use cursor Up/Down/Right to select the menu to be set or operated, then press ENTER. Use cursor Left/Right to change to desired setting. Press ENTER to enter the setting.
- Page 125 Contents Connections Playback Settings Tips Appendix Audio Make audio-related settings. Subwoofer Level Adjust Surround Parameter Adjusts the subwoofer channel volume for all input sources. You can adjust the surround audio sound field effects to match your preferences. The items (parameters) that can be adjusted depend on the signal being o Subwoofer input and the currently set sound mode.
- Page 126 Contents Connections Playback Settings Tips Appendix o Loudness Management o Dynamic Compression This sets whether to output as specified in “Dynamic Compression” or Compress dynamic range (difference between loud and soft sounds). output directly without compressing the dynamic range of audio Automatic dynamic range compression recorded in the disc.
- Page 127 Contents Connections Playback Settings Tips Appendix o Low Frequency Effects o Center Image Adjust the low frequency effects level (LFE). Distributes the dialogue output from the center channel to the front left and right channels and widens the sound image in the front. -10 dB –...
- Page 128 Contents Connections Playback Settings Tips Appendix o Panorama o Dimension The front sound field is expanded further towards the back to create a Shift sound image center to front or rear to adjust playback balance. seamlessly inclusive sound impression. 0 – 6 (Default : 3) Use “Panorama”.
- Page 129 Contents Connections Playback Settings Tips Appendix o Delay Time o Room Size Adjusts delay time for surround channels. Determine size of acoustic environment. 0 ms – 300 ms (Default: 30 ms) Small: Simulate acoustics of a small room. Simulate acoustics of a medium-small Medium small: room.
- Page 130 Contents Connections Playback Settings Tips Appendix o Subwoofer Turn subwoofer output on and off. The subwoofer is used. (Default): Off: The subwoofer is not used. 0 You can set this when the sound mode is “Direct” or “Stereo” and in the menu “Subwoofer Output”...
- Page 131 Contents Connections Playback Settings Tips Appendix Restorer 0 This item can be set with analog signals or PCM signal (Sample Rate = Compressed audio formats such as MP3 and WMA (Windows Media 44.1/48 kHz) is input. Audio) reduce the amount of data by eliminating signal components that 0 This cannot be set when the sound mode is set to “Direct”...
- Page 132 Contents Connections Playback Settings Tips Appendix o Power On Level Volume Sets the initial volume level when the power is turned on. Set the volume setting. Last Sets the power-on level to the last-used o Scale (Default): volume level. Mute: Sets the power-on level to mute level.
- Page 133 Contents Connections Playback Settings Tips Appendix o MultEQ ® Audyssey ® MultEQ ® compensates for both time and frequency characteristics of Set Audyssey MultEQ , Audyssey Dynamic EQ and Audyssey Dynamic ® ® the listening area based on “Audyssey ® Setup”...
- Page 134 Contents Connections Playback Settings Tips Appendix o Dynamic EQ o Reference Level Offset Solves the problem of deteriorating sound quality as volume is Audyssey Dynamic EQ ® is referenced to the standard film mix level. It decreased by taking into account human perception and room makes adjustments to maintain the reference response and surround acoustics.
- Page 135 Contents Connections Playback Settings Tips Appendix o Dynamic Volume Graphic EQ Solves the problem of large variations in volume level between TV, Uses the graphic equalizer to adjust the tone of each speaker. movies and other content (between quiet passages and loud passages, etc.) by automatically adjusting to the user’s preferred volume setting.
- Page 136 Contents Connections Playback Settings Tips Appendix o Speaker Selection o Curve Copy Select whether to adjust tones for individual speakers or for all Copy the Flat correction curve created in Audyssey ® Setup. speakers. All: Adjust all speaker tones together. 0 “Curve Copy”...
- Page 137 Contents Connections Playback Settings Tips Appendix Video Make video-related settings. o HDMI Pass Through HDMI Setup Selects how this unit will transmit HDMI signals to the HDMI output in Make settings for HDMI Audio Out, HDMI Pass Through and HDMI standby power mode.
- Page 138 Contents Connections Playback Settings Tips Appendix o Pass Through Source o RC Source Select Selects the HDMI input to pass through the HDMI output when this unit Set whether to allow this unit to be turned on by the input source select is in standby power mode.
- Page 139 Contents Connections Playback Settings Tips Appendix o HDMI Control o ARC You can link operations with devices connected to HDMI and On the TV connected to the HDMI OUT connector, set whether to compatible with HDMI Control. receive sound from the TV via HDMI. Use HDMI Control function.
- Page 140 Contents Connections Playback Settings Tips Appendix o TV Audio Switching o Power Off Control Sets automatic switching to the “TV Audio” input when a TV connected Links the power standby of this unit to external devices. via HDMI sends an appropriate CEC control command to this unit. If power to a connected TV is turned off independently of the input source, power Select the “TV Audio”...
- Page 141 Contents Connections Playback Settings Tips Appendix o Power Saving HDMI Upscaler Enables the Power Saving feature of the AVR to reduce energy costs Sets the mode for upscaling 1080p and 4K HDMI content to 8K. when using the TV's speakers. Upscale 1080p and 4K HDMI video to 8K This function is activated in the following cases.
- Page 142 Contents Connections Playback Settings Tips Appendix o Now Playing On-Screen Display Sets the display time for the playback display when the input source is Select the on-screen display user interface preferences. “HEOS Music” or “Tuner”. o Volume Always On Show display continuously. (Default): Sets where to display the volume level.
- Page 143 Contents Connections Playback Settings Tips Appendix Screensaver 4K/8K Signal Format Select the screen saver setting. Set the format of 4K and 8K signal to be played back by this unit when the TV or playback device connected to this unit is HDMI 4K or 8K signal A screen saver is activated if no operation is performed for more than 5 compatible.
- Page 144 Contents Connections Playback Settings Tips Appendix GRelation between the “4K/8K Signal Format” setting and supported resolutionsH 0 When setting this to “Enhanced”, we recommend using a “Premium High 4K/8K Signal Format Support Color Pixel Speed HDMI Cable” or “Premium High Speed HDMI Cable with Ethernet” that has an “HDMI Premium Certified Cable”...
- Page 145 Contents Connections Playback Settings Tips Appendix HDCP Setup Sets the HDCP version for each HDMI input source. Video may not be output depending on the HDCP version of your player and the TV. If this issue occurs, use this setting to set one version of HDCP. This may be able to output video.
- Page 146 Contents Connections Playback Settings Tips Appendix Inputs Perform settings related to input source playback. You do not have to change the settings to use the unit. Make settings when needed. Input Assign 0 By default, each item is set as follows. By making connections as indicated by the input sources printed on the Input connector INPUT...
- Page 147 Contents Connections Playback Settings Tips Appendix n TV set top box/satellite users please note o DIGITAL When using the digital audio output on a TV/satellite box: Set this to change the digital audio input connectors assigned to the To play the video signal assigned to “HDMI” combined with the audio input sources.
- Page 148 Contents Connections Playback Settings Tips Appendix o INPUT MODE o Set Defaults Set the audio input modes for each input source. The “Input Assign” settings are returned to the default settings. It is normally recommended to set the audio input mode to “AUTO”. AUTO Automatically detect input signal and (Default):...
- Page 149 Contents Connections Playback Settings Tips Appendix Source Rename Hide Sources Changes the display name of the input source. Remove from the display input sources that are not used. Once changed, the name is displayed on the display and menu screens Show Use this source.
- Page 150 Contents Connections Playback Settings Tips Appendix Speakers The acoustic characteristics of the connected speakers and listening room are measured and the optimum settings are made automatically. This is called “Audyssey ® Setup”. You do not have to perform Audyssey Setup when you have already performed “Speaker Calibration” in “Setup Assistant”. ®...
- Page 151 Contents Connections Playback Settings Tips Appendix o About the main listening position NOTE The main listening position is the position where listeners would 0 Make the room as quiet as possible. Background noise can disrupt the room measurements. Close windows and turn off the power on electronic devices normally sit or where one would normally sit alone within the listening (radios, air conditioners, fluorescent lights, etc.).
- Page 152 Contents Connections Playback Settings Tips Appendix Procedure for speaker settings Attach the Sound calibration microphone to the supplied microphone stand or own tripod and install it (Audyssey Setup) ® at the main listening position. When installing the Sound calibration microphone, point the tip of Preparation the microphone toward the ceiling and adjust the height to match the height of the ears of a listener in a seated position.
- Page 153 Contents Connections Playback Settings Tips Appendix Connect the Sound calibration microphone to the Select “Start”, then press ENTER. SETUP MIC jack of this unit. Audyssey ® Setup can also make the following settings. Speaker Layout Set the Speaker Layout to suit your speaker environment. Follow the instructions on the screen display and press “Next”...
- Page 154 Contents Connections Playback Settings Tips Appendix When the following screen is displayed, select “Begin When the detected speaker is displayed, select “Next” Test” and then press ENTER. and then press ENTER. Start the measurement of the first position. Audyssey Setup Speaker Detection Audyssey Setup Front...
- Page 155 Contents Connections Playback Settings Tips Appendix Move the Sound calibration microphone to position 2, Repeat step 8, measuring positions 3 to 6. select “Continue”, then press ENTER. The measurement of the second position starts. Measurements can be made in up to six positions. 0 To skip measuring the fourth and subsequent listening position, press cursor Left to select “Complete”...
- Page 156 Contents Connections Playback Settings Tips Appendix When the analysis and storage ends, unplug the Sound Perform the settings for Audyssey Dynamic EQ ® calibration microphone from the SETUP MIC jack on the Audyssey Dynamic Volume ® main unit and then press “Next”. The following screen is displayed during the analysis.
- Page 157 Contents Connections Playback Settings Tips Appendix Error messages An error message is displayed if Audyssey ® Setup could not be completed due to speaker placement, the measurement environment, etc. If an error message is displayed, check the relevant items and perform the necessary measures. Be sure to turn off the power before checking speaker connections. Examples Error details Measures...
- Page 158 Contents Connections Playback Settings Tips Appendix Retrieving Audyssey ® Setup settings If you set “Restore...” to “Restore”, you can return to Audyssey Setup ® measurement result (value calculated at the start by MultEQ ) even when ® you have changed each setting manually. Audyssey Setup Your AVR can automatically measure the acoustics of your room then optimize your speakers using the included...
- Page 159 Contents Connections Playback Settings Tips Appendix Manual Setup Speaker Layout Select a suitable speaker layout for your speaker system. Perform when setting the speakers manually or when changing settings made in Audyssey ® Setup. o Front/Center/Surround If you enable new speakers in the Speaker Layout menu after performing Audyssey ®...
- Page 160 Contents Connections Playback Settings Tips Appendix o Subwoofer Distances Set the presence of a subwoofer. Set distance from listening position to speakers. Use a subwoofer. Measure beforehand the distance from the listening position to each (Default): speaker. Select when a subwoofer is not connected.
- Page 161 Contents Connections Playback Settings Tips Appendix o Set the distance Levels 0.0 ft – 59.1 ft / 0.00 m – 18.00 m Set the volume of the test tone to be the same at the listening position when it is output from each speaker. o Test Tone Start 0 The speakers that can be selected differ depending on the “Speaker Layout”...
- Page 162 Contents Connections Playback Settings Tips Appendix Crossovers Advanced The following advanced speaker settings are available. Set in accordance with the lower limit frequency of the base frequencies that can be played back through each speaker. See the speaker manual o Low Frequency Effects for information concerning speaker crossover frequency.
- Page 163 Contents Connections Playback Settings Tips Appendix Subwoofer Output 0 “Subwoofer Output” can be set when “Speaker Layout” - “Subwoofer” in the menu is set to other than “No”. (v p. 160) Selects which low frequency signals are sent to the subwoofer outputs. 0 Play music or a movie source and select the mode offering the strongest bass.
- Page 164 Contents Connections Playback Settings Tips Appendix Low Pass Filter Selects the crossover point for the LFE channel. Set this when you want to change the playback LFE signal of the subwoofer. o Low Pass Filter 80 Hz / 90 Hz / 100 Hz / 110 Hz / 120 Hz / 150 Hz / 200 Hz / 250 Hz (Default: 120 Hz) Front panel Display...
- Page 165 Contents Connections Playback Settings Tips Appendix Network To use this unit by connecting it to a home network (LAN), you must configure network settings. If you set up your home network (LAN) via DHCP, set “DHCP” to “On”. (Use the default setting.) This allows this unit to use your home network (LAN). When assigning an IP address to each device manually, you need to assign an IP address to this unit using the “IP Address”...
- Page 166 2. Check that your iOS device is connected to the wireless LAN (Wi- o Scan Networks Fi) router and select “Denon AVR-S670H” from “SET UP NEW Select the network you wish to connect to from the list of possible AIRPLAY SPEAKER...” at the bottom of the Wi-Fi configuration networks shown on the TV screen.
- Page 167 Contents Connections Playback Settings Tips Appendix o WPS Router o Manual Use a WPS-compatible router to connect using the push button Enter the name (SSID) and password of the network you wish to method. connect to. 1. Select “Push Button” on the TV screen. 1.
- Page 168 Contents Connections Playback Settings Tips Appendix o DHCP Settings Selects how to connect to the network. Configure the IP address. Configure the network settings If you are using a broadband router (DHCP function), the information (Default): automatically from your router. required for network connection such as the IP address will be automatically configured since the DHCP function is set to “On”...
- Page 169 0 If you cannot connect to the Internet, recheck the connections and settings. 0 When using the web control function, Denon AVR Remote App or HEOS App, use (v p. 46) with the “Network Control” setting set to “Always On”.
- Page 170 Router Access 0 Up to 30 characters can be input. 0 The default Friendly Name on first use is “Denon AVR-S670H”. Checks the connection from this unit to the router. o Set Defaults Failed to communicate with the router.
- Page 171 Contents Connections Playback Settings Tips Appendix o Internet Access AirPlay Checks whether this unit has access to the Internet (WAN). Settings for Apple AirPlay. o AirPlay Name Failed to connect to the Internet. Check Error: the Internet connection environment or Displays the name which identifies this unit on Apple devices.
- Page 172 Contents Connections Playback Settings Tips Appendix Spotify Connect Wi-Fi and Bluetooth Toggles access to Spotify Connect. Enables/disables the Wi-Fi and Bluetooth radios. o Wi-Fi Enables Spotify Connect. (Default): The Wi-Fi function can be stopped to prevent noise that affects the Off: Disables Spotify Connect.
- Page 173 Contents Connections Playback Settings Tips Appendix HEOS HEOS Account is needed in order to use HEOS Favorites. The menu displayed differs depending on the status of the HEOS Account. You have not signed in You have already signed in A QR code is displayed on the TV screen. o Signed in as Scan the QR code with your mobile device and download the HEOS App.
- Page 174 Contents Connections Playback Settings Tips Appendix General Make various other settings. Language Set the language for display the menu on the TV screen. Configure the ECO Mode and auto standby mode settings. English / Français / Español (Default: English) o ECO Mode This mode can reduce the power consumption and heat generation of this unit when power on.
- Page 175 Contents Connections Playback Settings Tips Appendix Power savings are always active, regardless of volume or input signal. 0 When the unit is switching between the different power saving states in “ECO Mode: Auto”, you may notice a click noise from the inside of this unit, this is Gives you the best balance between normal.
- Page 176 Contents Connections Playback Settings Tips Appendix o Power On Default o On Screen Display Set the mode to ECO when the power is on. Display the power consumption of this unit using a meter on the TV screen. The ECO Mode will be set to the previous Last setting before the power was switched Always display the meter on the TV...
- Page 177 Contents Connections Playback Settings Tips Appendix o Auto Standby Set so the unit power automatically switches to standby. Sets the time for switching to auto standby when there are no audio or video signals input into this unit. Before the unit enters standby mode, “Auto Standby” is displayed on the unit display and the menu screen.
- Page 178 Contents Connections Playback Settings Tips Appendix o Device List Bluetooth Transmitter Available devices are displayed in the list once you start pairing Sets this unit's Bluetooth transmitter. mode on the Bluetooth headphones you want to connect. Select Set to use Bluetooth headphones to listen to audio playing. your Bluetooth headphones from the list to pair them.
- Page 179 Contents Connections Playback Settings Tips Appendix Quick Select 0 “Quick Select” can be set for each Quick Select. Sets the “Quick Select” parameters and display name. 0 When “Input Source” is “Disabled”, Video Select information is not registered/ o Name called up either.
- Page 180 Contents Connections Playback Settings Tips Appendix o Auto-Update Firmware Turns on Automatic Updates so that feature updates are automatically Checks for the latest firmware information about updates, updates the downloaded and installed when this unit is in standby mode. firmware. n Auto-Update o Check for Update This unit will automatically update to the newest firmware when in...
- Page 181 Contents Connections Playback Settings Tips Appendix o Allow Update Notes concerning use of “Update” In order to use these functions, you must have the correct system Enable or disable updates for this unit. requirements and settings for an Internet connection. (v p. 46) Enables this unit to receive updates.
- Page 182 Contents Connections Playback Settings Tips Appendix o Video Information Show the HDMI input/output signals and HDMI TV information. Show information about this unit settings, input signals, etc. HDMI Signal Info. o Audio Resolution / HDR / Color Space / Pixel Depth / ALLM / QFT / FRL Rate Show the audio information.
- Page 183 Contents Connections Playback Settings Tips Appendix o Firmware SOURCE Blu-ray SIGNAL Dolby Audio - Dolby TrueHD SOUND Dolby Audio - TrueHD Displays information for the current Version: firmware. o Notifications Displays and sets notifications. Also, sets whether or not to display the notification when the power is turned on.
- Page 184 Appendix Usage Data Save & Load To help us improve our products and customer service, Denon collects Save and restore device settings by using a USB memory device. anonymous information about how you use this unit (such as frequently used input sources and sound modes and speaker settings).
- Page 185 Contents Connections Playback Settings Tips Appendix Setup Lock Reset Returns settings to the factory default. Protect settings from inadvertent changes. Initialization can be performed for all unit settings or for Network settings o Lock only. Turn protection on. o All Settings Turn protection off.
- Page 186 Contents Connections Playback Settings Tips Appendix o Contents Troubleshooting Power does not turn on / Power is turned off Tips Operations cannot be performed through the remote control unit I want the volume not to become too loud by mistake Display on this unit shows nothing I want to keep the volume at the same level when I turn the power No sound comes out...
- Page 187 Contents Connections Playback Settings Tips Appendix Tips I want the volume not to become too loud by mistake Set the volume upper limit for “Limit” in the menu beforehand. This prevents children or others from increasing the volume too much by mistake. (v p.
- Page 188 Contents Connections Playback Settings Tips Appendix I want to set the optimized listening environment after changing the configuration/position of the speakers or changing a speaker to a new Perform Audyssey ® Setup. This automatically makes the optimized speaker settings for the new listening environment. (v p. 150) I want to combine a desired video with the current music Set “Video Select”...
- Page 189 Contents Connections Playback Settings Tips Appendix Troubleshooting If a problem should arise, first check the following: 1. Are the connections correct? 2. Is the set being operated as described in the owner’s manual? 3. Are the other devices operating properly? 0 If steps 1 to 3 above do not improve the problem, restarting the device may improve the problem.
- Page 190 Contents Connections Playback Settings Tips Appendix Power does not turn on / Power is turned off Power does not turn on. Check whether the power plug is correctly inserted into the power outlet. (v p. 48) Power automatically turns off. The sleep timer is set.
- Page 191 Contents Connections Playback Settings Tips Appendix Operations cannot be performed through the remote control unit Operations cannot be performed through the remote control unit. Batteries are worn out. Replace with new batteries. (v p. 9) Operate the remote control unit within a distance of about 23 ft/7 m from this unit and at an angle of within 30°. (v p. 9) Remove any obstacle between this unit and the remote control unit.
- Page 192 Contents Connections Playback Settings Tips Appendix No sound comes out No sound comes out of speakers. Check the connections for all devices. (v p. 29) Insert connection cables all the way in. Check that input connectors and output connectors are not reversely connected. Check cables for damage.
- Page 193 Contents Connections Playback Settings Tips Appendix Desired sound does not come out The volume does not increase. The maximum volume is set too low. Set the maximum volume using “Limit” on the menu. (v p. 132) Appropriate volume correction processing is performed according to the input audio format and settings, so the volume may not reach the upper limit. The Bluetooth headphones do not have volume control and the volume is too low or too high.
- Page 194 Contents Connections Playback Settings Tips Appendix No sound is produced from subwoofer. Check the subwoofer connections. Turn on the subwoofer’s power. Set “Speaker Layout” – “Subwoofer” on the menu to “Yes”. (v p. 160) When “Crossovers” - “Front” in the menu is set to “Full Range”, depending on the input signal and the sound mode, no sound may be output from the subwoofer.
- Page 195 Contents Connections Playback Settings Tips Appendix Audyssey MultEQ ® , Audyssey Dynamic EQ ® and Audyssey Dynamic Volume ® cannot be selected. These cannot be selected when you have not performed Audyssey Setup. (v p. 150) ® Switch to a sound mode other than “Direct” or “Pure Direct”. (v p. 100) These cannot be selected when using the headphones.
- Page 196 Contents Connections Playback Settings Tips Appendix Sound is interrupted or noise occurs During playback from the Internet radio or USB memory device, sound is occasionally interrupted. When the transfer speed of the USB memory device is slow, sound may occasionally be interrupted. The network communication speed is slow or the radio station is busy.
- Page 197 Contents Connections Playback Settings Tips Appendix No video is shown on the TV No picture appears. Check the connections for all devices. (v p. 35) Insert connection cables all the way in. Check that input connectors and output connectors are not reversely connected. Check cables for damage.
- Page 198 Contents Connections Playback Settings Tips Appendix The menu screen is not displayed on the TV The menu screen or status information screen is not displayed on the TV. The status information will not appear on the TV when the following video signals are being played. - Some images of 3D video content - Computer resolution images (example: VGA) - Video with an aspect ratio other than 16:9 or 4:3...
- Page 199 Contents Connections Playback Settings Tips Appendix AirPlay cannot be played back The AirPlay icon is not displayed on iTunes / iPhone / iPod touch / iPad. This unit and PC / iPhone / iPod touch / iPad are not connected to the same network (LAN). Connect it to the same LAN as this unit. (v p. 46) The firmware on iTunes / iPhone / iPod touch / iPad is not compatible with AirPlay.
- Page 200 Contents Connections Playback Settings Tips Appendix USB memory devices cannot be played back USB memory device is not recognized. Disconnect and reconnect the USB memory device. (v p. 43) Mass storage class compatible USB memory devices are supported. This unit does not support a connection through a USB hub. Connect the USB memory device directly to the USB port. The USB memory device must be formatted to “FAT32”...
- Page 201 Contents Connections Playback Settings Tips Appendix Bluetooth cannot be played back Bluetooth devices cannot be connected to this unit. The Bluetooth function in the Bluetooth device has not been enabled. See the Owner’s Manual of the Bluetooth device to enable the Bluetooth function. Bring the Bluetooth device near to this unit.
- Page 202 Contents Connections Playback Settings Tips Appendix The sound is cut off. Bring the Bluetooth device near to this unit. Remove obstructions between the Bluetooth device and this unit. To prevent electromagnetic interference, locate this unit away from microwave ovens, wireless LAN devices and other Bluetooth devices. Reconnect the Bluetooth device.
- Page 203 Contents Connections Playback Settings Tips Appendix The Internet radio cannot be played back A list of broadcasting stations is not displayed. The LAN cable is not properly connected, or the network is disconnected. Check the connection status. (v p. 46) Perform the network diagnostic mode.
- Page 204 Contents Connections Playback Settings Tips Appendix Music files on PC or NAS cannot be played back Files stored on a computer cannot be played. Files are stored in a non-compatible format. Record in a compatible format. (v p. 219) Files that are copyright protected cannot be played on this unit. The USB port of this unit cannot be used for connection to a computer.
- Page 205 Contents Connections Playback Settings Tips Appendix Various online services cannot be played Various online services cannot be played. The online service may have been discontinued. The HDMI Control function does not work The HDMI Control function does not work. Check that “HDMI Control” in the menu is set to “On”. (v p. 139) You cannot operate devices that are not compatible with the HDMI Control function.
- Page 206 Contents Connections Playback Settings Tips Appendix Cannot connect to a wireless LAN network Cannot connect to the network. The network name (SSID), password and encryption setting have not been set up correctly. Configure the network settings according to the setting details of this unit.
- Page 207 Contents Connections Playback Settings Tips Appendix Update error messages If an update is interrupted or fails, an error message appears. Display Description Connection failed. Please check your network, then try The network connection is unstable. again. Connection to the server failed. Check your network environment and try the update again.
-
Page 208: Resetting Factory Settings
Contents Connections Playback Settings Tips Appendix Resetting factory settings If the indicators are incorrect or the unit cannot be operated, restarting the unit may improve the problem. We recommend restarting the unit before returning the settings to the default settings. (v p. 189) If the operations are not improved by restarting the unit, follow the steps below. -
Page 209: Resetting Network Settings
Contents Connections Playback Settings Tips Appendix Resetting network settings If network contents cannot be played or the unit cannot connect to the network, restarting the unit may improve the problem. We recommend restarting the unit before returning the settings to the default settings. (v p. 189) If the operations are not improved by restarting the unit, follow the steps below. - Page 210 Contents Connections Playback Settings Tips Appendix Factory Restore When the unit or the network functions do not work properly, operation may be improved by performing the Factory Restore. Do this when the unit still does not work properly even after trying the steps for “Resetting factory settings” or “Resetting network settings”. (v p. 208, 209) After performing the Factory Restore, various settings are reset to the default settings.
- Page 211 Contents Connections Playback Settings Tips Appendix About HDMI HDMI is an abbreviation of High-Definition Multimedia Interface, which is an AV digital interface that can be connected to a TV or amplifier. This unit supports input and output of 3D (3 dimensional) video signals With the HDMI connection, high definition video and high quality audio of HDMI.
- Page 212 Contents Connections Playback Settings Tips Appendix Auto Lip Sync ARC (Audio Return Channel) This function can automatically correct delay between the audio and This function transmits audio signals from the TV to this unit through video. the HDMI cable and plays back the audio from the TV on this unit Use a TV that is compatible with the Auto Lip Sync function.
- Page 213 Contents Connections Playback Settings Tips Appendix o Supported audio formats ALLM (Auto Low Latency Mode) This unit automatically switches to low latency mode depending on 2-channel Linear PCM 2-channel, 32 kHz – 192 kHz, 16/20/24 bit playback contents when using a combination of television and game Multi-channel Linear PCM 7.1-channel, 32 kHz –...
- Page 214 Contents Connections Playback Settings Tips Appendix Copyright protection system In order to play back digital video and audio such as BD video or DVD video via HDMI connection, both this unit and the TV or player must to support the copyright protection system known as HDCP (High- bandwidth Digital Content Protection System).
- Page 215 Contents Connections Playback Settings Tips Appendix Relationship between video signals and TV output This unit HDMI-compatible TV Video device Output Input (IN) (HDMI OUT) Output HDMI signal HDMI signal HDMI connector HDMI connector HDMI connector HDMI connector NOTE 0 Only HDMI connections are available for the video input/output of this unit. Front panel Display Rear panel...
- Page 216 Contents Connections Playback Settings Tips Appendix When “HDMI Upscaler” in the menu is set to “Auto”, this unit upscales the input HDMI video signal and then outputs it to the TV. (v p. 141) HDMI Output signal 1080p 1080p 1080p 480i/576i 480p/576p 720p 1080i...
- Page 217 Contents Connections Playback Settings Tips Appendix Playing back a USB memory devices This unit is compatible with MP3 ID3-Tag (Ver. 2) standard. This unit can show the artwork that was embedded by using MP3 ID3-Tag Ver. 2.3 or 2.4. This unit is compatible with WMA META tags. If the image size (pixels) of an album artwork exceeds 500 ×...
- Page 218 Contents Connections Playback Settings Tips Appendix Playing back a Bluetooth device o Maximum number of playable files and folder The limits on the number of folders and files that can be displayed by This unit supports the following Bluetooth profile. this unit are as follows.
- Page 219 Contents Connections Playback Settings Tips Appendix Playing back a file saved on a PC or NAS This unit is compatible with MP3 ID3-Tag (Ver. 2) standard. This unit can show the artwork that was embedded by using MP3 ID3-Tag Ver. 2.3 or 2.4. This unit is compatible with WMA META tags.
- Page 220 Contents Connections Playback Settings Tips Appendix Playing back Internet Radio Personal memory plus function The most recently used settings (input mode, HDMI output mode, sound o Playable broadcast station specifications mode, tone control, channel level, MultEQ ® , Dynamic EQ, Dynamic Volume, Restorer and audio delay, etc.) are saved for each input source.
- Page 221 Contents Connections Playback Settings Tips Appendix Sound modes and channel output S This indicates the audio output channels or surround parameters that can be set. D This indicates the audio output channels. The output channels depend on the settings of “Speaker Layout”. (v p. 159) Channel output Sound mode Front...
- Page 222 Contents Connections Playback Settings Tips Appendix Sound modes and surround parameters Surround Parameter Dolby Pro Logic g Music mode Only Loudness Dynamic Low Frequency Sound mode Management Compression Effects Cinema EQ Delay Time Effect Level Room Size Panorama Dimension Center Width Direct/Pure Direct (2-channel) Direct/Pure Direct (Multi-channel) Stereo...
-
Page 223: Restorer
Contents Connections Playback Settings Tips Appendix Surround Parameter Audyssey Restorer DTS Neo:6 Dialog Tone Subwoofer Sound mode MultEQ® Dynamic EQ Dynamic Volume Music mode only Enhancer Level Adjust Subwoofer z6z7 Center Image Sz10 Sz10 Direct/Pure Direct (2-channel) Direct/Pure Direct (Multi-channel) Sz11 Sz11 Stereo... - Page 224 Contents Connections Playback Settings Tips Appendix z1 During playback in Pure Direct mode, the surround parameters are the same as in Direct mode. z2 This item can be selected when a Dolby TrueHD signal is played. z3 This item can be selected when a Dolby Digital, Dolby Digital Plus, Dolby TrueHD or DTS signal is played. z4 This can be set when the LFE signal is included in the input signal.
- Page 225 Contents Connections Playback Settings Tips Appendix Types of input signals, and corresponding sound modes F This indicates the default sound mode. S This indicates the selectable sound mode. 2-channel signal Multi-channel signal Dolby Dolby Dolby Sound mode NOTE Dolby Dolby Analog / Dolby Digital...
- Page 226 Contents Connections Playback Settings Tips Appendix Explanation of terms o Audyssey Audyssey MultEQ ® Audyssey MultEQ ® is a room equalization solution that calibrates any Audyssey Dynamic EQ ® audio system so that it can achieve optimum performance for every Audyssey Dynamic EQ ®...
- Page 227 Contents Connections Playback Settings Tips Appendix o Dolby Dolby Pro Logic g Dolby Pro Logic g is a matrix decoding technology developed by Dolby Dolby Digital Laboratories. Dolby Digital is a multi-channel digital signal format developed by Dolby Regular music such as that on CDs is encoded into 5-channels to achieve Laboratories.
- Page 228 Contents Connections Playback Settings Tips Appendix o DTS DTS Express DTS Express is an audio format supporting low bit rates (max. 5.1- channels, 24 to 256 kbps). This is an abbreviation of Digital Theater System, which is a digital audio DTS-HD system developed by DTS.
- Page 229 Contents Connections Playback Settings Tips Appendix o Audio DTS-HD High Resolution Audio DTS-HD High Resolution Audio is an improved version of the conventional Apple Lossless Audio Codec DTS, DTS-ES and DTS 96/24 signals formats, compatible with sampling This is a codec for lossless audio compression method developed by frequencies of 96 or 48 kHz and up to 7.1-channels of discrete digital Apple Inc.
- Page 230 Contents Connections Playback Settings Tips Appendix THIS SOFTWARE IS PROVIDED BY THE COPYRIGHT HOLDERS AND MPEG (Moving Picture Experts Group), MPEG-2, MPEG-4 CONTRIBUTORS “AS IS” AND ANY EXPRESS OR IMPLIED These are the names for digital compression format standards used for WARRANTIES, INCLUDING, BUT NOT LIMITED TO, THE IMPLIED the encoding of video and audio.
- Page 231 Contents Connections Playback Settings Tips Appendix o Video Speaker impedance This is an AC resistance value, indicated in Ω (ohms). Progressive (sequential scanning) Greater power can be obtained when this value is smaller. This is a scanning system of the video signal that displays 1 frame of video as one image.
- Page 232 Contents Connections Playback Settings Tips Appendix o Network WPA2 (Wi-Fi Protected Access 2) This is a new version of the WPA established by the Wi-Fi Alliance, AirPlay compatible with more secure AES encryption. AirPlay sends (plays) contents recorded in iTunes or on an iPhone/iPod WPA/WPA2-Personal touch/iPad to a compatible device via the network.
- Page 233 Contents Connections Playback Settings Tips Appendix o Others HDCP When transmitting digital signals between devices, this copyright protection technology encrypts the signals to prevent content from being copied without authorization. Pairing Pairing (registration) is an operation that is required in order to connect a Bluetooth device to this unit using Bluetooth.
- Page 234 Contents Connections Playback Settings Tips Appendix Trademark information Apple, AirPlay, iPad, iPad Air, iPad Pro and iPhone are trademarks of The Bluetooth ® word mark and logos are registered trademarks owned Apple Inc., registered in the U.S. and other countries. by the Bluetooth SIG, Inc.
- Page 235 Contents Connections Playback Settings Tips Appendix For DTS patents, see http://patents.dts.com. Manufactured under license from DTS, Inc. or DTS Licensing Limited. DTS, DTS-HD, and the DTS-HD logo are registered trademarks or trademarks of DTS, Inc. in the App Store ® is registered in the U.S.
- Page 236 Contents Connections Playback Settings Tips Appendix Specifications Audio section Power amplifier Rated output: Front: 75 W + 75 W (8 Ω/ohms, 20 Hz – 20 kHz with 0.08 % T.H.D.) 100 W + 100 W (6 Ω/ohms, 1 kHz with 0.7 % T.H.D.) Center: 75 W (8 Ω/ohms, 20 Hz –...
- Page 237 Contents Connections Playback Settings Tips Appendix Analog Input sensitivity: 200 mV Frequency response: 10 Hz – 100 kHz — +1, –3 dB (Direct mode) S/N: 98 dB (IHF–A weighted, Direct mode) Phono equalizer Input sensitivity: 2.5 mV RIAA deviation: ±1 dB (20 Hz to 20 kHz) S/N: 74 dB (IHF-A) Distortion factor:...
- Page 238 Contents Connections Playback Settings Tips Appendix Tuner section [FM] [AM] (Note: μV at 75 Ω/ohms, 0 dBf = 1 x 10 –15 Reception frequency range: 87.5 MHz – 107.9 MHz 520 kHz – 1710 kHz Effective sensitivity: 1.2 μV (12.8 dBf) 18 μV 50 dB sensitivity: MONO ―...
- Page 239 Contents Connections Playback Settings Tips Appendix Bluetooth section Communications system: Bluetooth Specification Version 5.0 Transmission power: Bluetooth Specification Power Class 1 Maximum communication range: Approx. 98.4 ft/30 m in line of sight Used frequency range: 2.4 GHz Modulation scheme: FHSS (Frequency-Hopping Spread Spectrum) Supported profiles: Receiver function A2DP (Advanced Audio Distribution Profile) 1.2...
- Page 240 Contents Connections Playback Settings Tips Appendix General Operating temperature: 41 °F - 95 °F (5 °C - 35 °C) Power supply: AC 120 V, 60 Hz Power consumption: 340 W Power consumption in standby mode: 0.1 W Power consumption in CEC standby 0.5 W mode: z When “Network Control”...
- Page 241 Contents Connections Playback Settings Tips Appendix Dimensions (Unit : in. (mm)) 17.1 (434) (60) 1.8 (45) 13.5 (344) 1.8 (45) o Weight : 17.2 lb (7.8 kg) Front panel Display Rear panel Remote Index...
- Page 242 Contents Connections Playback Settings Tips Appendix Index Bluetooth device ..........57 Firmware Update .......... 180 Blu-ray Disc player ........40, 51 FM/AM antenna ........44, 65 v Numerics Front panel ............. 15 3D ..............211 4K/8K ............211 Cable TV ............38 5.1-channel ............
-
Page 243: Table Of Contents
Contents Connections Playback Settings Tips Appendix Input Assign ..........146 NAS ............... 74 Rear panel ............20 Input settings ........120, 146 Network settings .......... 165 Remote control unit ........23 Input source ........... 50 Resetting factory settings ......208 Internet Radio .......... - Page 244 Contents Connections Playback Settings Tips Appendix Tips .............. 187 Web control ..........117 Troubleshooting ........... 189 Wi-Fi settings ..........166 TV ............35, 36 Wired LAN ..........46, 165 Wireless LAN ......... 47, 166 USB memory device ........ 43, 52 Video Select ...........
- Page 245 3520 10928 00AS ©2023 DEI Sales, Inc. All Rights Reserved.
Need help?
Do you have a question about the AVR-S670H and is the answer not in the manual?
Questions and answers
I’m trying to connect an Audio Technica turntable to an AVR-S670H using the phone inputs. I have tried both the phono and line settings on the turntable and am Not getting any output from The turntable. Is there another input to use that is more sensitive than phono?
To connect an Audio Technica turntable to a Denon AVR-S670H for optimal output:
1. Check Cartridge Type: Ensure the turntable has a moving magnet (MM) cartridge. If it has a moving coil (MC) cartridge, use an MC head amp or step-up transformer.
2. Connect Audio Cables: Plug the turntable’s left (L) and right (R) audio output cables into the AVR-S670H’s “Phono” input.
3. Connect Ground Wire (Optional): If the turntable has a ground wire, connect it to the “SIGNAL GND” terminal on the AVR-S670H. If this causes more noise, disconnect it.
4. Set Input Source: On the AVR-S670H, set the input source to “Phono”.
Avoid turning up the volume with no turntable connected to prevent hum noise.
This answer is automatically generated