Advertisement
Quick Links
Advertisement

Related Manuals for Millenium MPS-850


Summary of Contents for Millenium MPS-850
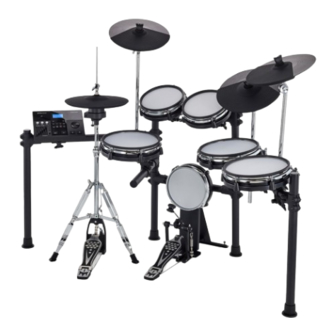
- Page 1 MPS-850 E-Drum Set...
- Page 2 Thomann GmbH Hans-Thomann-Straße 1 96138 Burgebrach Germany Telephone: +49 (0) 9546 9223-0 Internet: www.thomann.de 09.10.2023, ID: 428224 (V4)
-
Page 3: Table Of Contents
Table of contents Table of contents General information........................................5 1.1 Symbols and signal words....................................5 Safety instructions.......................................... 6 Scope of delivery..........................................7 Assembly............................................10 Protecting the environment....................................17 MPS-850 E-Drum Set... - Page 4 MPS-850 E-Drum Set...
-
Page 5: General Information
NOTICE! This combination of symbol and signal word indicates a possible dangerous situa‐ tion that can result in material and environmental damage if it is not avoided. Warning signs Type of danger Warning – danger zone. MPS-850 E-Drum Set... -
Page 6: Safety Instructions
The plasticiser contained in the rubber feet of this product may react with the coating of the floor and cause permanent dark stains after some time. If necessary, use a suitable mat or felt slide to prevent direct contact between the device’s rubber feet and the floor. MPS-850 E-Drum Set... -
Page 7: Scope Of Delivery
Connector for hi-hat Hi-hat (with edge and choke) Crash 1 (with edge and choke), crash 2 (with edge and choke) Ride (with edge, bell and choke) E-drum module Millenium MPS-850 Hi-hat stand with pedal Bass drum pad pedal Pedal beater... - Page 8 Scope of delivery Item Qty. Assembly instructions for the e-drum set User manual for the e-drum module MPS-850 E-Drum Set...
- Page 9 Scope of delivery ö (2 ×) (3 ×) & (2 ×) (5 ×) (5 ×) < (2 ×) > (2 ×) MPS-850 E-Drum Set...
-
Page 10: Assembly
Tom pad 1 (8"), tom pad 2 (8") Tom pad 3 (10"), tom pad 4 (10"), snare pad Hi-hat controller Hi-hat pad Crash 1, crash 2 Ride E-drum module Millenium MPS-850 Hi-hat stand with pedal Bass drum pad pedal Bass drum pad MPS-850 E-Drum Set... - Page 11 Attach the crossbeams of the rack (7, 8, 9) in the provided mounting clamps. Attach the crossbeam support tubes (3) in the provided mounting clamps. Make sure that the ends of the support tubes (3) are resting on the floor. Then tighten the mounting screws. MPS-850 E-Drum Set...
- Page 12 Insert the brackets (4) for the cymbals (crash, ride) into the provided mounting clamps on the rack. Use the mounting screws to attach the brackets at the required height. Loosen the retaining screws on the bracket joints and turn the brackets into the desired playing positions. Then tighten the retaining screws again. MPS-850 E-Drum Set...
- Page 13 Unscrew the wing nuts from the cymbal holders and take the felt washers off the holders. Place the cymbals as shown in the figure on the holders. Place the felt washers on the cymbals and fix the cymbals with the associated wing nuts on the holders. MPS-850 E-Drum Set...
- Page 14 Push the e-drum module (17) to the stop into the free clamp of the crossbeam. Thread the multi-cable (28) through the clamp and insert the sub-D connector into the corresponding socket of the drum module. Tighten the thumb screws (26, 27) on the clamp. Align the module and tighten the wing nut of the clamp. MPS-850 E-Drum Set...
- Page 15 Positioning the bass drum and hi-hat Place the pedal with the bass drum pad centred under the rack. Position the bass drum pedal centred in front of the pad. Place the hi-hat pedal to the left of the bass drum pad. MPS-850 E-Drum Set...
- Page 16 Set-up and cabling Set up the rack, the pads and the cymbals according to your needs. Finally, position the drum pedal and the hi-hat controller in front of the rack and connect all trigger cables to the e-drum module. MPS-850 E-Drum Set...
-
Page 17: Protecting The Environment
Dispose of this device through an approved waste disposal firm or through your local waste facility. When discarding the device, comply with the rules and regulations that apply in your country. If in doubt, consult your local waste disposal facility. MPS-850 E-Drum Set... - Page 18 Notes MPS-850 E-Drum Set...
- Page 20 Musikhaus Thomann · Hans-Thomann-Straße 1 · 96138 Burgebrach · Germany · www.thomann.de...
Need help?
Do you have a question about the MPS-850 and is the answer not in the manual?
Questions and answers