Table of Contents
Advertisement
Advertisement
Table of Contents

Subscribe to Our Youtube Channel
Related Manuals for Millenium MPS-250 USB


Summary of Contents for Millenium MPS-250 USB
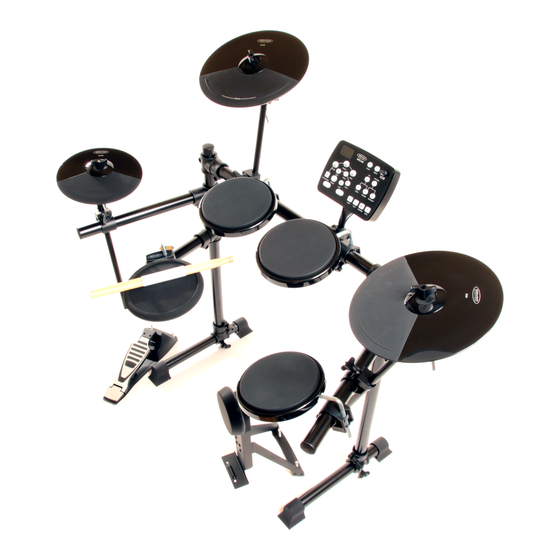
- Page 1 MPS-250 USB e-drum set user manual...
- Page 2 Musikhaus Thomann e.K. Treppendorf 30 96138 Burgebrach Deutschland Telephone: +49 (0) 9546 9223-0 E-mail: info@thomann.de Internet: www.thomann.de 05.02.2014, ID: 307340 (V2)
-
Page 3: Table Of Contents
Operation..........................18 8.1 Functions......................... 18 8.2 Playing the pads......................21 Technical data........................23 Connector and pin assignments................... 24 Appendix..........................25 11.1 Kit list..........................25 11.2 Voice list......................... 25 11.3 MIDI implementation....................29 Cleaning............................ 30 Protecting the environment................... 31 MPS-250 USB... -
Page 4: General Notes
General notes General notes This user manual contains important information on safe operation of the device. Read and follow all safety notes and all instructions. Save this manual for future refer‐ ence. Make sure that it is available to all persons using this device. If you sell the device, include the manual for the next owner. -
Page 5: Safety Notes
Decrease the volume level immediately if you experience ringing in your ears or hearing impairment. NOTICE! Operating conditions This device has been designed for indoor use only. To prevent damage, never expose the device to any liquid or moisture. Avoid direct sunlight, heavy dirt, and strong vibrations. MPS-250 USB... - Page 6 Safety notes NOTICE! External power supply The device is powered by an external power supply. Before connecting the external power supply, ensure that the input voltage (AC outlet) matches the voltage rating of the device and that the AC outlet is pro‐ tected by a residual current circuit breaker.
-
Page 7: Features
Features Features 184 sounds 20 pre-programmed drum kits 50 pre-programmed patterns Metronome Recording and playback function Flexible pad programming Connections: Headphones, Line IN/OUT and USB-MIDI Automatic switchoff MPS-250 USB... -
Page 8: Scope Of Delivery
Scope of delivery Scope of delivery Before assembling the e-drum set, verify that the delivery is complete by means of the list below. Rack, consisting of two side legs, a horizontal crossbar and three wing arms with holder clamps (pre-assembled unit) 2 ×... -
Page 9: Assembly
Assembly Assembly Overview The following overview shows the typical setup of a drum set. MPS-250 USB... - Page 10 Assembly Setting up the rack Adjust the height of the rack’s horizontal crossbar and three wing arms according to your preferred playing position. Then tighten the retaining screws. Position the two feet on the floor and insert the two rack legs into the holder clamps provided for this purpose.
- Page 11 The bass drum pad is played with a bass drum pedal (not included in the scope of delivery). The following figure shows an example of assembling the bass drum pad with a bass drum pedal. Observe the assembly instructions of the bass drum pedal. MPS-250 USB...
- Page 12 Assembly Drum module Attach the drum module to its support using the screws supplied, as illustrated. Then affix the support plate to the holder clamp on the rack. Setup and cabling Finally adjust the rack and all pads according to your preferences. As a final step, all pads must be connected to the drum module by means of cables (see Ä...
-
Page 13: Installation
Connecting a speaker, amplifier or PA system Connect an active speaker, an amplifier or your PA system to the LINE OUT output on the rear of the drum module. When connecting an external mono system, we recom‐ mend using a stereo-to-mono adapter. MPS-250 USB... - Page 14 Installation Connecting audio devices Connect audio devices such as CD players, MP3 players, etc. to the LINE IN input on the rear of the drum module. e-drum set...
-
Page 15: Connections And Controls
Button for opening the PATTERN menu. [VOICE] Button for opening the VOICE menu. [VOLUME] Button for opening the VOLUME menu. [DRUM OFF] Button for muting the drum track of a pattern. [STOP] Button for stopping pattern playback and for terminating a recording. MPS-250 USB... - Page 16 Connections and controls [PLAY] Button for playing back a pattern. [RECORD] Button for activating the recording mode. [SAVE] Button for saving a recording. [–]/[+] Selection / navigation buttons for all menus with forward and fast forward (press and hold down). Reset function To reset the drum module to its factory defaults, press and hold down these two buttons during startup of the device until ‘rES’...
- Page 17 Output jack for connecting an active speaker or an amplifier or directly a PA system. When connecting an external mono system, we recommend using a stereo-to-mono adapter. LINE IN Input jack for connecting external audio devices such as CD players, MP3 players, etc. MPS-250 USB...
-
Page 18: Operation
Operation Operation 8.1 Functions Power on Before switching on the device, check all cables for proper connection. Before switching on the device, turn the [MASTER VOLUME] control of the drum module to its minimum level, and switch off all external devices con‐ nected. - Page 19 Press the [VOLUME] button. The current playback volume appears on the dis‐ play. Using the [–] / [+] buttons, set the playback volume to any desired value between ‘0’ and ‘127’ . When practicing, you can mute the pattern’s drum track ([DRUM OFF] button). MPS-250 USB...
- Page 20 Operation Metronome Press the [CLICK] button to activate or deactivate the metronome. You may adjust the click speed at any moment by means of the [–] / [+] buttons. Press the [TEMPO] button. The current click speed appears on the display. Using the [–] / [+] buttons, set the click speed to any desired value between ‘40’...
-
Page 21: Playing The Pads
Tom pads have only one trigger and must be hit in the center in order to produce a sound. Crash and ride Crash and ride pads have only one trigger and must be hit in the slightly thicker rubber-coated zone to produce a sound. MPS-250 USB... - Page 22 Operation The crash pad can be muted with the hand just like an analog cymbal (choke func‐ tion). Snare The snare pad has two triggers: the center trigger produces the typical snare sound, while the rim trigger produces rim shots. Bass drum The bass drum pad has only one trigger and must be hit in the center to produce a sound.
-
Page 23: Technical Data
50 pre-programmed patterns, 1 user-defined pattern Connections 25-pin D-sub for connecting the pads (pad cable included in delivery) LINE IN / LINE OUT (3.5 mm jack connectors) Headphones (3.5 mm jack connector) Mains power supply power supply unit MPS-250 USB... -
Page 24: Connector And Pin Assignments
Connector and pin assignments Connector and pin assignments Introduction This chapter will help you select the right cables and plugs to connect your valuable equipment in such a way that a perfect sound experience is ensured. Please note these advices, because especially in ‘Sound & Light’ caution is indicated: Even if a plug fits into the socket, an incorrect connection may result in a destroyed power amp, a short circuit or ‘just’... -
Page 25: Appendix
Disco Magnet TightRope Smashing Machine Largeness Room Funky 11.2 Voice list Description Description KickDrum1 HighQ SideStick Slap SnareDrum2 ScraPush HandClap ScraPull SnareDrum1 Stick LoFloTom2 SquarClick CloseHH MetroClick LowFloTom1 MetroBell PedalHH KickDrum2 LowTom Description Description OpenHi-hat RideCymb2 Low-midTom HiBongo MPS-250 USB... - Page 26 Appendix Description Description Hi-midTom LowBongo CrashCymb1 MuteConga RHighTom HiConga RideCymb1 LowConga ChCymbal HighTimbal RideBell LowTimbale Tambourine HighAgogo SplashCymb LowAgogo Cowbell Cabasa CrashCymb2 Maracas VibraSlap ShortWhist Description Description LongWhist Castanets ShortGuiro MuteSurdo LongGuiro OpenSurdo Claves KICK Hi W-Block Kick 1 Lo W-Block Kick 2 MuteCuica Kick 3...
- Page 27 Description Description Closed Hi-Hat 2 Open Hi-Hat 2 Closed Hi-Hat 3 Open Hi-Hat 3 Closed Hi-Hat 4 Open Hi-Hat 4 Closed Hi-Hat 5 Open Hi-Hat 5 Closed Hi-Hat 6 Open Hi-Hat 6 Closed Hi-Hat 7 Open Hi-Hat 7 MPS-250 USB...
- Page 28 Appendix Description Description Closed Hi-Hat 8 Open Hi-Hat 8 Closed Hi-Hat 9 Open Hi-Hat 9 Closed Hi-Hat 10 Open Hi-Hat 10 Closed Hi-Hat 11 Open Hi-Hat 11 Closed Hi-Hat 12 Open Hi-Hat 12 OPEN HI-HAT Open Hi-Hat 13 Open Hi-Hat 1 Description Description HI TOM...
-
Page 29: Midi Implementation
Channel 10 supports only Bank 0. For more information regarding “System Exclusive”, “RPN” and “NRPN”, please contact your specialized dealer. Instrument Note Instrument Note Tom 1 Ride Tom 2 Hi-Hat Open Tom 3 Hi-Hat Close Snare Hi-Hat Pedal Snare Rim Kick Crash MPS-250 USB... -
Page 30: Cleaning
Cleaning Cleaning Device parts Clean the accessible parts of the device regularly. The frequency of cleaning depends on the operating environment: moist, smoky or particularly dirty environments may cause a higher accumulation of dirt on the components of the device. Use a dry soft cloth for cleaning. -
Page 31: Protecting The Environment
Dispose of this device through an approved waste disposal firm or through your local waste facility. When discarding the device, comply with the rules and regulations that apply in your country. If in doubt, consult your local waste disposal facility. MPS-250 USB... - Page 32 Notes e-drum set...
- Page 33 Notes MPS-250 USB...
- Page 34 Notes e-drum set...
- Page 36 Musikhaus Thomann e.K. · Treppendorf 30 · 96138 Burgebrach · Germany · www.thomann.de...
Need help?
Do you have a question about the MPS-250 USB and is the answer not in the manual?
Questions and answers