Advertisement
Quick Links
Advertisement

Related Manuals for AEMC instruments 6240


Summary of Contents for AEMC instruments 6240
- Page 1 GlobalTestSupply www. .com Find Quality Products Online at: sales@GlobalTestSupply.com...
- Page 2 GlobalTestSupply www. .com Find Quality Products Online at: sales@GlobalTestSupply.com...
- Page 3 1.4.1 Accessories and Replacement Parts ......6 4.3.1 Measurement Readings..........17 4.3.2 Connections and Readings.........17 4.3.3 Test Lead Connection ..........18 GlobalTestSupply www. .com Find Quality Products Online at: sales@GlobalTestSupply.com...
- Page 4 4.9.1 Erasing Selected Measurements ........23 4.9.2 Erasing All Measurements ..........23 6.1.1 Voltage Present ............27 6.1.2 Overrange ..............28 6.1.3 Noisy Measurement ............28 6.1.4 Overheating ..............28 GlobalTestSupply www. .com Find Quality Products Online at: sales@GlobalTestSupply.com...
- Page 5 • If the case needs cleaning, do not use any alcohol or oil based cleaners. Preferably use soapy water with a damp cloth or sponge. Do not immerse the 6240 micro-ohmmeter in water. • Use connection accessories of which the overvoltage category and the service voltage are greater than or equal to those of the measuring instrument (50V CAT III).
- Page 6 CAT IV: For measurements performed at the primary electrical supply (<1000V) such as on primary overcurrent protection devices, ripple control units, or meters. CAT III: For measurements performed in the building installation at installation and circuit breakers. CAT II: For measurements performed on circuits directly connected to on household appliances or portable tools.
- Page 7 Micro-ohmmeter Model 6240 ..........Cat. #2129.80 Includes extra large tool bag, set of two 10ft Kelvin clips (10A - Hippo), set of two 10ft Kelvin probes (1A - Spring Loaded), optical USB cable, US 115V power cord, two spare fuses (12.5A), NiMH rechargeable battery pack, and USB stick supplied with product user manual...
- Page 8 The Micro-ohmmeter Model 6240 is used to perform low resistance to 400 currents from 10mA to 10A. ration, which eliminates test lead resistance for a measurement accuracy pack with a built-in recharger (110/220V). the value of resistance, current or voltage test, polarity and battery charge.
- Page 9 Some of the more popular and most frequent uses of the micro-ohmmeter are in applications for: • Checking metallic coating resistance, especially in aeronautics • Ground connections and continuity measurement • Resistance measurements on motors and small transformers • Contact resistance measurements on breakers and switches •...
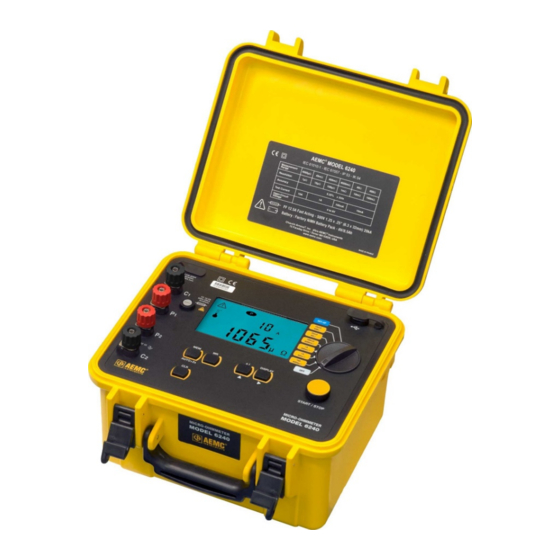
- Page 10 Figure 2-1 1. Kelvin input terminals 2. AC line recharging receptacle 4. Large multi-line backlit liquid crystal display (see § 2.6) 5. Optical interface connector for connection to a computer 6. Range selection switch 7. Start/Stop button 8. Program / function buttons (see §...
- Page 11 GlobalTestSupply www. .com Find Quality Products Online at: sales@GlobalTestSupply.com...
- Page 12 The display incorporates two lines of characters to display test results, as well as a library of symbols to assist the operator in determining conditions at a glance. The symbols that can appear are shown in Figure 2-2. Figure 2-2 OBJ.
- Page 13 GlobalTestSupply www. .com Find Quality Products Online at: sales@GlobalTestSupply.com...
- Page 14 Power Supply: 6V, 8.5Ah rechargeable NiMH battery pack Battery Life: Range dependent Dimensions: Weight: Case Protection: ABS plastic polycarbonate: watertight to IP64 (cover closed), water resistant to IP53 (cover open). Color: Safety yellow case with gray faceplate GlobalTestSupply www. .com Find Quality Products Online at: sales@GlobalTestSupply.com...
-
Page 15: Electromagnetic Compatibility
Operating Temperature: 14° to 132°F (-10° to 55°C), 10 to 85% RH Storage Temperature: -40° to 158°F (-40° to 70°C); 10 to 90% RH Altitude: <2000m Electrical safety as per EN 61010, EN 61557. Degree of pollution: 2 Protection: Measurement CAT III, 50V with respect to earth, 500V Electromagnetic Compatibility: marking and product standard EN 61326-1 Emissions in residential environment... - Page 16 • Never use test leads or measuring wires if there is any evidence of deterioration (insulation split, burnt, etc). • Never • Never connect the unit to a live circuit. • Never disconnect the connection wires before the icon disappears from the display.
- Page 17 To display and modify parameters: • To move through parameters, press the button. • To change the displayed parameters or view additional ones, press and hold the button. • To modify the parameters, use the button. • To accept the changes, press and hold the button >2s until the display stops blinking.
- Page 18 GlobalTestSupply www. .com Find Quality Products Online at: sales@GlobalTestSupply.com...
- Page 19 The measurement leads are connected using the four binding posts on the left side of the front panel as shown below. Connect the two red leads to terminals P1 and P2. Connect the two black leads to terminals C1 and C2. Any drop in the voltage on the load terminals is measured between the two “voltage”...
- Page 20 When measuring very low resistive values in the µ range, the presence currents can be present due to a variety of reasons including chemical or thermal EMF in samples made of dissimilar metals. readings. The presence of AC interference in the sample under test may cause the interference may be reduced by twisting the leads around each other.
- Page 21 1. Before making measurements, press the AUTO >2s button. 2. When the button is pressed, the MEM OBJ : TEST number (e.g. 01 : 01). The main display indicates 3. Use the button to switch between the OBJ and TEST option, then use the button to change the number of the test or object.
- Page 22 Data storage is organized into objects (OBJ), each of which can contain several tests (TEST). OBJ corresponds to the object tested and each test corresponds to a measurement made on the object. The instrument can store 99 measurements. 1. Start and Stop a measurement (see § 4.3). 2.
- Page 23 either Indicates address is already occupied Overwrites the Exits without Memory Recording Display shown if memory is full: Display shown If memory is empty: 1. Make sure there is no measurement in progress. 2. Press the MR button. 3. Use the buttons to select the desired OBJ and TEST.
- Page 24 1. Press the CLR button. 2. Use the buttons to select the desired OBJ and TEST. 3. Press the CLR button for >2s to delete the selected record. 1. Turn the rotary switch to Set-up. The default display appears: 2. Press for >2s.
- Page 25 When you purchase an AEMC instrument supported by DataView, the software is included as part of the product package. DataView program NOTE: When installing, the user must have Administrative access rights during the installation. The users access rights can be changed after the installation is complete.
- Page 26 Panel. If you are performing a Complete install, by default all avail- Panel indicates it is selected). Control Panels take up disk space on the computer; so unless you have other types of AEMC instruments, we recommend that you select MicroOhmmeter and deselect the rest.
- Page 27 8. You can now select additional Setup options to install (see step 3 9. The DataView folder now appears on your computer desktop, within which is the MicroOhmmeter icon and the icon(s) for any other Control Panel(s) you have installed. Clicking the DataView icon in the DataView folder on your desktop opens the core DataView program.
- Page 28 GlobalTestSupply www. .com Find Quality Products Online at: sales@GlobalTestSupply.com...
- Page 29 The > symbol indicates an overrange condition. Switch to a higher measurement range and restart the measurement until the > symbol no longer appears. symbol indicates noise in the measurement. The measurement accuracy is not guaranteed. Internal overheating can occur if a measurement in the 10A range last for several minutes.
- Page 30 will not be held ® responsible for any accident, incident, or malfunction following a repair done other than by its service center or by an approved repair center. • To avoid electrical shock, do not attempt to perform any servicing •...
-
Page 31: Ac Power Selection
The instrument includes a 110V line cord, which provides the charging voltage for the rechargeable battery. CHARGING THE BATTERY • The Model 6240 should be charged to a full charge before using • Charging to full capacity may take up to 6 hours for a completely discharged battery. - Page 32 ON Mode: • bAtt shown when instrument is turned on and battery is low. There will be a 5 second delay then 4 beeps before the instrument shuts down. • bAtt shown during high current measurement indicates a low battery condition (measurement will be possible on lower current range only).
- Page 33 that it be scheduled back to our factory Service Center at one-year intervals for recalibration, or as required by other standards or internal procedures. For instrument repair and calibration: You must contact our Service Center for a Customer Service Authorization Number (CSA#).
- Page 34 The Model 6240 is warranted to the owner for a period of two years from the date of original purchase against defects in manufacture. This limited warranty is given by AEMC Instruments, not by the distributor from whom it was ®...
- Page 35 GlobalTestSupply www. .com Find Quality Products Online at: sales@GlobalTestSupply.com...
Need help?
Do you have a question about the 6240 and is the answer not in the manual?
Questions and answers