Table of Contents

Related Manuals for GORMAN-RUPP PUMPS U4B65S-B


Summary of Contents for GORMAN-RUPP PUMPS U4B65S-B
- Page 1 OM‐05667‐01 June 24, 2004 Rev. G 05‐27‐2022 INSTALLATION, OPERATION, AND MAINTENANCE MANUAL WITH PARTS LIST SUPER U SERIES PUMPS MODELS U4B65S‐B INCLUDING: /F GORMAN‐RUPP PUMPS www.grpumps.com 2004 Gorman‐Rupp Pumps Printed in U.S.A.
- Page 2 Register your new Gorman‐Rupp pump online at www.grpumps.com Valid serial number and e‐mail address required. RECORD YOUR PUMP MODEL AND SERIAL NUMBER Please record your pump model and serial number in the spaces provided below. Your Gorman‐Rupp distributor needs this information when you require parts or service. Pump Model: Serial Number:...
-
Page 3: Table Of Contents
TABLE OF CONTENTS INTRODUCTION ..........PAGE I - 1 SAFETY - SECTION A . - Page 4 TABLE OF CONTENTS (continued) TROUBLESHOOTING - SECTION D ......PAGE D - 1 PREVENTIVE MAINTENANCE .
-
Page 5: Introduction
SUPER U SERIES OM-05667 INTRODUCTION Thank You for purchasing a Gorman‐Rupp pump. The following are used to alert maintenance per Read this manual carefully to learn how to safely sonnel to procedures which require special atten install and operate your pump. Failure to do so tion, to those which could damage equipment, and could result in personal injury or damage to the to those which could be dangerous to personnel:... -
Page 6: Safety - Section A
SUPER U SERIES OM-05667 SAFETY - SECTION A This information applies to Super U Se materials and residues containing spe ries basic pumps. Gorman‐Rupp has no cified entrained solids. Do not attempt control over or particular knowledge of to pump volatile, explosive or flam the power source which will be used. - Page 7 OM-05667 SUPER U SERIES Death or serious personal injury and This pump is designed to pump materi damage to the pump or components als which could cause serious illness or can occur if proper lifting procedures injury through direct exposure or are not observed.
-
Page 8: Installation - Section B
SUPER U SERIES OM-05667 INSTALLATION - SECTION B Review all SAFETY information in Section A. specific application. Since the pressure supplied to the pump is critical to performance and safety, Since pump installations are seldom identical, this be sure to limit the incoming pressure to 50% of section offers only general recommendations and the maximum permissible operating pressure as practices required to inspect, position, and ar... -
Page 9: Preinstallation Inspection
OM-05667 SUPER U SERIES PREINSTALLATION INSPECTION POSITIONING PUMP Lifting The pump assembly was inspected and tested be fore shipment from the factory. Before installation, inspect the pump for damage which may have oc curred during shipment. Check as follows: a. Inspect the pump for cracks, dents, damaged Death or serious personal injury and threads, and other obvious damage. -
Page 10: Suction And Discharge Piping
SUPER U SERIES OM-05667 (254 mm) must be maintained to permit removal of these gauges are desired for pumps that are not the cover. tapped, drill and tap the suction and discharge lines not less than 18 inches (457,2 mm) from the suction and discharge ports and install the lines. -
Page 11: Suction Lines In Sumps
OM-05667 SUPER U SERIES tight seal. Follow the sealant manufacturer's rec If two suction lines are installed in a single sump, ommendations when selecting and applying the the flow paths may interact, reducing the efficiency pipe dope. The pipe dope should be compatible of one or both pumps. -
Page 12: Discharge Lines
SUPER U SERIES OM-05667 pass line should be at least 1 inch in diameter to DISCHARGE LINES minimize the chance of plugging. Siphoning In low discharge head applications (less than 30 feet or 9 meters), it is recommended that the by Do not terminate the discharge line at a level lower pass line be run back to the wet well, and located 6 than that of the liquid being pumped unless a si... -
Page 13: Automatic Air Release Valve
OM-05667 SUPER U SERIES AUTOMATIC AIR RELEASE VALVE When properly installed, a Gorman‐Rupp Auto matic Air Release Valve will permit air to escape through the bypass line and then close automati If a manual shut‐off valve is installed in cally when the pump is fully primed and pumping a bypass line, it must not be left closed at full capacity. -
Page 14: Alignment
SUPER U SERIES OM-05667 DISCHARGE PIPE CLEAN‐OUT COVER INSTALL AIR RELEASE VALVE IN HORIZONTAL POSITION DISCHARGE CHECK VALVE 90_ LONG RADIUS ELBOW SUPPORT PUMP DISCHARGE BRACKET SELF‐PRIMING CENTRIFUGAL PUMP BLEED LINE 1” (25,4 MM) DIA. MIN. (CUSTOMER FUR NISHED) EXTEND 6” SUCTION (152 MM) BELOW LINE... -
Page 15: Coupled Drives
OM-05667 SUPER U SERIES hubs are the same distance apart at all points (see Figure 5). Check parallel adjustment by laying a straightedge across both coupling rims at the top, bottom, and Adjusting the alignment in one direction side. When the straightedge rests evenly on both may alter the alignment in another direc... -
Page 16: Drive Belt Tensioning
SUPER U SERIES OM-05667 quired monthly or at 500 hour intervals, whichever DRIVE BELT TENSIONING comes first. Ideal drive belt tension is the lowest tension at General Rules of Tensioning which the belt will not slip under peak load condi tions. -
Page 17: Operation - Section C
OM-05667 SUPER U SERIES OPERATION - SECTION C Review all SAFETY information in Section A. Add liquid to the pump casing when: 1. The pump is being put into service for the Follow the instructions on all tags, labels and de first time. -
Page 18: Operation
OM-05667 SUPER U SERIES If rotation is incorrect on a three‐phase motor, have the liquid could come to a boil, build a qualified electrician interchange any two of the pressure, and cause the pump casing to three phase wires to change direction. If rotation is rupture or explode. -
Page 19: Strainer Check
OM-05667 SUPER U SERIES heats and activates the valve. Never replace this valve with a substitute which has not been speci fied or provided by the Gorman‐Rupp Company. If the application involves a high discharge Strainer Check head, gradually close the discharge throttling valve before stopping the pump. - Page 20 OM-05667 SUPER U SERIES against the housing. Record this temperature for AND REPAIR). Bearing overheating can also be future reference. caused by shaft misalignment and/or excessive vi bration. A sudden increase in bearing temperature is a warning that the bearings are at the point of failing When pumps are first started, the bearings may to operate properly.
- Page 21 SUPER U SERIES OM-05667 TROUBLESHOOTING - SECTION D Review all SAFETY information in Section A. Before attempting to open or service the pump: 1. Familiarize yourself with this manual. 2. Lock out or disconnect the power source to ensure that the pump will remain inoperative.
- Page 22 OM-05667 SUPER U SERIES TROUBLE POSSIBLE CAUSE PROBABLE REMEDY PUMP STOPS OR Strainer clogged. Check strainer and clean if neces FAILS TO DELIVER sary. RATED FLOW OR PRESSURE Suction intake not submerged at Check installation and correct sub proper level or sump too small. mergence as needed.
- Page 23 SUPER U SERIES OM-05667 TROUBLE POSSIBLE CAUSE PROBABLE REMEDY BEARINGS RUN Bearing temperature is high, but Check bearing temperature regu TOO HOT within limits. larly to monitor any increase. Low or incorrect lubricant. Check for proper type and level of lubricant.
- Page 24 OM-05667 SUPER U SERIES Preventive Maintenance Schedule Service Interval* Item Daily Weekly Monthly Semi‐ Annually Annually General Condition (Temperature, Unusual Noises or Vibrations, Cracks, Leaks, Loose Hardware, Etc.) Pump Performance (Gauges, Speed, Flow) Bearing Lubrication Seal Lubrication (And Packing Adjustment, If So Equipped) V‐Belts (If So Equipped) Air Release Valve Plunger Rod (If So Equipped)
- Page 25 OM-05667 SUPER U SERIES PUMP MAINTENANCE AND REPAIR - SECTION E MAINTENANCE AND REPAIR OF THE WEARING PARTS OF THE PUMP WILL MAINTAIN PEAK OPERATING PERFORMANCE. STANDARD PERFORMANCE FOR PUMP MODEL U4B65S‐B, Including /F Based on 70_F (21_ C) clear water at sea level Contact the Gorman‐Rupp Company to verify per...
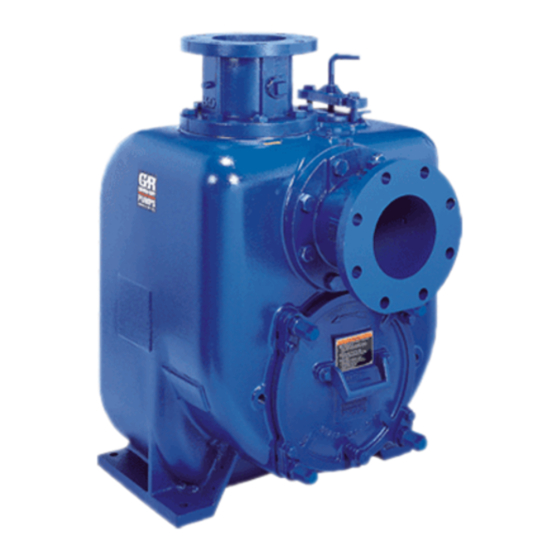
- Page 26 OM-05667 SUPER U SERIES ILLUSTRATION PARTS PAGE Figure 1. Pump Model U4B65S-B, Including /F PAGE E - 2 MAINTENANCE & REPAIR...
- Page 27 OM-05667 SUPER U SERIES PARTS LIST Pump Model U4B65S-B, Including /F (From S/N 1298951 Up) If your pump serial number is followed by an “N”, your pump is NOT a standard production model. Contact the Gorman‐Rupp Company to verify part numbers.
- Page 28 OM-05667 SUPER U SERIES ILLUSTRATION SEAL AREA DETAIL Figure 2. Repair Rotating Assembly PAGE E - 4 MAINTENANCE & REPAIR...
- Page 29 OM-05667 SUPER U SERIES PARTS LIST Repair Rotating Assembly ITEM PART NAME PART ITEM PART NAME PART NUMBER NUMBER BEARING HOUSING 38251-520 17180 SIGHT GAUGE 26714-021 PIPE PLUG P04 17090 IMPELLER SHAFT 38514-819 1706H N0612 17040 1.50" SEAL ASSEMBLY 46512-074 ADJ SHIM 37J 17090 BALL BEARING...
- Page 30 OM-05667 SUPER U SERIES PUMP AND SEAL DISASSEMBLY pump integrity are compromised by such practices. AND REASSEMBLY Review all SAFETY information in Section A. Follow the instructions on all tags, label and decals Before attempting to open or service the attached to the pump.
- Page 31 SUPER U SERIES OM-05667 Rotating Assembly Removal the pump or component only as high as necessary and keep personnel away (Figure 2) from suspended objects. The rotating assembly may be serviced without disconnecting the suction or discharge piping; Back Cover And Wear Plate Removal however, the power source must be removed to provide clearance.
- Page 32 OM-05667 SUPER U SERIES Figure 3. Loosening Impeller impeller is removed. Inspect the impeller and re place if cracked or badly worn. (Figure 1) Remove the impeller adjusting shims (26); tie and Remove the hardware (3 and 4) securing the rotat tag the shims, or measure and record their thick...
- Page 33 SUPER U SERIES OM-05667 Disengage the hardware (14 and 15) and slide the Rotate the bearings by hand to check for rough bearing cap (13) and oil seal (6) off the shaft. Re ness or binding and inspect the bearing balls. If ro move the bearing cap gasket (12) and press the oil tation is rough or the bearing balls are discolored, seal from the bearing cap.
- Page 34 OM-05667 SUPER U SERIES the oil seal from rolling as the shaft and bearings be replaced any time the shaft and bear are installed in the bearing housing. The O.D. of the ings are removed. sleeve should be just smaller than the bearing NOTE housing bore, while the I.D.
- Page 35 SUPER U SERIES OM-05667 seat bore in the seal plate for dirt, nicks and burrs, Wipe lightly in a concentric pattern to avoid and remove any that exist. The stationary seat bore scratching the faces. must be completely clean before installing the Inspect the seal component for wear, scoring, seal.
- Page 36 OM-05667 SUPER U SERIES Install the seal plate gasket (7). Position the seal A clearance of .025 to .040 inch (0,64 to 1,02 mm) plate (8) over the shaft and secure it to the bearing between the impeller and the seal plate is recom housing with the hardware (9 and 10).
- Page 37 SUPER U SERIES OM-05667 complete unit. Individual parts are not sold sepa USE TWO USE TWO REMAINING OPPOSING rately. ADJUSTING SCREWS HAND NUTS AND LOCKING COL TO PRESS LARS TO SET FACE BACK COVER CLEARANCE INTO PUMP Reach through the back cover opening with the CASING check valve and position the check valve adaptor INDEX COLLARS 3...
- Page 38 OM-05667 SUPER U SERIES holes in the back cover plate. Secure the locking Final Pump Assembly collars to the back cover plate with the hardware (Figure 1) (20 and 21). Install the two remaining back cover nuts snugly against the adjusting screws. Install the shaft key (25, Figure 2) and reconnect the power source.
- Page 39 SUPER U SERIES OM-05667 tinuously or installed in an environment with rapid portant in areas where variable hot and temperature change. cold temperatures are common. For cold weather operation, consult the factory or a lubricant supplier for the recommended grade of oil.
- Page 40 For Warranty Information, Please Visit www.grpumps.com/warranty or call: U.S.: 419-755-1280 Canada: 519-631-2870 International: +1-419-755-1352 GORMAN‐RUPP PUMPS...
Need help?
Do you have a question about the U4B65S-B and is the answer not in the manual?
Questions and answers