
Related Manuals for IOGear GCS2HU


Summary of Contents for IOGear GCS2HU
- Page 1 User Manual 2-Port Cable KVM Switch with HDMI Support GCS2HU/GCS62HU PART NO. M1130 www.iogear.com...
- Page 2 IOGEAR, the IOGEAR logo, are trademarks or registered trademarks of IOGEAR. Microsoft and Windows are registered trademarks of Microsoft Corporation. All other brand and product names are trademarks or registered trademarks of their respective holders. IOGEAR makes no warranty of any kind with regards to the information presented in this document.
-
Page 3: Table Of Contents
Table of Contents Package Contents Firmware Upgrade System Requirements Upgrade Fail Overview Compliance Information Standard Installation Limited Warranty Advanced Installation Contact LED Indication Port Switching Hotkeys Summary Table Hotkeys Summary Table Cont. Autoscan Interval Table Mac Keyboard Emulation Factory Default Settings... -
Page 4: Package Contents
Package Contents • 1 x 2-Port Cable KVM Switch with HDMI Support • 1 x Manual • 1 x Warranty Card... -
Page 5: System Requirements
System Requirements Console • 1 x HDMI display • 1 x Standard 104 Key wired USB keyboard • 1 x Standard 2 or 3 button wired mouse • Powered speakers and microphone (optional) Computers • 1 x HD port • 2 x USB ports •... -
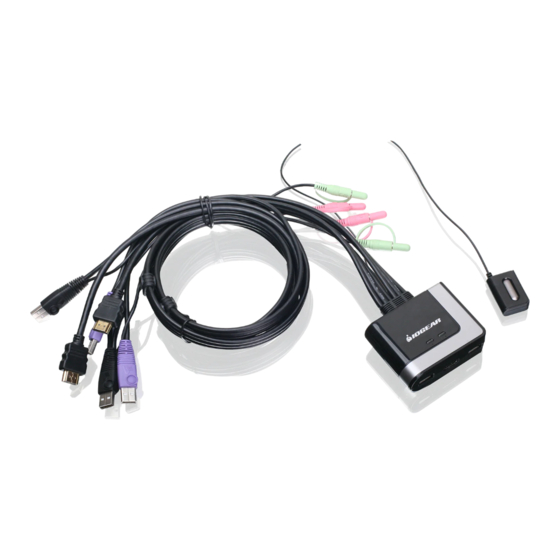
Page 6: Overview
Overview PC 1 LED CPU Audio connector PC 2 LED CPU USB Keyboard connector Console USB Mouse Port 10. CPU HD connection Console HD Port 11. CPU USB Keyboard connector Console USB Keyboard Port 12. CPU Microphone connector Console Speaker Port 13. -
Page 7: Standard Installation
Standard Installation Step 1 Step 3 Please make sure your computers and monitor are Connect your USB keyboard and mouse to the powered off before you start. console USB keyboard port and console USB mouse port. Step2 Connect the HD cable from your monitor to the console HD monitor port. - Page 8 Step 4 Step 5 Connect your powered speaker and microphone to Connect a set of your molded KVM cable to each of the console audio port and console your computers – HD cable to the HD output, USB microphone port. cables to open USB ports from your computer, audio cable to your audio output and mic.
-
Page 9: Advanced Installation
Advanced Installation Step 1 Step 3 Please make sure your computers and monitor are Connect your USB keyboard to the console USB powered off before you start. keyboard port. Step2 Connect the HD cable from your monitor to the console HD monitor port. Then, turn on the monitor. - Page 10 Step 4 Step 5 Connect a powered USB hub to the console mouse Connect your powered speaker and mic. to the port, then connect the mouse to any available USB console audio port and console mic. port. port in the hub. Then, connect any peripherals that you want to share between your computers to the other available USB ports in the hub.
- Page 11 Step 6 Final Step Connect a set of your molded KVM cable to each Turn on your computers. of your computers – HD cable to the HD output, USB cables to open USB ports from your computer, audio cable to your audio output and mic. cable to the mic.
-
Page 12: Led Indication
LED Indication - LED will light up in Green indicating port on focus. - Both LEDs will be flashing together when the KVM is in Firmware Upgrade Mode. -
Page 13: Port Switching
Port Switching You can switch port via remote switch button, Port Switching via Hotkey Commands mouse or hotkey commands. To trigger a Hotkey Mode, simply press [Scroll Lock] [Scroll Lock]. Please refer to Hotkey Summary Table for details. Port Switching via Remote Switch Button Simply press the remote switch button once to switch focus to the next port. -
Page 14: Hotkeys Summary Table
Hotkeys Summary Table Hotkey combination Description [Enter] Switch KVM and audio focus to the next port [k] [Enter] Switch KVM focus to the next port [s] [Enter] Switch audio focus to the next port Activate Autoscan Mode. It will toggle between the two computers every [a] [Enter] 5 seconds Activate Autoscan Mode. -
Page 15: Hotkeys Summary Table Cont
Hotkeys Summary Table Cont. Hotkey combination Description List out current settings [F4] [Enter] [Scroll Lock] [Scroll Lock] + Note: Please have a Notepad or word document opened before you trigger this function. [Ctrl] [Ctrl]* + [F5] [Enter] Perform a USB keyboard and mouse reset Sets the keyboard language layout. -
Page 16: Autoscan Interval Table
Autoscan Interval Table Description 3 seconds 5 seconds (default) 10 seconds 20 seconds... -
Page 17: Mac Keyboard Emulation
Mac Keyboard Emulation The PC compatible (101/104 key) keyboard can emulate the functions of the Mac keyboard. The emulation mappings are listed in the table below. [Alt] PC Keyboard Mac Keyboard [Shift] Shift [Print Screen] [Scroll Lock] [Crtl] Ctrl [Ctrl] [1] [Enter] Return... -
Page 18: Factory Default Settings
Factory Default Settings Function Default Setting Autoscan Interval 5 seconds Hotkeys [Scroll Lock] [ Scroll Lock] Keyboard Operating Platform PC compatible Mouse Emulation Mouse Port-Switching Keyboard Emulation... -
Page 19: Firmware Upgrade
When you see Step 1 the 2 LEDs are flashing on the KVM, you can now Go to www.iogear.com to download the latest release the remote switch button. available firmware or the specific firmware that you wish to upgrade to. - Page 20 Step 4 Step 5 Windows will now install all the required drivers. After you see the below message “Your new You may see the below message popup in tray hardware is installed and ready to use.”, extract icon area. the downloaded file with WinRAR or compatible software.
- Page 21 Step 6 Step 7 Read the License Agreement and click “I Agree” Choose the correct KVM that you wish to perform then click “Next” if you wish to continue with the firmware upgrade from the “Device List” and then firmware upgrade. Otherwise, click “Cancel” to exit. click “Next”...
- Page 22 Step 8 Step 9 If you have checked the “Check Firmware Version” When the firmware upgrade is done, you will see checkbox, then the utility will check the current “Firmware upgrade OK” in the “Status Messages” firmware that is on your KVM. If the current firm- window.
-
Page 23: Upgrade Fail
Upgrade Fail Unplug the 2 USB connections from your computer that has performed the firmware upgrade. Then, repeat the firmware upgrade process by following the procedure of Firmware Upgrade section starting from step 3. -
Page 24: Compliance Information
Compliance Information FCC Statement This equipment has been tested and found to comply with the limits for a Class B digital device, pursuant to Part 15 of the FCC Rules. These limits are designed to provide reasonable protection against harmful inter- ference when the equipment is operated in a commercial environment. -
Page 25: Limited Warranty
For further inquiries please contact IOGEAR. -
Page 26: Contact
Contact WE’RE HERE TO HELP YOU! NEED ASSISTANCE SETTING UP THIS PRODUCT? Make sure you: www.iogear.com 1. Visit for more product information www.iogear.com/support 2. Visit for live help and product support IOGEAR www.iogear.com iogear.custhelp.com support@iogear.com... - Page 30 ® © 2018 IOGEAR...
Need help?
Do you have a question about the GCS2HU and is the answer not in the manual?
Questions and answers
Can you please provide clarification on the video ports as HD and HDMI appear to be used interchangeably in the information on the Amazon item. Is the port on the switch (to go to the monitor), and the two cables going to the PCs, all HDMI?
Yes, the video ports on the IOGear GCS2HU switch and the cables to the PCs are all HDMI. The manual mentions connecting the HD (HDMI) cable from the monitor to the console HD monitor port and from the KVM switch to the computer's HD output.
This answer is automatically generated