Advertisement
+050001441 - rel. 5.0 - 07.02.2022
E
V-U
2
- Electronic expansion valve / Elektroniczny zawór rozprężny / Détendeur électronique / Elektronisches Expansionsventil / Válvula de expansión electrónica
WAZNE
Carel
gwarantuje
poprawne
rozprężnego Carel, jeśli jest on obsługiwany wyłącznie przez sterowni-
ki rmy Carel. Używanie zaworu ze sterownikami innych producentów,
jeśli nie zostało to wyraźnie uzgodnione z rmą Carel, skutkuje auto-
matycznym unieważnieniem gwarancji.
Przed instalacją produktu należy przeczytać "Instrukcję obsługi systemów
EEV (kod +030220811)". Podręcznik dostępny jest w zakładce "Dokumenty"
na stronie www.carel.com.
IMPORTANT
Carel guarantees the correct operation of the Carel ExV, if driven by Carel
drivers only. The use of the Carel ExVs with other manufacturers driver, if not
expressely agreed with Carel, will automatically void the warranty.
For more information, read the "EEV systems operating manual (code
+030220811) before installing this product. The manual is available in the "do-
cumentation" download area at www.carel.com.
Ustawienie / Positioning
wykrywanie przegrzania
skraplacz
parownik
Zawór rozprężny E V
E
2
V expansion valve
Spawanie i obsługa / Welding and handling
T. Max
650°C
A
B
C
Ogólny opis urządzenia
Zawór elektroniczny E2V przeznaczony jest do instalowania w obiegu czynnika chłodniczego. Zawór E2V wykorzystuje przegrza-
działanie
elektronicznego
zaworu
nie jako sygnał sterujący, który jest obliczany za pomocą czujnika ciśnienia i temperatury umieszczonego na wylocie parownika.
Ciecz wlotowa powinna być odpowiednio schłodzona, aby zapobiec pracy zaworu z czynnikiem zdławionym. Hałas zaworu może
zwiększać się, gdy nie ma wystarczającej ilości czynnika chłodniczego lub następuje znaczny spadek ciśnienia za zaworem. W
przypadku zaworów E2V zaleca się stosowanie wyłącznie regulatorów fi rmy Carel lub regulatorów ofi cjalnie zatwierdzonych do
użytku przez CAREL. Nie należy używać zaworów E2V poza normalnymi warunkami pracy opisanymi poniżej.
Ustawienie: Zawory E
2
V działają dwukierunkowo. Przyłącze boczne należy wykorzystać jako wlot płynu (Rys. 1), ponieważ w ten
sposób w przypadku zaniku zasilania zawór pozostanie zamknięty z powodu ciśnienia wciskającego płytę do gniazda. W przypadku
stosowania zaworów odcinających przed zaworem rozprężnym należy tak ustawić obwód, aby w pobliżu zaworu nie tworzył się
młot hydrauliczny. Zaworu odcinającego i zaworu rozprężnego nie wolno nigdy zamykać jednocześnie, aby uniknąć niebezpiecz-
nego nadciśnienia w obwodzie. Przed wlotem czynnika chłodniczego należy zawsze instalować fi ltr mechaniczny. Dostępna jest
seria opcjonalnych fi ltrów: E2VFIL0100 dla zaworów E2V**BSF** i E2V**BS1**; E2VFIL0200 dla zaworów E2V**BSM**; E2VFIL0300
dla zaworów E2V**BWA** lub E2V**BWB**. Zawór może być zorientowany w dowolnym kierunku, z wyjątkiem pozycji ze stato-
rem skierowanym w dół(zawór odwrócony do góry nogami). Dla zaworu E
tradycyjnego zaworu termostatycznego, to znaczy znajduje się przed parownikiem i dowolnym dystrybutorem. Czujniki temperatu-
ry i ciśnienia (do zakupienia oddzielnie) należy umieścić za parownikiem, upewniając się, że:
• czujnik temperatury jest zamontowany z zastosowaniempasty przewodzącej oraz, że zapewniono odpowiednią izolację termiczną;
• oba czujniki są zainstalowane PRZED przed montażem wszelkich urządzeń, które mogą zmieniać ciśnienie (np. zawory) i/lub
temperaturę (np. wymiennik).
Spawanie i obsługa: Zawory E
2
V posiadają złącza spawane (E2V***S***) lub kształtki rurowe (E2V***R*** i E2V***W***). W przypadku
zaworów z przyłączami spawanymi należy wykonać czynności przedstawione na rysunku, postępując w następujący sposób:
1. jeżeli stator jest już zmontowany, zdjąć go odkręcając nakrętkę mocującą i wysunąć;
2. zamontować metalowy fi ltr siatkowy (opcjonalny) wyłącznie na przyłączu wlotu bocznego (Rys. 2-B), przed przyspawaniem zaworu
upewnić się, że jest on całkowicie włożony i zabezpieczony na miejscu przez rurę. UWAGA! Filtr należy stosować tylko do przepływu w
jednym kierunku. W przypadku stosowania zaworu do przepływu w dwóch kierunkach, wymagany jest odpowiedni fi ltr w obwodzie;
3. owinąć zawór mokrą szmatką i wykonać lutospawanie bez przegrzewania zaworu, kierując płomień na końce armatury (dla
uzyskania lepszego efektu bez wpływu na uszczelnienie w miejscu lutospawania, należy używać stopów o temperaturze topnie-
nia poniżej 650 ° C lub o zawartości srebra powyżej 25 %);
4. po ochłodzeniu zaworu wymienić stator na wkładzie, wcisnąć go całkowicie, a następnie całkowicie dokręcić czarną nakrętkę do
momentu odkształcenia gumowego pierścienia statora (moment dokręcenia 0,3 Nm);
5. podłączyć wstępnie okablowane złącze
WAŻNE: Zawory CAREL są dostarczane w pozycji pełnego otwarcia. Jeżeli zawór jest aktywowany przed spawaniem do obwodu,
musi on zostać całkowicie otwarty, aby zapobiec uszkodzeniu elementów wewnętrznych przez wysokie temperatury.
Nie wolno skręcać ani naprężać zaworu ani łączników rurowych. Nie uderzać zaworu młotkiem ani innymi przedmiotami.
Nie należy używać szczypiec ani innych narzędzi, które mogą zdeformować konstrukcję zewnętrzną lub uszkodzić części
wewnętrzne. Nigdy nie należy kierować płomienia na zawór.
Nigdy nie zbliżać zaworu do magnesów lub pól magnetycznych.
Nie instalować ani nie używać zaworu w przypadku:
• odkształcenia lub uszkodzenia konstrukcji zewnętrznej;
• silnego uderzenia, na przykład przy upadku;
• uszkodzenia części elektrycznych (stator, kabel, złącze,...).
Firma CAREL nie gwarantuje działania zaworu w przypadku odkształcenia konstrukcji zewnętrznej lub uszkodzenia części
elektrycznych. WAŻNE: obecność cząsteczek brudu może spowodować nieprawidłowe działanie zaworu.
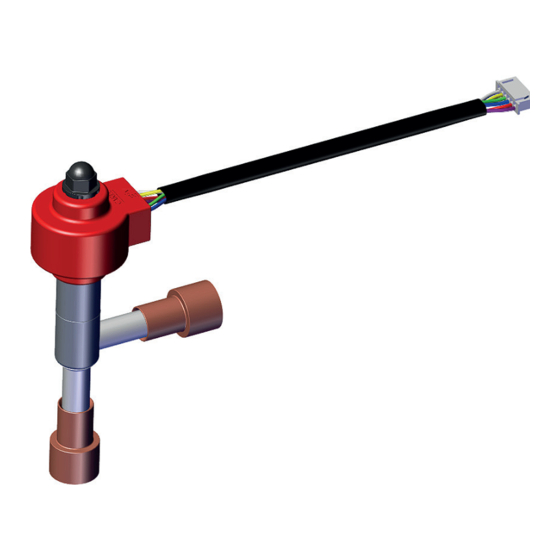
Połączenia elektryczne
Jednobiegunowy stator do zaworu E2V jest dostarczany z 6-żyłowym przewodem o długości 1 m lub 2 m i złączem XHP-6. Al-
ternatywnie można stosować zawory E2V**U**2* z kablem o długości 0,3 m i złączem serii Superseal 1.5 (IP67), podłączonym do
specjalnego przedłużenia kabla (E2VCABS*U*) zgodnie z dyrektywą 2004/108/WE z późniejszymi zmianami. Podłączyć złącze za-
silacza (typu XHP-6) do odpowiedniego przeciwzłącza kompatybilnego jednobiegunowego sterownika, zwracając uwagę, aby nie
odwracać faz zasilania. Schemat przyłączy elektrycznych przedstawiono na Rys. 3.
Specy kacja techniczna zaworu E
Kompatybilność
Maks. ciśnienie robocze (MOP)
Rys. 1
Maks. robocza różnica ciśnień (MOPD) 35 bar (508 psi) - 26 bar (377 psi) dla E2V35*****
P.E.D.
UL/CSA orzecznictwo
(UL 429 I CSA C22.2 no.139-2010)
ATEX 2014/34/EU
Temperatura czynnika chłodniczego -40T70 °C (-40T158 °F)
Temperatura pomieszczenia
Prosimy o kontakt z fi rmą CAREL w celu uzyskania informacji na temat innych normalnych warunków pracy lub alternatywnych
czynników chłodniczych.
Stator zaworu E
2
V-U rmy CAREL
Jednobiegunowy stator niskonapięciowy
D
Napięcie zasilania
12 V
Częstotliwość napędu
50 Hz
Rezyst. fazy (25°C / 77°F) 40 Ω ± 10%
Klasa ochrony
IP67
Kąt kroku
15 °
Posuw liniowy/krok
0.03 mm
(0-0012 cala)
W odniesieniu do stosowania stojanów elektromagnetycznych E2VSTA **** z palnymi czynnikami chłodniczymi zostały one ocenione i spełniają następujące
wymagania:
• Annex CC of IEC 60335-2-24: 2010, o którym mowa w pkt 22.109 i załączniku BB normy IEC 60335-2-89: 2019, o której mowa w pkt 22.113; podczas normalnej
pracy lub awarii nie wykryto elementów wyładowań łukowych lub iskrzących;
• IEC 60335-2-24: 2010 (klauzule 22.110)
• IEC 60335-2-40: 2018 (klauzule 22.116, 22.117)
• IEC 60335-2-89: 2019 (klauzule 22.114)
Temperatury powierzchni produktu zostały zmierzone i zweryfi kowane podczas testów wymaganych przez normę IEC 60335 cl. 11 i 19 i stwierdzono, że nie pr-
zekracza 272°C (522 °F). Dopuszczalność tych produktów w zastosowaniach końcowych, w których używany jest palny czynnik chłodniczy, musi zostać przeanali-
Rys. 2
zowana i oceniona w zastosowaniu końcowym.
2
V zalecana pozycja jest taka sama jak w przypadku
2
V-U rmy CAREL
Grupa 1: R1234yf; idrocarburi R290, R600, R600a, R32, R452B, R454A, R454B, R454C, R455A,
R1270 - Grupa 2: R22, R134a, R404A, R407C, R410A, R417A, R507A, R744, R1234ze, R448A,
R449A, R450A, R513A, R407H, R427A, R452A, R407A, R407E, R407F, R1233zd
Certyfi kat CE: 60 bar( 870psi). Certyfi kacja UL: 45bar (652 psi)
Gr. 1 i 2 art. 4, ust. 3. Produkty te spełniają wymagania normy IEC 60079-15 ed. 4 ograniczone
do wymagań norm EN 60335-2-24:2010, EN 60335-2-40/A1:2006 oraz EN 60335-2-89:2010 w
przypadku stosowania palnych gazów chłodniczych.
UL fi le n° E3045579, cURus (A1) - UR (A3-B2)
Zawory E2V ** U ** C * (zawory bez stojana) zostały ocenione zgodnie z normą IEC 80079-
36:2016 wykazując, że podczas normalnej pracy nie mają rzeczywistych potencjalnych źródeł
zapłonu lub mogą się nimi stać. Dlatego zawór, z wyjątkiem stojana, nie może być klasyfi ko-
wany i oznaczony jako wyposażenie Ex h. W przypadku zastosowania w obszarze klasy ko-
wanym ATEX, łączyć zawór tylko z dedykowanym stojanem ATEX E2VSTAX***.
-30T70 °C (-22T158 °F)
Połączenia
6-pinowe (AWG 18-22) z kablem: o długości 1 m za pomocą
złącza XHP-6 (kody E2V**U**0*); o długości 2 m za pomocą
złącza XHP-6 (kody E2V**U**1*); o długości 0,3 m za pomocą
złącza serii Superseal 1.5 (IP67, kody E2V**U**2*).
Jedn. kroki operacyjne 500
Kroki regulacji
480
General features
The E
2
V electronic valve is designed to be installed in refrigerant circuits. The E
2
V uses the superheat as the control signal which is cal-
culated by a pressure and temperature probe located at the evaporator outlet. The inlet fl uid should be suitably subcooled to prevent
the valve from operating with fl ash gas. Valve noise may increase when refrigerant charge is insuffi cient or there is signifi cant pressure
drop downstream of the valve. Only Carel controllers or controllers offi cially accredited by CAREL are recommended to be used with
V valve. Do not use the E
V outside the normal operating conditions, shown below.
the E
2
2
Positioning: The E
V valves are double-acting. Use the side connection as the preferential liquid inlet (Fig. 1), as this helps the valve
2
remain closed in the event of power failures, due to the pressure that pushes the disc into the seat. If using shutoff valves before the
expansion valve, the circuit must be set up so that no fl uid hammer is created near the valve. The shutoff valve and expansion valve
must never be closed at the same time, to avoid dangerous excess pressure in the circuit. Always install a mechanical fi lter before the
refrigerant inlet. A series of optional fi lters is available: E2VFIL0100 for E2V**BSF** valves and E2V**BS1**; E2VFIL0200 for E2V**BSM**
valves; E2VFIL0300 for E2V**BWA** or E2V**BWB** valves. The valve can be oriented in any direction, with the exception of the
stator pointed downwards, (valve upside down). The recommended position for the E
mostatic valve, that is, upstream of the evaporator and any distributor. The temperature and pressure sensors (not supplied with the
E
2
V) must be positioned downstream of the evaporator, making sure that:
• the temperature sensor is installed with conductive paste and is adequately thermally insulated;
• both sensors are installed BEFORE any devices that may vary the pressure (e.g. valves) and /or temperature (e.g. exchanger).
Welding and handling: The E
2
V valves have welded connections (E2V***S***) or pipe fi ttings (E2V***R*** and E2V***W***).
For the valves with welded connections, follow the steps shown in the fi gure, proceeding as follows:
1. if the stator is already assembled, remove it by unscrewing the fastening nut and sliding it out;
2. install the metal mesh fi lter (optional) exclusively on the side inlet connection (Fig. 2-B), making sure it is fully inserted and secured
in place by the pipe, before welding the valve. Important! Only use this filter for fl ow in one direction. If using the valve for fl ow in
two directions, a suitable fi lter is required in the circuit;
3. wrap a wet rag around on the valve and perform the welding without overheating the valve, aiming the fl ame at the ends of the
fi ttings (for better braze welding without aff ecting the seal where welding, use alloys with a fusion temperature less than 650 °C
or with a silver content above 25%);
4. when the valve has cooled down replace the stator on the cartridge, pushing it fully in and then completely tightening the
black nut until deforming the rubber ring on the stator (tightening torque 0.3 Nm);
5. connect the pre-wired connector
IMPORTANT: CAREL valves are supplied in the fully open position. If the valve is activated before being welded to the circuit, it must
be returned to the fully open position to prevent high temperatures from damaging the internal components.
Do not twist or strain the valve or the connection pipes.
Do not strike the valve with hammers or other objects.
Do not use pliers or other tools that may deform the external structure or damage the internal parts.
Never point the ame at the valve.
Never bring the valve near magnets or magnetic elds.
Do not install or use the valve in the event of:
deformation or damage to the external structure;
heavy impact, for example due to dropping;
damage to the electrical parts (stator, cable, connector,...).
CAREL does not guarantee the operation of the valve in the event of deformation of the external structure or damage to the
electrical parts. IMPORTANT: the presence of dirt particles may cause valve malfunctions.
Electrical connections: The E2V unipolar stator comes with a 1 m or 2 m long 6-wire cable with XHP-6 connector. Alternati-
vely, use codes E2V**U**2* with 0.3 m cable and Superseal series 1.5 connector (IP67), connected to a special cable extension
(E2VCABS*U*) for applications in accordance with directive 2004/108/EC and subsequent amendments. Connect the power supply
connector (XHP-6 type) to the relevant conter-connector of a compatible unipolar driver paying attention not to invert the power
supply phases. See for reference the electrical connections in Fig. 3.
Operating speci cations CAREL E2V-U
Group 1: R1234yf; idrocarburi R290, R600, R600a, R32, R452B, R454A, R454B, R454C, R455A,
Compatibility
R1270
Group 2: R22, R134a, R404A, R407C, R410A, R417A, R507A, R744, R1234ze, R448A, R449A,
R450A, R513A, R407H, R427A, R452A, R407A, R407E, R407F, R1233zd
Maximum Operating Pressure (MOP) CE approval: 60 bar (870psi). UL approval: 45bar (652 psi)
Maximum Operating DP (MOPD)
35 bars (508 psi) - 26 bar (377 psi) for E2V35*****
P.E.D.
Gr. 1 and 2, art. 4, par. 3.
UL/CSA certifi cation
UL fi le n° E3045579, cURus (A1) - UR (A3-B2)
(UL 429 e CSA C22.2 no.139-2010)
ATEX 2014/34/EU
The E2V**U**C* valves (valves without stators), have been tested in accordance with IEC
80079-36:2016 to determine that during normal operation they have no potential ignition
sources or that may become eff ective. Consequently, the valve, excluding the stator, does
not need to be classifi ed and marked as Ex h equipment. If used in an ATEX classi ed area,
only use the valve with the dedicated E2VSTAX*** ATEX stator.
Refrigerant temperature
-40T70 °C (-40T158 °F)
Room temperature
-30T70 °C (-22T158 °F)
Contact CAREL for other normal operating conditions or alternative refrigerants.
CAREL stator E2V-U: Unipolar low voltage stator
Power supply voltage
12 V
Connections
Drive frequency
50 Hz
Phase resistance (25°C / 77°F)
40 Ohm ± 10%
Index of protection
IP67
Step angle
15 °
Linear advance/step
0.03 mm
Complete closing steps 500
(0-0012 inches)
Control steps
Reff ering to the use of E2VSTA **** electromagnetic stators with fl ammable refrigerants, they have been evaluated and comply with the following requirements:
• Annex CC of IEC 60335-2-24: 2010 referred to in clause 22.109 and Annex BB of IEC 60335-2-89: 2019 referred to clause 22.113; no arcing or sparking compo-
nents were found during normal operation or failure;
• IEC 60335-2-24: 2010 (clauses 22.110)
• IEC 60335-2-40: 2018 (clauses 22.116, 22.117)
• IEC 60335-2-89: 2019 (clauses 22.114)
The surface temperatures of the product have been measured and verifi ed during the tests required by the IEC 60335 cl. 11 and 19 and found not exceeding 272°C
(522°F). The acceptability of these products in the end use application where fl ammable refrigerant is used must be reviewed and judged in the end use application.
2
V valve is the same as for a traditional ther-
6 pin (AWG 18-22) with cable: 1 m long with
XHP-6 connector (codes E2V**U**0*); 2 m long
with XHP-6 connector (codes E2V**U**1*); 0.3
m long with Superseal series 1.5 connector
(IP67, codes E2V**U**2*).
480
Advertisement
Table of Contents

Related Manuals for Carel E2V-U


Summary of Contents for Carel E2V-U
- Page 1 IMPORTANT: CAREL valves are supplied in the fully open position. If the valve is activated before being welded to the circuit, it must Nie wolno skręcać ani naprężać zaworu ani łączników rurowych. Nie uderzać zaworu młotkiem ani innymi przedmiotami.
- Page 2 CEI 60335-2-89: 2019 (clauses 22.114) manual, can cause the fi nal product to malfunction of which CAREL can not be held responsible. The fi nal client must use the product only Las temperaturas superfi ciales del producto han sido medidas y verifi cadas durante las pruebas requeridas por IEC und verifi...
Need help?
Do you have a question about the E2V-U and is the answer not in the manual?
Questions and answers