Table of Contents
Advertisement
Advertisement
Table of Contents

Related Manuals for E-Bike EKD01

Summary of Contents for E-Bike EKD01
-
Page 1: B02Nu-Aksm Displayer Manual
EKD01-AKSM Displayer Manual 1/20... -
Page 2: Table Of Contents
Directory B02NU-AKSM DISPLAYER MANUAL ....................1 ............................2 DIRECTORY I. P ........................ 3 RODUCT INTRODUCTION 1. Name ............................... 3 2. Product model ..........................3 3. Product appearance........................3 4. Product Specifications ........................ 3 5. Lordinterface ..........................4 6. Button definition .......................... 5 7. -
Page 3: Product Introduction
I. Product introduction 1. Name Smart Displayer instrument. 2. Product model B02NU-AKSM 3. Product appearance 4. Product Specifications 3/20... -
Page 4: Lordinterface
5. Lordinterface... -
Page 5: Button Definition
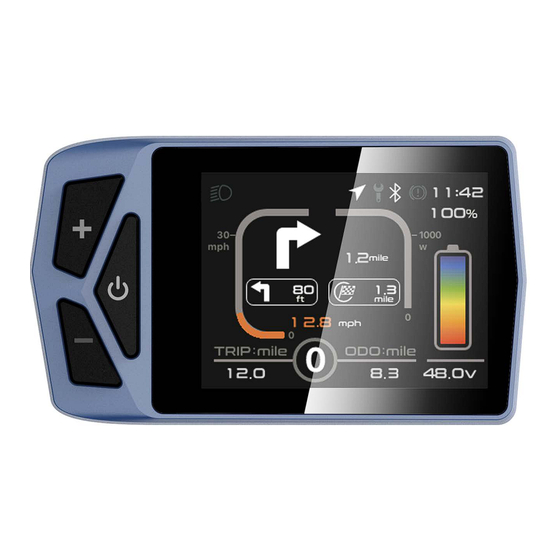
When the battery runs out, fewer bars appear. ⑦ Real-time speed: Displays the current speed at which the e-bike is traveling. ⑧ Gear indicator: Displays the current assist gear of the electric bike. -
Page 6: General Operations
7. General Operations B02NU-AKSM provides 4 themes and 3 languages users to set up, this manual uses Theme 1 (English version) as an example. "Press and hold the key >2.5 seconds" is replaced with "long press", "long key <0.5 seconds" is replaced with "tap". ①... - Page 7 lowest power, and 5 is the highest power. When the monitor is powered on, the default setting is Gear 0. gear level selection screen is shown in the following figure: ③ Headlight/backlight switch Turn on the light when light is off headlight indicator : Press and hold "+"...
-
Page 8: Information Viewing And Setting
II. Information viewing and setting 1. Display settings Click " " to enter the settings menu, use "+" or "-" to move the cursor up and down, select "Display Settings", "Information", "Language", "Theme", " Password", Bluetooth", "Reset Factory Settings" and "Exit", and click to operate. - Page 9 shutdown will occur until the non-operational time reaches the auto-off time. ③ Mileage reset Go to the "ODO Reset menu and select "No"/"Yes". " It will be reset automatically when the mileage reaches the maximum (655km) (maximum varies by protocol), or go to the menu and select "Yes" to clear all mileage.
-
Page 10: Information Viewing
range, 4-1 range decreases in order, as shown in the following figure: Note: This varies slightly from phone to phone. ⑥ Boot Gear gear number selection, default gears, at this time the instrument 0-5 gears are adjustable; When switching to 3 gears, the instrument 0-3 gears are adjustable;... - Page 11 ③ Display Information – Go to the Display Information menu display the software and hardware version numbers (varies by product). As shown in the following figure: ④ Error Code – Go Code menu to the Error , "E-CODE 0" refers to the last error 9"...
-
Page 12: Language Selection
⑥ Electricity style: There is a percentage of actual voltage display, default percentage charge As shown in the following figure: 3. Language selection B02NU-AKSM is available in 8 languages for users to choose from. Go to Language" menu and select a different language switch. "... -
Page 13: Password Settings
5. Password settings ① Start password off/on. Enter the "Password" menu, select and enter the Startup Password" (status is on/off) menu, and the interface prompts you to " enter the password. At this time, use the "+" or "-" keys to switch the numbers "0-9"... - Page 14 this once. Note: If you want to enable feature, a new the password you need to enter password after modification Do not change the initial password arbitrarily. After modification, the interface will automatically jump to the original menu . As shown in the figure below: ③...
-
Page 15: Bluetooth Connection
6. Bluetooth connection Short press " " to enter the menu interface, enter the " Bluetooth " menu, click " " to enter the Bluetooth QR code interface. You can scan the QR code through the mobile APP to bind the device. After binding automatically , you will ... - Page 16 16/20...
- Page 17 After Bluetooth of screen successfully G O" on the connecting the the display , click " main interface of the APP interface to select the destination to enter the navigation and when you start navigation, the display changes as follows (real-time navigation requires payment): 17/20...
- Page 18 Navigation is The app is open connected Current hint and distance Next turn tips and distances Real-time Mileage to speed destination Total mileage Single mileage Average Navigation indicator: The symbol lights up to indicate that in the it is now navigation interface.
-
Page 19: Factory Reset
7. Factory reset Short press " " menu interface, click " " to enter the factory to enter the reset interface. Select confirm after a short press on " ", the instrument restarts and restores factory settings; Select cancel briefly press "... -
Page 20: Error Code Comparison Table
Error code comparison table Error code Description of the fault Troubleshooting methods "04" The speed control put has no Check that the handle is in homing place "05" Speed regulation put failure Check the handlebar "07" Overvoltage protection Check the battery voltage "08"...
Need help?
Do you have a question about the EKD01 and is the answer not in the manual?
Questions and answers
my display EKD01 has error code 30 and i checked the controller connector i just unplugged it and re plugged it can someone help me and my display also just turns off an on its so annoying
le luci non si accendono