Table of Contents
Advertisement
Quick Links
Advertisement
Table of Contents

Related Manuals for Milesight WS202-868M


Summary of Contents for Milesight WS202-868M
- Page 1 www.ime.de PIR & Light Sensor Featuring LoRaWAN ® WS202 User Guide...
- Page 2 Do not place the device close to objects with naked flames, heat source (oven or sunlight), cold source, liquid and extreme temperature changes. The device is not intended to be used as a reference sensor, and Milesight will not take responsibility for any damages which may result from inaccurate readings.
- Page 3 3. Delete low power alarm interval, device only uplinks once when battery level is lower than 10%. 1. Add Single-Channel mode; Jan. 16, 2023 V 1.2 2. Add Milesight D2D LoRa Uplink feature. 3. Add reboot downlink command. May 15, 2023 V 1.3 Add blocking stickers...
-
Page 4: Table Of Contents
3.1 NFC Configuration ........................7 3.2 LoRaWAN Settings ........................8 3.3 General Settings ........................11 3.4 Threshold Settings ........................ 11 3.5 Milesight D2D Settings ......................12 3.6 Maintenance .......................... 12 3.6.1 Upgrade ........................12 3.6.2 Backup .........................13 3.6.3 Reset to Factory Default .....................14 4. -
Page 5: Product Introduction
® ® enables encrypted radio transmissions over long distances while consuming very little power. The user can get an alarm through Milesight IoT Cloud or through the user's own Application Server. 1.2 Features Built-in light sensor, combine PIR sensor to achieve triggers ... -
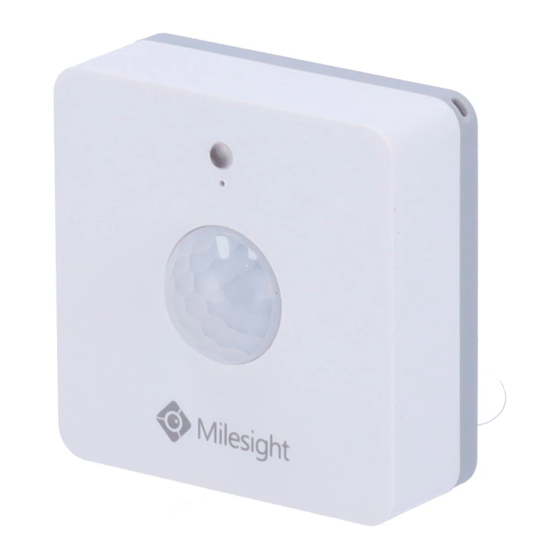
Page 6: Hardware Overview
www.ime.de 2.2 Hardware Overview PIR Area 2.3 Dimensions (mm) -
Page 7: Led Patterns
1. Pull out the battery insulating sheet to power on the device. The indicator will light up in green for 3 seconds when the device turns on. 2. Download and install “Milesight ToolBox” App from Google Play or App Store. 3. Enable NFC on the smartphone and open Milesight ToolBox. -
Page 8: Lorawan Settings
3) WS202 can also be configured by ToolBox software via a dedicated NFC reader provided by Milesight IoT, you can also configure it via TTL interface inside the device. 3.2 LoRaWAN Settings Go to Device > Setting > LoRaWAN Settings of ToolBox App to configure join type, App EUI, App Key and other information. - Page 9 www.ime.de Network Session Nwkskey for ABP mode, default is 5572404C696E6B4C6F52613230313823. Application Appskey for ABP mode, default is 5572404C696E6B4C6F52613230313823. Session Key RX2 Data Rate RX2 data rate to receive downlinks or send D2D commands. RX2 Frequency RX2 frequency to receive downlinks or send D2D commands. Unit: Hz Select Standard-Channel mode or Single-Channel mode.
- Page 10 www.ime.de Spread Factor If ADR is disabled, the device will send data via this spread factor. If the device does not receive ACK packet from network server, it will resend Confirmed Mode data once. Reporting interval ≤ 30 mins: the device will send a specific number of LinkCheckReq MAC packets to the network server with periodic or threshold uplinks everytime more than 25~35 mins passes to validate connectivity;...
-
Page 11: General Settings
3) Select OTAA mode if you use Milesight IoT Cloud to manage devices. 4) Only OTAA mode supports rejoin mode. 3.3 General Settings Go to Device > Setting > General Settings of ToolBox App to change the reporting interval, etc. -
Page 12: Milesight D2D Settings
2. Go to Device > Settings > D2D Settings to enable D2D function, and define an unique Milesight D2D key which is the same as Milesight D2D agent devices, then select the frequency and spreading factor. (Default Milesight D2D Key: 5572404C696E6B4C6F52613230313823) 3. -
Page 13: Backup
www.ime.de Note: 1) Operation on ToolBox is not supported during upgrade. 2) Only Android version ToolBox supports the upgrade feature. 3.6.2 Backup WS202 supports configuration backup for easy and quick device configuration in bulk. Backup is allowed only for devices with the same model and LoRaWAN frequency band. -
Page 14: Reset To Factory Default
www.ime.de Note: Slide the template item to the left to edit or delete the template. Click the template to edit the configurations. 3.6.3 Reset to Factory Default Please select one of the following methods to reset device: Via Hardware: Hold on the reset button for more than 10s. After reset complete, the indicator will blink in green twice, then device will reboot. -
Page 15: Device Payload
www.ime.de 3M Tapes Fix: Paste 3M tape to the back of the device, then tear the other side and place it on a flat surface. Screw Fix: Remove the back cover of the device, screw the wall plugs into the wall and fix the cover with scr ews on it, then install back the device. -
Page 16: Basic Information
For decoder examples, you can find them at https://github.com/Milesight-IoT/SensorDecoders. 5.1 Basic Information WS202 reports basic information of the device whenever it joins the network. Channel Type Description 01(Protocol Version) 01=> V1 08 (Device SN) 12 digits 09 (Hardware Version) 01 40 =>... -
Page 17: Downlink Commands
www.ime.de Channel Type Value Channel Type Value 75 (Battery) 64 => 100% 00 (PIR Status) 01=> Occupied Channel Type Value 00 (Light 01=> Bright Status) 5.3 Downlink Commands WS202 supports downlink commands to configure the device. The application port is 85 by default.
Need help?
Do you have a question about the WS202-868M and is the answer not in the manual?
Questions and answers