Table of Contents
Advertisement
Quick Links
Advertisement
Table of Contents

Related Manuals for Milesight EM500 Series


Summary of Contents for Milesight EM500 Series
- Page 1 Outdoor Environment Monitoring Sensor Featuring LoRaWAN ® EM500 Series User Guide...
- Page 2 In order to protect the security of the device, please change device password when first configuration. The default password is 123456. The device is not intended to be used as a reference sensor, and Milesight will not should responsibility for any damage which may result from inaccurate readings.
- Page 3 All information in this guide is protected by copyright law. Whereby, no organization or individual shall copy or reproduce the whole or part of this user guide by any means without written authorization from Xiamen Milesight IoT Co., Ltd. For assistance, please contact Milesight technical support: Email: iot.support@milesight.com...
-
Page 4: Table Of Contents
5.3 EM500-PP Sensor Installation ....................25 5.4 EM500-SMT/SMTC Sensor Installation ................25 5.4.1 Horizontal Installation ....................26 5.4.2 Vertical Installation .....................26 5.5 EM500-SWL Sensor Installation ...................27 5.6 EM500-UDL Sensor Installation ....................28 6. Milesight IoT Cloud Management ....................28 7. Device Payload ..........................29... -
Page 5: Product Introduction
LoRaWAN ® enables encrypted radio transmissions over long distance while consuming very little power. The user can obtain sensor data and view the trend of data change through Milesight IoT Cloud or through the user's own Network Server. 1.2 Features Up to 15 km communication range ... -
Page 6: Hardware Overview
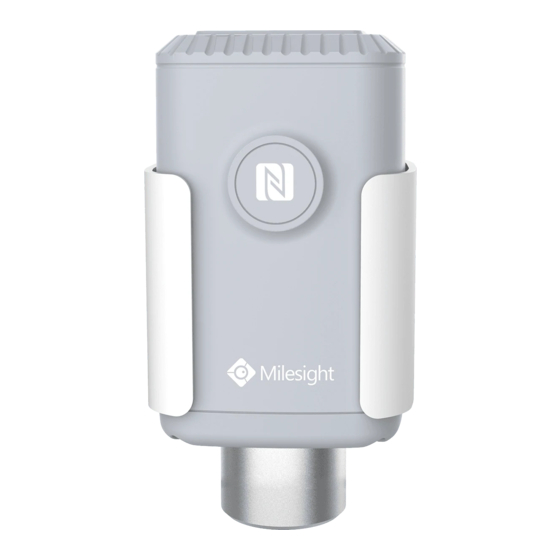
2.2 Hardware Overview EM500 series sensors is made up of a LoRaWAN transceiver and a sensor. Among them, ® ultrasonic sensors and gas sensors are combined with LoRaWAN transceiver. ® Front View of EM500: ® Antenna (Internal) ①LoRaWAN ②NFC Area ③Water-proof Connector... -
Page 7: Dimensions(Mm)
2.3 Dimensions(mm) EM500 EM500-CO EM500-UDL... -
Page 8: Power Button
2.4 Power Button Note: The LED indicator and power button are inside the device. Switch on/off and reset can also be configured via NFC. Function Action LED Indication Turn On Press and hold the button for more than 3 seconds. Off →... - Page 9 2. Lock the sensor wires to the block according to the label on the motherboard or chapter 2.5, then pass the sensor cable through the cap, rubber seal and cover. 3. Put the motherboard back and restore everything to its due position. When restoring the cover, ensure the arrow faces the front of the transceiver.
-
Page 10: Operation Guide
4) Ensure the location of smartphone NFC area and it’s recommended to take off phone case. 5) If the smartphone fails to read/write configurations via NFC, keep the phone away and back to try again. 6) EM500 series can also be configured by dedicated NFC reader, which can be purchased from Milesight IoT. -
Page 11: Usb Configuration
4.1.2 USB Configuration 1. Download ToolBox software from Milesight official website. 2. Release the enclosure of the EM500 transceiver, then connect the device to a computer via Type-C port. 3. Open the ToolBox and select type as General, then click password to log in ToolBox. (Default password: 123456) 4. -
Page 12: Lorawan Settings
4.2 LoRaWAN Settings LoRaWAN settings is used for configuring the transmission parameters in LoRaWAN ® network. Parameters Description Device EUI Unique ID of the device which can also be found on the label. App EUI Default App EUI is 24E124C0002A0001. Application Port The port used for sending and receiving data, default port is 85. - Page 13 Enable or disable the frequency to send uplinks. If frequency is one of CN470/AU915/US915, enter the index of the channel that you want to enable and make them separated by commas. Examples: 1, 40: Enabling Channel 1and Channel 40 1-40: Enabling Channel 1 to Channel 40 Channel 1-40, 60: Enabling Channel 1 to Channel 40 and Channel 60 All: Enabling all channels...
-
Page 14: Basic Settings
1) Please contact sales for device EUI list if there are many units. 2) Please contact sales if you need random App keys before purchase. 3) Select OTAA mode if you use Milesight IoT cloud to manage devices. 4) Only OTAA mode supports rejoin mode. -
Page 15: Advanced Settings
(EM500-PP) Note: 1) The pressure unit in the reporting package is fixed as kPa. 2) Please modify the threshold settings if the unit is changed. Change the suitable soil type. It only works with hardware V2.0 and Soil Type above. (EM500-SMT/SMTC) SMT: Mineral soil, potting soil and rockwool are optional. -
Page 16: Threshold Settings
3-7, or the sensor will measure again. 4.4.3 Threshold Settings Enable the threshold settings and input the threshold. EM500 series will upload the current data once instantly when the collected value exceeds the preset threshold. Only when the value turns... -
Page 17: Data Storage
EM500-PT100/CO2/SMTC supports to send alarms when mutation of temperature value reaches the threshold value. 4.4.4 Data Storage EM500 series supports storing 1000 data records locally and exports data via ToolBox App or software. The device will record the data according to reporting interval even not joining network. -
Page 18: Data Retransmission
4. Click Data Cleaning to clear all stored data inside the device if necessary. 4.4.5 Data Retransmission EM500 series supports data retransmission to ensure network server can get all data even if network is down for some times. There are two ways to get the lost data: Network server sends downlink commands to enquire the historical data for specifying time ... - Page 19 2) If the network is disconnected again during data retransmission, it will only send the latest disconnection data; 3) The retransmission data format is started with “20ce”, please refer to EM500 Series...
-
Page 20: Maintenance
4.5 Maintenance 4.5.1 Upgrade ToolBox Software: 1. Download firmware from Milesight official website to your PC. 2. Go to Maintenance > Upgrade, click Browse to import firmware and upgrade the device. ToolBox App: 1. Download firmware from Milesight official website to your smartphone. -
Page 21: Backup
4.5.2 Backup EM500 devices support configuration backup for easy and quick device configuration in bulk. Backup is allowed only for devices with the same model and LoRaWAN ® frequency band. 1. Go to Template page on the App and save current settings as a template. You can also edit the template file. -
Page 22: Reset To Factory Default
4.5.3 Reset to Factory Default Please select one of following methods to reset device: Via Hardware: Hold on power button (internal) for more than 10s. Via ToolBox Software: Go to Maintenance > Backup and Reset to click Reset. Via ToolBox App: Go to Device >... -
Page 23: Installation
5. Installation 5.1 EM500 Transceiver Installation EM500 transceiver support wall, pole and DIN rail mounting. Before installation, ensure the mounting bracket has fixed to the device via screws. Wall Mounting: 1. Drill 2 holes on the wall according to the mounting bracket, then fix the wall plugs into the wall. -
Page 24: Em500-Co Sensor Installation
wrap the hose clamp around the pole. After that use a screwdriver to tighten the locking mechanism by turning it clockwise. DIN Rail Mounting: Use 2 pcs of M3 × 6 flat head Phillips screws to fix the mount clip to the bracket, and then hang the device to the DIN rail. -
Page 25: Em500-Pp Sensor Installation
5.3 EM500-PP Sensor Installation Pipe sensor should be considered following notes to insure proper installation: The selected installation position should reflect the actual situation of the measured pressure. Install the sensor in the pipe where the measuring medium flows straightly and avoid the location of bends, split, dead corners or other places where vortices are easy to form. -
Page 26: Horizontal Installation
Be careful when inserting the sensor into dense soil, as the prongs will break if excessive sideways force is used. When installing the sensor in a lightning prone area, please check your lightning protection. When removing the sensor from the soil, do not pull it out of the soil by the cable. Doing so ... -
Page 27: Em500-Swl Sensor Installation
5.5 EM500-SWL Sensor Installation Lower the sensor via cable into the media until it is close to the bottom of tanks or ponds. Be careful not to hit the bottom hard or touch hard objects like sand or sludge since it will damage the sensor. -
Page 28: Em500-Udl Sensor Installation
6. Milesight IoT Cloud Management EM500 series can be managed by Milesight IoT Cloud platform. Milesight IoT cloud is a comprehensive platform that provides multiple services including device remote management and data visualization with the easiest operation procedures. Please register a Milesight IoT... -
Page 29: Device Payload
2. Go to “My Devices” page and click “+New Devices”. Fill in the SN of device and select an associated gateway. 3. After the device is online in Milesight IoT Cloud, you can check the data via webpage or mobile App and create dashboard for it.
Need help?
Do you have a question about the EM500 Series and is the answer not in the manual?
Questions and answers