URC UR2-DTA-RF4 - Digital Adapter Remote Control Manual
- User manual (2 pages)
Advertisement
- 1 Welcome
- 2 Identifying the Digital Adapter in Your Home
- 3 Replacing Batteries
- 4 Get to know your Remote Control
- 5 Program the Remote to Control Your Digital Adapter
- 6 Program the Remote to 6 Control Your TV (OPTIONAL)
- 7 Advanced Programming Features
- 8 Troubleshooting
- 9 Set-up Code Tables
- 10 Documents / Resources
Welcome
The Digital Adapter Remote controls your digital adapter (DTA) and the Volume, Mute, Power, Input on many connected TVs.
Identifying the Digital Adapter in Your Home

This remote control is pre-programmed for the DTA 170HD and the DTA 271HD digital adapter models. Follow the instructions below if you want to use the remote to control the other adapter models, your TV or for advanced programming features. If you are unsure of your DTA model, check the front panel or bottom label of the DTA for one of the following types:
- Cisco/Technicolor DTA 271HD
- Cisco DTA 170HD
- Technicolor DCI401TWC2
- Arris/Motorola HD-uDTA
- Pace DC60Xu HD
This remote only works with the models listed above.
Replacing Batteries

Before you program or operate the remote control, you must install two new AA alkaline batteries.
- Remove the battery compartment cover on the back of your remote control.
- Check battery polarity carefully, and install the batteries as shown in the illustration to the right.
- Replace the battery compartment cover.
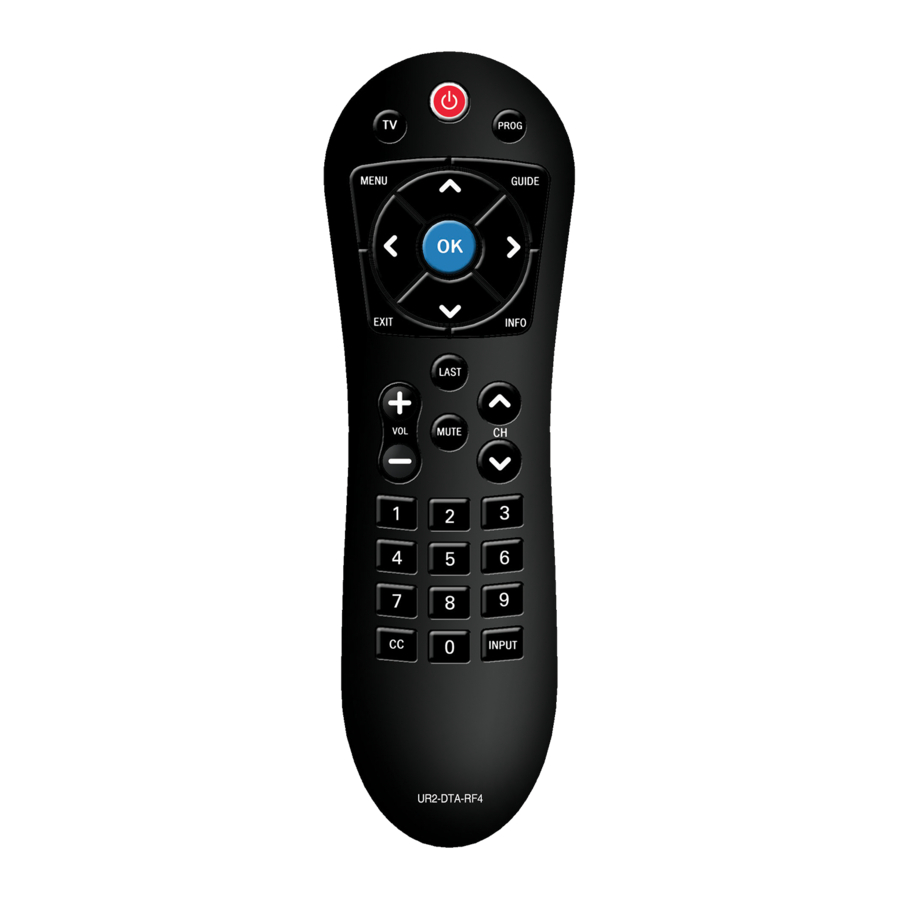
Get to know your Remote Control

TV
Turns TV on and off once the remote has been programmed to the TV.
MENU
Press to display Menu screen.
OK
Press to select the highlighted item.
EXIT
Press to exit on-screen menus.
VOL
Use VOLUME UP to raise volume and VOLUME DOWN to lower it.
MUTE
Press to turn sound on or off.
CC
Press to turn Closed Captioning (CC) on or off. Additional CC settings available through MENU.
UNIVERSAL POWER
Press to send the power code for all mapped devices.
PROG
Press to program the remote.
GUIDE
Press to display the on-screen Guide (where available).
NAVIGATION BUTTONS
Press to move Up, Down, Right, Left.
INFO
Press to display current channel information.
LAST
Press to return to the last previously viewed channel.
CHANNEL
Use CHANNEL UP to advance one channel and CHANNEL DOWN to go back one channel.
INPUT
Press to change input on the currently programmed TV.
Program the Remote to Control Your Digital Adapter
Cisco/Technicolor DTA 271HD
No additional programming steps are required. Insert the batteries into your remote and it will work immediately with the DTA 271HD.
Want to place your DTA 271HD out of sight?
If you would like to keep your adapter out of sight and still get a remote signal, enable RF mode. Follow these steps, making sure that your DTA front panel is viewable by the remote control:
Step 1. Make sure that the DTA and TV are connected and powered on.
Step 2. Point remote at the DTA front panel.
Step 3. Press and hold the PROG button for five seconds, until the RED Power button lights up.
Step 4. Press and release the INFO button.
Step 5. The RED Power button will blink slowly indicating the remote is ready to be programmed.
Step 6. A message on the TV screen will prompt you to enter three (3) digits on the remote control.
If the three (3) digits entered are correct, a message on the TV screen will indicate successful programming.
If the three (3) digits entered are incorrect, a message on the TV screen will indicate programming did not succeed.
Cisco DTA 170HD
No additional programming steps are required. Insert the batteries into your remote and it will work immediately with the DTA 170HD.
Technicolor DCI401TWC2
The steps below MUST be performed if your digital adapter is a Technicolor DCI401TWC2.
Step 1. Insert batteries into the remote.
Step 2. Press and hold the PROG button for five seconds, until the RED Power button lights up.
Step 3. Press [1], [0], [3] on the remote control keypad.
If the digital adapter code is valid, the RED Power button will blink twice and turn off.
After successfully completing steps 1-3 continue following the steps below, making sure that your DTA front panel is viewable by the remote control.
Step 4. Make sure that the DTA and TV are connected and powered on.
Step 5. Point remote at the DTA front panel.
Step 6. Press and hold the PROG button for five seconds, until the RED Power button lights up.
Step 7. Press and release the INFO button.
Step 8. The RED Power button will blink slowly indicating the remote is ready to be programmed.
Step 9. A message on the TV screen will prompt you to enter three (3) digits on the remote control.
If the three (3) digits entered are correct, a message on the TV screen will indicate successful programming.
If the three (3) digits entered are incorrect, a message on the TV screen will indicate programming did not succeed.
Your remote is now programmed to work with your DTA. The DTA can be placed out of sight and your remote will continue to control its behavior.
Arris/Motorola HD-uDTA
The steps below MUST be performed if your digital adapter is an Arris/Motorola HD-uDTA.
Step 1. Insert batteries into the remote.
Step 2. Press and hold the PROG button for five seconds, until the RED Power button lights up.
Step 3. Press [1], [0], [2] on the remote control keypad.
If the digital adapter code is valid, the RED Power button will blink twice and turn off.
Your remote is now programmed to work with your DTA.
Want to place your Arris/Motorola HD-uDTA out of sight?
If you would like to keep your DTA out of sight and still get a remote signal, enable RF mode.
Follow these steps, making sure that your DTA front panel is viewable by the remote control:
Step 1. Make sure that the DTA and TV are connected and powered on.
Step 2. Point remote at the DTA front panel.
Step 3. Press and hold the PROG button for five seconds, until the RED Power button lights up.
Step 4. Press and release the INFO button.
Step 5. The RED Power button will blink slowly indicating the remote is ready to be programmed.
Step 6. A message on the TV screen will prompt you to enter three (3) digits on the remote control.
If the three (3) digits entered are correct, a message on the TV screen will indicate successful programming.
If the three (3) digits entered are incorrect, a message on the TV screen will indicate programming did not succeed.
Pace DC60Xu HD
The steps below MUST be performed if your digital adapter is an Pace DC60Xu HD.
Step 1. Insert batteries into the remote.
Step 2. Press and hold the PROG button for five seconds, until the RED Power button lights up.
Step 3. Press [1], [0], [4] on the remote control key pad.
If the digital adapter code is valid, the RED Power button will blink twice and turn off.
Want to place your Pace DC60Xu HD out of sight?
If you would like to keep your DTA out of sight and still get a remote signal, enable RF mode.
Follow these steps, making sure that your DTA front panel is viewable by the remote control:
Step 1. Make sure that the DTA and TV are connected and powered on.
Step 2. Point remote at the DTA front panel.
Step 3. Press and hold the PROG button for five seconds, until the RED Power button lights up.
Step 4. Press and release the INFO button.
Step 5. The RED Power button will blink slowly indicating the remote is ready to be programmed.
Step 6. A message on the TV screen will prompt you to enter three (3) digits on the remote control.
If the three (3) digits entered are correct, a message on the TV screen will indicate successful programming.
If the three (3) digits entered are incorrect, a message on the TV screen will indicate programming did not succeed.
Program the Remote to 6 Control Your TV (OPTIONAL)
If you would like to program your remote to control your TV power, input and volume, there are three methods:
- Quick Set-Up Method
- Manual Code Search
- Automatic Code Search
The Quick Set-Up Method enables the easiest set-up by using one-digit codes for up to 20 major brands. Manual code entry requires you to find your TV brand in the included list of three-digit TV set-up codes. Automatic mode can take up to 15 minutes and requires you to press a button when your TV responds to the remote control.
Quick Set-Up Method
Step 1. Make sure that the DTA and TV are connected and powered on.
Step 2. Locate your TV brand in the Quick Set-Up Code Table and identify the corresponding "Button Press" and "Button Number" values.
Step 3. Press and hold simultaneously for 3 seconds both the TV & MENU or TV & GUIDE buttons, as specified by the "Button Press" value your TV brand is assigned to. The RED Power button light will turn on for 20 seconds confirming that you are in the programming mode.
Step 4. While the RED Power button light is on, point the remote at the TV and press the "Button Number" assigned to your TV brand (e.g. for Sharp TV, key 5). The TV should turn off, if it does not, press the same number key repeatedly until the TV turns off.
* Note: The remote will exit the programming mode automatically if it does not have matching codes and the RED Power button light will turn off.
Step 5. Once the TV has turned off, press the TV key once again to save the code. The remote is now ready to control your TV. If the matching code could not be found in step 4, use the Manual Code search or the Automatic Code Search method.
Quick Set-Up Code Tables
TV
| Button Press | Button Number | Brand |
| TV&MENU | 0 | RCA |
| 1 | SAMSUNG | |
| 2 | SONY | |
| 3 | LG | |
| 4 | VIZIO | |
| 5 | SHARP | |
| 6 | PANASONIC | |
| 7 | SANYO | |
| 8 | TOSHIBA | |
| 9 | PHILIPS | |
| TV&GUIDE | 0 | COBY |
| 1 | MITSUBISHI | |
| 2 | HITACHI | |
| 3 | MAGNAVOX | |
| 4 | JVC | |
| 5 | ZENITH | |
| 6 | INSIGNIA | |
| 7 | EMERSON | |
| 8 | WESTINGHOUSE | |
| 9 | TCL |
Manual Code Search
Step 1. Make sure that the DTA and TV are connected and powered on.
Step 2. Locate your TV brand in the list of TV codes included in this instruction sheet.
Step 3. Point the remote at the TV.
Step 4. Press and hold the PROG button for five seconds, until the RED Power button lights up.
Step 5. Release the PROG button and make sure the RED Power button light stays on.
Step 6. Press and release TV button. The RED Power button will blink once and remain on.
Step 7. Find the three (3) digit TV code for your TV brand. Press the three (3) number buttons in order on the remote.
If the device code is valid, the RED Power button will blink twice and turn off.
The device code will be retained. If the device code is invalid, the RED Power button will blink twice, but stay on. Input another three (3) digit code or cancel the process by pressing the "TV" button.
Step 8. If you are able to control TV power on/off and TV volume with the TV and VOL buttons on the remote you have successfully programmed your remote to your TV. If not, return to step 2 and try the next code for your TV brand. While in programming mode, if a button is not pressed within 20 seconds, the remote will exit the process.
Automatic Code Search
If the code for your TV can't be found using the Manual Code Search, please try the Automatic Code search using the following steps:
Step 1. Make sure that the DTA and TV are connected and powered on.
Step 2. Point the remote at the TV.
Step 3. Press and hold the PROG button for five seconds, until the RED Power button lights up.
Step 4. Release the PROG button and make sure the RED Power button light stays on.
Step 5. Press and release the CH UP button to begin auto search mode. The remote will transmit the TV power code every 1.5 seconds and the RED Power button will blink at the same time. Finding the correct code may take up to 15 minutes.
Step 6. When your TV turns off, immediately press the TV button. This will store the code and exit the search mode.
Step 7. If you are able to control TV power on/off and TV volume with the TV and VOL buttons on the remote you have successfully programmed your remote to your TV. If your remote is still not programmed, you may need to repeat steps 2-6 and press the TV button faster.
Advanced Programming Features
Restore Remote Default Settings
If you want to restore all remote settings to their original state, follow these steps:
Step 1. Press and hold the PROG button for five seconds, until the RED Power button lights up.
Step 2. Press [9], [8], [7], waiting for the RED Power button to blink once after each button press. Once all button presses are completed the RED Power button will blink two times quickly to show the procedure is successful.
Controlling Volume
By default the remote is set to control the DTA volume. If you would like to control the TV volume using your remote, please complete the "Program the Remote to Control Your TV" steps.
After TV programming, if you would like to control the DTA volume using your remote control, follow these steps:
Step 1. Press and hold the PROG button for five seconds, until the RED power button lights up.
Step 2. Press the VOL- button.
After TV Programming, if you would like to control the TV volume using your remote control, follow these steps:
Step 1. Set the base volume of the DTA to a high level by holding the VOL + key until the onscreen indicator shows a high or maximum setting.
Step 2. Press and hold the PROG button for five seconds, until the RED Power button lights up.
Step 3. Press and release the VOL+ button.
Troubleshooting
If the remote control doesn't work
Make sure the batteries are inserted correctly.
Make sure the TV and DTA are connected and powered on.
If above steps don't fix the problem, complete "Restore Remote Default Settings" steps and repeat programming.
If TV Model is not included in the TV code list or TV programming is unsuccessful
Use your TV remote to power the TV on/off.
If audio is low or of poor quality
If you have not programmed your DTA remote to control your TV volume, use your TV remote to increase the base volume level. You should now be able to use your DTA remote to adjust volume as needed.
If you have programmed your DTA remote to control your TV volume, the base volume level of the DTA may be set too low. Reset the remote to control the DTA volume by following the steps in the "Controlling Volume" section. Turn up the volume of the DTA to high or maximum and then follow the steps to control the TV volume in the "Controlling Volume" section.
If the remote control RED power button blinks 5 times when pressed
The batteries are low. Replace with new batteries.
Set-up Code Tables
DTA
| Manufacturer/Brand | Set-Up Code Number |
| Cisco/Technicolor DTA 271HD | 101 |
| Cisco DTA 170HD | 101 |
| Arris/Motorola HD-uDTA | 102 |
| Technicolor DCI401TWC2 | 103 |
| Pace DC60Xu HD | 104 |
TV
| Manufacturer/Brand | Set-Up Code Number |
| ADMIRAL | 072 081 160 161 096 |
| AD NOTAM | 672 |
| ADVENT | 147 |
| AFFINITY | 680 |
| AIWA | 141 145 |
| AKAI | 070 146 004 148 124 226 104 108 244 |
| AKIO | 103 |
| ALARON | 028 |
| AMARK | 112 127 |
| AMERICA ACTION | 043 |
| AMPRO | 073 167 |
| ANAM | 043 054 056 080 112 131 |
| AOC | 058 070 004 112 245 |
| APEX | 092 |
| APEX DIGITAL | 015 150 037 |
| AQUAVISION | 097 100 686 |
| AUDIOVOX | 076 103 043 035 078 224 |
| AUVIO | 689 |
| Avera | 761 |
| AVIELO | 090 628 |
| AVION | 223 |
| AXESS | 711 |
| BAYSONIC | 043 |
| BELL&HOWELL | 072 |
| BENQ | 234 |
| BRADFORD | 043 |
| BROKSONIC | 096 170 |
| CAIRN | 162 |
| CANDLE | 070 002 003 004 |
| CAPEHART | 058 |
| CARVER | 164 |
| CELEBRITY | 001 |
| CETRONIC | 043 |
| CIELO | 714 |
| CIIL | 732 |
| CINERAL | 103 120 |
| CITIZEN | 070 002 003 004 101 103 127 |
| CLASSIC | 043 |
| COBY | 640 641 671 236 |
| CONCERTO | 004 |
| CONTEC | 043 051 |
| CONTINU-US | 745 746 747 |
| CORONADO | 127 |
| CRAIG | 043 054 028 |
| CROSLEY | 164 |
| CROWN | 043 127 |
| CURTIS MATHES | 070 004 101 011 072 081 120 164 127 |
| CXC | 043 |
| DAEWOO | 076 103 112 004 127 016 043 044 125 120 |
| DAYTRON | 004 127 |
| DELL | 041 249 |
| DENON | 011 |
| DIGITAL PROJECTION | 090 |
| DUMONT | 004 073 |
| DWIN | 131 132 161 |
| DYNASTY | 043 |
| DYNATECH | 062 |
| FISHER | 007 057 |
| ELECTROBAND | 001 |
| ELECTROHOME | 024 076 127 |
| ELEMENT | 004 110 622 690 |
| EMERSON | 005 028 043 048 076 096 155 004 051 151 153 154 127 121 |
| ENVISION | 070 |
| EPSON | 087 228 |
| ESA | 031 |
| Evervue | 755 |
| FREEMOTION | 688 |
| FUJITSU | 164 197 028 157 149 066 217 |
| FUNAI | 028 043 052 168 |
| FUSION | 642 |
| FUTURETECH | 043 |
| GATEWAY | 165 031 |
| GE | 070 073 130 144 160 161 004 008 009 034 056 074 155 081 120 |
| GEM | 031 |
| GIBRALTER | 004 073 |
| GOLDSTAR | 004 106 112 127 |
| GPX | 674 |
| GRUNPY | 028 043 |
| HAIER | 004 116 623 749 |
| HALL MARK | 004 |
| HANNSPREE | 099 |
| HARLEY DAVIDSON | 028 |
| HARMAN KARDON | 164 |
| HARVARD | 043 |
| HISENSE | 198 021 619 630 631 004 |
| HITACHI | 011 007 009 004 072 010 012 023 075 158 127 174 243 670 |
| 749 | |
| HP | 027 039 098 |
| HUMAX | 122 |
| HYPERION | 242 |
| HYUNDAI | 049 067 |
| ILO | 055 096 |
| INFINITY | 164 |
| INFOCUS | 046 215 225 233 726 733 |
| INKEL | 129 |
| INSIGNIA | 068 069 078 096 164 168 247 350 354 400 |
| INTEQ | 073 |
| JADOO TV | 673 |
| JBL | 164 |
| JCB | 001 |
| JCPENNEY JENSEN | 004 008 024 030 065 070 101 160 127 013 |
| JVC | 038 001 034 083 195 159 227 639 |
| KENWOOD | 070 001 |
| KLEGG | 220 |
| KLOSS | 002 059 |
| KREISEN | 202 |
| KTV | 070 043 154 127 |
| LG | 004 106 112 127 086 236 648 741 |
| LODGENET | 072 |
| LOEWE | 196 164 738 |
| LOGIK | 072 |
| LUXMAN | 004 |
| LXI | 007 015 052 081 160 164 |
| MAGNAVOX | 070 003 004 022 059 060 061 063 064 127 164 094 160 056 028 035 211 205 218 050 138 232 |
| MAJESTIC | 072 |
| MARANTZ | 164 070 143 169 |
| MATSUI | 164 |
| MATSUSHITA | 080 |
| MAXENT | 165 |
| MEGATRON | 004 |
| MEMOREX | 004 007 072 028 096 |
| METZ | 088 |
| MGA | 024 070 004 042 |
| MIDLAND | 073 |
| MINERVA | 088 |
| MINTEK | 077 |
| MINUTZ | 008 |
| MITSUBISHI | 109 024 042 004 040 146 028 124 081 200 235 348 |
| MOTOROLA | 081 |
| MTC | 070 004 062 101 |
| MULTITECH | 043 |
| NAD | 015 025 |
| NEC | 070 130 134 040 056 007 019 024 004 182 140 717 758 |
| NEXUS | 620 078 |
| NIKEI | 043 |
| NIKKO | 103 |
| NIKO | 175 |
| NORCENT | 211 |
| NTC | 103 |
| NUVISION | 084 |
| OLEVIA | 219 004 161 144 160 |
| ONKING | 043 |
| ONWA | 043 |
| OPTIMUS | 080 |
| OPTOMA | 029 032 |
| OPTONICA | 019 081 |
| ORION | 096 201 203 204 205 028 |
| PANASONIC | 080 034 056 164 190 230 248 237 240 664 |
| PEERLESS-AV | 723 763 |
| PHILCO | 070 003 004 024 056 059 060 063 064 127 164 |
| PHILIPS | 164 005 038 093 127 070 003 004 059 199 218 161 232 629 |
| PIONEER | 023 025 135 176 004 018 070 183 191 208 214 182 660 |
| PLANAR | 728 742 |
| POLAROID | 026 118 119 006 110 |
| PORTLAND | 004 103 127 |
| PRISM | 034 |
| PROSCAN | 144 160 161 167 |
| PROTON | 004 058 171 173 193 127 163 |
| PROTRON | 102 213 004 115 |
| PROVIEW | 110 |
| PROX | 092 |
| PYLE HOME | 661 662 |
| QUASAR | 034 056 239 |
| RADIO SHACK | 004 019 127 043 |
| RCA | 160 161 144 065 070 004 023 024 056 074 152 081 209 713 333 |
| REALISTIC | 007 019 |
| REVOLUTION HD | 220 |
| RUNCO | 072 073 130 179 180 181 182 216 194 697 |
| SAMPO | 070 004 058 165 |
| SAMSUNG | 192 101 655 089 105 133 184 185 |
| SANSEI | 120 |
| SANSUI | 096 244 078 762 |
| SANYO | 007 053 057 082 020 657 750 |
| SCEPTRE | 036 699 |
| SCOTCH | 004 |
| SCOTT | 004 005 028 043 048 127 113 |
| SEARS | 004 007 015 028 030 057 082 094 160 052 164 127 |
| SEIKI | 690 |
| SELECO | 189 |
| SEMIVOX | 043 |
| SEMP | 015 |
| SEURA | 704 |
| SHARP | 081 019 014 028 004 022 127 684 692 275 735 |
| SHERWOOD | 128 |
| SIGNATURE | 072 |
| Silo | 001 |
| Skyvue | 744 |
| SOLE | 177 178 |
| SONY | 001 241 633 126 139 |
| SOUNDESIGN | 003 004 028 043 |
| SOYO | 163 |
| SPECTRICON | 112 |
| SPECTRONIQ | 004 |
| SQUAREVIEW | 052 |
| SSS | 004 043 |
| STARLITE | 043 |
| SUNBRITE | 633 634 635 236 |
| SUNBRITE TV | 238 |
| SUPRE MACY | 002 |
| SUPREME | 001 |
| SVA | 046 |
| SYLVANIA | 070 003 059 060 063 064 127 160 164 044 056 168 121 231 |
| SYMPHONIC | 052 168 |
| SYNTAX OLEVIA | 219 004 161 144 160 |
| TANDY | 081 |
| TATUNG | 056 062 |
| TCL | 705 749 |
| TECHNICS | 034 080 |
| TECHNOL ACE | 028 |
| TECHVIEW | 246 |
| TECHWOOD | 004 |
| TEKNIKA | 002 003 004 024 028 043 072 101 103 164 127 |
| TELEFUNKEN | 244 |
| TELERENT | 072 |
| TERA | 172 |
| THOMPSON | 166 |
| TILEVISION | 663 |
| TMK | 004 |
| TNCI | 073 |
| TOSHIBA | 015 030 007 040 062 101 142 045 137 703 330 |
| TOTEVISION | 127 |
| TRUTECH | 212 |
| UNIVERSAL | 008 009 |
| UPSTAR | 708 |
| VENTURER | 721 |
| VIDEO CONCEPTS | 146 |
| VIDIKRON | 188 164 182 |
| VIDTECH | 004 |
| VIEWSONIC | 210 211 720 |
| VIORE | 055 229 192 |
| VISCO | 110 |
| VIZIO | 236 031 624 004 625 675 386 387 724 |
| WARDS | 004 064 164 008 009 019 028 060 061 063 072 074 070 127 |
| W BOX TECHNOLOGIES | 731 |
| WESTINGHOUSE | 076 036 221 222 001 280 690 695 |
| WINBOOK | 079 |
| YAMAHA | 004 070 206 207 |
| YORK | 004 |
| YUPITERU | 043 |
| ZENITH | 011 072 073 095 103 096 |
| ZONDA | 112 |
Documents / ResourcesDownload manual
Here you can download full pdf version of manual, it may contain additional safety instructions, warranty information, FCC rules, etc.
Download URC UR2-DTA-RF4 - Digital Adapter Remote Control Manual
Advertisement


Need help?
Do you have a question about the UR2-DTA-RF4 and is the answer not in the manual?
Questions and answers