Advertisement
Quick Links
1
Welcome
4
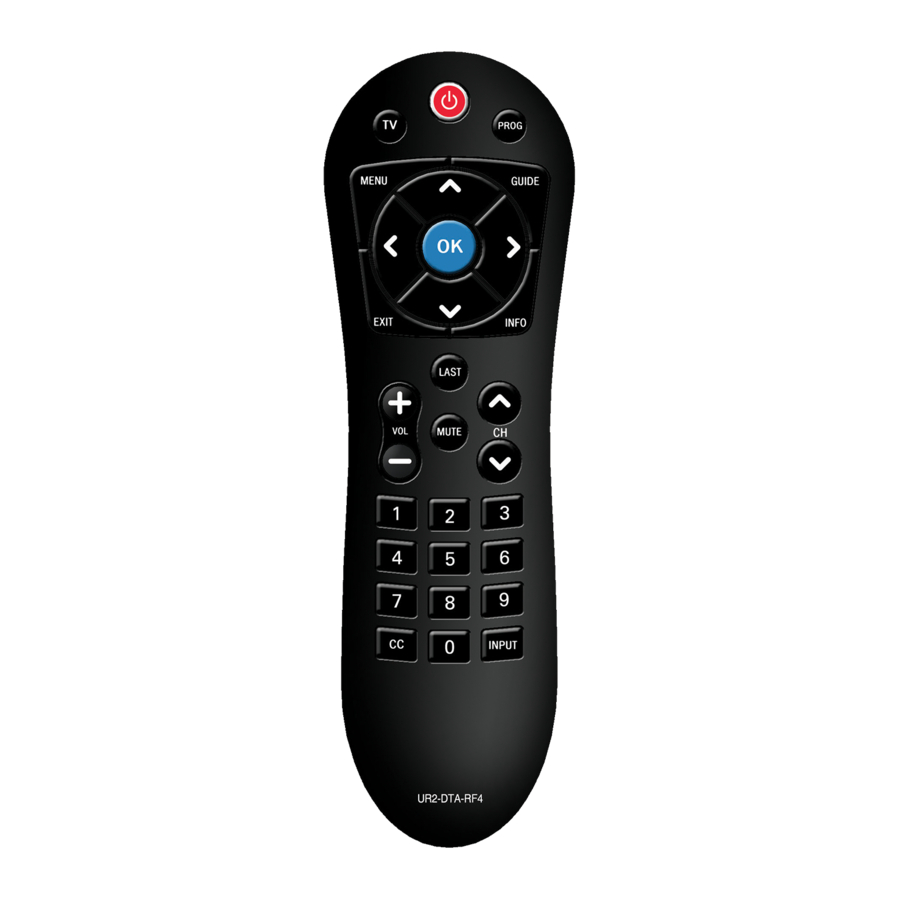
Get to know your Remote Control
User Manual for
The Digital Adapter Remote controls your digital
the Digital Adapter
adapter (DTA) and the Volume, Mute, Power, Input
TV
on many connected TVs.
Remote Control
Turns TV on and off once the remote
has been programmed to the TV.
Identifying the Digital
2
Adapter in Your Home
MENU
This remote control is pre-programmed for
Press to display Menu screen.
the DTA 170HD and the DTA 271HD digital adapter
models. Follow the instructions below if you want
to use the remote to control the other adapter
OK
models, your TV or for advanced programming
Press to select the highlighted item.
features. If you are unsure of your DTA model,
check the front panel or bottom label of the DTA
for one of the following types:
EXIT
Cisco/Technicolor DTA 271HD
Press to exit on-screen menus.
.
Cisco DTA 170HD
Technicolor DCI401TWC2
Arris/Motorola HD-uDTA
Pace DC60Xu HD
VOL
This remote only works with the models listed above.
Use VOLUME UP to raise volume
and VOLUME DOWN to lower it.
Replacing Batteries
3
Before you program or operate the
MUTE
Install two AA
alkaline batteries
remote control, you must install two
Press to turn sound on or off.
as shown here
new AA alkaline batteries.
1. Remove the battery compartment
cover on the back of your remote
control.
CC
2. Check battery polarity carefully,
Press to turn Closed Captioning (CC) on or off.
and install the batteries as shown
Additional CC settings available through MENU.
in the illustration to the right.
3. Replace the battery compartment
OCE-0189A REV 04 (07/10/17)
cover.
B. Cisco DTA 170HD
Program the Remote
to Control Your
5
No additional programming steps are required.
Insert the batteries into your remote and it will
Digital Adapter
work immediately with the DTA 170HD.
UNIVERSAL POWER
Press to send the power code
C. Technicolor DCI401TWC2
A. Cisco/Technicolor DTA 271HD
for all mapped devices.
No additional programming steps are required.
The steps below MUST be performed
Insert the batteries into your remote and it will
if your digital adapter is a Technicolor
work immediately with the DTA 271HD.
PROG
DCI401TWC2.
Press to program the remote.
Want to place your DTA 271HD out of
Step1. Insert batteries into the remote.
sight?
Step2. Press and hold the PROG button for five
seconds, until the RED Power button lights
GUIDE
up.
Press to display the on-screen
If you would like to keep your adapter out of sight
Step3. Press [1], [0], [3] on the remote control
Guide (where available).
and still get a remote signal, enable RF mode.
keypad.
Follow these steps, making sure that your DTA
front panel is viewable by the remote control:
NAVIGATION BUTTONS
If the digital adapter code is valid, the RED Power
Press to move Up, Down, Right, Left.
button will blink twice and turn off.
Step1. Make sure that the DTA and TV are
connected and powered on.
INFO
After successfully completing steps 1-3 continue
Step2. Point remote at the DTA front panel.
Press to display current channel
following the steps below, making sure that
Step3. Press and hold the PROG button for five
information.
your DTA front panel is viewable by the remote
seconds, until the RED Power button lights
up.
control.
LAST
Step4. Press and release the INFO button.
Press to return to the last previously
Step5. The RED Power button will blink slowly
Step4. Make sure that the DTA and TV are
viewed channel.
indicating the remote is ready to be
connected and powered on.
programmed.
Step5. Point remote at the DTA front panel.
CHANNEL
Step6. A message on the TV screen will prompt
Step6. Press and hold the PROG button for five
Use CHANNEL UP to advance one
you to enter three (3) digits on the remote
seconds, until the RED Power button lights
channel and CHANNEL DOWN to go
control.
up.
back one channel.
Step7. Press and release the INFO button.
If the three (3) digits entered are correct, a
Step8. The RED Power button will blink slowly
INPUT
message on the TV screen will indicate
indicating the remote is ready to be
Press to change input
successful programming.
programmed.
on the currently programmed TV.
If the three (3) digits entered are incorrect, a
Step9. A message on the TV screen will prompt
message on the TV screen will indicate
you to enter three (3) digits on the remote
programming did not succeed.
control.
Follow these steps, making sure that your DTA
If the three (3) digits entered are correct, a
Step1. Make sure that the DTA and TV are
front panel is viewable by the remote control:
message on the TV screen will indicate successful
connected and powered on.
programming.
Step2. Point remote at the DTA front panel.
If the three (3) digits entered are incorrect, a
Step3. Press and hold the PROG button for five
Step1. Make sure that the DTA and TV are
message on the TV screen will indicate
seconds, until the RED Power button lights
connected and powered on.
programming did not succeed.
up.
Step2. Point remote at the DTA front panel.
Step3. Press and hold the PROG button for five
Step4. Press and release the INFO button.
Your remote is now programmed to work with
seconds, until the RED Power button lights
Step5. The RED Power button will blink slowly
up.
your DTA. The DTA can be placed out of sight
indicating the remote is ready to be
Step4. Press and release the INFO button.
and your remote will continue to control its
programmed.
Step5. The RED Power button will blink slowly
behavior.
Step6. A message on the TV screen will prompt
indicating the remote is ready to be
you to enter three (3) digits on the remote
programmed.
control.
D. Arris/Motorola HD-uDTA
Step6. A message on the TV screen will prompt
you to enter three (3) digits on the remote
If the three (3) digits entered are correct, a
The steps below MUST be performed
control.
message on the TV screen will indicate successful
if your digital adapter is an Arris/Motorola
programming.
HD-uDTA.
If the three (3) digits entered are incorrect, a
If the three (3) digits entered are correct, a
message on the TV screen will indicate successful
message on the TV screen will indicate
Step1. Insert batteries into the remote.
programming.
programming did not succeed.
Step2. Press and hold the PROG button for five
If the three (3) digits entered are incorrect, a
seconds, until the RED Power button lights
E. Pace DC60Xu HD
message on the TV screen will indicate
up.
programming did not succeed.
Step3. Press [1], [0], [2] on the remote control
The steps below MUST be performed if
keypad.
Program the Remote to
your digital adapter is an Pace DC60Xu HD.
6
Control Your TV
If the digital adapter code is valid, the RED Power
Step 1. Insert batteries into the remote.
button will blink twice and turn off.
Step 2. Press and hold the PROG button for five
If you would like to program your remote to
seconds, until the RED Power button lights up.
Your remote is now programmed to work with
control your TV power, input and volume, there
Step 3. Press [1], [0], [4] on the remote control key
your DTA.
are three methods:
pad.
Quick Set-Up Method
Want to place your Arris/Motorola
If the digital adapter code is valid, the RED Power
Manual Code Search
HD-uDTA out of sight?
button will blink twice and turn off.
Automatic Code Search
If you would like to keep your DTA out of sight
Want to place your Pace DC60Xu HD out
The Quick Set-Up Method enables the easiest
and still get a remote signal, enable RF mode.
of sight?
set-up by using one-digit codes for up to 20 major
brands. Manual code entry requires you to find
Follow these steps, making sure that your DTA
If you would like to keep your DTA out of sight
your TV brand in the included list of three-digit TV
front panel is viewable by the remote control:
and still get a remote signal, enable RF mode.
set-up codes. Automatic mode can take up to 15
Quick Set-Up Code Tables
minutes and requires you to press a button when
your TV responds to the remote control.
TV
Button Press
Button Number
Brand
A. Quick Set-Up Method
0
RCA
1
SAMSUNG
Step1. Make sure that the DTA and TV are
2
SONY
connected and powered on.
3
LG
Step2. Locate your TV brand in the Quick Set-Up
Code Table and identify the corresponding
4
VIZIO
TV&MENU
"Button Press" and "Button Number"
5
SHARP
values.
6
PANASONIC
Step3. Press and hold simultaneously for 3 seconds
7
SANYO
both the TV & MENU or TV & GUIDE buttons,
as specified by the "Button Press" value
8
TOSHIBA
your TV brand is assigned to. The RED
9
PHILIPS
Power button light will turn on for 20
0
COBY
seconds confirming that you are in the
1
MITSUBISHI
programming mode.
2
Step4. While the RED Power button light is on,
HITACHI
point the remote at the TV and press the
3
MAGNAVOX
"Button Number" assigned to your TV
4
JVC
TV&GUIDE
brand (e.g. for Sharp TV, key 5). The TV
5
ZENITH
should turn off, if it does not, press the
same number key repeatedly until the
6
INSIGNIA
TV turns off.
7
EMERSON
(OPTIONAL)
8
WESTINGHOUSE
* Note: The remote will exit the programming
9
TCL
mode automatically if it does not have
matching codes and the RED Power
B. Manual Code Search
button light will turn off.
Step5. Once the TV has turned off, press the TV
Step1. Make sure that the DTA and TV are
key once again to save the code.
connected and powered on.
The remote is now ready to control your
Step2. Locate your TV brand in the list of TV codes
TV.
included in this instruction sheet.
If the matching code could not be found in
Step3. Point the remote at the TV.
step 4, use the Manual Code search or the
Step4. Press and hold the PROG button for five
Automatic Code Search method.
seconds, until the RED Power button
lights up.
Step5. Release the PROG button and make sure
the RED Power button light stays on.
Step6. Press and release TV button. The RED
Power button will blink once and remain on.
Step7. Find the three (3) digit TV code for your TV
brand.
Press the three (3) number buttons in order
on the remote.
If the device code is valid, the RED Power
button will blink twice and turn off.
The device code will be retained.
If the device code is invalid, the RED Power
button will blink twice, but stay on.
Input another three (3) digit code or cancel
the process by pressing the "TV" button.
Step8. If you are able to control TV power on/off
and TV volume with the TV and VOL
buttons on the remote you have
successfully programmed your remote to
your TV. If not, return to step 2 and try the
next code for your TV brand.
While in programming mode, if a button is
not pressed within 20 seconds, the remote
will exit the process.
C. Automatic Code Search
If the code for your TV can't be found using the
Manual Code Search,
please try the Automatic Code search using the
following steps:
Step1. Make sure that the DTA and TV are
Advertisement

Related Manuals for URC UR2-DTA-RF4


Summary of Contents for URC UR2-DTA-RF4
- Page 1 B. Cisco DTA 170HD Follow these steps, making sure that your DTA Quick Set-Up Code Tables Program the Remote If the three (3) digits entered are correct, a Step1. Make sure that the DTA and TV are minutes and requires you to press a button when lights up.
- Page 2 connected and powered on. Step2. Press [9], [8], [7], waiting for the RED Power Make sure the batteries are inserted correctly. Federal Communication Commis- Set-up Code Tables button to blink once after each button Manufacturer/Brand Set-Up Code Number Manufacturer/Brand Set-Up Code Number Manufacturer/Brand Set-Up Code Number Manufacturer/Brand...
Need help?
Do you have a question about the UR2-DTA-RF4 and is the answer not in the manual?
Questions and answers