Table of Contents
Advertisement
Available languages
Available languages
Quick Links
Operator's Manual
675 Series
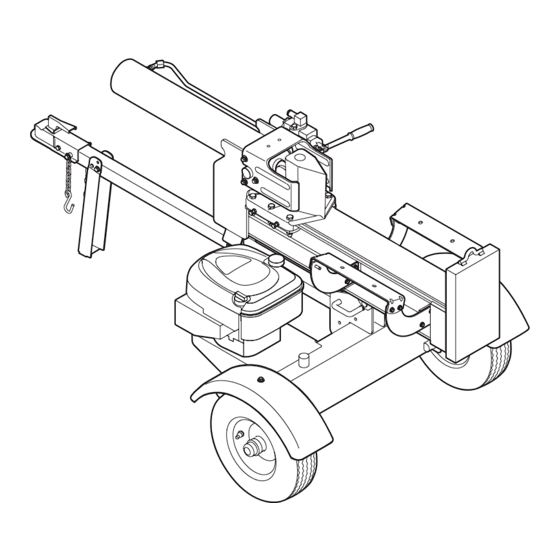
LOG SPLITTER
Model No. 247.77640
CAUTION: Before using
this product, read this
manual and follow all
safety rules and operating
instructions.
Sears, Roebuck and Co., Hoffman Estates, IL 60179, U.S.A.
®
Visit our web site: www.sears.com/craftsman
• SAFETY
• ASSEMBLY
• OPERATION
• MAINTENANCE
• PARTS LIST
• Español
FORM NO. 769-05144
6/7/2009
Advertisement
Table of Contents

Related Manuals for Craftsman 24BF570L099


Summary of Contents for Craftsman 24BF570L099
- Page 1 • MAINTENANCE • PARTS LIST CAUTION: Before using • Español this product, read this manual and follow all safety rules and operating instructions. Sears, Roebuck and Co., Hoffman Estates, IL 60179, U.S.A. Visit our web site: www.sears.com/craftsman FORM NO. 769-05144 6/7/2009...
-
Page 2: Table Of Contents
Maintenance ..........Pages 15-17 WARRANTY STATEMENT CRAFTSMAN FULL WARRANTY When operated and maintained according to all supplied instructions, if this Craftsman log splitter fails due to a defect in material or workmanship within one year from the date of purchase, call 1-800-4-MY-HOME ®... - Page 3 SAFETY INSTRUCTIONS WARNING DANGER This machine was built to be operated according to the This symbol points out important safety safe operation practices in this manual. As with any type of instructions which, if not followed, could power equipment, carelessness or error on the part of the endanger the personal safety and/or property of operator can result in serious injury.
-
Page 4: Safe Operation Practices
SAFETY INSTRUCTIONS Preparation Operation Always wear safety shoes or heavy boots. Before starting this machine, review the “Safety Instructions”. Failure to follow these rules may result in serious injury to the Always wear safety glasses or safety goggles when operating operator or bystanders. - Page 5 SAFETY INSTRUCTIONS Maintenance and Storage When splitting in the vertical position, stabilize the log before moving the control. Split as follows: WARNING Place log on the end plate and turn until it leans against the beam and is stable. This machine is equipped with an internal combustion engine and When splitting extra large or uneven logs, the log must should not be used on or near any unimproved forest-covered, be stabilized with wooden shims or split wood between...
-
Page 6: Safety Labels
SAFETY INSTRUCTIONS Safety Symbols This page depicts and describes safety symbols that may appear on this product. Read, understand, and follow all instructions on the machine before attempting to assemble and operate. Symbol Description READ THE OPERATOR’S MANUAL(S) Read, understand, and follow all instructions in the manual(s) before attempting to assemble and operate WARNING—... -
Page 7: Assembly
ASSEMBLY Attaching the Tongue NOTE: Your log splitter is shipped with motor oil in the engine. However, you MUST check the oil level before operating. Be careful With the log splitter still standing upright, remove the two hex not to overfill. bolts and hex nuts from the tank bracket. - Page 8 ASSEMBLY Disconnect the dislodger from the beam weld bracket by remov- Lift and slide the cylinder up to the top of beam and into the weld ing the six hex screws. See Figure 4. brackets. See Figure 6. Figure 4 Figure 6 Disconnect the log cradle bracket on the control valve side of the Attach the dislodger over the wedge assembly and secure it to the...
- Page 9 ASSEMBLY If necessary, with the log splitter on level ground, use a funnel to Replace the vented dipstick securely, tightening it until the top of the threads are flush with top of the pipe. fill engine with oil to the FULL mark on the dipstick. Be careful not to overfill.
-
Page 10: Operation
The coupler hitch is at the end of the tongue and attaches to a a tow Used to start the engine. ball for transportation purposes. mEETS ANSI SAFETy STANDARDS Craftsman Log Splitters conform to the safety standard of the American National Standards Institute (ANSI). - Page 11 OPERATION ToNGuE To STop ENGINE The tongue is used to attach to a towing vehicle for transportation. Push the stop switch to the OFF position. See Figure 9. ChokE CoNTRoL Disconnect spark plug wire and ground it to prevent accidental starting while the equipment is unattended.
- Page 12 OPERATION Log Dislodger Stand in front of the log splitter to operate the control handle and to stabilize the log. See Figure 12. The log dislodger is designed to remove any partially split wood from the wedge. This may occur while splitting large diameter wood or freshly cut wood.
- Page 13 OPERATION Stand behind the reservoir tank to operate the control handle and Attach the coupler hitch to a class I or higher 2” ball on a towing to stabilize the log. See Figure 14. vehicle. Latch securely. If the coupler hitch does not fit on the ball: Turn the adjustment nut located under the coupler hitch one turn counter-clockwise.
-
Page 14: Service & Adjustments
SERVICE & ADJUSTMENTS FLExIbLE pump CoupLER WARNING The flexible pump coupler is a nylon “spider” insert, located between Do not at any time make any adjustments without first stopping the pump and the engine shaft. Over time, the coupler will harden and the engine, disconnecting spark plug wire and grounding it against deteriorate. -
Page 15: Maintenance
MAINTENANCE maintenance Schedule TASKS SERVICE DATES Before First 5 Every 25 Every 50 Every 100 Each Use Hours Hours Hours Hours Lubricate Beam & Wedge Change Hydraulic Fluid Change Hydraulic Filter Clean Reservoir Screen Check Reservoir Fluid ... - Page 16 MAINTENANCE hyDRAuLIC FLuID AND INLET FILTER bEAm AND SpLITTING WEDGE Before each use, lubricate both sides of the beam (where it comes into WARNING contact with the splitting wedge) with engine oil. The wedge plate on Stop the engine and relieve hydraulic system pressure before chang- the log splitter is designed so the gibs on the side of the wedge plate ing or adjusting fittings, hoses, tubing, or other system components.
- Page 17 MAINTENANCE Service Spark plug Clean the spark plug and reset the gap to .030” at least once a season or every 50 hours of operation. Clean the area around the spark plug. Remove and inspect the spark plug. Replace the spark plug if the electrodes are pitted, burned or the porcelain is cracked.
-
Page 18: Off Season Storage
OFF-SEASON STORAGE FuEL STAbILIZER Prepare your log splitter for storage at the end of the season or if the log splitter will not be used for 30 days or more. NOTE: Fuel stabilizer is an acceptable alternative in minimizing the WARNING formation of fuel gum deposits during storage. - Page 19 NOTES...
-
Page 20: Troubleshooting
TROUBLESHOOTING WARNING Before performing any type of maintenance/service, disengage all controls and stop the engine. Wait until all moving parts have come to a complete stop. Disconnect spark plug wire and ground it against the engine to prevent unintended starting. Always wear safety glasses during operation or while performing any adjustments or repairs. - Page 21 TROUBLESHOOTING WARNING Before performing any type of maintenance/service, disengage all controls and stop the engine. Wait until all moving parts have come to a complete stop. Disconnect spark plug wire and ground it against the engine to prevent unintended starting. Always wear safety glasses during operation or while performing any adjustments or repairs.
-
Page 22: Parts List
PARTS LIST Craftsman Log Splitter model 247.77641... - Page 23 Craftsman Log Splitter model 247.77641 Ref. Part No. Description Ref. Part No. Description 918-0769A Hydraulic Cylinder 710-0521 Hex Bolt 3/8-16 x 3” 727-04166 Hydraulic Tube 719-0353 Coupling Shield 710-1018 Hex Cap Screw 1/2-20 x 2.75 914-0122 Square Key 3/16” x.75...
- Page 24 PARTS LIST briggs & Stratton Engine model 126T02 For Craftsman Log Splitter model 247.77640 306A 358 ENGINE GASKET SET 1095 VALVE GASKET SET...
- Page 25 PARTS LIST briggs & Stratton Engine model 126T02 For Craftsman Log Splitter model 247.77640 125A 130A 130A 109A 633A 118A 117A pRImER SySTEm ChokE SySTEm 121 CARBURETOR OVERHAUL KIT 125B 109B 633A 633A 977 CARBURETOR GASKET SET 108A 633A 972B...
- Page 26 PARTS LIST briggs & Stratton Engine model 126T02 For Craftsman Log Splitter model 247.77640 425A 966B 968B 967A 445A 443A 300A 676C 676A 613A 676D 676E 832A 994B 832B 836B 1388 832E 1386 836C 1387...
- Page 27 PARTS LIST briggs & Stratton Engine model 126T02 For Craftsman Log Splitter model 247.77640 222A 222C 222D 222E 843A 209B 209A 265A 265B 333A 851A 356B 635A 627A 356D 356G 356H 356J 789B 578A 789C 789D 1119 1160 923B 922A...
- Page 28 PARTS LIST briggs & Stratton Engine model 126T02 For Craftsman Log Splitter model 247.77640 969A 969A 969A 921P 921A 921H 969A 969A 921B 921J 921R 969A 969A 969A 921K 921U 921C 969A 921L 921W 921E 969A 969A 921M 921X 921F...
- Page 29 PARTS LIST briggs & Stratton Engine model 126T02 For Craftsman Log Splitter model 247.77640 564A 604A 1211 1210 564B 564B 604C 604B 783A 564B 604D 1005 309A 783A 930A 1036 EMISSIONS LABEL...
- Page 30 PARTS LIST briggs & Stratton Engine model 126T02 For Craftsman Log Splitter model 247.77640 564A 604A 1211 1210 564B 564B 604C 604B 783A 564B 604D 1005 309A 783A 930A 1036 EMISSIONS LABEL...
- Page 31 PARTS LIST briggs & Stratton Engine model 126T02 For Craftsman Log Splitter model 247.77640 Ref. No. Part No. Description Ref. No. Part No. Description BS-697322 Cylinder Assembly BS-690837 Screw (Rewind Starter) BS-399269 Bushing/Seal Kit BS-691108 Screw (Flywheel Guard) BS-299819S Oil Seal...
- Page 32 PARTS LIST briggs & Stratton Engine model 126T02 For Craftsman Log Splitter model 247.77640 Ref. No. Part No. Description Ref. No. Part No. Description BS-794307 Engine Gasket Set 222D BS-791128 Control Bracket (Fixed Speed) BS-19069 Flywheel Puller 222E BS-692982 Control Bracket (Manual Friction, 5...
- Page 33 PARTS LIST briggs & Stratton Engine model 126T02 For Craftsman Log Splitter model 247.77640 Ref. No. Part No. Description Ref. No. Part No. Description BS-497680 Rewind Starter BS-695266 Starter Housing BS-691340 Screw (Muffler) BS-499034 Muffler Guard 613A BS-691653 Screw (Muffler)
- Page 34 PARTS LIST briggs & Stratton Engine model 126T02 For Craftsman Log Splitter model 247.77640 Ref. No. Part No. Description Ref. No. Part No. Description BS-691994 Brake BS-694395 Carburetor Primer 923A BS-695891 Brake BS-498261 Carburetor Gasket Set BS-691994 Brake BS-691959 Key Set...
- Page 35 PARTS LIST Craftsman Log Splitter model 247.77641 777S32061 WARNIN G CONTROL VALVE PERSON STABILIZING LOG ON SPLITTER MUST BE SAME PERSON WHO OPERATES CONTROL VALVE. REVERSE KEEP HANDS AWAY FROM WEDGE AND MOVING PARTS. 777D12600 NEUTRAL KEEP HANDS and FEET AWAY...
-
Page 36: Repair Protection Agreement
REPAIR PROTECTION AGREEMENT Congratulations on making a smart purchase. Your new Craftsman® Once you purchase the Agreement, a simple phone call is all that it product is designed and manufactured for years of dependable opera- takes for you to schedule service. You can call anytime day or night, or tion. -
Page 37: Español
Cuando son operados y mantenidos de acuerdo con las instrucciones suministradas en su totalidad, si este registro Craftsman bifurcador falla debido a un defecto de material o mano de obra dentro de un año a partir de la fecha de compra, llame al 1-800-4-MY-HOME ®... - Page 38 INSTRUCCIONES DE SEGURIDAD ADvERTENCIA pELIGRo Esta máquina fue construida para ser operada de acuerdo La presencia de este símbolo indica que se trata con las reglas de seguridad contenidas en este manual. de instrucciones importantes de seguridad que Al igual que con cualquier tipo de equipo motorizado, un se deben respetar para evitar poner en peligro descuido o error por parte del operador puede producir su seguridad personal y/o material y la de otras...
- Page 39 INSTRUCCIONES DE SEGURIDAD Preparativos Nunca deje la máquina en funcionamiento sin vigilancia. No utilice la máquina bajo la influencia del alcohol, las drogas Siempre use zapatos de seguridad o botas reforzadas. o un medicamento. Siempre use anteojos o antiparras de seguridad cuando hace Nunca permita a nadie operar esta máquina sin recibir antes la funcionar esta máquina.
- Page 40 INSTRUCCIONES DE SEGURIDAD Cuando corte en posición vertical, estabilice el tronco antes de La válvula de descarga de presión viene preconfigurada de mover el control. Corte según se indica a continuación: fábrica. No la ajuste. Coloque el tronco en la placa del extremo y gírelo hasta No intente nunca mover la máquina en terreno en pendiente o que se incline contra la vigueta y quede estable.
- Page 41 INSTRUCCIONES DE SEGURIDAD Símbolos De Seguridad Esta página representa y describe los símbolos de seguridad que pueden aparecer en este producto. Leído, entienda, y siga todas las instrucciones en la máquina antes de procurar montar y funcionar. Símbolo Descripción LEA EL MANUAL(S) DEL OPERADOR leído, entienda, y siga todas las instrucciones en el manual(s) antes de procurar montar y funcionar ADVERTENCIA —...
- Page 42 ARMADO Colocación de la lengüeta NOTA: Su máquina rompetroncos se envía con aceite en el motor. Sin embargo, usted DEBE controlar el nivel de aceite antes de hacerlo Con la máquina rompetroncos fija en posición vertical, retire los funcionar. Tenga cuidado de no llenar en exceso. dos pernos hexagonales y las tuercas hexagonales del soporte NOTA:Las referencias que contiene este manual sobre los lados del tanque.
- Page 43 ARMADO Desconecte el liberador del soporte soldado de vigueta retirando Levante y deslice el cilindro hacia arriba hasta el tope de la los seis tornillos hexagonales. Vea la Figura 4. vigueta y dentro de los soportes soldados. Vea la Figura 6. Figura 4 Figura 6 Coloque el liberador encima del montaje de la cuña y fíjelo en los...
- Page 44 ARMADO Si es necesario, con el rompetroncos sobre una superficie Controle el nivel de fluido con la varilla de nivel. Vea la Figura 7. nivelada, use un embudo para llenar el motor de aceite hasta la No llene el depósito en exceso. marca FULL de la varilla.
- Page 45 La lengüeta se usa para acoplar a un vehículo de remolque para mANIJA DEL ARRANCADoR transporte. Se utiliza para encender el motor. CumpLE CoN LoS ESTáNDARES DE SEGuRIDAD DE ANSI La máquina cortadora de madera de Craftsman cumple con las normas de seguridad del Instituto Nacional Americano de Normalización (ANSI).
- Page 46 FUNCIONAMIENTO CoNTRoL DEL CEbADoR pARA DETENER EL moToR El control del cebador se usa para cebar el carburador y ayudar a que Empuje el interruptor de detención a la posición Apagado. Vea la el motor arranque. Figura 9. CHOKE Desconecte el cable de la bujía y haga masa para evitar que se encienda accidentalmente el equipo al dejarlo sin vigilancia.
- Page 47 FUNCIONAMIENTO Liberador de la madera Párese delante de la unidad para operar la manija de control y estabilizar el tronco. Vea la Figura 12. El liberador de madera está diseñado para sacar de la cuña la madera parcialmente cortada. Esto puede suceder cuando se corta madera de gran diámetro o recientemente cortada.
- Page 48 FUNCIONAMIENTO Párese detrás del tanque de depósito para operar la manija de Sujete el enganche acoplador a una bola clase I o superior de 2" en un vehículo de remolque. Sujete bien. control y estabilizar el tronco. Vea la Figura 14. Si el enganche acoplador no encaja sobre la bola: Gire la tuerca de ajuste ubicada debajo del enganche acoplador una vuelta a la izquierda.
- Page 49 SERVICIO Y AJUSTES AbRAZADERAS DE LA mANGuERA ADvERTENCIA • Antes de cada uso, verifique que todas las abrazaderas de Nunca realice ningún ajuste sin antes detener el motor, desconectar mangueras están ajustadas. el cable de la bujía y hacer masa contra el motor. Utilice siempre anteojos de seguridad durante la operación o mientras realiza ajustes ACopLADoR FLExIbLE DE LA bombA o reparaciones.
- Page 50 MANTENIMIENTO programa de mantenimiento TAREAS FECHAS DE LOS SERVICIOS Antes de Primeras 5 Cada 25 Cada 50 Cada 100 cada uso horas horas horas horas Lubrique la vigueta y la cuña Cambie el fluido hidráulico Cambie el filtro hidráulico ...
- Page 51 MANTENIMIENTO LíquIDo hIDRáuLICo y FILTRo DE ENTRADA vIGuETA y CuñA DE CoRTE Antes de cada uso, lubrique con aceite de motor los dos lados de ADvERTENCIA la vigueta (donde hace contacto con la cuña de corte). La placa de Detenga el motor y libere la presión del sistema hidráulico antes la cuña de la máquina rompetroncos está...
- Page 52 MANTENIMIENTO mantenimiento de la bujía Limpie la bujía y ajuste el espacio a 0.030" al menos una vez por temporada o cada 50 horas de funcionamiento. Limpie el área alrededor de la bujía. Saque e inspeccione la bujía. Cambie la bujía si los electrodos están picados, quemados o la porcelana está...
- Page 53 ALMACENAMIENTO FUERA DE TEMPORADA ESTAbILIZADoR DE CombuSTIbLE Prepare la máquina rompetroncos para su almacenamiento al finalizar la temporada o si la unidad no se utilizará durante 30 días o más. NOTA: El uso de estabilizadores de combustible es una alternativa ADvERTENCIA aceptable para minimizar la formación de depósitos de goma de Nunca almacene la máquina con combustible en el tanque dentro...
- Page 54 SOLUCIÓN DE PROBLEMAS ADvERTENCIA Antes de realizar cualquier tipo de mantenimiento o servicio, desenganche todos los controles y detenga el motor. Espere a que se detengan completamente todas las piezas móviles. Desconecte el cable de la bujía y póngalo haciendo masa contra el motor para evitar que se encienda accidentalmente. Utilice siempre anteojos de seguridad durante la operación o mientras realiza ajustes o reparaciones.
- Page 55 SOLUCIÓN DE PROBLEMAS ADvERTENCIA Antes de realizar cualquier tipo de mantenimiento o servicio, desenganche todos los controles y detenga el motor. Espere a que se detengan completamente todas las piezas móviles. Desconecte el cable de la bujía y póngalo haciendo masa contra el motor para evitar que se encienda accidentalmente. Utilice siempre anteojos de seguridad durante la operación o mientras realiza ajustes o reparaciones.
- Page 56 NOTAS...
- Page 57 NOTAS...
- Page 58 NOTAS...
- Page 59 Felicitaciones por haber realizado una adquisición inteligente. El Una vez adquirido el Acuerdo, puede programar el servicio con producto Craftsman® que ha adquirido está diseñado y fabricado tan sólo realizar una llamada telefónica. Puede llamar en cualquier para brindar muchos años de funcionamiento confiable. Pero como momento del día o de la noche o programar un servicio en línea.
- Page 60 Your Home For expert troubleshooting and home solutions advice: www.managemyhome.com For repair – in your home – of all major brand appliances, lawn and garden equipment, or heating and cooling systems, no matter who made it, no matter who sold it! For the replacement parts, accessories and owner’s manuals that you need to do-it-yourself.
Need help?
Do you have a question about the 24BF570L099 and is the answer not in the manual?
Questions and answers