
Subscribe to Our Youtube Channel
Related Manuals for Wenglor B60 Series


Summary of Contents for Wenglor B60 Series
- Page 1 B60xxxx Smart Cameras and Vision Sensors Operating Instructions Original operating instructions Subject to change without notice Available as PDF file only Revision level: 26.09.2023 Version 1.0.1 www.wenglor.com...
-
Page 2: Table Of Contents
Table of Contents General ................................4 Information Concerning these Instructions ..................4 Explanations of Symbols ........................4 Limitation of Liability ..........................5 Copyrights ............................5 For Your Safety ............................6 Use for Intended Purpose ........................6 Use for Other than the Intended Purpose ....................6 Personnel Qualifications ........................6 LED Warnings ............................7 Modification of Products ........................7 Repair ..............................7... - Page 3 Connection to External Illumination and Trigger Sensor..............22 Adjusting Network Settings ........................24 5.5.1 Manual Network Settings .......................24 5.5.2 Test Connection between Smart Camera and PC ..............26 Software wenglor Discovery Tool ......................26 Device Website ............................27 Structure of Device Website ......................27 Dashboard ............................28 Interfaces ............................29...
-
Page 4: General
• Local accident prevention regulations and national work safety regulations must be complied with as well. • The product is subject to further technical development, and thus the information contained in these oper- ating instructions may also be subject to change. The current version can be found at www.wenglor.com the product’s separate download area. NOTE! The operating instructions must be read carefully before using the product and must be kept on hand for later reference. -
Page 5: Limitation Of Liability
• wenglor assumes no liability with regard to printing errors or other inaccuracies contained in this operating manual, unless it can be proven that wenglor was aware of the errors at the time the operating manual was created. -
Page 6: For Your Safety
• The product is not suitable for use in potentially explosive atmospheres. • The product may be used only with accessories supplied or approved by wenglor, or in combination with approved products. A list of approved accessories and combination products can be found at www.wenglor.com... -
Page 7: Led Warnings
• Unauthorized opening of the device is not permitted. Repair Trained and authorized wenglor personnel may only carry out repairs to the device. Interventions and modifica- tions to the device by the customer will void the warranty claim against wenglor. -
Page 8: Conditions For Specified Protection Class
Conditions for specified protection class To maintain the specified degree of protection of the device during operation, the following specifications apply. In case of non-compliance, the device does not comply with any specified degree of protection. • The connected cables at the electrical connections are screwed. •... -
Page 9: Technical Data
The B60 is available in 3 different software packages: • B60Mxxx: uniVision • B60Exxx: uniVision Extended • B60Pxxx: uniVision Script All currently associated modules can be found at: Product Highlights of uniVision 3 Image Processing Software | wenglor B60 C Mount Order No. B60x103 B60x113... - Page 10 Please also consider the trigger prohibited time (see following section) and that the processing time in uniVision is short enough to handle the required trigger frequency. In case of data overflow the error handling of the device takes care of a defined behavior (see operating instructions of software wenglor uniVision 3 DNNF023). ** T emperature range: The internal temperature is approx. 10...30° C above the ambient temperature. Use in areas with ...
-
Page 11: Dimensional Drawings
The following table defines the tightening torques of the connectors and mounting options to ensure compliant and fault-free operation: Connection type / mounting holes Tightening torque in (Nm) M12, 12-pin M12, 8-pin Mounting holes Dimensional Drawings All dimensions specified in mm (1 mm = 0.03937″) B60 C-Mount uniVision Software... -
Page 12: Connection Diagram
Connection Diagram The Smart Camera B60 has 3 separate connectors for parameterization and process data. Power over Ethernet (PoE) is supported via the LAN connector. When using the LAN and Power-I/O connectors at the same time, note that power is supplied via the Power-I/O connector while PoE is disabled. •... - Page 13 Default settings Symbol default E/A1 Output (PNP, not inverted) E/A2 Output (PNP, not inverted) E/A3 Output (PNP, not inverted) E/A4 Output (PNP, not inverted) E/A5 Output (PNP, not inverted) E/A6 Output (PNP, not inverted) M12; 8-pin (LAN) Connection Diagram Legend Encoder A/A (TTL) Platinum measuring resistor Encoder B/B (TTL)
-
Page 14: Complementary Products
You can reach the product page of the B60 Smart Cameras via the link below. From there, navigate to the de- sired product and the corresponding system components • Complementary products • Spare Parts • Illumination Technology • Mounting technology • Connection equipment • Software www.wenglor.com/B60 Layout Technical Data... -
Page 15: Control Panel / Button / Indicator Elements
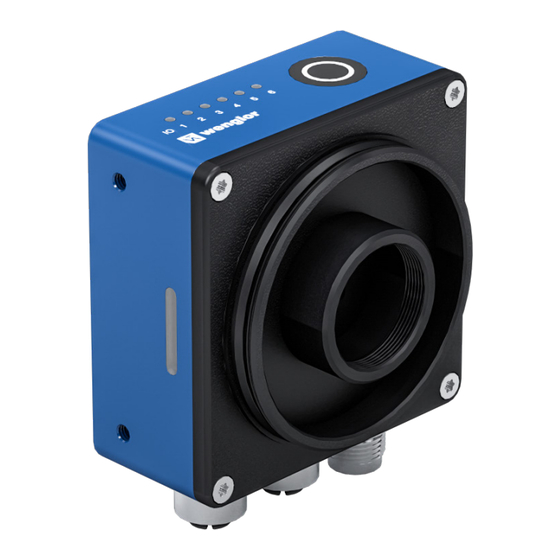
1 = I/O-Status LEDs 2 = Button 3 = Connection plugs 4 = Device status LEDs 5 = C Mount thread 6 = Protective tube thread 7 = Mounting holes 8 = Image chip Control Panel / Button / Indicator elements 01: LED (I/O Status) 8d: Button 3.6.1 I/O-Status LEDs... -
Page 16: Button
> 15 seconds No function * M ake sure that the trigger mode is enabled and the trigger source is set to software (see operating instructions of DNNF023). ** W hen the Localize function is activated, the corresponding device is highlighted in the Software wenglor Discovery Tool (see operating instructions of DNNF022 and on the device website (see section „7.7 Device... -
Page 17: Connector Leds
• General Safety Precautions NOTE! • All currently associated modules can be found at Product Highlights of uniVision 3 Image Processing Software | wenglor » • Mounting screws are not included in the scope of delivery. • Z60K heat sinks are not included in the scope of delivery and must be ordered separately. -
Page 18: Transport And Storage
4. Transport and Storage Transport Upon receipt of shipment, the goods must be inspected for damage in transit. The manufacturer must be in- formed without delay concerning damage to the package. When returning the package, clear indication of transport damage must be attached. Storage The following points must be taken into consideration with regard to storage: •... -
Page 19: Installation And Electrical Connection
5. Installation and Electrical Connection System overview The current system overview is located at System Overviews B60 Smart Camera | wenglor. Mounting and General Installation Instructions ATTENTION! Danger of material damage in case of improper installation! Damage to the product possible. - Page 20 The following diagram shows the cable outlet on the Smart Camera when using angled wenglor connection cables: Mounting option for Robot Vision with Universal Robots (UR) To attach the B60 to a Universal Robot, use ZVZC001. For camera and robot calibration, this adapter is also used to attach a ZVZJ* calibration plate to the robot.
-
Page 21: Electrical Connection
Electrical Connection Depending on the usage only one or two connections are needed. Connect the Smart Camera to 24 V DC (± 10%). Alternatively, PoE functionality can be used via the LAN connector (e.g. using a PoE switch) (see section „3.3 Connection Diagram“). -
Page 22: Connection To External Illumination And Trigger Sensor
Connection to External Illumination and Trigger Sensor For L* Lights: Smart Camera B50* / B60* + 24 V DC Connection Line M12x1, 4-/5-pin ZDCG004 Connection Line M12x1, 4-pin Trigger Sensor ZC4G003 (optional) Connection Line M12x1, 5-pin Connection Line (optional) M12x1, 12-pin L* Lights For ZVZF* Lights: Smart Camera B50* / B60*... - Page 23 How to set up: • Connect as described above • Parameter settings in the software wenglor uniVision (changes to default): Module Application Property Value Line 6 Line Selector Line Mode Output Smart Camera - Digital I/O control Line Inverter ...
-
Page 24: Adjusting Network Settings
In TCP/IP networks the devices must be in the same network to communicate. It can be that either the Smart Camera or the customer PC must be configured to ensure this. NOTE! Use the software wenglor Discovery Tool (see section „6. Software wenglor Discovery Tool“) to adjust the network settings of the B60 Smart Camera. - Page 25 Fig. 1: Local connection properties Fig. 2: Properties of internet protocol uniVision Software...
-
Page 26: Test Connection Between Smart Camera And Pc
6. Software wenglor Discovery Tool The software wenglor Discovery Tool can be installed on any Windows 10 (22H2) and 11 (22H2) PC for finding B60 Smart Cameras, for setting up the network configuration of B60 Smart Cameras and for accessing the device website. -
Page 27: Device Website
• Make sure that the network settings of the B60 Smart Camera and the PC fit together. • Use the software wenglor Discovery Tool to find B60 Smart Cameras, to adjust the net- work settings and to access the device website. For details, check the operating instruc- tions of the software wenglor Discovery Tool (DNNF022). -
Page 28: Dashboard
• For details about compatability between firmware and uniVision version, see the release notes and the operating instructions of the software wenglor uniVision 3 (DNNF023). More info opens a new tab in the browser with the product detail page on the wenglor website (only available with internet access). -
Page 29: Interfaces
• After network changes, enter the new IP address in the browser or open the software wenglor Discovery Tool in order to find the device again (for details, see operating instruc- tion of software wenglor Discovery Tool DNNF022). -
Page 30: Ftp/Sftp Client
• Password is only visible if authentification is deactivated or, in case of activated authentifi- cation, if user of user group admin or admin (default) is logged in. • For details about process data via Device FTP, see operating instruction of the software wenglor uniVision 3 DNNF023. Device Website... -
Page 31: Sftp Server
• Password is only visible if authentification is deactivated or, in case of activated authentifi- cation, if user of user group admin or admin (default) is logged in. • For details about file exchange between B60 Smart Camera and PC, see operating instruction of the software wenglor uniVision 3 DNNF023. uniVision Software... -
Page 32: Jobs
Open the tab “Jobs” in order to see and edit the uniVision job settings. It is possible to edit the name of the processing instance and to show the available network ports. NOTE! For details about the different ports, see operating instruction of software wenglor uniVision 3 DNNF023. Device Website... - Page 33 Click on “Edit job” in the section “Current job” in order to open the uniVision software for editing the uniVision job. NOTE! • Make sure that the suitable version of the software wenglor uniVision 3 is installed on the • For details about the suitable version of the software wenglor uniVision 3, check the uniVi- sion version of the device at the tab “Dashboard”...
-
Page 34: Diagnosis
Click on visualization opens the webbased job visualization in a separate tab of the browser. NOTE! The webbased visualization is described in the operating instruction of the software wenglor uniVision 3 DNNF023. Diagnosis Click in the icon menu bar on the “Diagnosis” icon in order to get further diagnosis info. -
Page 35: Logging
7.5.2 Logging The side navigation “Logging” allows to download logging info for all services of the device in one zip file for the wenglor support and development team. Settings Click in the icon menu bar on the “Settings” icon for further device settings. -
Page 36: Position Sensor
7.6.2 Position Sensor The side navigation “Position Sensor” shows the current position values of the device. The following angle values are possible for x and y axis: • X axis: Angle from -180 to 180°. • Y axis: Angle from 0 to 90 to 0 to -90 to 0°. If y is bigger than 70° or smaller than -70° the gimbal lock effect leads to big changes on angle of x axis. - Page 37 Click on Teach in order to set the current position as new reference. The current position of x and y will then display 0°. Activate the “Position Check” (default: deactivated), in order to detect unwanted position changes with the de- vice status LED.
-
Page 38: Reboot
If the current position is out of the limits, the device status LED on the device and the device website show a warning info (see section „7.7 Device Status“). 7.6.3 Reboot The side navigation “Reboot” allows to perform a software reboot of the device. Device Website... -
Page 39: Update
Current version shows the current firmware version. Clicking on the link opens a new tab in the browser to the product detail page on the wenglor website. The latest firmware version is available at “Downloads” “Soft and Firmware” (only available with internet access). -
Page 40: Security
Functionality Admin or admin Setter Worker Logged (default) Software wenglor Discovery Tool: • Find devices • Open devices extended view • Access device website Software wenglor Discovery Tool: • Start/stop localizing • Edit name and network settings... - Page 41 By default, authentification is deactivated. Enable authentification and click on OK. uniVision Software...
- Page 42 If authentification is active, the button “Login” appears in the icon menu bar. Enter username and login. Use admin (default) to login for the first time. • Username: admin • Password: admin Edit username or password of admin (default) via clicking on “Manage account”. NOTE! •...
- Page 43 Admins and admin (default) can create new accounts, edit and delete other accounts. Setter and Worker can only change the own username or password. Enter username, password and user group when creating new accounts. uniVision Software...
-
Page 44: Appearance
7.6.6 Appearance The side navigation “Appearance”, allows to activate or deactivate dark theme. By default, dark theme is deac- tivated. Bright Theme Dark Theme Device Website... -
Page 45: Language
7.6.7 Language The side navigation “Language” shows the current user language “English”. Device Status Open the device status in the icon menu bar for further status info. uniVision Software... -
Page 46: Help Button
• Downloads: Opens a new tab in the browser with the product detail page of the device containing all avail- able downloads on the wenglor website (only available with internet access). • Third Party Licenses: Opens a new tab in the browser to access the third party licenses of the device (no internet access necessary). -
Page 47: Software Wenglor Univision 3
The B60 is parameterized with the uniVision software (version 3.0.0 or higher). For details on the parameteriza- tion of the camera settings and the uniVision modules, please refer to the operating instructions for the wenglor uniVision 3 software. For more information, see: https://www.wenglor.com/p/DNNF023... -
Page 48: Change Index Of Operating Instruction
12.2 Third Party Licenses Third party licenses used on the B60 Smart Camera are available via the device website (see section „7.8 Help Button“) or on the wenglor website (requires internet access) at: https://www.wenglor.com/License/s/License Change Index of Operating Instruction...
Need help?
Do you have a question about the B60 Series and is the answer not in the manual?
Questions and answers