Table of Contents

Related Manuals for Wenglor P1PY1 Series


Summary of Contents for Wenglor P1PY1 Series
- Page 1 P1PY1xx Long-Range Laser Distance Sensors der wintec. Operating Instructions Translation of the original operating instructions Subject to change without notice Available as PDF file only Version 1.1.1 Status: 06/07/2021 www.wenglor.com...
-
Page 2: Table Of Contents
Table of Contents 1. General ...........................4 1.1 Information Concerning These Instructions .................... 4 1.2 Explanations of Symbols ......................... 4 1.3 Limitation of Liability ..........................5 1.4 Copyrights ..............................5 2. For Your Safety ........................6 2.1 Use for Intended Purpose ........................6 2.2 Use for Other than the Intended Purpose.................... - Page 3 7.1.4 Condition Monitoring Functions ....................31 7.1.4.1 Status Message Function ....................31 7.1.4.2 Warning/Error Output Function ..................31 7.1.4.3 Acceleration Sensor (P1PY111, P1PY113) ..............33 7.1.4.4 Signal Observation ......................33 7.1.5 Simulation Functions ........................34 7.2 Condition Monitoring/Process Data ....................... 35 7.2.1 Process Data In ...........................
-
Page 4: General
• Local accident prevention regulations and national work safety regulations must be complied with as well. • The product is subject to further technical development, and thus the information contained in these oper- ating instructions may also be subject to change. The current version can be found at www.wenglor.com in the product’s separate download area. -
Page 5: Limitation Of Liability
• wenglor assumes no liability for printing errors or other inaccuracies contained in these operating instruc- tions unless wenglor was verifiably aware of such errors at the point in time at which the operating instruc- tions were prepared. -
Page 6: For Your Safety
• The product is not suitable for use in potentially explosive atmospheres. • The product may be used only with accessories supplied or approved by wenglor, or in combination with approved products. A list of approved accessories and combination products can be accessed at www.wenglor.com on the product detail page. -
Page 7: Personnel Qualifications
• In the event of possible changes, the respectively current version of the operating instruc- tions can be accessed at www.wenglor.com in the product’s separate download area. • Read the operating instructions carefully before using the product. -
Page 8: Technical Data
3. Technical Data 3.1 General Data Optical Data Working range 0 … 10,000 mm Maximum reproducibility 3 mm* Linearity deviation 10 mm* Light source Laser (red) Wavelength 660 nm Service life (ambient temp. = +25 °C) 100,000 h Laser class (EN 60825-1) Beam divergence <... -
Page 9: Warm-Up Phase
Order No. P1PY Technical Data Setting range 50 – 10,000 mm — Measuring range — 50 – 10,000 mm Switching hysteresis < 15 mm — Current consumption (operat- < 35 mA < 40 mA ing voltage = 24 V) Switching frequency 50 Hz* —... -
Page 10: Working Range
3.3 Working Range The sensor’s working range is influenced by two parameters: • Object remission • Ambient light The following values can typicially be reached in Precision mode (default): Ambient Light 100 lux 5,000 lux 20,000 lux 100,000 lux Remission White (90 % remission) 50…10,000 mm 50…10,000 mm... -
Page 11: Switching Distance Deviation
3.4.1 Switching Distance Deviation Typical characteristic curve based on Kodak white (90% remission). Speed Mode Precision Mode P1PY1 Speed P1PY1 Precision 1000 2000 3000 4000 5000 6000 7000 8000 9000 10000 1000 2000 3000 4000 5000 6000 7000 8000 9000 10000 Sr/mm Sr/mm Modus Precision Plus... -
Page 12: Light Spot Diameter
5 mm 10 mm 15 mm Table 1 3.6 Complementary Products wenglor can provide you with suitable connection equipment for your product. Suitable mounting technology no. Suitable connection equipment no. IO-Link master EFBL001, EFBL003, EP0L001 wTeach2 software DNNF005 IO-Link Device Tool software DNNF019... -
Page 13: Layout
3.7 Layout P1PY101, P1PY103, P1PY107, P1PY108, P1PY111, P1PY113 P1PY102, P1PY104 1 = emitter diode 2 = receiver diode L = Cable length M4 screw = 0.5 Nm Dimensions specified in mm (1 mm = 0.03937″) Long-Range Laser Distance Sensors... -
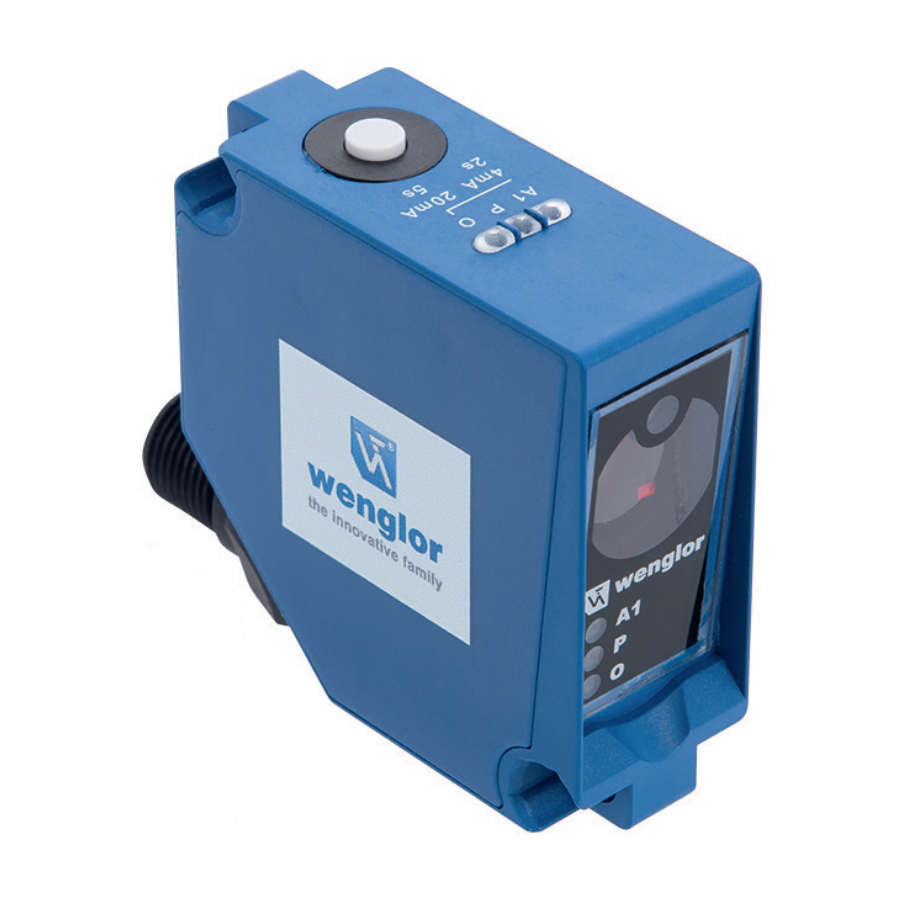
Page 14: Control Panel
3.8 Control Panel P1PY101, P1PY102, P1PY103, P1PY107 P1PY108 P1PY104, P1PY111, P1PY113 A 43 A 45 A 44 5a 68 6a 5a 68 12 5a 68 63 06 = teach-in key 06 = teach-in key 06 = teach-in key 5a = switching status indicator A1 5a = switching status indicator A1 5a = switching status indicator A1 6a = switching status indicator A2... -
Page 15: Transport And Storage
4. Transport and Storage 4.1 Transport Upon receipt of shipment, the goods must be inspected for damage in transit. In the case of damage, con- ditionally accept the package and notify the manufacturer of the damage. Then return the device, making reference to damage in transit. -
Page 16: Installation And Electrical Connection
5. Installation and Electrical Connection 5.1 Installation • Protect the product from contamination during installation. • Observe all applicable electrical and mechanical regulations, standards, and safety rules. • Protect the product against mechanical influences. • Insert the supplied spacer sleeves into the designated recesses on the side facing the mounting surface. •... -
Page 17: Electrical Connection
5.2 Electrical Connection • Wire the sensor in accordance with the connection diagram. • Switch on the supply voltage (see ““3. Technical Data” on page • The blue supply voltage indicator lights up. • Adjust the sensor so that the light spot strikes the object to be detected/measured. E A1 E A1 E A1... -
Page 18: Diagnosis
5.3 Diagnosis 5.3.1 LED Indicators Indicator Status Meaning Sensor ready for operation Supply voltage indicator P No voltage supply Switching output active Switching status Warning 2.5 Hz indicator A1, A2 Error 5 Hz Switching output inactive Object within the set measuring range Object outside the set measuring range Analog indicator O Warning... -
Page 19: Troubleshooting
• Shut down the machine. • Analyze and eliminate the cause of error with the aid of the diagnostics information. • If the error cannot be eliminated, please contact wenglor’s support department. • Do not operate in case of indeterminate malfunctioning. -
Page 20: Sensor Settings
6. Sensor Settings This section describes the settings that can be made directly on the sensor via the control panel. These set- tings differ between the versions with digital switching outputs and those with analog output. 6.1 Versions with Switching Outputs P1PY101, P1PY102, P1PY103, P1PY104, P1PY111, P1PY113 Teach-In Three different teach-in modes are available. -
Page 21: Versions With Analog Output
6.2 Versions with Analog Output P1PY107, P1PY108 Analog Output Function The sensor reads out its measured value as a linear proportional current or voltage value. The characteristic curve can be set within the entire measuring range by teaching in. Voltage output: P1PY107 Voltage No signal Measuring range... - Page 22 Substitute Values (Current Output Only) By means of substitute values, the sensor is able to provide more precise information as to whether the analog signal corresponds to a valid measured value within the measuring range. No signal: 21 mA Rising Characteristic Curve Object outside the near measuring range: 3.5 mA Object outside the far measuring range: 20.5 mA Falling Characteristic Curve...
-
Page 23: Io-Link
To this end, the sensor is connected to a suitable IO-Link master (see product detail page/complementary products). The interface protocol and the IODD can be found at www.wenglor.com in the download area for the respec- tive product. 7.1 Settings via IO-Link/Parameters The functions described in the following section can be set acyclically via IO-Link/parameters. - Page 24 Function Possible Settings Default A distance range in which signals are to be evaluated can be defined within the working range. Signals outside the set distance range are ignored and are not included in the signal evaluation. This means that ranges in which no usable signals are to be expected can be completely hidden.
- Page 25 Function Possible Settings Default The interference filter can be used to increase measurement reliability in the case of brief interferences in the measured section. Interferenc- es such as rain, snow or chips in the air generate brief signals, which can result in incorrect measurements. A higher filter level allows the interfering signals to be ignored for a defined period.
- Page 26 Function Possible Settings Default The teach-in key has internal illumination, which enables optimal visi- bility and operability even in dark environments. Key illumination Teach-in key illuminated Teach-in key not illuminated The measured distance can be read out in millimeters or inches. Millimeter Measured value Distance values read out in mm...
-
Page 27: Input/Output Functions (I/O)
7.1.2 Input/Output Functions (I/O) 7.1.2.1 Pin Function The pin function is used to define the function of pins I/O1, I/O2 (digital versions only) and I3, as these can be used for different functions. Possible Settings Default Switching Output Switching point SSC1 is assigned to the switching output. Error Output The error output switches if one of the assigned errors occurs;... -
Page 28: Output Functions
Laser-Off Input The sensor’s emitted light is deactivated as long as the input is activated. The sensor does not supply a measured value and sets the status to “No signal.” Teach-In Input Teach-in The outputs (switching outputs/analog output) can be set by following the same procedure as with the teach-in key (see section 6). -
Page 29: Input Functions
7.1.2.3 Input Functions The input functions are used to set the physical inputs. Function Possible Settings Default Operating Voltage Active The function is triggered as soon as operating voltage is applied to the input. Operating Input mode voltage active Operating Voltage Inactive The function is triggered as soon as 0 V is applied to the input or the input is not connected. - Page 30 Window Teach-In Sensor Teach-in distance Function size of the Window size near switching point Switching Function size of the Object point far switching point 50 – 10,000 mm NOTE! Switching point 5,000 mm If a distance range has been set, the switching point can be set within the set distance range only.
-
Page 31: Condition Monitoring Functions
7.1.4 Condition Monitoring Functions 7.1.4.1 Status Message Function The sensor provides a large number of different status messages. Due to the process data structure, four status messages can be transmitted as individual process data. These parameters can be used to set the status messages that are transmitted via the process data. Function Possible Settings Default... - Page 32 Status Messages Warnings Warning signal The object reflects too little light. The sensor detects when the optic cover is dirty, and the signal deteriorates as Optics dirty a result. Ambient light Object detection is impeded by too much ambient light. When using the interference filter, the sensor detects whether a brief interfering Interference in the working event has occurred in the measuring range.
-
Page 33: Acceleration Sensor (P1Py111, P1Py113)
7.1.4.3 Acceleration Sensor (P1PY111, P1PY113) The sensor has an integrated acceleration sensor. It detects accelerations and can thereby detect impacts or shock loads. Function Possible Settings Default Acceleration Sensor Acceleration sensor activated Acceleration sensor deactivated The status message remains active until it is acknowledged. This makes it possible to reliably detect even those messages that occur for a shorter duration than the cycle time. -
Page 34: Simulation Functions
7.1.5 Simulation Functions This function simulates the behavior of the sensor regardless of the current status and measured value. This can be used to check whether a plant in which the sensor is integrated reacts correctly to the data supplied by the sensor and processes them accordingly. -
Page 35: Condition Monitoring/Process Data
7.2 Condition Monitoring/Process Data The data described in the following section can be read or written cyclically via IO-Link/process data. 7.2.1 Process Data In Data Meaning Measured distance in mm respectively 1/10 Inch. As the sensor cannot determine a measured value in the following error cases, substi- Measured Value tute values are read out: No signal: 0x7FFC / 32764 mm... -
Page 36: Events
DNNF005. 9. Maintenance Instructions NOTE! • This wenglor sensor is maintenance-free. • Cleaning and inspection of the plug connections at regular intervals are advisable. • Do not clean the sensor with solvents or cleaning agents that could damage the product. -
Page 37: Proper Disposal
Update of technical data, see “Sensitivity” in chapter “7.1.1 Sensor Func- tions” on page 23 11.3 EU Declaration of Conformity The EU declaration of conformity can be found on our website at www.wenglor.com in the product’s separate download area. Long-Range Laser Distance Sensors...
Need help?
Do you have a question about the P1PY1 Series and is the answer not in the manual?
Questions and answers