Advertisement
Quick Links
Advertisement

Related Manuals for LINSY HOME LH518E2


Summary of Contents for LINSY HOME LH518E2
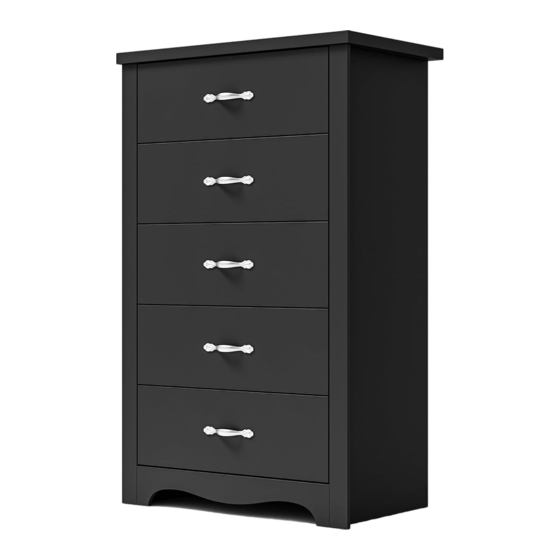
- Page 1 LH518E2 PRODUCT SPECIFICATION :26.7*15.7*42.7inch...
- Page 3 Safety And Care Advice Important – Please read these instructions fully before starting assembly. Please check if all the components and tools listed Please assemble the produ ct as close toits on pages 3 - 4 are re ceived. final position as possible. Please remove all fittings from the plastic bags and Do not place furniture directly in front of separate them into homologous groups .
-
Page 4: Parts List
Components Please check if all the pieces listed below are received. Parts list Number Description Specifications( ) Quantity Material Top panle 677*398*27 Melamine Faced Boards Side board(L) 1058*375*15 Melamine Faced Boards Melamine Faced Boards Side board(R) 1058*375*15 Back board 973*572*3 Melamine Faced Boards Side board(L) Trim 1058*48*12... - Page 5 Components Please check if all the pieces listed below are received. (diameter 15mm) White furniture Small Two-in-one Wood Tenon Two-in-one Screws *48pcs Two-in-one Cam *10pcs anchors *2pcs Screws *38pcs (diameter 6*30mm) *24pcs Self-tapping screws Black aluminum alloy Self-tapping screws Two-section ball rail *5pcs Back Plate Buckle *8pcs (M4*35mm) *20pcs handles *5pcs...
- Page 6 Assembly Instructions Please use the screws correctly, otherwise the product will be seriously damaged! Step 1 x 20 Step 2 x 20...
- Page 7 Assembly Instructions Please use the screws correctly, otherwise the product will be seriously damaged! Step 3 Step 4 x 20...
- Page 8 Assembly Instructions Please use the screws correctly, otherwise the product will be seriously damaged! Step 5 x 30 Step 6 x 10...
- Page 9 Assembly Instructions Please use the screws correctly, otherwise the product will be seriously damaged! Step 7 Step 8...
- Page 10 Assembly Instructions Please use the screws correctly, otherwise the product will be seriously damaged! Step 9 x 15 The bottom of the dresser. The Top of the dresser. Please pay attention to the orientation of drawer slides.
- Page 11 Assembly Instructions Please use the screws correctly, otherwise the product will be seriously damaged! Step 10 x 15 The Top of the dresser. The bottom of the dresser. Please pay attention to the orientation of drawer slides.
- Page 12 Assembly Instructions Please use the screws correctly, otherwise the product will be seriously damaged! Step 11 Step 12...
- Page 13 Assembly Instructions Please use the screws correctly, otherwise the product will be seriously damaged! Step 13 Step 14...
- Page 14 Assembly Instructions Please use the screws correctly, otherwise the product will be seriously damaged! Step 15 Step 16...
- Page 15 Assembly Instructions Please use the screws correctly, otherwise the product will be seriously damaged! Step 17 Step 18...
- Page 16 Assembly Instructions Please use the screws correctly, otherwise the product will be seriously damaged! Step 19 x 12 The other side is also installed in the same way. This step is complete.
- Page 17 Assembly Instructions Please use the screws correctly, otherwise the product will be seriously damaged! Step 20 Step 21...
- Page 18 Assembly Instructions Please use the screws correctly, otherwise the product will be seriously damaged! Step 22 Step 23...
- Page 19 Assembly Instructions Please use the screws correctly, otherwise the product will be seriously damaged! Step 24 Step 25...
- Page 20 Assembly Instructions Please use the screws correctly, otherwise the product will be seriously damaged! Note:There are no pinholes on the back panel, please install the back panel buckle with self-tapping screws in the position shown. Step 26 Step 27...
- Page 21 Assembly Instructions Please use the screws correctly, otherwise the product will be seriously damaged! Step 28 Enlarged view at C. The installation is complete.
Need help?
Do you have a question about the LH518E2 and is the answer not in the manual?
Questions and answers