Advertisement
Quick Links
Advertisement

Related Manuals for LINSY HOME LH022L4


Summary of Contents for LINSY HOME LH022L4
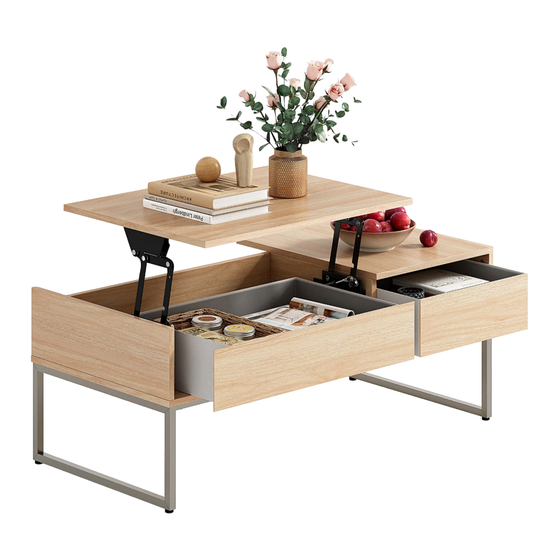
- Page 1 COFFEE TABLE - Width 41.3 inch LH022L4 - Depth 19.7 inch - Height 16.6 inch...
- Page 2 Safety and Care Advice Important – Please read these instructions fully before starting assembly. Please check if all the components and tools Please assemble the product as close to its listed on pages 3 - 4 are received. final position as possible. Please remove all fittings from the plastic bags Do not place furniture directly in front of and separate them into homologous groups.
- Page 3 Components Please check if all the pieces listed below are received. List Reference Description Specifications(mm) Quantity Material Side Panels 496*230*68 Iron Tube Connecting Pipe 1006*18*18 Iron Tube Bottom Wood Panel 1050*500*15 Wood Right Panel 498*160*15 Wood Left Panel 498*160*15 Wood Back Panel 1018*160*15 Wood...
- Page 4 Components Please check if all the pieces listed below are received. M6 Leveling M6*28 Bolts M5*12 Bolts M6*12 Bolts Adjusters M6*30 M4*12 Bolts Eccentric Locknuts M6*40 Screws Wooden Dowels Anti-collision Anti-collision M4 Allen Key Hydraulic Lifter Protective Angles Rubber Pad...
- Page 5 Assembly Instructions Please use the screws correctly, otherwise the product will be seriously damaged ! Step 1 x 18 pcs Step 2 x 4 pcs x 8 pcs x 1 pc...
- Page 6 Assembly Instructions Step 3 x 10 pcs x 1 pc Step 4 4 pcs x 6 pcs x 1 pc...
- Page 7 Assembly Instructions Step 5 x 8 pcs x 1 pc Step 6 x 2 pcs x 1 pc...
- Page 8 Assembly Instructions Step 7 x 4 pcs x 1 pc Step 8 x 8pcs x 1 pc x 4 pcs x 2 pcs...
- Page 9 Assembly Instructions Step 9 x 4 pcs x 1 pc x 4 pcs Step 10...
- Page 10 Assembly Instructions Step 11 Step 12...
Need help?
Do you have a question about the LH022L4 and is the answer not in the manual?
Questions and answers