
Related Manuals for Racing RACPVSS18V4IN1


Summary of Contents for Racing RACPVSS18V4IN1
- Page 1 ORIGINAL INSTRUCTIONS >EN INSTRUCTION MANUAL CORDLESS TOOL 18V 4 IN 1 RACPVSS18V4IN1 BUILDER SAS 32, rue Aristide Bergès -ZI 31270 Cugnaux –France MADE IN PRC IMPORTANT: Please read the instruction manual before using.
-
Page 2: General Power Tool Safety Warnings
ORIGINAL INSTRUCTIONS >EN 1. APPLICATION The cordless tool of 18 V 4 in 1 is intended for Screwing screws in and out and for drilling holes in wood, metal or plastic. Sawing wood, metal and plastics Dry sanding of wood, plastic, putty and painting surfaces or varnished. This product is not suitable for sanding plaster-based substrates. - Page 3 ORIGINAL INSTRUCTIONS >EN a) Power tool plugs must match the outlet. Never modify the plug in any way. Do not use any adapter plugs with earthed (grounded) power tools. Unmodified plugs and matching outlets will reduce risk of electric shock. b) Avoid body contact with earthed or grounded surfaces, such as pipes, radiators, ranges and refrigerators.
- Page 4 ORIGINAL INSTRUCTIONS >EN 4) Power tool use and care a) Do not force the power tool. Use the correct power tool for your application. The correct power tool will do the job better and safer at the rate for which it was designed. b) Do not use the power tool if the switch does not turn it on and off.
- Page 5 ORIGINAL INSTRUCTIONS >EN f) Do not expose a battery pack or tool to fire or excessive temperature. Exposure to fire or temperature above 130 °C may cause explosion. g) Follow all charging instructions and do not charge the battery pack or tool outside the temperature range specified in the instructions.
- Page 6 ORIGINAL INSTRUCTIONS >EN Fire hazard! Avoid short-circuiting the contacts of a detached battery. Do not incinerate the battery. Charger Use the charger provided with the tool only to charge the battery. Never attempt to charge non-rechargeable batteries. Have defective cords replaced immediately. ...
-
Page 7: Additional Safety Instructions
ORIGINAL INSTRUCTIONS >EN CAUTION: Do not recharge non-rechargeable batteries. ADDITIONAL SAFETY INSTRUCTIONS Warning! Sawing or sanding can result in the formation of hazardous dusts (e.g. arising from materials with paints containing lead, materials containing asbestos, metals or some wood types) which can present a hazard to the operator or persons in the vicinity. -
Page 8: Residual Risks
ORIGINAL INSTRUCTIONS >EN Only when the electric tool is turned on should the sawing blade be moved against the workpiece. There is a risk of kickback if the tool insert jams in the workpiece. Make sure that the footplate is securely placed against the workpiece during sawing. The ... - Page 9 ORIGINAL INSTRUCTIONS >EN construction and build, this electric tool may present the following hazards: a) Lung damage, if suitable respiratory protection is not worn; b) Cuts c) Ear damage if working without ear protection. d) Eye damage if suitable eye protection is not worn. e) Damage to your health caused by swinging your hands and arms when operating the appliance for longer periods of time or if the unit is not held or maintained properly.
-
Page 10: Your Product
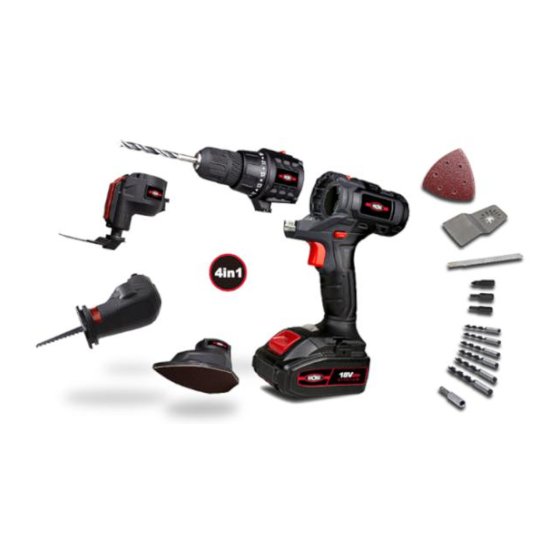
ORIGINAL INSTRUCTIONS >EN 3. YOUR PRODUCT 1 Keyless chuck 8 Handle 15 Lever for unlocking sawblade 2 Torque adjustment ring 9 Rechargeable battery Multi-tools attachment 3 Gear selection switch 10 Unlock button for battery 17 Stainless scraper 4 Drill attachment 11 On/off switch 18 Sanding plate 5 Unlocking lever for appliance... -
Page 11: Package Content List
ORIGINAL INSTRUCTIONS >EN 4. PACKAGE CONTENT LIST Remove all packaging materials. Remove remaining packaging and packing inserts (if included). Check that the package contents are complete. Check the appliance, the power cord, the power plug of charger and all accessories for transportation ... - Page 12 Sound pressure level (LpA) ..84.8 dB(A),K=3 dB(A) Sound power level (LWA) ... 95.8 dB(A),K=3 dB(A) Vibration (ah) ......4.229m/s , K=1.5 m/s Battery type Model: RACPVSS18V4IN1 20V d.c. 2Ah Lithium-ion Charger type Model: RACPVSS18V4IN1 Input 110-240V~ 50-60Hz,0.8A Output 21.6V d.c., 1500mA Charging time 1.5 hours...
-
Page 13: Operation
ORIGINAL INSTRUCTIONS >EN Wear hearing protection. 6. OPERATION 5.1 Charging the battery pack IMPORTANT: The battery pack is not fully charged at the factory. Before attempting to charge them, thoroughly read all of the safety instructions. 1) To assure that the charger you use are applicable to the battery pack. 2) Insert the charger into 110-240V~, 50/60Hz outlet. - Page 14 ORIGINAL INSTRUCTIONS >EN Battery capacity indicator There are battery capacity indicators on the battery pack; you can check the capacity status of the battery if you squeeze the button. Before using the machine, please press switch trigger to check if the battery is full enough for properly working.
- Page 15 ORIGINAL INSTRUCTIONS >EN WARNING! Stop appliance before changing gear to avoid the tool damage. 1). Wait for the appliance to come to a standstill. 2) Slide the gear selector (3) into the required position: L=> low speed H=>high speed Set the direction of rotation The appliance’s direction of rotation can be changed with the rotational direction switch.
- Page 16 ORIGINAL INSTRUCTIONS >EN Attaching/removing sanding sheet The sanding plate is fitted with Velcro for rapid attachment of the sanding sheet. Attaching sanding sheet 1). Press the sanding sheet evenly onto the sanding plate. Ensure that the holes in the sanding sheet are placed above the openings in the sanding plate.
- Page 17 ORIGINAL INSTRUCTIONS >EN 2). Turn the appliance on. By using the on/off switch (11) you can progressively control the stroke rate. Gentle pressure: low stroke rate. Greater pressure: higher stroke rate. The on/off switch cannot be locked. 3). Place the footplate (13) on the workpiece. 4).
- Page 18 ORIGINAL INSTRUCTIONS >EN Sawing • Use only undamaged sawblades in perfect condition. Only use metal sawblades for metalworking. • Ensure your stance is stable and hold the appliance tightly with both hands and away from your body. • Before sawing the workpiece, check for hidden foreign objects such as nails, screws. These must be removed.
-
Page 19: Battery Pack
ORIGINAL INSTRUCTIONS >EN 7. Cleaning/Maintenance Note: Repair and servicing work not described in this manual should always be carried by our Service Centre. Use only original parts. Switch off the device and remove the battery from the device before working with or transporting it. -
Page 20: Delaration Of Conformity
10. DELARATION OF CONFORMITY BUILDER SAS 32, rue Aristide Bergès - ZI 31270 Cugnaux - France, declares that, Product: CORDLESS TOOL 18V 4 IN 1 Trade mark: RACING Model: RACPVSS18V4IN1 Serial number: 20210123522-20210125021 Is in conformity with the essential requirements and other relevant provisions of the applicable European Directives, based on the application of European harmonized standards. -
Page 21: Warranty
11. WARRANTY WARRANTY The manufacturer guarantees the product against defects in material and workmanship for a period of 2 years from the date of the original purchase. The warranty only applies if the product is for household use. The warranty does not cover breakdowns due to normal wear and tear. The manufacturer agrees to replace parts identified as defective by the designated distributor. -
Page 22: Product Failure
12. PRODUCT FAILURE WHAT TO DO IF MY MACHINE BREAKS DOWN? If you bought your product in a store: a) Empty the fuel tank. b) Make sure that your machine is complete with all accessories supplied, and clean! If this is not the case, the repairer will refuse the machine. -
Page 23: Warranty Exclusions
13. WARRANTY EXCLUSIONS THE WARRANTY DOES NOT COVER: • Start-up and setting up of the product. • Damage resulting from normal wear and tear of the product. • Damage resulting from improper use of the product. • Damage resulting from assembly or start-up not in accordance with the user manual. •...
Need help?
Do you have a question about the RACPVSS18V4IN1 and is the answer not in the manual?
Questions and answers