Table of Contents
Advertisement
Available languages
Available languages
Quick Links
Classe Class
Clase
3
<120
mgkWh
IT
UK
FR
ES
AZIENDA CERTIFICATA UNI EN ISO 9001
UNI EN ISO 9001 CERTIFIED COMPANY
BRUCIATORE DI GASOLIO AD UNA FASE DI ACCENSIONE
FOCUS PRO 3 - FOCUS PRO 3R
FOCUS PRO 6 - FOCUS PRO 6R
MANUAL PARA LA INSTALACION Y EL MANTENIMENTO
SINGLE STAGE LIGHT OIL BURNER
BRULEURS A FIOUL DOMESTIQUE A UNE ALLURE
QUEMADOR DE GASÓLEO DE UNA ETAPA
MANUALE DI INSTALLAZIONE E MANUTENZIONE
INSTALLATION AND MAINTENANCE MANUAL
NOTICE D'INSTALLATION ET D'ENTRETIEN
Advertisement
Chapters
Table of Contents

Related Manuals for Lamborghini Caloreclima FOCUS PRO 3


Summary of Contents for Lamborghini Caloreclima FOCUS PRO 3
- Page 1 <120 BRULEURS A FIOUL DOMESTIQUE A UNE ALLURE mgkWh QUEMADOR DE GASÓLEO DE UNA ETAPA FOCUS PRO 3 - FOCUS PRO 3R FOCUS PRO 6 - FOCUS PRO 6R MANUALE DI INSTALLAZIONE E MANUTENZIONE INSTALLATION AND MAINTENANCE MANUAL NOTICE D’INSTALLATION ET D’ENTRETIEN...
- Page 3 ITALIANO ....................4 Leggere attentamente le istruzioni ed avvertenze contenute sul presente libretto in quanto forniscono importanti indicazioni riguardanti la sicurezza, l’installazione e la manutenzione. Conservare con cura questo libretto per ogni ulteriore consultazione. L’installazione deve essere effettuata da personale qualificato che sarà...
-
Page 4: Table Of Contents
La ringraziamo per la preferenza accordata ai nostri prodotti. LAMBORGHINI CALORECLIMA è impegnata nella ricerca di soluzioni tecniche innovative, capaci di soddisfare ogni esigenza. La presenza costante dei nostri prodotti sul mercato italiano e internazionale è garantita da una rete capillare di Agenti e Concessionari. Questi sono affiancati dai Servizi di Assistenza, che assicurano una qualificata assistenza e manu- tenzione dell’apparecchio. -
Page 5: Norme Generali
NORME GENERALI E AVVERTENZE Il presente libretto costituisce parte integrante ed essenziale del prodotto e dovrà essere con- segnato all’installatore. Leggere attentamente le avvertenze contenute nel presente libretto in quanto forniscono importanti indicazioni riguardanti la sicurezza d’installazione, d’uso e manutenzione. Conservare con cura questo libretto per ogni ulteriore consultazione. - Page 6 poi, misurando il valore di CO , una seconda volta, con la porta aperta. Il valore del CO misurato in entrambi i casi non deve cambiare in maniera significativa. In caso si trovassero più di un bruciatore e di un ventilatore nello stesso locale, questo test deve essere effettuato con tutti gli apparecchi funzionanti contemporaneamente.
- Page 7 Non stirare (forzare) mai i cavi di alimentazione e mantenerli distanti da fonti di calore. La lunghezza dei cavi utilizzati deve consentire l’apertura del bruciatore ed eventualmente della porta della caldaia. I collegamenti elettrici devono essere effettuati esclusivamente da personale qualificato e devono essere scrupolosamente rispettate le regolamentazioni vigenti in materia di elettricità.
-
Page 8: Dimensioni
45° 3/8"G Ø H Modello Ø F Ø G FOCUS PRO 3 FOCUS PRO 3R FOCUS PRO 6 FOCUS PRO 6R CURVE DI LAVORO Le curve rappresentate in diagramma sono state ottenute effettuando le prove di combustio- ne secondo le specifiche e le caratteristiche di focolare previste dalle norme vigenti. -
Page 9: Caratteristiche Tecniche
CARATTERISTICHE TECNICHE FOCUS PRO 14,5 14,5 26,2 26,2 Potenza termica 32,2 32,2 64,3 64,3 1,20 1,20 2,20 2,20 kg/h Portata 3,50 3,50 kg/h Preriscaldatore Funzionamento Tutto / niente Combustibile Gasolio Viscosità gasolio max a 20°C 1,5 °E - 6 CSt - 41 sec; R1 Alimentazione elettrica 230/50 o 60 monofase V/Hz... -
Page 10: Collegamenti Elettrici
- eventuale lampada di blocco e/o contaore ATTENZIONE: - non scambiare il neutro con la fase - eseguire un buon collegamento di terra FOCUS PRO 3 - FOCUS PRO 6 1 2 2 2 3 4 5 6 7 8 9 10 11 12 Legenda Contaore... - Page 11 FOCUS PRO 3R - FOCUS PRO 6R 1 2 2 2 3 4 5 6 7 8 9 10 11 12 Legenda Contaore Fusibile Filtro antidisturbo T2 T1 Fotoresistenza Interruttore generale Lampada di sicurezza Morsettiera apparecchiatura Motore bruciatore Presa bruciatore Preriscaldatore TC-TA Spina...
-
Page 12: Scelta Ugello
SCELTA UGELLO La scelta va fatta in relazione alla potenza del focolare della caldaia tenendo presente che il gasolio ha un potere calorifico (P.C.I.) di 10200 kcal/kg. La tabella indica la portata o consu- mo, in kg/h e in kW, di gasolio in funzione della grandezza dell’ugello, (in GPH) della pres- sione della pompa (in bar). -
Page 13: Installazione
INSTALLAZIONE PRIMA DELLA MESSA IN FUNZIONE DEL BRUCIATORE È BENE ASSICURARSI CHE: - Bruciatore ed apparecchiatura di comando siano collegate a terra. - L’ugello montato sul bruciatore sia di portata idonea alla caldaia. - Nel serbatoio ci sia olio combustibile e le saracinesche siano aperte. - Il fusibile di protezione circuito elettrico sia di giusto valore. - Page 14 La pompa è preregolata in fabbrica a 12 bar. Per il controllo della pressione servirsi di un ma- nometro a bagno d’olio. La pressione può essere regolata fra 11 e 14 bar per FOCUS PRO 3 - 6 e fra 7 e 14 bar per FOCUS PRO 3 R - 6R. ITALPUMP...
-
Page 15: Controllo Combustione
CONTROLLO COMBUSTIONE Al fine di ottenere i migliori rendimenti di combustione e, nel rispetto dell’ambiente, si racco- manda di effettuare,con gli adeguati strumenti, controllo e regolazione della combustione. Valori fondamentali da considerare sono: • Indica con quale eccesso d’aria si svolge la combustione; se si aumenta l’aria, il valore di CO % diminuisce, e se si diminuisce l’aria di combustione il CO % aumenta. -
Page 16: Manutenzione
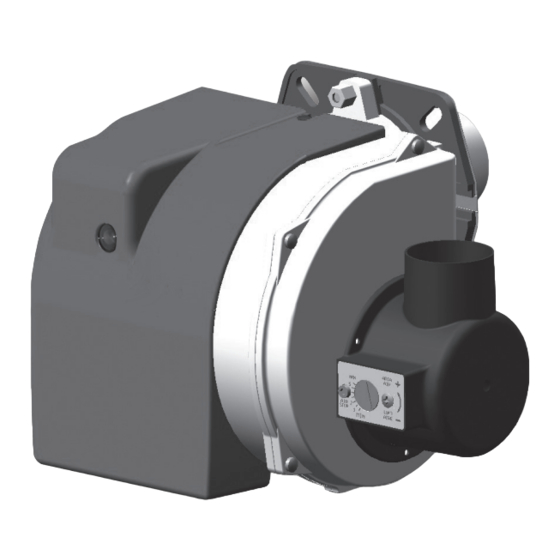
DIAGNOSI DELLE CAUSE DI MALFUNZIONAMENTO E BLOCCO APP. LMO Riepilogo anomalie di funzionamento Indicazione ottica Possibile cause Assenza del segnale di fiamma • Malfunzionamento valvole combustibile • Malfunzionamento rilevatore fiamma ¬¬ 2 lampeggi • Difettosità nella taratura del bruciatore, assenza di combustibile •... - Page 17 COME ACCEDERE AI COMPONENTI DEL BRUCIATORE Per accedere ai componenti principali è sufficiente svitare la vite 1 e togliere il cofano. Per accedere alla ventola svitare le 4 viti 2 del semicorpo aria del bruciatore. Togliendo il coperchio aspirazione aria 3, tramite le 3 viti 4, si accede al coperchio aria inter- no 5, al perno bandella 6 e alla bandella 7.
- Page 18 ELETTRODI - UGELLO Dopo avere rimosso il cofa- no, staccare i cavi elettrodi del trasformatore e rimuovere la fotoresistenza 1 il raccordo 2 che collega il tubino del gasolio alla linea 3 dell’ugello, allentare le viti 4 e estrarre il gruppo flangia ugello-deflettore-elettrodi.
-
Page 19: Ricerca Guasti
RICERCA GUASTI SINTOMI CAUSE PROBABILI RIMEDI 1. Controllare i fusibili Il motore non gira Mancanza di energia elettrica 2. Controllare i termostati am- biente, caldaia, sicurezza) 1. Non avviene la scarica agli 1. Verificare la corretta posizio- elettrodi ne delle punte e pulire Il motore gira ma non 2. - Page 20 Thank you for choosing our products. LAMBORGHINI CALORECLIMA is daily committed to seeking innovative technical solutions to satisfy every need. Constant presence of our products on the Italian and international markets is assured by a widespread network of Agents and Dealers assisted Technical Service who assures qualied service and maintenance of the boiler.
-
Page 21: General Standards
GENERAL STANDARDS This manual is an integral and essential part of the product and must be given to the installer. Read the warnings given in this manual as they supply important indications regarding instal- lation, use and maintenance safety. Keep this manual carefully for future reference. The burner must be installed in compliance with the Standards in force, according to the manufacturer’s instructions and by qualified staff Incorrect installation can cause injury/damage to persons, animals or objects, for which the manufacturer cannot be held responsible. - Page 22 all appliances functioning simultaneously. Never obstruct the air apertures of the burner room, the burner fan intake apertures and any air duct or ventilation grid and external dissipations, with the purpose of preventing: - the formation of toxic/explosive gas mixtures in the air of the burner room; - combustion with insufficient air, from which dangerous, costly and polluting functioning occurs.
-
Page 23: Dimensions
45° 3/8"G Ø H Model Ø F Ø G FOCUS PRO 3 FOCUS PRO 3R FOCUS PRO 6 FOCUS PRO 6R PRESSURE CURVES The curves shown in the diagram were obtained by performing combustion tests in accordan- ce with the specifications and characteristics of fire required by law... -
Page 24: Technical Specifications
TECHNICAL SPECIFICATIONS FOCUS PRO 14,5 14,5 26,2 26,2 Output 32,2 32,2 64,3 64,3 1,20 1,20 2,20 2,20 kg/h Flow 3,50 3,50 kg/h Preheater Functioning On / Off Fuel Light oil Max Viscosity at 20°C 1,5 °E - 6 CSt - 41 sec; R1 Electrical power supply 230/50 o 60 single-phase V/Hz... -
Page 25: Wiring
- Eventual blocking lamp and/or hour-meter ATTENTION: - Do not invert neutral with phase. - Ensure a good earth connection. FOCUS PRO 3 - FOCUS PRO 6 1 2 2 2 3 4 5 6 7 8 9 10 11 12 Hour-meter T2 T1... - Page 26 FOCUS PRO 3R - FOCUS PRO 6R 1 2 2 2 3 4 5 6 7 8 9 10 11 12 Hour-meter Fuse Anti-interference filter T2 T1 Photoresistance Main switch Safety lamp Control box Burner motor Burner connector Preheater TC-TA Plug TA-TC Boiler environment thermostat Ignition transformer...
-
Page 27: Nozzle Choice
NOZZLE CHOICE The choice depends on the capacity of the boiler chamber bearing in mind that Light Oil has a heating value (P.C.I.) of 10200 kcal/kg. The scheme shows the range or consumption, in kG/H and kW, of light Oil in relation to the nozzle size (in GPH) and to pump pressure (in bar). -
Page 28: Installation
INSTALLATION BEFORE STARTING THE BURNER ALWAYS CHECK THE FOLLOWING: - Burner and control unit have a proper earth connection. - The on-burner nozzle has a flow-rate suitable for the boiler. - That there is fuel in the tank and the gates are open. - The fuse on the electrical circuit is rated. - Page 29 The pump pressure is pre-set during production at 12 bar.For controlling pressure use an oil bathed manometer.The pressure can be adjusted from 11 to 14 bar for FOCUS PRO 3 - 6 and from 7 to 14 bar for FOCUS PRO 3R - 6R.
-
Page 30: Combustion Control
COMBUSTION CONTROL In order to obtain the best combustion performance and efficiency, and for respect of the envi-ronment, checksand adjustment of the combustion must be carried out, and with appro- priate tools.Basic values to be considered are: • indicates the amount of excess air during combustion; if air is increased, CO value-sdecrease, and if combustion air is decreased, CO % values increase. -
Page 31: Maintenance
DIAGNOSIS OF LMO EQUIPMENT FAULTS AND LOCK OUT Description of operating anomalies Visual indication Possible causes No flame signal • Faulty fuel valves ¬¬ 2 flashes • Faulty flame detector • Incorrect burner setting, no fuel • No ignition ¬¬¬ 3 flashes Not used ¬¬¬¬... - Page 32 HOW TO ACCESS THE BURNER COMPONENTS To access the main components, simply unscrew the screw 1 and remove the cover. To access the fan, unscrew the 4 screws 2 of the semi-body air burner. By removing the air intake cover 3, through the 3 screws 4, you can access the internal air cover 5, pin air flap 6 and air flap 7.
- Page 33 CHOKE ELECTRODES After removing the cover, detach the high-tension cables from the transformer side, remove the photo resistance 1, unscrew the connector 2 that hooks the fuel line to the choke 3, loosen the screws 4 and remove the flange- choke-deflectorelectrode assem- bly.
-
Page 34: Fault Finding
FAULT FINDING PROBLEM PROBABLE CAUSE SOLUTION 1. Check fuses Motor does not work No power supply 2. Check thermostats 1. Check correct position of 1. Electrodes are not discharged tipsand clean them Motor works but there 2. Nozzle is dented 2. - Page 35 Nous vous remercions pour avoir choisi nos produits. LAMBORGHINI CALORECLIMA s’active quotidiennement dans la recherche de solutions techniques innovantes et performantes. Les Agents et Concessionnaires de notre réseau assurent leur présence constante et la diusion de nos produits sur le marché italien et in- ternational.
-
Page 36: Normes Generales
NORMES GENERALES Ce livret est partie intégrante et essentielle du produit et il doit être remis à l’installateur. Lire attentivement les conseils contenus dans le présent livret car ils fournissent des indica- tions importantes sur la sécurité d’installation, l’utilisation et l’entretien. Bien conserver ce livret pour toute consultation ultérieure. - Page 37 Si vous sentez une odeur de gaz, il ne faut pas actionner les interrupteurs électrique ques. Ouvrir les portes et les fenêtres. Fermer les robinets du gaz. Faire appel à des person- nes qualifiées. La pièce du brûleur doit posséder des ouvertures sur l’extérieur, conformes aux normes loca- les en vigueur.
- Page 38 Si le câble électrique du brûleur est défectueux, le faire remplacer uniquement par un per- sonnel qualifié. Ne touchez jamais le brûleur lorsque des parties de votre corps sont mouillées ou si vous êtes déchaussés. Ne pas forcer les câbles électriques et ne pas les placer à proximité des sources de chaleur. La longueur des câbles utilisés doit permettre l’ouverture du brûleur et éventuellement de la porte de la chaudière.
-
Page 39: Dimensions
45° 3/8"G Ø H Modèle Ø F Ø G FOCUS PRO 3 FOCUS PRO 3R FOCUS PRO 6 FOCUS PRO 6R COURBES DE TRAVAIL Les courbes de travail représentées sur le diagramme ont été obtenues sur la base des essais de combustion selon les spécications et les caractéristiques des chambres de combu- stion prévues par les normes en vigueur. -
Page 40: Caracteristiques Tecniques
CARACTERISTIQUES TECNIQUES FOCUS PRO 14,5 14,5 26,2 26,2 Puissance thermique 32,2 32,2 64,3 64,3 1,20 1,20 2,20 2,20 kg/h Débit 3,50 3,50 kg/h Préchauf. Fonctionnement Tout / Rien Combustible Fioul domestique Viscosité max à 20°C 1,5 °E - 6 CSt - 41 sec; R1 Alimentation électrique 230/50 o 60 monophasé... -
Page 41: Connexions Electriques
ATTENTION: - ne pas èchanger le neutre avec la phase - réaliser un bon branchement de terre FOCUS PRO 3 - FOCUS PRO 6 1 2 2 2 3 4 5 6 7 8 9 10 11 12 Légende Compte-heures... - Page 42 FOCUS PRO 3R - FOCUS PRO 6R 1 2 2 2 3 4 5 6 7 8 9 10 11 12 Légende Compte-heures Fusible Filtre antiparasite T2 T1 Photorésistance Intérrupteur général Témoin de sécurité Bornier du coffret de sécurité Moteur bruleûr Prise bruleûr Préchauffeur TC-TA...
-
Page 43: Choix Du Gicleur
CHOIX DU GICLEUR Le choix doit être fait en fonction de la puissance du foyer de la chaudière, en tenant compte que le fioulà un pouvoir calorifique (P.C.I.) de 10200 kcal/kg et de la forme du foyer. Repor- tez vous a la notice de votre chaudiere pour connaitre le type de gicleur adapte. Le tableau suivant indique le débit ou la consommation de fioul, en kg/h et en kW, en fonction de la di- mension du gicleur (en GPH) et de la pression de la pompe (en bar). -
Page 44: Installation
INSTALLATION AVANT LA MISE EN SERVICE DU BRULEUR, IL FAUT BIEN S’ASSURER QUE: - Le brûleur et le coffret de sécurité soient raccordés à une installation de mise à terre. - Le débit du gicleur installé sur le brûleur soit approprié à la chaudière. - Le réservoir contienne du fioul et que les vannes soient ouvertes. - Page 45 La pompe est préréglée en usine à 12 bar.Pour contrôler la pression, il faut se servir d’un manomètre à bain d’huile. La pression peut être réglée entre 11 et 14 bar pour FOCUS PRO 3 - 6 et entre 7 et 14 bar pour FOCUS PRO 3 R - 6R. ITALPUMP DANFOSS Légende...
-
Page 46: Contrôle De La Combustion
CONTRÔLE DE LA COMBUSTION Aÿn d’obtenir de meilleurs rendements de combustion et, pour respecter également l’envi- ronnement, il estrecommandé d’effectuer le contrôle et le réglage de la combustion à l’aide d’instrument appropriés.Il faut considérer les valeurs fondamentales suivantes: • indique avec quel excès d’air s’effectue la combustion; si l’on augmente l’air, la va- leur de CO % diminue et, si on diminue l’air de combustion, le CO % augmente. -
Page 47: Entretien
DIAGNOSTIC DES CAUSES A L’ORIGINE D’UN DYSFONCTIONNEMENT OU D’UNE MISEEN SECURITE DE l’APPAREIL LMO Récapitulation des pannes de fonctionnement Indication optique Causes éventuelles Absence du signal de flamme • Dysfonctionnement des vannes du combustible • Dysfonctionnement du détecteur de présence ¬¬... - Page 48 COMMENT ACCÉDER AUX COMPOSANTS DU BRÛLEUR Pour accéder aux composants principaux, il suffit de dévisser la vis 1 et d’enlever le capot. Pour accéder au ventilateur, dévissez les 4 vis 2 du demi-corps d’air du brûleur. En enlevant le couvercle d’entrée d’air 3, à travers les 3 vis 4, on accède au couvercle d’air interne 5, le pivot clapet d’air 6 et la clapet d’air 7.
- Page 49 ÉLECTRODES– GICLEUR Après avoir enlevé le capot ôter les câbles de haute tension du côté transformateur, enlever la photorésistance 1, devisser le raccord 2 qui réunit le tuyau du fioul domestique à la ligne 3 du gicleur, desserrer les vis 4 et extraire le groupe bride –...
-
Page 50: Anomalies De Fonctionnement
ANOMALIES DE FONCTIONNEMENT INDEX CAUSES PROBABLES REMEDES 1. Contrôler les fusibles Le moteur ne fonction- Manque d’énergie électrique ne pas 2. Contrôler les thermostats 1. La décharge sur les électro- 1. Vérifier la position correcte desne se produit pas despointes et les nettoyer Le moteur fonctionne 2. - Page 51 Le damos las gracias por haber preferido uno de nuestros productos. LAMBORGHINI CALORECLIMA es una Empresa diariamente comprometida con la bú- squeda de soluciones técnicas innovadoras y capaces de satisfacer cualquier exigencia. La presencia constante de nuestros productos en el mercado italiano e internacional está...
-
Page 52: Normas Generales
NORMAS GENERALES El presente manual forma parte integral del producto y debe ser entregado al técnico que realiza la instalación. Lea atentamente las instrucciones descritas en este manual, en él se suministran informa- ción importante sobre la seguridad, la instalación, el uso y el mantenimiento. Manténgalo siempre en buen estado para futuras consultas. - Page 53 El local donde se instala el quemador debe contar con salidas hacia el exterior conforme a las normas vigentes. Si tiene dudas sobre la circulación del aire, le recomendamos medir el valor del CO tenien- do el quemador encendido y en su máxima capacidad con el local ventilado y únicamente con las aperturas destinadas a alimentar con aire el quemador;...
- Page 54 Si el cable de alimentación está dañado, solamente puede ser cambiado por personal cuali- ficado. Nunca toque el quemador con las partes del cuerpo que estén mojadas o sin colocarse zapatos No extender (forzar) los cables de alimentación y manténgalos lejos de las fuentes de calor. La longitud de los cables que se utilizan debe permitir la apertura del quemador y de la puer- ta de la caldera.
-
Page 55: Medidas
45° 3/8"G Ø H Tipo Ø F Ø G FOCUS PRO 3 FOCUS PRO 3R FOCUS PRO 6 FOCUS PRO 6R CURVAS DE TRABAJO Las curvas mostradas en el diagrama se han obtenido mediante la realización de las prue- bas de combustión de acuerdo con las especificaciones y características del hogar requeri- dos por las normas aplicables. -
Page 56: Características Técnicas
CARACTERÍSTICAS TÉCNICAS FOCUS PRO 14,5 14,5 26,2 26,2 Potencia térmica 32,2 32,2 64,3 64,3 1,20 1,20 2,20 2,20 kg/h Caudal 3,50 3,50 kg/h Precalentador Funcionamento Todo / Nada Combustible Gasóleo Viscosidad max a 20°C 1,5 °E - 6 CSt - 41 sec; R1 Alimentación eléctrica 230/50 o 60 monofásica V/Hz... -
Page 57: Conexiones Eléctricas
- eventual lámpara de bloqueo y/o cuentahoras ATENCION: - no intercambiar el neutro con la fase - efectuar un buen empalme de tierra FOCUS PRO 3 - FOCUS PRO 6 1 2 2 2 3 4 5 6 7 8 9 10 11 12 Descripción Cuentahoras... - Page 58 FOCUS PRO 3R - FOCUS PRO 6R 1 2 2 2 3 4 5 6 7 8 9 10 11 12 Descripción Cuentahoras Fusible Filtro antiinterferencia T2 T1 Fotorresistencia Interruptor general Lampara seguridad Regleta de borners programador Motor quemador Conector quemador Precalentador TC-TA Conector...
-
Page 59: Seleccion Inyector
SELECCION INYECTOR La elección debe ser efectuada en relación a la potencia del hogar de la caldera teniendo presente que el gasoleo tiene un poder calorífico (P.C.I.) de 10200 kcal/kg. La tabla indica la capacidad o consumo en kg/h y en kW de gasoleo en función de la medida del inyector (en GPH) y de la presión de la bomba (en bar). -
Page 60: Instalación
INSTALACIÓN ANTES DE PONER EN MARCHA EL QUEMADOR ES CONVENIENTE ASEGURARSE DE QUE: - El quemador y el programador estén conectados a tierra. - La boquilla montada en el quemador sea apropiada a la caldera. - El soporte de las boquillas (10) esté montado con la señal “O” hacia arriba. - En el depósito haya fuel y que las válvulas de compuerta estén abiertas. - Page 61 La bomba es preregulada en fabrica a 12 bar. Para el control de la presión servirse de un manómetro en bano de aceite. La presión puede ser regulada entre 11 o 14 bar para FO- CUS PRO 3 - 6 y entre 7 y 14 bar para FOCUS PRO 3 R - 6R. ITALPUMP...
-
Page 62: Control Combustion
CONTROL COMBUSTION Con el fin de obtener los mejores rendimientos de combustión y, en el respeto del ambiente, se recomienda de efectuar con los adecuados instrumentos, el control y la regulación de la combustión.Valores fondamentales a considerar son: • CO2 indica con cual exceso de aire se desarrolla la combustión; si se aumenta el aire, el valor deCO2 % disminuye, y si se disminuye el aire de combustión el CO2 % aumenta •... -
Page 63: Mantenimiento
DIAGNÓSTICO DE LAS CAUSAS DE MAL FUNCIONAMIENTO Y BLOQUEO DEL EQUIPO LMO Resumen de las anomalías de funcionamiento Indicación óptica Causa posible Falta la señal de llama • Mal funcionamiento válvulas de combustible • Mal funcionamiento detector de llama ¬¬ 2 destellos •... - Page 64 CÓMO ACCEDER A LOS COMPONENTES DEL QUEMADOR Para acceder a los componentes principales, simplemente desenrosque el tornillo 1 y retire la tapa. Para acceder al ventilador, desatornille los 4 tornillos 2 del medio cuerpo del aire del quemador. Al retirar la tapa de entrada de aire 3, a través de los 3 tornillos 4, puede acceder a la cubier- ta de aire interna 5, el piñon palomilla 6 y la palomilla dell’aire 7.
- Page 65 ELECTRODOS INYECTOR Una vez que se ha procedido a retirar el chasis, extraer los cables de alta tensión desde el lado del transformador, extraer la fotoresistencia 1, desajustar el empalme 2 que conecta el tubo del gasóleo a la línea 3 del inyector, desajustar los tornillos 4 y extraer el grupo brida-inyector- deflector-electrodos.
-
Page 66: Busqueda Fallos
BUSQUEDA FALLOS SINTOMAS PROBABLES CAUSAS SOLUCIONES 1. Controlar los fusibles El motor non gira Falta de energìa eléctrica 2. Controlar los termóstatos (am- biente, caldera, seguridad) 1. No hay descarga a los eléc- 1. Verificar la correcta posición- trodos de las puntas y limpiar 2. - Page 68 Le illustrazioni e i dati riportati sono indicativi e non impegnano. Lamborghini Caloreclima si riserva il diritto di apportare senza obbligo di preavviso tutte le modifiche che ritiene più opportune per l’evolu- zione del prodotto. The illustrations and data given are indicative and not binding. Lamborghini Caloreclima reserves the right to make all modifications it deems appropriate for improvement of the product without forewar- ning.
Need help?
Do you have a question about the FOCUS PRO 3 and is the answer not in the manual?
Questions and answers