Advertisement
Quick Links
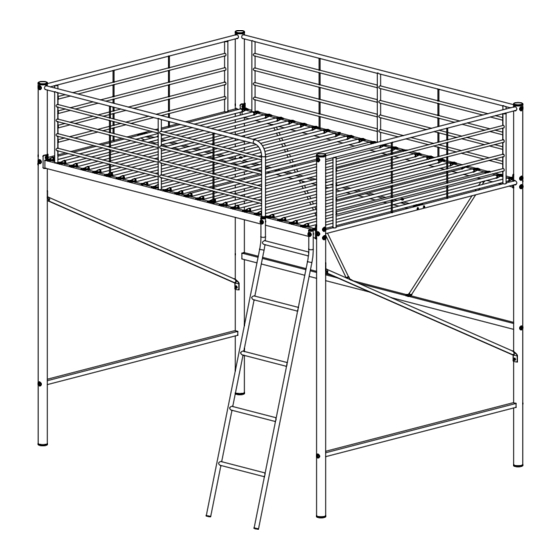
Double High Sleeper Bunk Bed
Assembly Instructions
Dimensions
Length - 200cm
Width - 142.5cm
Height - 185cm
Important
– Please read these instructions fully before starting assembly
If you need help or have damaged or missing parts, call the Customer Helpline: 08456 400800
– Please keep for future reference
633/7863
Issue 1 - 02/11/11
Advertisement

Related Manuals for Justwise 633/7863


Summary of Contents for Justwise 633/7863
- Page 1 Double High Sleeper Bunk Bed Assembly Instructions 633/7863 – Please keep for future reference Dimensions Length - 200cm Width - 142.5cm Height - 185cm Important – Please read these instructions fully before starting assembly If you need help or have damaged or missing parts, call the Customer Helpline: 08456 400800...
- Page 2 Safety and Care Advice Important – Please read these instructions fully before starting assembly • Check you have all the • Make sure you have enough • Place the product on flat and components and tools listed on space to layout the parts before steady surface during use.
-
Page 3: Components - Parts
Components - Parts If you have damaged or missing components, call the Customer Helpline: 08456 400800 Please check you have all the parts listed below Corner post x 2 (Ø4.5 x 184.7cm) Corner post x 2 (Ø4.5 x 184.7cm) Side support x 2 (Ø1.9 x 134.3cm) End panel x 2 Rear support x 2... - Page 4 Components - Fittings If you have damaged or missing components, call the Customer Helpline: 08456 400800 Please check you have all the fittings listed below Note: The quantities below are the correct amount to complete the assembly. In some cases more fittings may be supplied than are required.
- Page 5 Assembly Instructions Step 1 Assembling side frames Lay corner posts , end panel , side support and short lower stretcher flat on the floor as shown. Note: The holes in end Note: Hole at top panel must be at the top.
- Page 6 Assembly Instructions Step 2 Assembling rear guard and stretchers Two people are needed here. With help, stand both side frames upright. Assemble rear guard in between the side frames as shown. Note: Do not fully tighten any screws during the assembly.
- Page 7 Assembly Instructions Step 3 Assembling front guard and central support At this stage, choose if End to bend up! you want the ladder on the right hand side or left hand side. According to which side you want the ladder, assemble front guard in between the side frames as shown.
- Page 8 Assembly Instructions Step 4 Attaching ladder Assemble ladder front guard using fixings Note: fixings located inside the frame as shown.
- Page 9 Assembly Instructions Step 5 Assembling slats (with holes) Assemble slats in the locations shown, using screws Note: Screws used at each end. Screws secure into central support in the middle.
- Page 10 Assembly is complete. If you need help or have damaged or missing parts, call the Customer Helpline: 08456 400800 Justwise Group LTD., 6 The Shires, Shire Hill Industrial Estate, Saffron Walden Essex. CB11 3AP...
Need help?
Do you have a question about the 633/7863 and is the answer not in the manual?
Questions and answers