Advertisement
Introduction
This all new Air FRYER provides an easy and healthy way to prepare your favorite ingredients. By using hot rapid air circulation and a grill, it is able to make numerous dishes. The best part is that the Air FRYER heats food in all directions and most ingredients do not need any oil.
Overview

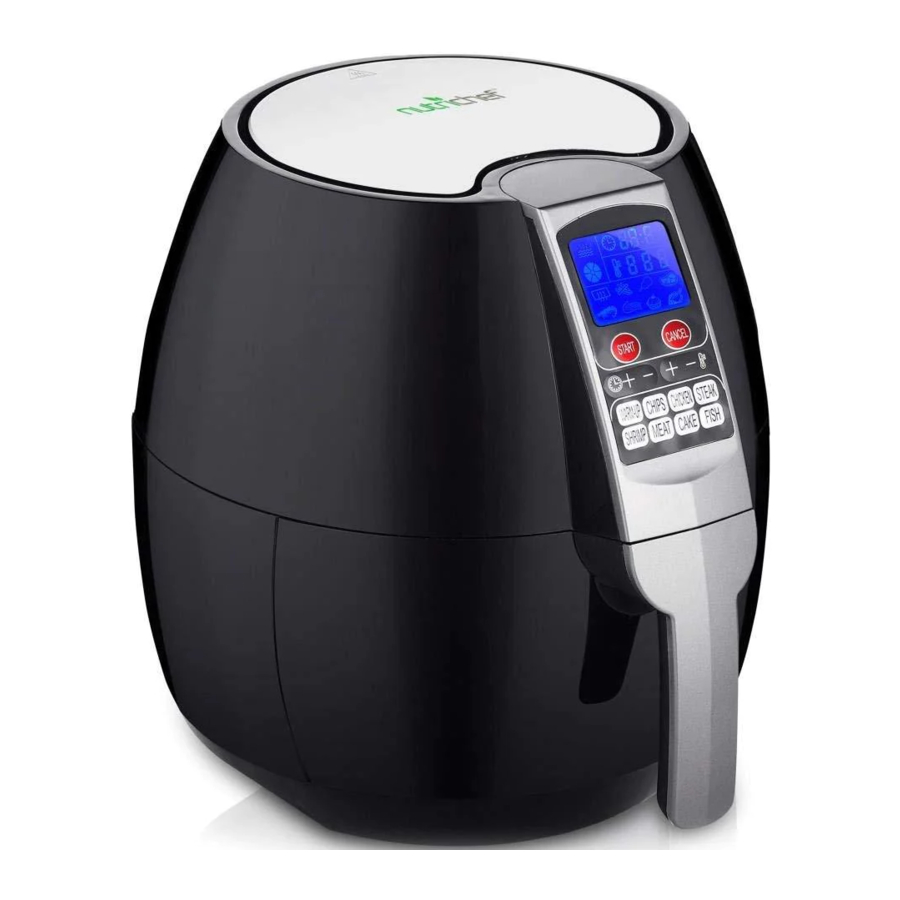
- Basket
- Pan
- Basket handle
- Basket release button
- Temperature control button 80 - 200
- Timer 0-30min.
- Power-on/Pause
- Cancel
- Air inlet
- Air outlet openings
- Power cable
- LCD (Liquid Crystal Display)
- Shortcut function button
NOTE: Please read this manual carefully before any using of the appliance as dangers may occur under incorrect operations. Keep it safe for future reference.
Danger/Warnings
- Do not immerse the housing in water or rinse under the tap. Doing so may damage the electrical and heating components.
![shock hazard]() Prevent any liquid from entering the appliance to prevent from electric shock or short-circuit.
Prevent any liquid from entering the appliance to prevent from electric shock or short-circuit.- Keep all ingredients in the basket to prevent any contact with heating elements.
- Do not cover the air inlet and the air outlet when the appliance is in use.
![]()
Filling the pan with oil may cause a fire hazard.- Do not touch the inside of the appliance while it is in use.
- Check if the voltage indicated on the appliance fits the wall outlet voltage.
- Do not use the appliance if there is any damage on plug, power cord or other parts.
- Do not go to any unauthorized person to replace or fix damaged power cord.
- Keep the appliance and its power cord out of the reach of children.
- Keep the power cord away from hot surfaces.
- Do not plug the appliance in, or operate the control panel with wet hands.
- Make sure that the appliance is plugged into a grounded wall outlet. Always make sure that the plug is inserted into the wall outlet properly.
- Do not connect appliance to an external timer switch.
- Do not place the appliance on or near flammable materials such as a tablecloth or curtains.
- Do not place the appliance against a wall or against other appliance. Leave at least 4 inches of free space on the back and sides as well as 4 inches of free space above the appliance.
- Do not place anything on top of the appliance.
- Do not use the appliance for any other purpose than described in this manual.
- Do not operate the appliance unattended.
![burn hazard]() During hot air frying, hot steam is released through the air outlet openings. Keep your hands and face at a safe distance from the steam and from the air outlet openings. Also be careful of hot steam and air when you remove the pan from the appliance. Any accessible surfaces may become hot during use.
During hot air frying, hot steam is released through the air outlet openings. Keep your hands and face at a safe distance from the steam and from the air outlet openings. Also be careful of hot steam and air when you remove the pan from the appliance. Any accessible surfaces may become hot during use.- Immediately unplug the appliance if you see dark smoke coming out of the appliance. Wait for the smoke emission to stop before removing the pan from the appliance.
- Ensure that appliance in placed on a horizontal, even and stable surface.
- This appliance is designed for household use only. It may not be suitable to be safely used in environments such as staff kitchens, farms, motels, and other non-residential environments.
NOTE: The guarantee is not valid if the appliance is used for professional or semi-professional purposes, or if is not otherwise used according to instructions. - For safety, give the appliance approximately 30 minutes to cool down before handling or cleaning.
 Prevent any liquid from entering the appliance to prevent from electric shock or short-circuit.
 During hot air frying, hot steam is released through the air outlet openings. Keep your hands and face at a safe distance from the steam and from the air outlet openings. Also be careful of hot steam and air when you remove the pan from the appliance. Any accessible surfaces may become hot during use.
Automatic switch-off
The appliance has a built-in timer, which will automatically shut down the appliance when the timer reaches zero. You can manually switch off the appliance by pressing the cancel button, which will automatically shut down the appliance in 20 seconds.
Electromagnetic fields EMF
The appliance complies with all standards regarding Electro-Magnetic fields (EMF).
Under proper handling there is no harm to the human body based on available scientific evidence.
Before first use
Remove all packaging materials and stickers or labels.
Clean the basket and pan with hot water, with some washing liquid and a non-abrasive sponge. These parts are safe to be cleaned in a dishwasher.
Wipe inside and outside of the appliance with a clean cloth. There is no need to fill the pan with oil and/ or frying fat as the appliance works on hot air.
Using the appliance
- Place the appliance on a stable, horizontal and even surface.
Do not place the appliance on non-heat-resistant surface. - Put the basket in the pan.
![]()
Do not fill the pan with oil or any other liquid. - Preheat the appliance for 3 minutes when it is cold. Press the WARM-UP button first, and then press the START button to have the appliance warm up gradually. After the warm-up, carefully pull the pan out of the air fryer.
![]()
![]()
The appliance will stop heating after the pan is pulled out, and the air blower will stop in 5 seconds. - Place the ingredients in the basket, and then place the basket into the appliance.
![]()
- Select proper function and temperature for the ingredients. See section 'settings' in this chapter to determine the right temperature.
NOTE: 7 functions are provided: CHIP, CHICKEN, STEAK, SHRIMP, MEAT, CAKE, and FISH. Press the function button to select the proper function according to the ingredients. If you need more flexible time setting and temperatures, adjustment can be made directly by pressing corresponding button. There are two buttons (TIME '+' & '-') in the control panel that can adjust the time setting in 1 minute increments (holding the button down advances time rapidly). There are two buttons (TEMP '+' &'—') in the control panel which can adjust temperature setting in 5 degree increments (holding the button down advances rapidly).
![]()
- The heating-up icon and blower icon will be blinking during the running of the applicant.
![]()
![]()
During the hot air frying process, the heating-up icon will blink and go out from time to time. This indicates that the heating element is switched on (temperature reaches the setting) and off (temperature drops below the setting) to maintain the set temperature. - To turn on the appliance, adjust the timer button to the required preparation time and the timer will begin to countdown.
- Oil from the ingredients will gather in the bottom of the pan.
- Some ingredients require shaking halfway during the preparation time (see section 'settings' in this chapter). To do this, pull the pan out of the appliance by the handle and shake it. Then slide the pan back into the air fryer.
![]()


Do not press the button on the handle during shaking

Tip: You can remove the basket from the pan in order to ONLY shake the basket if there's need to reduce the weight. To do this, pull the pan out of the appliance, place it on the heat-resistant holder and press the button on the handle.

- When you hear the timer ring 5 times, the set preparation time has elapsed. Pull the pan out of the appliance and place it on the heat-resistant holder.
Note: After the timer rings for 5 times, the air blower will stop in 20 seconds. - Check if the ingredients are ready.
NOTE: If the ingredients are not ready yet, simply slide the pan back into the appliance, adjust the temperature and time settings, then press the START button to run the appliance. - To remove ingredients, press the basket release button and lift the basket out of the pan.
![]()
NOTE: Do not turn the pan over as the oil collected on the bottom of the pan will leak onto the ingredients. - Empty the basket into a bowl or onto a plate.
![]()
TIP: To remove large or fragile ingredients, lift the ingredients out of the basket with a pair of tongs. - When a batch of ingredients is ready, the fryer is already ready to prepare another batch.


Settings
The table below will help you to select the basic settings for the ingredients.
Note: Keep in mind that these settings are indications. As ingredients differ in origin, size, shape and brand, we cannot guarantee the best setting for your ingredients. Because the Rapid Air technology reheats the air inside the appliance instantly, pulling the pan briefly out of the appliance during hot air frying barely disturbs the process.
Tips
- Small ingredients usually require a slightly shorter preparation time than larger ingredients.
- A larger amount of ingredients typically requires a slightly longer preparation time, and a smaller amount of ingredients will typically requires a slightly shorter preparation time.
- Shaking smaller ingredients halfway during the preparation time optimizes the end result and can help prevent uneven frying of ingredients.
- Add some oil to fresh potatoes and fry your ingredients for another few minutes for a crispy result.
- Do not prepare overly greasy ingredients such as sausages in the air fryer.
- Snacks that can be prepared in an oven can also be prepared in the air fryer.
- The optimal amount to prepare crispy fries is approximately 500 grams.
- Use pre-made dough to get snacks quickly and easily. Pre-made dough also requires a shorter preparation time than home-made dough.
- Place a baking tin or oven dish in the fryer basket if you want to bake a cake or quiche, or if you want to fry fragile or stuffed ingredients.
- You can also use the air fryer to heat ingredients. To do this, set the temperature to 150° for up to 10 minutes.
| FOOD | MIN-MAX AMOUNT (grams) | TIME (min) | TEMP (F) | SHAKE | EXTRA INFO |
| Thin Frozen Fries | 300 - 700 | 9 - 16 | 392° | YES | |
| Thick Frozen Fries | 300 - 700 | 11 - 20 | 392° | YES | |
| Home-made Fries | 300 - 800 | 16 - 10 | 392° | YES | + 1/2 tbsp of oil |
| Home-made Potato Wedges | 300 - 800 | 18 - 22 | 356° | YES | + 1/2 tbsp of oil |
| Home-made Potato Cubes | 300 - 750 | 12 - 18 | 356° | YES | + 1/2 tbsp of oil |
| Rosti | 250 | 15 - 18 | 356° | YES | |
| Potato Gratin | 500 | 15 - 18 | 392° | YES | |
| Steak | 100 - 500 | 8 - 12 | 356° | ||
| Pork Chops | 100 - 500 | 10 - 14 | 356° | ||
| Hamburger | 100 - 500 | 7 - 14 | 356° | ||
| Sausage Roll | 100 - 500 | 13 - 15 | 392° | ||
| Drumsticks | 100 - 500 | 18 - 22 | 356° | ||
| Chicken Breast | 100 - 500 | 10 - 15 | 356° | ||
| Spring Rolls | 100 - 400 | 8 - 10 | 392° | YES | Use "oven-ready" |
| Frozen Chicken Nuggets | 100 - 500 | 6 - 10 | 392° | YES | Use "oven-ready" |
| Frozen Fish Fingers | 100 - 400 | 6 - 10 | 392° | Use "oven-ready" | |
| Cheese Snacks | 100 - 400 | 8 - 10 | 356° | Use "oven-ready" | |
| Stuffed Vegetables | 100 - 400 | 10 | 320° | ||
| Cake | 300 | 20 - 25 | 320° | ||
| Quiche | 400 | 20 - 22 | 356° | ||
| Muffins | 300 | 15 - 18 | 392° | ||
| Sweet Snacks | 400 | 20 | 320° |
Making home-made fries
To make home-made fries, follow the steps below:
- Peel and slice the potatoes.
- Wash the potato sticks thoroughly and dry them with kitchen paper.
- Pour 1/2 tablespoon of olive oil in a bowl, put the sticks on top and mix until the sticks are coated with oil.
- Remove the sticks from the bowl with your fingers or a kitchen utensil so that excess oil stays behind in the bowl. Put the sticks in the basket.
- Fry the potato sticks according to the instructions in this chapter.
Cleaning
Clean the appliance after every use.
Note: Do not clean the pan, basket and the inside of the appliance by metal kitchen utensils or abrasive cleaning materials, as this may damage the non-stick coating of them.
- Remove the mains plug from the wall socket to allow the appliance to cool down.
Note: Removing the pan allows the fryer to cool down more quickly. - Wipe the outside of the appliance with a moist cloth.
- Clean the pan and basket with hot water, some washing-up liquid and a non-abrasive sponge. You can remove any remaining dirt by using degreasing liquid.
Note: The pan and basket are dishwasher-proof.
Tip: If dirt is stuck on the basket or the bottom of the pan, fill the pan with hot water and some dishwashing liquid, put the basket in the pan and let the pan and the basket soak for about 10 minutes. - Clean the inside of the appliance with hot water and a non-abrasive sponge.
- Clean the heating element with a cleaning brush to remove any food residue.
Storage
- Unplug the appliance and let it cool down thoroughly.
- Make sure all parts are clean and dry.
Environment

Do not throw away the appliance with normal household waste when it is exhausted. Hand it in at an official collection point for recycling. By doing this, you're contributing to environmental protection.
Troubleshooting
| PROBLEM | POSSIBLE CAUSE | SOLUTION |
| The Air Fryer does not work. | Appliance is not plugged in. | Insert the main power plug in a grounded wall outlet. |
| You did not set the timer. | Set the timer to a time in order to turn on the appliance. | |
| Ingredients are not done. | Too many ingredients in the basket. | Use smaller batches as they fry more evenly. |
| The temperature is set too low. | Set the temperature to the required temperature setting. (See "Settings") | |
| Ingredients are fried unevenly. | Certain types of food need to be shaken halfway through cook time. | Ingredients that lie on top of, or across each other (e.g. fries) need to be shaken. (See "Settings" ) |
| Fried snacks are not crispy. | You used a type of snack meant to be prepared in a traditional deep fryer | Use "oven-ready" snacks or lightly brush some oil onto the snacks for a crispier result |
| Unable to slide the pan into the appliance properly. | Too many ingredients in the basket. | Do not fill the basket beyond the MAX indication. |
| The basket is not placed in the pan correctly. | Push the basket down into the pan until you hear a click. | |
| White smoke comes out of the appliance. | You are preparing greasy ingredients. | When you fry greasy ingredients in the Air Fryer, a large amount of oil will leak into the pan. The oil produces white smoke and the pan may heat up more than usual. This does not affect the appliance or the end result. |
| The pan still contains grease residue from previous use. | White smoke is caused by grease heating up in the pan. Make sure you clean the pan properly after each use. | |
| Fresh fries are fried unevenly in the Air Fryer. | You did not use the right potato type. | Use fresh potatoes and make sure that they stay firm during frying. |
| You did not rinse the potato sticks properly before you fried them. | Rinse the potato sticks properly to remove starch from the outside of the sticks. | |
| Fresh fries are not crispy when they come out of the Air Fryer | The crispiness of the fries depends on the amount of oil and water in the fries. | Make sure the dry potato sticks properly before you add the oil. |
| Cut the potato sticks smaller for a crispier result. | ||
| Add slightly more oil for a crispier result. |

Do not dispose of electrical appliances as unsorted municipal waste, use separate collection facilities.

Documents / ResourcesDownload manual
Here you can download full pdf version of manual, it may contain additional safety instructions, warranty information, FCC rules, etc.
Advertisement


Need help?
Do you have a question about the PKAIRFR54 and is the answer not in the manual?
Questions and answers