Table of Contents
Advertisement
Quick Links
Advertisement
Table of Contents

Related Manuals for Robe Robin T2


Summary of Contents for Robe Robin T2
- Page 1 QR code for user manual Version 1.0...
-
Page 2: Table Of Contents
Table of contents 1. Safety instructions ......................3 2. Description of the Robin T2 LightMaster Rear ............5 2.1 Control elements of the FollowSpot controller ............6 3. Installation........................7 3.1 Installation of the Robin T2 on the tripod..............10 4. -
Page 3: Safety Instructions
Refer servicing to qualified service personnel. Operate the ROBIN T2 LightMaster Rear only after having familiarized with its functions. Do not permit oper- ation by persons not qualified for operating the ROBIN T2 LightMaster Rear. Most damages are the result of unprofessional operation! Please use the original packaging if the ROBIN T2 LightMaster Rear is to be transported. - Page 4 - Reorient or relocate the receiving antenna. - Increase the separation between the equipment and receiver. - Connect the equipment into an outlet on a circuit different from that to which the receiver is connected. - Consult the dealer or an experienced radio/TV technician for help.
-
Page 5: Description Of The Robin T2 Lightmaster Rear
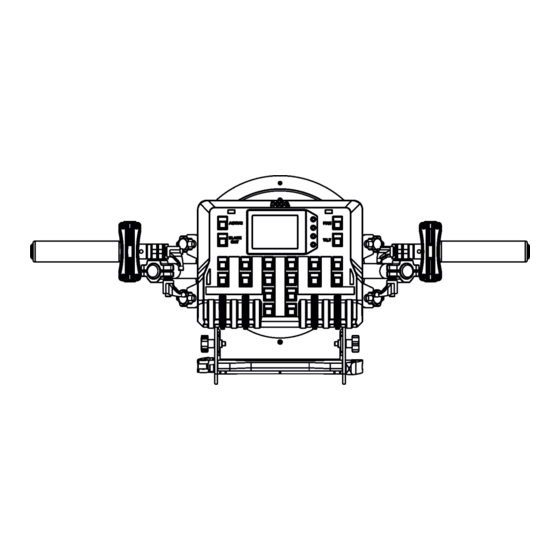
2. Description of the Robin T2 LightMaster Rear 1 - Front holder 2 - Front fastening screws 3 - supporting frame 4 - Handle 5 - FollowSpot controller 6 - USB (type A) 7 - Handle 8 - Rear fastening screws... -
Page 6: Control Elements Of The Followspot Controller
2.1 Control elements of the FollowSpot controller 1 - Active button (actives the FollowSpot Controller) 2 - BlackOut button 3 - Graphic touch screen 4 - Switch On screen button 5 - Pan button(switches pan and tilt motors from soft mode to hard mode 6 - Tilt button(switches pan and tilt motors from soft mode to... -
Page 7: Installation
Always secure adjusted position of the balance weight by means of two locks (9). 1. Switch the Robin T2 to the Hard option of the Follow Spot Mode (Personality-->Follow Spot Mode -->Hard). 2. Disconnect the fixture from mains and place it on a flat surface (e.g. table). Move the head to a horizontal... - Page 8 3. Unscrew the four locks (16) and remove the front holder (1) from the supporting frame (3). 4. Screw the front holder (1) on the head by means of six screws (2). 5. Insert the supporting frame (3) under the head and screw it on the head by means of the four rear screws (8) and by means of the four locks (16) to the front holder (1).
- Page 9 6. Attach the FollowSpot Controller (5) to the FollowSpot Controller base (14). During attaching, both spring locks (10) have to be in an unlocked position (pressed towards the Follow Spot Controller). 7. Connect the FollowSpot Controller base (14) with the fixture base (18) by means of the USB cable (17). 8.
-
Page 10: Installation Of The Robin T2 On The Tripod
Position of the pin(11) has to be secured by means of the lock (12). 3. The four quarter -turn locks (9) of the adaptor serve for fastening the Robin T2 with installed LightMaster on the tripod with adaptor. Two workers should install the Robin T2 fixture on the assebled tripod with the adaptor. -
Page 11: Operation
4. Operation After installing the ROBIN T2 LightMaster Rear on the fixture and connecting with the fixture via USB cable, connect the fixture to mains and leave it to perform resets (except pan/tilt reset). After finishing resets, the fixture is in the FollowSpot mode with pan/tilt motors in the Hard mode. - Page 12 To assign an effect to the Jog-wheels and faders 1.Touch desired effect. Buttons (8/10/16/18) which activate jog-wheels (23/24/25/26) and buttons (20/22), which matches faders (27/28) will start to flash. 2.Press desired button and selected effect will be assigned to its jog-wheel (fader). Assigned effect is displayed in a yellow colour, free effects stay in a white colour.
-
Page 13: Saving And Recalling Followspot Controller Presets
Functionality of the Robin T2 LightMaster can by restricted by means of commands on the channel Power/ Special Functions of the Robin T2 as follows: 225-229 DMX -LightMaster enabled 230-234 DMX - LightMaster disabled (except two faders on its handle bar and pan/tilt) - Page 14 3. Press and hold selected preset button until jog-wheels activating buttons stop to flash. Note: the FollowSpot controller presets are common for all user show and cannot be saved on the USB flash drive. If you use the FollowSpot Controller in the RoboSpot, the FollowSpot controller presets will be overwriten by presets from RoboSpot.
-
Page 15: Control Menu
5. Control menu The FollowSpot Controller is equipped with the QVGA Robe touch screen with battery backup which allows to set the device behaviour according to your needs. Icons used in the touch screen menu: - [back arrow] used to move back to the previous screen (or menu level). -
Page 16: Menu Functions Mapping
Green 0-255 Blue 0-255 Amber 0-255 L Green 0-255 0-255 Efw. pos 0-127 Efw. rot 0-255 0, 8-103 Robin T2 Profile RGW 1 0, 32-59 RGWr 1 0-255 Prism1 0-127 Pris1 r 0-255 Prism2 0-127 Pris1 2 0-255 FS rot... -
Page 17: Menu Show Library
5.2 Menu Show library The menu item offers 10 user shows. In the show is saved: Functions mapping of the FollowSpot Controller Sensitivity of jog-wheels Faders switching and inversion The show can be saved on a USB flash drive and load to the FollowSpot Controller if need. To select a show 1. - Page 18 To export a show 1. Disconnect the FollowSpot Controller from the FollowSpot Controller base and connect a USB flash drive to the USB port on the bottom side of the FollowSpot Controller. 2. Press and hold the On button until the graphic touch screen will light (the screen lights about 20 sec and after that will be switched off unless you touch any icon).
- Page 19 Wait until the message "Show Saved" appears on the screen. Touch the Cancel button. Default name of saved show file on the USB flash drive has the following sentence structure e.g. lightmaster-1-0031.cfg lightmaster-2-0031.cfg where the number 1 (2,3,...10) represents a number of show, the number 0031 represents last four numbers of RDM UID of the FollowSpot Controller.
-
Page 20: Menu All Lamps On/Off
5.3 Menu All Lamps On/Off The menu item allows to switch on/off lamp in the Robin BMFL FollowSpot. 5.4 Menu Product IDs Select this menu item to read a MAC Address , RDM UID, and RDM Label. 5.5 Menu Software Version Select this item to read the software version of the fixture modules: Display System - a display processor Module C - a control panel processor... -
Page 21: Software Update
255.0.0.0 . During the update, the FollowSpot Controller has to be attached to FollowSpot Controller base and this base has to be connected to the Robin T2 by means of the USB cable. The Robin T2 fixture has to be connected to mains. -
Page 22: Technical Specifications
Weight: 8.3 kg Dimensions (mm) Included items 1 x Robin T2 LightMaster Rear 1 x BMFL Base adaptor for FollowSpot (P/N 10980365) 1 x Tripod for RoboSpot, FollowSpot, LightMaster (P/N 10980350) 1 x USB cable A-B, 1.8m length (P/N13050756) 1 x User manual... -
Page 23: Cleaning And Maintenance
To preserve the environment please dispose or recycle this product at the end of its life according to the local regulations and codes. June 14, 2023 Copyright © 2023 Robe Lighting - All rights reserved Specifications are subject to change without notice. Made in CZECH REPUBLIC by ROBE LIGHTING s.r.o. Palackeho 416/20 CZ 75701 Valasske Mezirici...
Need help?
Do you have a question about the Robin T2 and is the answer not in the manual?
Questions and answers