Table of Contents
Advertisement
Quick Links
Advertisement
Table of Contents

Related Manuals for Robe Robin T11 Profile


Summary of Contents for Robe Robin T11 Profile
- Page 1 Version 1.6...
-
Page 2: Table Of Contents
Robin T11 Profile Robin T11 Profile EP Table of contents 1. Safety instructions ......................3 2. Operating determination ....................4 3. Fixture exterior view and control elements ..............5 4. Installation........................6 4.1 Connection to the mains .................... 6 4.2 Replacing gobos ....................... 7 4.3 Replacing frost ...................... -
Page 3: Safety Instructions
BEFORE YOU INITIAL START - UP! 1. Safety instructions Please use only an original ROBE packaging (paper box, loader case or foam shell) for transporting the device, otherwise potential damage of the device during its transport will not subject to warranty. -
Page 4: Operating Determination
Do not view the light output with optical instruments or any device that may concentrate the beam. The light source contains blue LEDs. CAUTION! Risk group 2, RG-2 2. Operating determination This device is a moving head for creating decorative effects and was designed for indoor use only. This device is for professional use only. -
Page 5: Fixture Exterior View And Control Elements
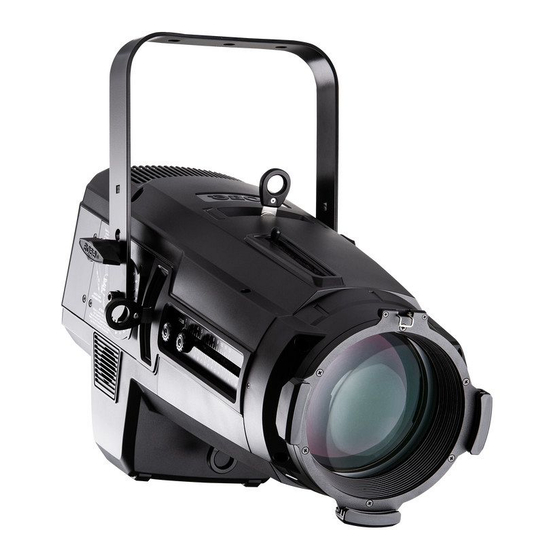
3. Fixture exterior view and control elements 1 - Tilt locks 2 - Framing shutters 3 - Static gobo holder 4 - Frost 5 - Gel frame adaptor 6 - Front lens 7 - Focus 8 - Zoom Rear side of the fixture 1 - Display with four control buttons 2 - control knobs 3 - Ethernet (standard version) -
Page 6: Installation
4.1 Connection to the mains For protection from electric shock, the fixture must be earthed! The Robin T11 Profile is equipped with auto-switching power supply that automatically adjusts to any 50-60Hz AC power source from 100-240 Volts. -
Page 7: Replacing Gobos
5. Remove the original gobo (2) and insert the new one (glossy side towards the light source). The Robe gobo has a small position point (8) at its edge which has to aim at the position point (4) on the gobo holder (4). Insert the spring lock to secure correct gobo position in the gobo holder. -
Page 8: Replacing Frost
4.3 Replacing frost Unplug the fixture from mains before replacing frost! 1. Disconnect the fixture from mains and allow it to cool. 2. Remove the top cover (1) by loosening the four quarter-turn locks on it to get access to the frost module (1). 3. -
Page 9: Drop-In Gobo And Iris Module Installation
4.4 Drop-in gobo and iris module installation Unplug the fixture from mains before installing drop-in gobo and iris module! 1. Disconnect the fixture from mains and allow it to cool. 2. Slide the static gobo holder (1) up and remove the top cover (2) by loosening the four quarter-turn locks on it. 3. -
Page 10: Drop-In Manual Iris Installation
6. Connect cable from gobo and iris module to the to the Robin T11. Cable from Drop-in gobo and iris module 7. Put the top cover (2) back on the Robin T11, fasten securing wire and secure the cover by means of the four quarter-turn locks. - Page 11 4. Insert the manual iris module (5) to the Robin T11. 5. Secure the manual iris module (5) in the Robin T11 by means of two screws (6). 6. Put the top cover (2) back on the Robin T11, fasten securing wire and secure the cover by means of the four quarter-turn locks.
-
Page 12: Rigging The Fixture
4.6 Rigging the fixture A structure intended for installation of the fixture(s) must safely hold weight of the fixture(s) placed on it. The structure has to be certificated to the purpose. The fixture (fixtures) must be installed in accordance with national and local electrical and construction codes and regulations. - Page 13 Truss installation 1. Bolt clamp (1) to the yoke (2) with M12 bolt and lock nut through the hole in the yoke. 3. Clamp the fixture on a truss (3) and tighten the rigging clamp (1). 4. Pull one safety wire (4) around the truss (2) and lock it. Lock the second end of the safety wire the attachment point (4) as shown on the picture below.
-
Page 14: Dmx-512 Connection
4.7 DMX-512 connection The fixture is equipped with 5-pin XLR sockets for DMX input and output.The sockets are wired in parallel. Only use a shielded twisted-pair cable designed for RS-485 and 5-pin XLR-plugs and connectors in order to connect the controller with the fixture or one fixture with another. DMX output DMX input XLR mounting socket (rear view):... -
Page 15: Ethernet Connection
The Universe is a single DMX 512 frame of 512 channels. The Robin T11 Profile is equipped with 8-pin RJ- 45 socket for Ethernet input.Use a network cable category 5 (with four “twisted” wire pairs) and standard RJ-45 plugs in order to connect the fixture to the network. - Page 16 Ethernet / DMX operation Option “ Artnet" (gMaI or gMA2 or sACN) has to be selected from “Ethernet Mode” menu at first fixture. Option “Ethernet To DMX” has to be selected from the “Ethernet Mode” menu at the first fixture (connected to the Ethernet) in the fixture chain, next fixtures have standard DMX setting.
-
Page 17: Wireless Dmx Operation
4.9 Wireless DMX operation The external ROBE Wireless CRMX Dongle allows receiving wireless DMX. This device is equipped with the Lumen Radio CRMX module and antenna for receiving DMX signal. CRMX module operates on the 2.4 GHz band. ROBE Wireless CRMX Dongle... -
Page 18: Remotely Controllable Functions
5. Remotely controllable functions 5.1 Colour influencing functions Factory setting of menu functions (channels) which influence behaviour of colour channels is the following: Function Factory setting Function Factory setting DMX mode Uniformity Colour calibration mode Colour mix control 0 DMX Colour mixing mode 110 DMX (5600K) Dimmer curve... - Page 19 Colour Mix control (DMX channel "Colour Mix control") The Colour Mix control channel defines relation between colour channels (Cyan, Magenta, Yellow, Red, Green, Blue, Amber, Lime and CCT ) and the colours on the virtual colour wheel: DMX value Function 0 - 9 Virtual colour wheel has priority over colour channels (default setting) 10-19...
- Page 20 Green correction (DMX channel "Green correction ") The channel allows you a fine correction of colours (whites, mixed colours, colours on the Virtual colour wheel). E.g. white colour from red to green tint. Virtual colour wheel (DMX channel " Virtual colour wheel") The virtual colour contains 67 preset colours and 10 user colours.
-
Page 21: Effect Functions
5.2 Effect functions Static gobo One static gobo can be manually inserted into light beam. Frost Manual 1° frost filter provides variable frost. The frost filter is replaceable. Zoom Manual zoom in range of 4.8 °- 51°. Focus Manual focus allows to focus beam from approx. 2 meters to infinity. Framing system Manual framing system consists of four framing shutters which allow you to control each shutter blade posi- tion and angle. -
Page 22: Control Menu Map
6. Control menu map Default settings=Bold print Level 1 Level 2 Level 3 Level 4 Level 5 Level 6 Level 7 DMXA Set DMXA 001-512 DMX Pres. Mode 1 Mode 8 IP Addr Def addr Set Address Cus addr IP 1 0-255 IP 2 0-255... - Page 23 Level 1 Level 2 Level 3 Level 4 Level 5 Level 6 Level 7 Pers DMX Pres Mode 1 Mode 8 DMX In Wired Ethernet Ethernet Eth Mode ArtNet sACN gMA I gMA II ArtNet 0-255 sACN 1-63999 MANet 1-256 1-32 IGMP r 1-10s...
- Page 24 Level 1 Level 2 Level 3 Level 4 Level 5 Level 6 Level 7 Manual Powr 0-255 Dimm F 0-255 Test Prg St Alone Music T On, Off Auto Run Test Prog 1 Prog 2 Prog 3 Pr Play Test Prg Prog 1 Prog 2 Prog 3...
-
Page 25: Control Menu
7. Control menu The Robin T11 Profile is equipped with the two-row LCD display & 4 control buttons which allow you to set fixture´s behaviour according to your needs, obtain information on its operation, control all range of effects and program it in the stand-alone mode. - Page 26 Note: the item FAN allows you to switch fans to the auto mode (AUTO) or manually set a desired level of fans noise from 1 (minimum) to 255 (maximum). To set values in both pages ( Page 1, Page 2) to the default (factory) values, press and hold any two knobs simultaneously for two seconds.
-
Page 27: Standard Mode
7.2 Standard mode The following menu items are accessible in the standard mode only. 7.2.1 DMXA (Addressing) Set DMXA - Use this menu item to set the DMX start address of the fixture, which is defined as the first channel from which the ROBIN T11 will respond to the controller. -
Page 28: Pers(Personality)
was last reset. In order to reset this counter to 0, press and hold both [NEXT] and [PREV] buttons and the [Enter] button at the same time. LB2 Tmp. - The menu shows temperature on the LEDs control PCB (RB 3406-bottom side) in the fixture. - Page 29 IGMP - Use the menu item to set time for connecting to multitask address (1-10sec.) for IGMP protocol. Display - Display adjusting. This menu allows you to adjust the display behaviour. Turn - This function turns the display by 180°. On/Off T - This function allows you to keep the display permanent on or turn it off two minutes after last pressing any button on the control panel.
-
Page 30: Manual Control (Manual)
Reset WPas. - Rest Web password. The menu item allows you to reset a password for access on the Web server (default password: 2479, user: robe). Defaults - The menu item allows to set all fixture parameters to the default (factory) values. -
Page 31: Reset
Powr power/special functions L Fre a LEd frequency selection L Fr S a LEd frequency fine adjusting Col F colour functions CRI S a CRI selection Virt C a virtual colour wheel a red colour coarse Red F a red colour fine Green a green colour coarse Green F... - Page 32 If you use the Robe Universal Interface, connect a USB port of your computer with the Robe Universal Interface by means of the USB cable and DMX input of the fixture with the DMX output of the Robe Universal Interface via a DMX cable.
- Page 33 6. Select correct "COM " number if you use a Flash cable RS232/DMX or select "Robe Universal Interface " if you use the Robe Universal Interface/Robe Universal Interface WTX and then click on the "Connect" button. 7. If the connection is OK, click the “Start Uploading" button to start software uploading. It will take several minutes to perform software update.
-
Page 34: Rdm
DMX512, the RDM protocol allows a console or dedicated RDM controller to send commands to and receive messages from specific moving lights. RDM allows explicit commands to be sent to a device and responses to be received from it. The list of commands for Robin T11 Profile is the following. Parameter ID Discovery command SET command... -
Page 35: Technical Specifications
9. Technical Specifications Electrical Power supply: electronic auto-ranging Input voltage range: 100-240V, 50-60Hz Fuse: T 6.3 A Max. power consumption: 420W (power factor 0.98) Mains input: CE - max. 16A ETL - max. 10A Mains output: CE - max. 15A ETL - max. - Page 36 Motorized rotating gobos (optional) 2 replaceable gobos can be indexed and rotated in both directions at different speeds Gobos: outside diameter= 26.8 mm, image diameter=22.5 mm, thickness=1.1-3.5 mm, high +0,1 temperature borofloat or better glass. Do not use steel gobos 0.15mm "Slot&lock"...
- Page 37 Connection DMX data IN/OUT: 2x Locking 5-pin XLR AC power IN/OUT:2x Neutrik PowerCon TRUE 1 Ethernet: 1x RJ45 Ethernet IN/OUT (EP version only): 2 x RJ 45 Rigging Via mounting bracket (97° tilt range) Temperatures Maximum/Minimum ambient operating temperature : +45°C/-5°C Maximum housing temperature : 70°...
- Page 38 1x Robin T11 Profile 1x user manual Robin T11 Profile with Drop-in gobo and iris module T11: 1x Robin T11 Profile with Drop-in gobo and iris module T11 (P/N 10980655) 1x Gobo Holder R size for Robin T11 (P/N 10980655) 1x user manual...
-
Page 39: Maintenance And Cleaning
10. Maintenance and cleaning It is absolutely essential that the fixture is kept clean and that dust, dirt and smoke-fluid residues must not build up on or within the fixture. Otherwise, the fixture‘s light-output will be significantly reduced. Regular cleaning will not only ensure the maximum light-output, but will also allow the fixture to function reliably throughout its life. -
Page 40: Appendix
12. Appendix 12.1Changing the LED light source The Robin T11 allows you to change the LED light source and this way keep a high performance of the fixture. To change the LED light source. 1. Disconnect the fixture from mains and allow it to cool about 30 minutes. 2. - Page 41 5. Unscrew the four socket head screws M4x16 (3) with plain washers (use Allen key 3) and carefully slide the LED source module (4) out from the fixture. Be careful, do not to damage connectors on LEDs PCB! 6. Disconnect the cable (5) from black connector on the left side of the fixture. 7.
- Page 42 9. Connect two cables (6) to the black and white connectors on the right side of the new LED module. Connect one cable (5) to the black connector on the left side of the new LED module. 10.Insert the new LED source module (4) to the fixture and screw it by means of four screws M4x16 (3) to the fixture.
- Page 43 12. Check the rear cover does not cut wires under the cover. Right side of the fixture Left side of the fixture Right side of the fixture Left side of the fixture Left side of the fixture 13. Screw the rear cover (2) back to the fixture by means of the two screws M4x12 on each side of the fixture. 14.
-
Page 44: Obtaining Information About The Led Light Source By Mobile Phone
12.2. Obtaining information about the LED light source by mobile phone You can read information about the LED light source by means of the mobile application ROBE COM. The LED light source has to be outside of the fixture. Download and install the application ROBE COM from Google Play (for Android 5.0 and higher) or App Store (for iOS 12.0 and higher) to your mobile phone. - Page 45 If NFC connection is OK, the following screens will appear. When the following screen will appear, touch the button CANCEL. Touch the found LED module ("Robin T11 LED module") and than touch "LED engine" to read information about found LED module. Robin T11 LED Robin T11 LED module...
- Page 46 DMX protocol Robin T11 - DMX protocol Version: 1.4 (8 modes) Short desciption of modes Mode Description 16-bit CMY/RGB, 18 channels 8-bit CMY/RGB, 9 channels 16-bit RGBAL, 22 channels White light+dimmer , 6 channels Only Dimmer , 1 channel 16-bit CMY/RGB + gobos+iris (for optional drop-in module), 24 channels 8-bit CMY/RGB +gobos+iris (for optional drop-in module), 13 channels 16-bit RGBAL + gobos+iris (for optional drop-in module), 28 channels Quick overview of default DMX values for each channel...
- Page 47 DMX protocol Mode/channel Type of Function Value control Power/Special functions Factory display menu setting: DMX Input-Wired ,Graphic display- On, Blackout while gobo wheel moving-Off, Fans mode-Auto, Dimmer Curve: Square law 0 -19 Reserved (0=default) To activate following functions, stop in DMX value for at least 3 s and shutter must be closed at least 3 sec.
- Page 48 DMX protocol Mode/channel Type of Function Value control LED frequency fine adjusting Factory display menu setting: 600Hz Select desired PWM output frequency of LEDs on the channel above. Selected LED Frequency step LED Frequency (step -126) step LED Frequency (step -125) step LED Frequency (step -124) step...
- Page 49 DMX protocol Mode/channel Type of Function Value control 0-255 CRI selection from Standard (80) to High (90+) (0=default) proportional Virtual colour wheel No function (0=default) step Filter 4 (Medium Bastard Amber) step Filter 10 (Medium Yellow) step Filter 19 (Fire) step Filter 26 (Bright Red) step...
- Page 50 DMX protocol Mode/channel Type of Function Value control Filter 170 (Deep Lavender) 91-92 step 93-94 Filter 172 (Lagoon Blue) step Filter 179 (Chrome Orange) 95-96 step Filter 180 (Dark Lavender) 97-98 step 99-100 Filter 181 (Congo Blue) step 101-102 Filter 197 (Alice Blue) step 103-104 Filter 201 (Full C.T.
- Page 51 DMX protocol Mode/channel Type of Function Value control Yellow/Blue (16 bit) Colour saturation control - fine (0=default for CMY mode, 0 - 255 proportional 255=default for RGB mode) Red (8 bit) 0 - 255 Colour saturation control - coarse 0-100% (255=default) proportional Red (16bit) 0 - 255...
- Page 52 0 - 255 Dimmer intensity from 0% to 100% (0=default) proportional Dimmer intensity - fine 0 - 255 Fine dimming (0=default) proportional Copyright © 2021 Robe Lighting s.r.o. - All rights reserved All Specifications subject to change without notice Page 7...
- Page 53 DMX protocol Robin T11 - DMX protocol Version: 1.4 Quick overview of default DMX values for each channel Mode/channel Default Function DMX Value Power/Special functions LED frequency selection LED frequency fine adjusting Colour functions CRI selection Virtual colour wheel 0/255 Cyan/Red (8 bit) (0=default for CMY mode, 255=default for RGB mode) 0/255 Cyan/Red (16 bit) (0=default for CMY mode, 255=default for RGB mode)
- Page 54 DMX protocol Mode/channel Type of Function Value control Power/Special functions Factory display menu setting: DMX Input-Wired ,Graphic display- On, Blackout while gobo wheel moving-Off, Fans mode-Auto, Dimmer Curve: Square law 0 -19 Reserved (0=default) To activate following functions, stop in DMX value for at least 3 s and shutter must be closed at least 3 sec.
- Page 55 DMX protocol Mode/channel Type of Function Value control LED frequency fine adjusting Factory display menu setting: 600Hz Select desired PWM output frequency of LEDs on the channel above. Selected LED Frequency step LED Frequency (step -126) step LED Frequency (step -125) step LED Frequency (step -124) step...
- Page 56 DMX protocol Mode/channel Type of Function Value control 0-255 CRI selection from Standard (80) to High (90+) (0=default) proportional Virtual colour wheel No function (0=default) step Filter 4 (Medium Bastard Amber) step Filter 10 (Medium Yellow) step Filter 19 (Fire) step Filter 26 (Bright Red) step...
- Page 57 DMX protocol Mode/channel Type of Function Value control Filter 170 (Deep Lavender) 91-92 step 93-94 Filter 172 (Lagoon Blue) step 95-96 Filter 179 (Chrome Orange) step 97-98 Filter 180 (Dark Lavender) step Filter 181 (Congo Blue) 99-100 step 101-102 Filter 197 (Alice Blue) step 103-104 Filter 201 (Full C.T.
- Page 58 DMX protocol Mode/channel Type of Function Value control Yellow/Blue (16 bit) Colour saturation control - fine (0=default for CMY mode, 0 - 255 proportional 255=default for RGB mode) Red (8 bit) 0 - 255 Colour saturation control - coarse 0-100% (255=default) proportional Red (16bit) 0 - 255...
- Page 59 DMX protocol Mode/channel Type of Function Value control 40-49 Addition mode ("Virtual" + "Colour mix") step 50-59 Subtraction mode ("Virtual" – "Colour mix") step 60-69 Inverted Subtraction mode ("Colour mix"-"Virtual") step 70-79 White Point Off (CCT+Green Cor.+Virtual Colour Wheel deactivated) step 80-128 Reserved...
- Page 60 0 - 255 Dimmer intensity from 0% to 100% (0=default) proportional Dimmer intensity - fine 0 - 255 Fine dimming (0=default) proportional Copyright © 2021 Robe Lighting s.r.o. - All rights reserved All Specifications subject to change without notice Page 8...
- Page 61 T11 - Colours on Virtual Colour Wheel Green Amber Colour name Red DMX Blue DMX Lime DMX Filter 4 (Medium Bastard Amber) Filter 10 (Medium Yellow) Filter 19 (Fire) Filter 26 (Bright Red) Filter 58 (Lavender) Filter 68 (Sky Blue) Filter 71 (Tokyo Blue) Filter 79 (Just Blue) Filter 88 (Lime Green)
- Page 62 Green Amber Colour name Red DMX Blue DMX Lime DMX Filter 179 (Chrome Orange) Filter 180 (Dark Lavender) Filter 181 (Congo Blue) Filter 197 (Alice Blue) Filter 201 (Full C.T. Blue) Filter 202 (Half C.T. Blue) Filter 203 (Quarter C.T. Blue) Filter 204 (Full C.T.
Need help?
Do you have a question about the Robin T11 Profile and is the answer not in the manual?
Questions and answers