Table of Contents
Advertisement
Quick Links
roilVection
roilVection
Model JF62/JF63/JF64
Natural Gas/LP
Owner's Manual
A P P R O VA L S :
F O R Y O U R S A F E T Y:
Do not store or use gasoline or other flammable vapors or liquids in the vicinity of this or any
other appliance.
W A R N I N G :
Improper installation, adjustment, alteration, maintenance can cause property damage, injury, or
death. Read the installation, operating and maintenance instructions thoroughly before installing
or servicing this equipment.
Broiler area must be kept free of combustible materials, and the flow of combustion and ventilation
air must not be obstructed. Operating personnel must not perform any maintenance or repair
functions. Contact your Nieco Authorized Dealer.
IMPORTANT: RETAIN THIS MANUAL IN A SAFE PLACE FOR FUTURE REFERENCE
™
™
Advertisement
Table of Contents

Related Manuals for Nieco BroilVection JF64


Summary of Contents for Nieco BroilVection JF64
- Page 1 Broiler area must be kept free of combustible materials, and the flow of combustion and ventilation air must not be obstructed. Operating personnel must not perform any maintenance or repair functions. Contact your Nieco Authorized Dealer. IMPORTANT: RETAIN THIS MANUAL IN A SAFE PLACE FOR FUTURE REFERENCE...
- Page 2 PaRTs loCaTIon DRaWInGs - MoDel Jf62 DIsCHaRGe & ToP VIeW Nieco Corporation - Model JF62/63/64G...
- Page 3 PaRTs loCaTIon DRaWInGs - MoDel Jf62 feeD enD VIeW Nieco Corporation - Model JF62/63/64G...
-
Page 4: Parts Location Drawings
PaRTs loCaTIon DRaWInGs RIGHT sIDe ConTRol boX Nieco Corporation - Model JF62/63/64G... - Page 5 PaRTs loCaTIon DRaWInGs feeDeR bRaCKeT asseMblY Nieco Corporation - Model JF62/63/64G...
- Page 6 PaRTs loCaTIon DRaWInGs feeDeR asseMblY Nieco Corporation - Model JF62/63/64G...
-
Page 7: General Information
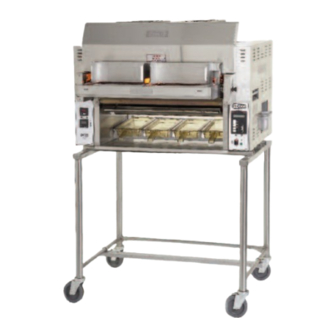
GeneRal InfoRMaTIon a.1 Description The Nieco Model JF62/63/64 (single belt) and JF62-2/63-2/64-2 (dual belt) automatic broiler features high release convection burners, Patent pending BroilVection™ air system that uses waste heat to greatly reduce energy needs, easy cleaning and a simple and intuitive control package to help eliminate broiling problems and provide the operator with even greater control over the broiling environment. -
Page 8: Service/Technical Assistance
Authorized Nieco Distributors and Service Agencies will void the warranty and may significantly alter the performance of your broiler. The use of non-Nieco parts is capable of affecting these criteria, and may affect broiler performance, parts longevity and food safety. Your local Authorized Nieco Distributor and Service Agent has been factory trained and has a complete supply of parts for your Nieco Automatic Broiler. - Page 9 Distributor for adjustment or repair. • Use only genuine Nieco replacement parts for your broiler. Failure to do so will void the warranty and may significantly alter the performance of your broiler. The use of non-Nieco parts is capable of affecting these criteria, and may affect broiler performance, parts longevity and food safety.
-
Page 10: Pre-Installation
12” (305 mm) 0” (0 mm) 0” (0 mm) Sides of broiler 12” (305 mm) 0” (0 mm) 0” (0 mm) Front of broiler 12” (305 mm) 0” (0 mm) 24” (610 mm) (Feed end) Nieco Corporation - Model JF62/63/64G... - Page 11 For easy movement of the appliance, the connector should be installed with a "lazy" loop for minimum tension. note: Gas appliances should be disconnected prior to maximum movement. (Minimal movement is possible to connect hose.) Nieco Corporation - Model JF62/63/64G...
-
Page 12: Electrical Connection
Disconnect power before servicing. b.10 Pre-operation Check Be sure that all parts are installed in the proper location: Ventilation is turned on Broiler is plugged in Gas line is connected Nieco Corporation - Model JF62/63/64G... -
Page 13: Operation
3.Main On/Off Switch - Turns the broiler on and off. 4.Ignition Failure Light - If flashing, indicates the broiler is no longer lit. 5.Power Indicator Light - Glows green when the power to the broiler is on. Nieco Corporation - Model JF62/63/64G... - Page 14 4. SELECTION INDICATOR LIGHT - Lights up to show which button is selected. on THe baCK of THe bRoIleR a. Belt Reverse Buttons - In the event the broiler gets jammed, use these buttons to reverse the direction of the meat belt to help clear the jam.equipped). Nieco Corporation - Model JF62/63/64G...
-
Page 15: Lighting Procedures
If this still doesn’t light the broiler, see the MANUAL IGNITION instructions. 1. Turn the MaIn PoWeR sWITCH on. 2. Allow broiler to heat for 45 minutes before cooking. Nieco Corporation - Model JF62/63/64G... -
Page 16: Manual Ignition
Your Nieco Automatic Broiler is designed to automatically stop gas flow to the broiler in the event of power failure, gas pressure loss or any other related incident. No attempt to operate this appliance should be made in the event of a power failure. -
Page 17: Control Operation
After an hour, push the down arrow to lower Do not cook during the set point to 25º ABOVE the actual calibration. temperature. The numbers on your c. Your broiler is now calibrated. broiler will be different than those shown here. Nieco Corporation - Model JF62/62-2G... -
Page 18: Cleaning And Disassembly
Picture of the part to be removed and cleaned. How to remove and Instructions clean the parts. Pull each meat guide out slightly from the bottom, then lift off. Wash, rinse, and sanitize in the 3-compartment sink. Nieco Corporation - Model JF62/63/64G... - Page 19 Meat Guides Clean: Every 4 hours Feed End Tools Scrub Pad 3-Compartment Sink Instructions 1. Lift the meat guides up and off the feeder. 2. Wash, rinse, and sanitize in the 3-compartment sink. Nieco Corporation - Model JF62/63/64G...
- Page 20 3. Wash, rinse, and sanitize in the 3-compartment sink. DO NOT lift the feeder base by the feeder bar or the chains. This will damage the feeder base. REASSEMBLY: Pull the release pin and place feeder base in position. Nieco Corporation - Model JF62/63/64G...
- Page 21 REASSEMBLY: Pull the release pin and place feeder base in position. Feeder Housing Clean: Daily Feed End Tools Scrub Pad 3-Compartment Sink Instructions 1. Lift and remove. 2. Wash, rinse, and sanitize in the 3-compartment sink. REASSEMBLY: Hang feeder housing on brackets. Nieco Corporation - Model JF62/63/64G...
- Page 22 Heat Resistant Gloves Degreaser 3-Compartment Sink Instructions 1. Lift and slide bracket out. 2. Take to sink area and spray with degreaser. 3. Wash with a scrub pad, rinse, and sanitize in the 3-compartment sink. Nieco Corporation - Model JF62/63/64G...
- Page 23 Soapy Towel Sanitized Towel Instructions 1. Clean product holding area while still warm. 2. Wring out a soapy towel and wash product holding area. 3. Wring out a sanitized towel and wipe product holding area. Nieco Corporation - Model JF62/63/64G...
- Page 24 1. Tilt and lift pins off hooks; lift off. 2. Take to sink area and spray with degreaser. 3. Wash, rinse, and sanitize in the 3-compartment sink. REASSEMBLY: Make sure pan inserts are on and return pan hangs on brackets. Nieco Corporation - Model JF62/63/64G...
- Page 25 Heat Resistant Gloves Degreaser 3-Compartment Sink Instructions 1. Lift and remove the grease box. 2. Take to sink area and spray with degreaser. 3. Wash with a scrub pad, rinse, and sanitize in the 3-compartment sink. Nieco Corporation - Model JF62/63/64G...
- Page 26 3. If necessary, use a stiff toothbrush to clean any clogged burner holes. REASSEMBLY: Be sure the holes on the burner are facing up. Burners must be completely dry before reassembly. Dry with a paper towel. Nieco Corporation - Model JF62/63/64G...
- Page 27 EXTREMELY HOT! Be careful not to burn yourself. 1. Lift cap from shroud collar. 2. Take to sink area and spray with degreaser. 3. Wash with a scrub pad, rinse, and sanitize in the CAUTION: 3-compartment sink. Extremely Hot Nieco Corporation - Model JF62/63/64G...
- Page 28 1. Scrape each shaft of both belts on the discharge end with the wide end of the shaft cleaning tool. The tool is located on the clip on the discharge end of the broiler. 2. Wipe shaft cleaning tool with a towel. Nieco Corporation - Model JF62/63/64G...
Need help?
Do you have a question about the BroilVection JF64 and is the answer not in the manual?
Questions and answers