oticon EduMic Instructions For Use Manual
Hide thumbs
Also See for EduMic:
- Troubleshooting manual (4 pages) ,
- Connection procedures (3 pages) ,
- User manual
Table of Contents
Advertisement
Advertisement
Table of Contents

Related Manuals for oticon EduMic


Summary of Contents for oticon EduMic
- Page 1 Instructions for use EduMic...
- Page 2 Introduction to this booklet This booklet guides you on how to use and maintain your new EduMic. Please read the booklet carefully, including the Warnings section. This will help you achieve the full benefit of your new EduMic. If you have additional questions about the use of your EduMic, please contact your hearing care professional.
- Page 3 Intended use Intended use EduMic is intended as a wireless microphone and transmit- ter of speech and other audio signals to the hearing aids. Indications for use No indications for use. Intended user Adults and children older than 36 months.
-
Page 4: Table Of Contents
Getting started Introduction Start up EduMic parts and functions Turn EduMic ON and OFF Mute microphone mode Pair EduMic with hearing aids Pair EduMic with rechargeable hearing aids Charge EduMic Handling Low battery indication Battery performance Charging time Pairing management... - Page 5 Other modes Connect to external sound sources Connect to classroom systems FM protective skin Enter telecoil mode Warnings Warnings More info Conditions of use Troubleshooting Warranty Technical information...
- Page 6 About Start-up Handling Other modes Warnings More info...
-
Page 7: Getting Started
Getting started Before you can use EduMic, EduMic and the hearing aids need to be paired. The pairing will be stored, so you only need to pair once. Please visit www.oticon.global/compatibility for more information. Pair EduMic with hearing aids See page... -
Page 8: Introduction
Introduction Speaker EduMic can stream to Oticon hearing aids with 2.4 GHz technology. The hearing aids receive the streamed sound in a dedicated EduMic program. Microphone mode When you turn EduMic on, a green LED will appear. This indicates the microphone mode is enabled. - Page 9 A wireless microphone can benefit When a universal (FM) receiver is hearing aid users of all ages by plugged in, EduMic is in FM mode providing direct access to a primary and streams the audio from another speaker. wireless classroom system.
-
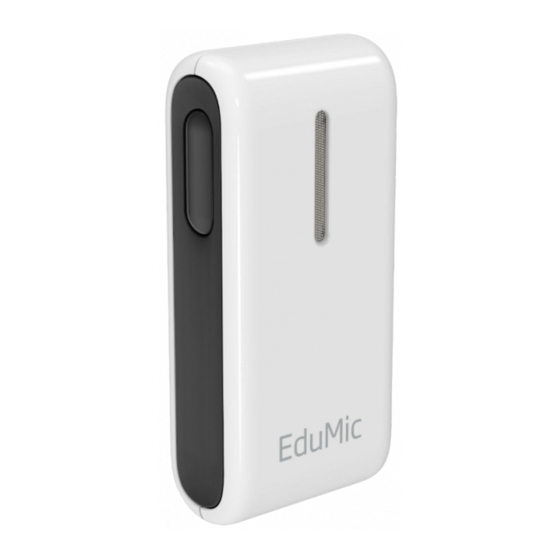
Page 10: Edumic Parts And Functions
EduMic parts and functions Power indicator Status indicator Microphone Sound in Button ON, OFF, mute, telecoil, clear pairings Rotating clip Attaches to lanyard or clothes USB socket For charging Front Back About Start-up Handling Other modes Warnings More info... - Page 11 Status indicator Mode Blinking blue Pairing in progress White Start-up Green ON/microphone mode Mute in microphone Blinking green mode Yellow Jack/FM mode Blinking yellow Mute in jack/FM mode Pairings cleared Magenta Telecoil mode Blinking magenta Mute in telecoil mode Power indicator Mode White Start-up...
- Page 12 Lanyard parts and functions Safety breakaway For urgent removal Lanyard with EduMic Adjustable adapter For individual adjustment Start-up About Handling Other modes Warnings More info...
- Page 13 Use of lanyard When using EduMic with the lanyard, the distance from the mouth to the top of EduMic should be a maximum of 20 cm. 1. Attach the clip onto the adjustable adapter. 2. Hang the lanyard around your neck and adjust the adapter for the right distance to your mouth.
-
Page 14: Turn Edumic On And Off
Press the button for 2 seconds until both indicators turn WHITE and release the button. Wait for 10 seconds until the status indicator turns GREEN. EduMic is now turned ON and the microphone is ready for use. OFF: Press the button for 2 seconds until the status indicator turns OFF. -
Page 15: Mute Microphone Mode
Mute microphone mode Use the mute function if you need to mute the audio stream from EduMic. Press the button briefly to mute the audio stream from EduMic. Mute: Press the button briefly. The status indicator blinks GREEN. The audio stream from EduMic is now muted. -
Page 16: Pair Edumic With Hearing Aids
1. Turn the hearing aids OFF by opening the battery drawer. 2. Turn the hearings aids ON by closing the battery drawer. The hearing aids can now be paired with EduMic within the next 3 minutes. About Start-up Handling Other modes Warnings More info... - Page 17 GREEN. It is recommended to pair one set of hearing aids at a time. EduMic is now ready for use with the hearing aids. The status indicator will blink BLUE while pairing is in progress.
-
Page 18: Pair Edumic With Rechargeable Hearing Aids
Pair EduMic with rechargeable hearing aids Ensure EduMic is turned ON Enable pairing mode in hearing aids 1. OFF 2. ON 1. Turn the hearing aids OFF by pressing the lower part of the hearing aid push button for 3 seconds. - Page 19 GREEN. It is recommended to pair one set of hearing aids at a time. EduMic is now ready for use with the hearing aids. The status indicator will blink BLUE while pairing is in progress.
-
Page 20: Charge Edumic
Charge EduMic Connect to power source Charging Charging complete 1. Insert the micro USB The power indicator will The power indicator will into the charging socket blink YELLOW during turn GREEN when the on EduMic. charging. battery is fully charged. -
Page 21: Low Battery Indication
When charging, the charging indicator should be lit as described in this booklet. If the charging indicator is not lit as described, disconnect the device from the charger and consult your hearing care professional. When charging EduMic, use the supplied original USB cable or power supply 5.0V/1A, CE and safety marked. -
Page 22: Battery Performance
Battery performance A fully charged EduMic will give you 10 hours of use. The daily battery performance varies depending on your specific use of EduMic. E.g. streaming stereo sound in jack mode will consume more battery power than streaming your voice in microphone mode. -
Page 23: Charging Time
Charging time Make sure to charge EduMic fully before you use it for the first time. We recommend to recharge EduMic overnight after use. In this way you will start the day with a fully charged EduMic. Charging time may vary depending on the remaining power of the battery. -
Page 24: Pairing Management
EduMic program. This can happen automatically or manually. Automatic hearing aid program change EduMic can store up to 10 sets of hearing aid pairings. When any of these sets of hearing aids are within a 20 m range of EduMic, they will automatically change to the EduMic program. -
Page 25: Clear Pairings
Caring for EduMic It is possible to clear all pairings from EduMic when these are no longer needed. Pairing the hearing aids again will ensure access to automatic program change for these hearing aids. Ensure EduMic is turned ON Clear pairings... -
Page 26: Use Of Rotating Clip
When using EduMic in microphone mode, wear it as indicated, in an upright position. The distance from the mouth to the top of EduMic should be a maximum of 20 cm. EduMic should not be worn close to pieces of jewellery or other hard objects. -
Page 27: Caring For Edumic
Cleaning EduMic is moisture repellent, which makes it very easy to clean with a damp cloth. It is recommended that you clean it on a regular basis. IMPORTANT NOTICE EduMic must never be washed or immersed in water, alcohol or other strong detergents. -
Page 28: Connect To External Sound Sources
Connecting to external sound sources The 3.5 mm jack input allows you to connect EduMic to external sound sources like a sound field system, smartboards or PC/tablets, etc. Connect the jack cable Jack mode Insert the jack. When the jack cable is connected, the status indicator is YELLOW. - Page 29 Mute/unmute Return to microphone mode Press the button briefly to mute the audio 1. Unplug the jack from EduMic. stream from EduMic. 2. The status indicator will turn GREEN and The status indicator blinks YELLOW. EduMic will return to microphone mode.
- Page 30 Setting up the system requires an FM transmitter and a universal FM receiver with a Europin connector. Plug in the receiver FM mode Plug in the receiver and ensure EduMic is When the FM receiver is connected, turned ON. the status indicator is YELLOW.
- Page 31 Mute/unmute Return to microphone mode Press the button briefly to mute the audio 1. Unplug the receiver from EduMic. stream from EduMic. 2. The status indicator will turn GREEN and The status indicator blinks YELLOW. EduMic will return to microphone mode.
- Page 32 IMPORTANT NOTICE For details on the functionality of your specific classroom system, please refer to the associated Instructions for use. About Start-up Handling Other modes Warnings More info...
-
Page 33: Fm Protective Skin
FM protective skin When a universal receiver is plugged into EduMic, it is recommended to use the enclosed white rubber skin to protect the receiver from breakage. IMPORTANT NOTICE The FM protective skin must not be used in Microphone mode. The skin will distort the... -
Page 34: Enter Telecoil Mode
Telecoil mode Press and hold down the button for 10 seconds until the status indicator turns MAGENTA. EduMic is now in telecoil mode and the EduMic microphone is disabled. The range of operation is 3 m. About Start-up Handling Other modes... - Page 35 Mute/unmute Exit telecoil mode Press the button briefly to mute the audio Press the button for 2 seconds until the stream from EduMic. status indicator is off. The status indicator blinks MAGENTA. To unmute, press the button briefly again.
-
Page 36: Warnings
EduMic must never be exposed to extreme heat EduMic with a receiver attached should be kept e.g. left inside a parked car in the sun. EduMic out of reach of children and anyone who might must not be dried in microwave ovens or other swallow the receiver or otherwise cause injury ovens. - Page 37 Rechargeable battery If this occurs, increase the distance between Do not attempt to open EduMic as it may damage EduMic and the interfering device. the battery. Never attempt to replace the battery. Use on aircraft If battery replacement is needed, please return EduMic contains Bluetooth.
-
Page 38: More Info
Warnings Connection to external equipment Charging The safety of the use of EduMic, when connected To prevent potential battery damage during stor- to external equipment with auxiliary input cable age please charge EduMic every 6 months. or directly, is determined by the external signal Possible side effects source. -
Page 39: Conditions Of Use
15% to 93% relative humidity, non-condensing transportation humidity Operating temperature +5 °C to +40 °C Storage temperature -20 °C to +30 °C Charge EduMic before storage Charge every 6 months hereafter Transportation temperature -20 °C to +60 °C Atmospheric pressure 700 hPa to 1060 hPa... -
Page 40: Troubleshooting
Oticon Opn and Oticon Siya hearing aids are already paired with another EduMic EduMic is unable to pair with hearing aids Hearing aids are paired with another EduMic that is turned ON and within a range of 20 m Low-pitched noise in jack... - Page 41 Replace/recharge the batteries to ensure the hearing aids have power and pair again Clear all pairings with this EduMic, and pair with relevant EduMic as they can only be paired with one EduMic Turn OFF the connected EduMic or clear all pairings with this EduMic to connect with the relevant EduMic...
- Page 42 International warranty Your device is covered by an international sale of consumer goods. Your hearing care limited warranty issued by the manufacturer professional may have issued a warranty for a period of 12 months from the date of that goes beyond the clauses of this limited delivery to you.
-
Page 43: Warranty
Warranty Certificate Name of owner: ___________________________________________________________ Hearing care professional: ___________________________________________________ Hearing care professional’s address: ___________________________________________ Hearing care professional’s phone: ____________________________________________ Purchase date: ____________________________________________________________ Warranty period: _______________ Month: ____________________________________ Serial no.: ________________________________________________________________... -
Page 44: Technical Information
Additional information can be found in the exposure. Technical data sheet on www.oticon.global For body-worn operation, this device meets FCC and IC RF exposure limits and has been tested while in contact with the human body. - Page 45 Declaration of Conformity is available from in compliance with the essential requirements the manufacturer. and other relevant provisions of Directive 2014/53/EU. This medical device complies with Medical Device Regulation (EU) 2017/745. Denmark www.oticon.global Waste from electronic equipment must be handled according to local regulations.
- Page 46 Indicates that the product is qualified for indoor use. TwinLink 2.4 GHz The device contains Bluetooth Low Energy (BLE) 2.4 GHz radio technology, which supports wireless streaming to Oticon hearing aids with a 2.4 GHz receiver. About Start-up Handling Other modes Warnings More info...
- Page 47 Hearing loop This logo incorporates the universal symbol for hearing assistance. The “T” signifies that a hearing loop is installed. Singapore IMDA label Indicates that the device complies with the standards and specification published by Info- Communications Media Development Authority (IMDA) and is compatible with the public telecommunication networks in Singapore and does not cause radio frequency interference to other authorized radio-communication networks.
- Page 48 Description of additional symbols used on labels Keep dry Indicates a medical device that needs to be protected from moisture. Catalogue number Indicates the manufacturer’s catalogue number so that the medical device can be identified. Serial number Indicates the manufacturer’s serial number so that a specific medical device can be identified. Battery recycling symbol Li-Ion Battery recycling symbol Power supply inlet...
- Page 50 0000220025000001...
Need help?
Do you have a question about the EduMic and is the answer not in the manual?
Questions and answers