
Related Manuals for overstock GSI22X4


Summary of Contents for overstock GSI22X4
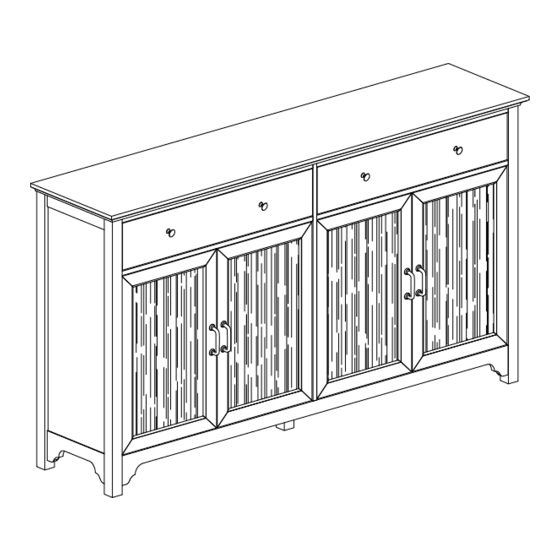
- Page 1 ASSEMBLY INSTRUCTIONS 68" Fluted Glass Sideboard ITEM# GSI22X4 If you find any damage after opening, please be sure to take pictures of the damage and contact us. We will help you solve the problem as soon as possible. THANK YOU...
-
Page 2: General Assembly Guidelines
General Assembly Guidelines Ensure that all parts and hardware are available before beginning assembly. Follow each step carefully to ensure the proper assembly of this product. III. Two people are recommended for ease in the assembly of this product. The three main types of hardware used to assemble this product are : wood dowels , screws and bolts. -
Page 3: Parts List
PARTS LIST A Carton part list A:Top panel 1 pc B:Bottom panel 1 pc C:Left panel 1 pc D:Right panel 1 pc F: Front Stretcher 2 pcs G: Shelf 2 pcs E: Partition Panel 1 pc H: Top Apron 2 pcs I: Bottom Front Apron 1 pc J: Support Leg 1 pc K:Door 4 pcs L: Drawer Front Panel 2 pcs... - Page 4 PARTS LIST HARDWARE LIST 1:Cam lock 32 pcs 2:Cam bolt 22 pcs 3:Wood plug 26 pcs 4:Pull knob 4 pcs Ø6x32 Ø8x30 Ø15x10 5:Screw 12 pcs 6.Hinge 8pcs 8:Wood screw 30 pcs 7:Screw 48 pcs Ø3.0x12 Ø26 Ø3.5 X 16 Ø4x18 9.Shelf support pin 8 pcs 10: Door stopper 2pc...
- Page 5 Step 1 6 pcs 6 pcs 4 pcs Secure cam bolt (2) into part (A) with Philips head screwdriver as per diagram, then attach part (H) to part (A) by using screw (12) with Philips head screwdriver as per diagram. Step 2 8 pcs 4 pcs...
- Page 6 Step 3 2 pcs 4 pcs Secure cam bolt (2) into part (E) with Philips head screwdriver, and then turn panel (E) over. Insert wooden dowels (3) into part (E) as per diagram. Step 4 4 pcs 6 pcs 2 pcs 4 pcs Insert wooden dowels (3) into part (I,F).
- Page 7 Step 5 2 pcs 8 pcs 1 pcs Insert wooden dowels (3) into part (B) and secure cam bolt (2) into part (B) with Philips head screwdriver as per diagram. Attach part (J) to part (B) by using screw (14).
- Page 8 Step 6 4 pcs Note: Please don't over-tighten the cam lock, otherwise, it will be broken. Use cam lock (1) secure parts (I) to part (B) with Philips head screwdriver as per diagram.
- Page 9 Step7 2 pcs Note: Please don't over-tighten the cam lock, otherwise, it will be broken. Using cam lock (1) secure parts (E) to part (B) with Philips head screwdriver as per diagram.
- Page 10 Step 8 2 pcs Note: Please don't over-tighten the cam lock, otherwise, it will be broken. Use cam lock (1) secure parts (F) to part (E) with Philips head screwdriver as per diagram. P.10...
- Page 11 Step 9 8 pcs Note: Please don't over-tighten the cam lock, otherwise, it will be broken. Use cam lock (1) secure parts (C,D) to the assembly with Philips head screwdriver as per diagram. P.11...
- Page 12 Step 10 6 pcs Note: Please don't over-tighten the cam lock, otherwise, it will be broken. Use cam lock (1) secure parts (A) to the assembly with Philips head screwdriver as per diagram. P.12...
- Page 13 Step 11 30 pcs Attach parts (Q,T) with part (R) as per diagram. Attach back panels (Q,R,T) to the assembly from the previous step by using screws (8). P.13...
- Page 14 Step 12 8 pcs 22 pcs Insert shelf support pins (9) into the interior of the assembly at desired shelf heights. Carefully place shelves (G) on shelf support pins. Place sticker (20) cover the cam lock holes. P.14...
- Page 15 Step 13 2 pcs 4 pcs 4 pcs 10 pcs Using bolt (5) attach knob (4) into part (L) with Philips head screwdriver as per diagram. Secure cam bolt (13) into part (L) as per diagram. Insert wooden dowels (21) into parts (S). Step 14 12 pcs Using screw (12) attach parts (M,N) into part (O) with Philips head screwdriver as per...
- Page 16 Step 15 10 pcs 8 pcs Note: Please don't over-tighten the cam lock, otherwise, it will be broken. Use cam lock (1) secure parts (L) to the assembly with Philips head screwdriver as per diagram. Place sticker (20) cover the cam lock holes. Step 16 8 pcs 8 pcs...
- Page 17 Step 17 Insert the assembled drawers (L) into the unit frame, extend the Ball Bearing Slide Tracks on the pedestal Side Panel all the way forward. Then align the Slide Runners on the assembled drawers with the Slide Tracks and push the drawer carefully inside until it stops. Note: if the drawer does not go in smoothly, please take it out and repeat the step.
- Page 18 Step 18 32 pcs Using bolt (7) attach hinge (E) into parts (C,D,E) with Philips head screwdriver as perdiagram. P.18...
- Page 19 Step 19 WARNING 2pcs Serious or fatal injuries can occur from furniture tipping over. To prevent the furniture from tipping over we recommend that it is permanently fixed to the 2pcs wall. Wall anchor and hardware are included with this product. Please make 2pcs sure hardware is suitable for your walls before installing, as different wall materials may require different types of anchors.
-
Page 20: Final Assembly
Final Assembly P.20...
Need help?
Do you have a question about the GSI22X4 and is the answer not in the manual?
Questions and answers