Advertisement
- 1 Package Contents
- 2 Product Diagram
- 3 Mapping and Cleaning
-
4
Maintenance
- 4.1 Regular Maintenance
- 4.2 Dustbin and Washable Filter
- 4.3 Vision and Laser Fusion Navigation System and Edge Detection Sensors
- 4.4 Anti-Drop Sensors and Charging Contacts Pins
- 4.5 Multi-Surface Main Brush
- 4.6 Edge Brushes
- 4.7 Driving Wheels and Universal Wheel
- 4.8 Dirty Water Tank, Detachable Base and Filter
- 5 Troubleshooting
- 6 Product Specifications
- 7 Documents / Resources

Package Contents
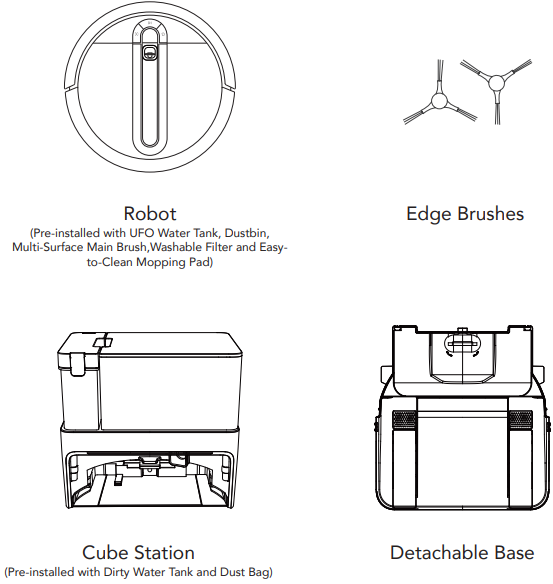
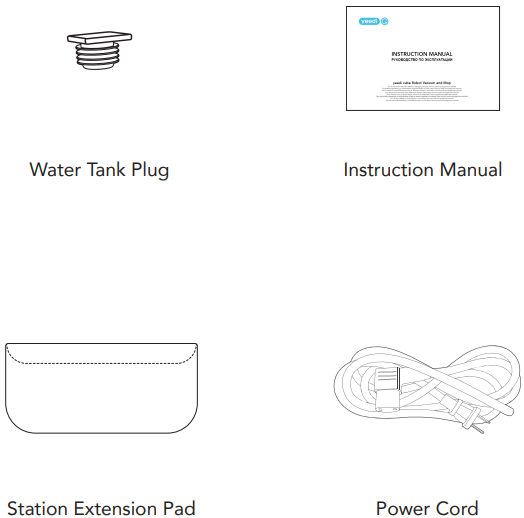

- All figures and illustrations are for reference only and may present differences in appearance from the actual product.
- The "Edge Brushes", "Water Tank Plug", "Detachable Base","Station Extension Pad" and "Power Cord" need to be installed by the user prior to use.
- Accessories from different countries shall be subject to the actual product configuration at the time of purchase, and the patterns are for reference only.
Product Diagram
Robot Top View
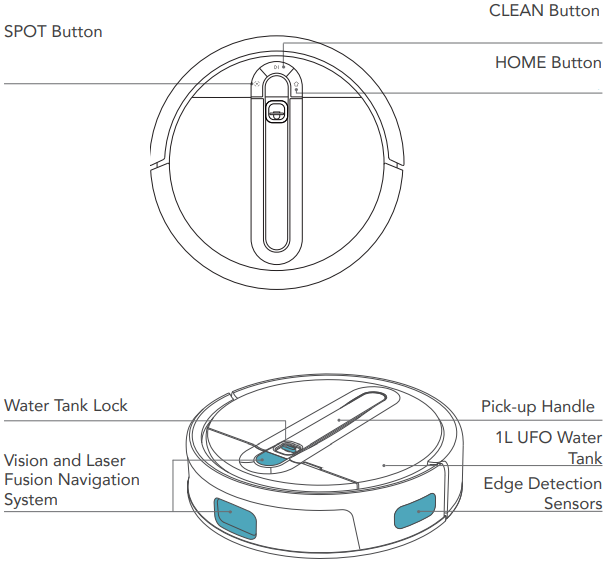
SPOT Button (Spot Cleaning Button)
CLEAN Button (Auto Clean Button)
HOME Button (Return to Station Button)
Robot Side View

Power Switch
"I"=ON,
"O"=OFF.
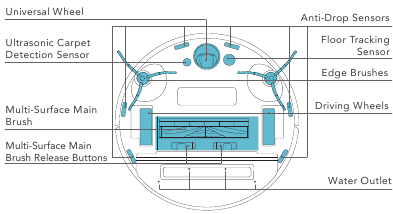
Robot Bottom View
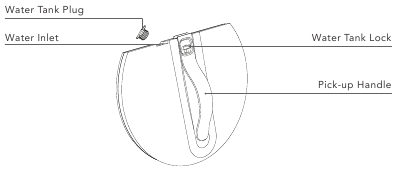
UFO Water Tank Cube Station
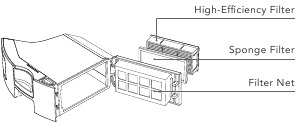
Dustbin

Cube Station
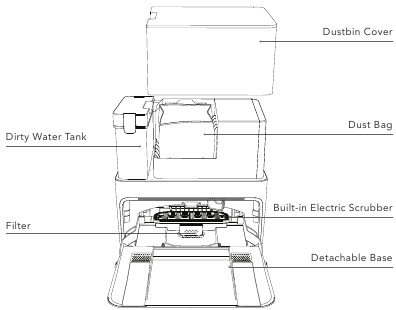

- The Detachable Base needs to be installed by the user before use.
- Lift the mop Built-in Electric Scrubber before installation and put it down after installation. Otherwise, the Robot's operations will be affected.
- The Filter is removable and needs to be cleaned regularly.
Mapping and Cleaning
Notes before Cleaning
Tidy up the area to be cleaned
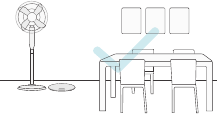
Put furniture, such as chairs and floor fans, in their proper place. Put away low items such as scales to ensure the maximum cleaning space.
Open the door to help the Robot explore
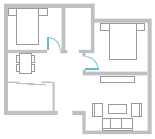
During the first use, make sure each room door is open to help the Robot fully explore your house.
Stop the Robot from falling
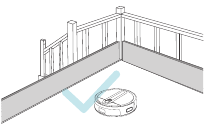
It may be necessary to place a physical barrier at the edge of a drop to stop the Robot from falling over it.

Put away objects such as wires, cloths, or slippers that may be on the floor to improve the mapping and cleaning efficiency.

Before using the Robot on a rug with tasseled edges, please fold the edges under the rug.


Please do not stand in narrow spaces such as hallways so as to avoid preventing the Robot from identifying the area to be cleaned.

Please make sure that the Robot has created a home map in the yeedi App before it starts cleaning.
Notes before Using
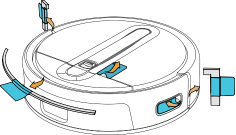
- Remove all protection materials Lift the Scrubber and install the Detachable Base.
Please remove all protection materials on the Robot before use.
![]()
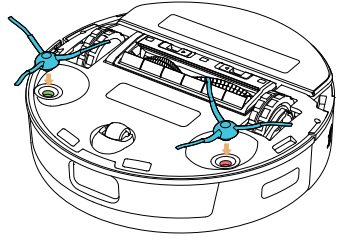
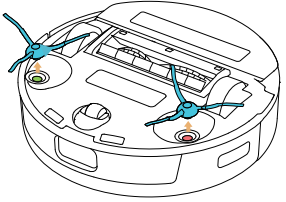
- Install Edge Brushes
Make sure the color of the Edge Brushes is consistent with that of mounting slot. The "click" sound indicates a successful connection.
![Yeedi - Cube - Install Edge Brushes Install Edge Brushes]()
Note: The Robot experience may be affected if protection materials are not removed.
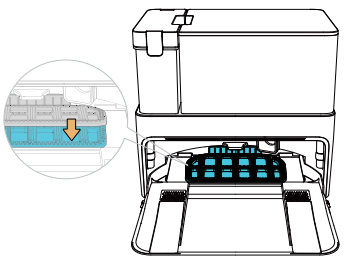
- Lift the Scrubber and install the Detachable Base.
![Yeedi - Cube - Lift the Scrubber and install the Detachable Base. Lift the Scrubber and install the Detachable Base.]()
Step 1: Lift the Scrubber and a "click" sound will be heard;
Step 2: Push the Detachable Base into the Station on a flat surface.
The "click" sound indicates a successful connection. - Reset the Scrubber once it has been successfully installed.
Lower the Scrubber to finish installation.
![Yeedi - Cube - Reset the Scrubber once it has been successfully installed Reset the Scrubber once it has been successfully installed]()
Note: The Robot experience may be affected if the Scrubber is not lowered in time after installing the "Detachable Base".
- Put the Cube Station in place and connect it to the power supply. Install the Station Extension Pad.
Step 1: Place the Cube Station against the wall in a large space and do not place items within a radius of about 0.5 m or 1.5 m in front of it.
Step 2: Align the dashed line with the edge of the base, with the rough side facing up, and place it under the base. After putting it in place, peel off the transparent tape from the smooth bottom and stick the extension pad onto the hard, non-carpeted floor.
![Yeedi - Cube - Put the Cube Station in place and connect it to the power supply Put the Cube Station in place and connect it to the power supply]()
Note:
- Cover an area of at least 5 cm height from the bottom of any reflective objects such as mirrors.
- Do not place the Cube Station in direct sunlight.
- Periodically wipe off any accumulated water on the Extension Pad to maintain its anti-slip effect.
- Please do not move it frequently to avoid affecting the fixation of the extension pad.
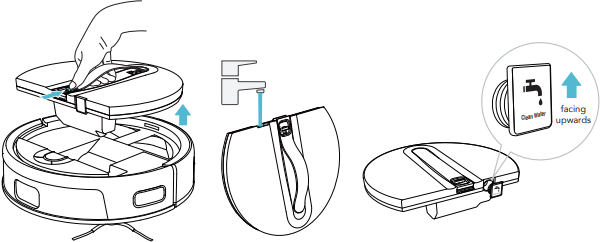
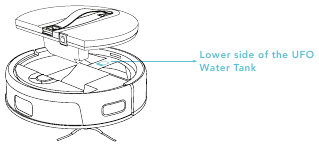
- Remove the UFO Water Tank.
Step 1: Hold the handle on the Water Tank with one hand and slide down the lock with your thumb to lift the Tank upward.
Step 2: Fill the Tank with clean water and put it back into the Robot after installing the Plug.
![Yeedi - Cube - Remove the UFO Water Tank. Remove the UFO Water Tank.]()
Note:
- Please make sure the Tank Plug is installed.
- To prolong the service life of the Water Tank, it is recommended to use purified water or softened water.
- Do not add any cleaning solution from any other brands; excessive solution could cause the Robot to slip or be damaged.
- Keep the UFO Water Tank Plug properly.
- Do not put any foreign objects in the Tank.
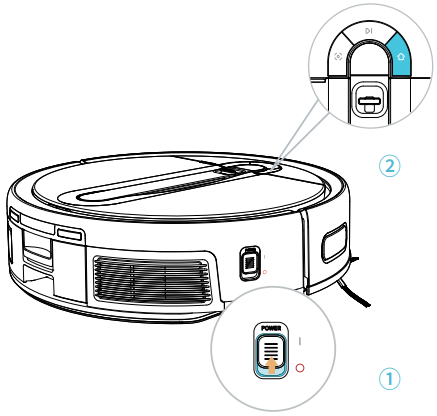
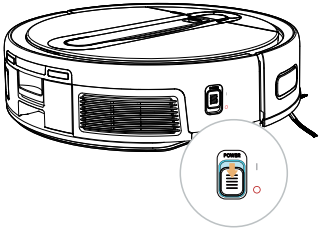
- Turn on the power switch, put the Robot near the Cube Station and press the HOME Button. The Robot will automatically return to the Station to charge.
![Yeedi - Cube - Turn on the power switch Turn on the power switch]()
- Turn on the power switch.
- The Robot will automatically return to Station to charge by pressing the HOME Button.
- It will charge for about 6.5 hours until fully charged.

- "I"=ON, "O"=OFF
- The Robot cannot be charged when being powered OFF.
- When the Robot completes the cleaning or when the battery gets low, it automatically returns to the Cube Station to recharge.
- Please make sure that the Robot starts cleaning from the Station. Do not move the Station while it is cleaning.
yeedi App
- Download the yeedi App to experience more functions:
Method 1: Open "Scan" in your mobile phone to scan the QR code on the Robot, download and install the yeedi App according to the prompts.
![]()
Method 2: Open the mobile App store, search "yeedi", download and install the yeedi App.
![]()
- After downloading, please complete registration, login, and the network setup according to the guide in the mobile App page.
Connect the Robot to the Mobile Phone
Network setup steps:
- Please turn on your mobile phone Bluetooth and Wi-Fi;
- Make sure that yeedi cube Robot Vacuum and Mop is on;
- Open the yeedi App;
- Scan the QR code on the Robot using the yeedi App, complete "Confirm access to the setup mode", "confirm the device and Wi-Fi to be connected", and "enter the Wi-Fi password" respectively according to the prompts in the App, and then wait for the setup result;
- If the network setup fails, it is recommended that you try again according to the above steps, or choose other network setup methods according to the prompts in the App.
 | Slowly flashing white light | Disconnected from Wi-Fi or waiting for home Wi-Fi connection |
| Rapidly flashing white light | Connecting to home Wi-Fi | |
| Solid white | Connected to home Wi-Fi |

Robot Operation Buttons
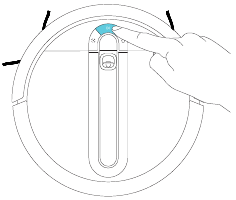
- Function of the CLEAN Button (Auto Clean Button)
![]()
- Please ensure that the Robot is on the Cube Station and is fully charged before starting.
- Press the CLEAN Button to start the first mapping and Auto Clean.
- When the Robot is working, press the CLEAN Button to stop cleaning and press again to continue.
- Press and hold for 2 seconds to end the current cleaning task.
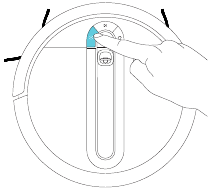
- Function of the SPOT Button (Spot Cleaning Button)
- Please place the Robot in the area to be cleaned before starting.
![]()
- Press the SPOT Button to start the Spot Cleaning task, which will focus on the 1.5*1.5 meters area centered on the Robot (the Cleaning Settings can be modified in the App).
- When the Robot is working, press the SPOT Button to pause cleaning and press again to continue.
- Move the Robot to end the current Spot Cleaning and start the next one by pressing the SPOT Mode Button again.
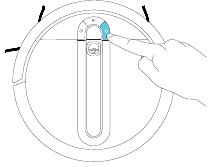
- Function of the HOME Button (Return to Station Button)
![]()
- When the Robot is outside the Cube Station, press the HOME Button to return.
- Press the HOME Button to pause the returning; and press again to continue.
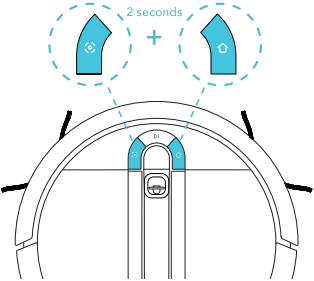
- Button combination for network setup of the Wi-Fi Model
![Yeedi - Cube - Button combination for network setup of the Wi-Fi Model Button combination for network setup of the Wi-Fi Model]()
- Press the SPOT and HOME Buttons at the same time for 2 seconds. When you hear the prompt tone, the Robot enters the network setup mode.
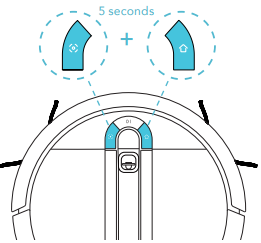
- Button combination for restoring default setting
![]()
- Press the SPOT and HOME Buttons at the same time for 5 seconds. When the startup music sounds, the Robot has successfully restored default setting.
Note: Use this button combination with caution as all of the Robot's usage data will be deleted after the default setting has been restored.
- ON and OFF Button
![Yeedi - Cube - ON and OFF Button ON and OFF Button]()
- If you are not going to use the Robot for a long time, turn the power switch to "o" to shut it down.

- Do not turn the Robot off and keep it in charging state after working completed so as to facilitate control by the App and all forthcoming work.
- If you are not going to use the Robot for a long time, please charge it every three months.
Instructions for Robot and Station Indicator Lights
- Robot lighting effect
![Yeedi - Cube - Robot lighting effect Robot lighting effect]()
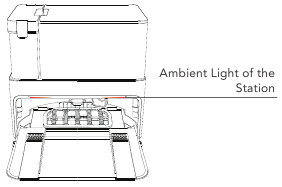
- Cube Station lighting effect
![]()
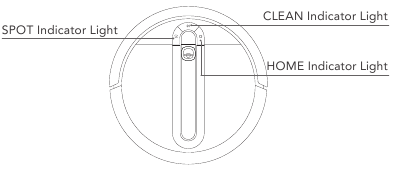
| Indicator Light | Display Status | Robot Status |
| CLEAN Indicator Light | The light blue light is solid on | Have a cleaning task |
| The red light is solid on | Low power/power off charging | |
| The red light flashes | Robot alarm status | |
| The white light is | Standby/network setup | |
| solid on | succeeded/Base Station docking successful | |
| The white light is flashing | Charging/Start up/Robot loading/Firmware update | |
| HOME Indicator Light | The white light is solid on | Return to Station |
| SPOT Indicator Light | The light blue light is solid on | Spot Cleaning |
| Ambient Light of the Station | The light blue light is solid on | Working/Charging |
| The left red light is solid on | Dirty water bucket out of place/full of water | |
| The right red light is solid on | Dust Bag out of place |
Maintenance
Regular Maintenance
To keep the Robot cleaning at peak performance, perform maintenance tasks and replace parts with the following frequencies:
| Robot Parts | Maintenance Frequency | Replacement Frequency |
| Easy-to-Clean Mopping Pad | / | Every 3-6 months |
| Edge Brushes | Once every 2 weeks | Every 3-6 months |
| Multi-Surface Main Brush | Once per week | Every 6-12 months |
| Washable Filter | Once per week | Every 3-6 months |
| Edge Detection Sensors Vision and Laser Fusion Navigation System Universal Wheel Anti-Drop Sensors Robot Charging Contacts Station Charging Contacts Pins | Once per week | / |
| Detachable Base and Filter | Once every 2 weeks | / |
| Dirty Water Tank | After each mopping | / |

Dustbin and Washable Filter
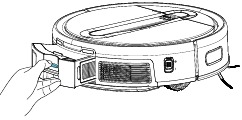
- Press the Dustbin Release Button to remove the Dustbin
![]()
- Press the Dustbin Cover Release Button to empty the Dustbin
![]()
- Open the Filter Net, remove the fine Washable Filter and the High-Efficiency Filter Assembly
![]()
- Clean the dust on both sides of the Filter Net with the Multi- Function Cleaning Tool
![]()
- Wash High-Efficiency Filter Assembly, Sponge Filter and Dustbin with water
![]()
- Air-dry High-Efficiency Filter Assembly, Sponge Filter and Dustbin
![]()
Note: Please avoid direct sunlight and exposure to high temperatures.
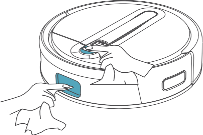
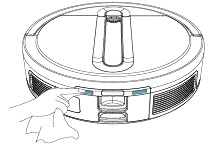
Vision and Laser Fusion Navigation System and Edge Detection Sensors
Please wipe with a clean soft cloth, and do not use detergent.
- Wipe Vision and Laser Fusion Navigation System
![]()
- Wipe Edge Detection Sensors
![]()
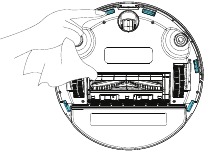
Anti-Drop Sensors and Charging Contacts Pins
Please wipe with a clean soft cloth, and do not use detergent.
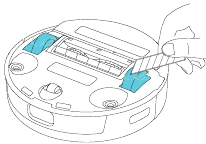
- Wipe Anti-Drop Sensors
![]()
- Wipe Robot Charging Contacts
![]()
- Wipe Station Charging Contacts Pins
![]()

- Sensitive electronic components are contained in the Charging Contacts. Please use dry cloth when cleaning. Do not use wet cloth to prevent damage.
- Before cleaning the Robot Charging Contacts and Station Charging Contacts Pins, turn the Robot OFF and unplug the Cube Station.
Multi-Surface Main Brush
Clean Multi-Surface Main Brush
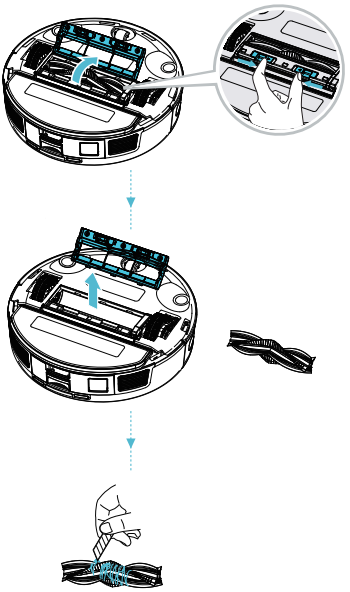
Remove any foreign objects caught in the Multi-Surface Main Brush with the Multi-Function Cleaning Tool.
Edge Brushes
- Remove Edge Brushes
![]()
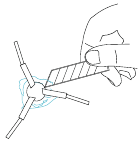
- Clean Edge Brushes with the Multi-Function Cleaning Tool
![]()

Driving Wheels and Universal Wheel
- Clean Driving Wheels Clean Universal Wheel
![]()
- Clean Universal Wheel
![]()

Dirty Water Tank, Detachable Base and Filter
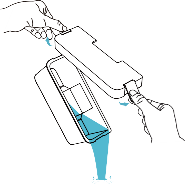
- Empty Dirty Water Tank
![]()
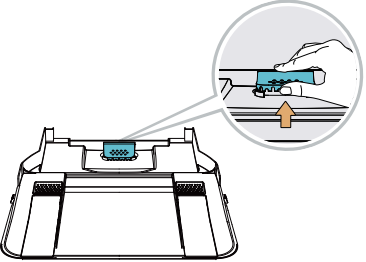
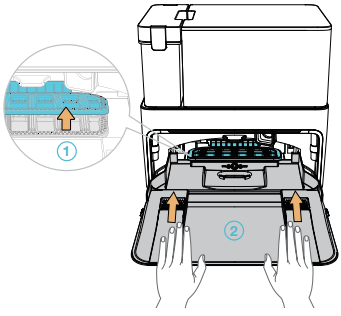
- Detachable Base
![Yeedi - Cube - Detachable Base Detachable Base]()
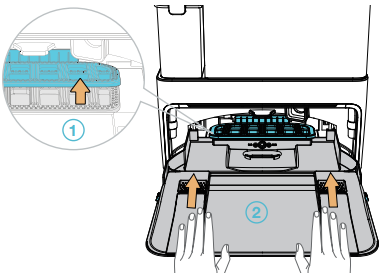
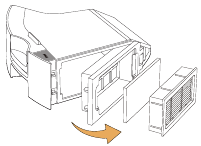
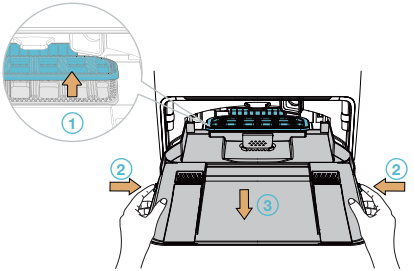
Remove the Detachable Base regularly. (Lift the Scrubber, press the buttons on both sides of the Detachable Base and pull it out in parallel.)
- Pull up and remove Filter
![Yeedi - Cube - Pull up and remove Filter Pull up and remove Filter]()
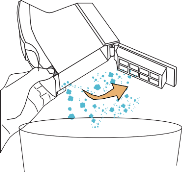
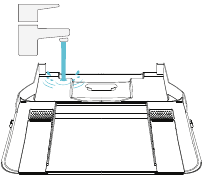
- Clean Detachable Base
![]()

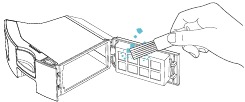
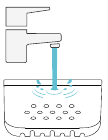
- Wipe Filter
![]()
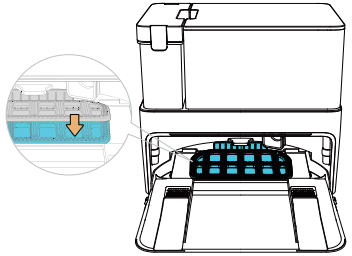
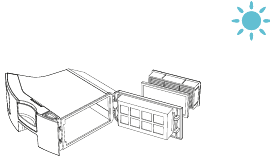
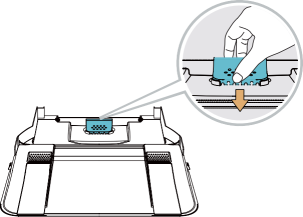
- Install Filter
Press down and when you hear a "click", the Filter is in place.
![Yeedi - Cube - Install Filter Install Filter]()
- Install Detachable Base
![Yeedi - Cube - Install Detachable Base Install Detachable Base]()
- Lower Scrubber
![Yeedi - Cube - Lower Scrubber Lower Scrubber]()

Troubleshooting
Problems encountered during use can refer to the following solutions.
| No. | Malfunction | Possible Causes | Solutions |
| 1 | Unable to connect the Robot to the App (Wi-Fi Model) | The maximum number of devices connected to the router has been reached. |
|
| Incorrect Wi-Fi username or password entered. | Connect to the Wi-Fi and enter the correct username and password. | ||
| The Robot is not within range of your home Wi-Fi signal. | Make sure the Robot is within range of your home Wi-Fi signal. | ||
| Network setup started before the Robot was ready. | Network setup can only be performed when the Robot is ready. Press the SPOT and HOME Buttons at the same time for 2 seconds. When you hear the voice prompt, the Robot is ready for network setup. | ||
| No 2.4GHz network. | The Robot does not yet support 5GHz networks. Enable the 2.4GHz network during network connection. Wi-Fi network requirements:
| ||
| 2 | The Robot is unable to charge. | The Robot is not turned ON. | Turn ON the Robot. CLEAN white light flashing indicates that the Robot has started charging. |
| Charging Contacts are dirty. | Please check whether the Charging Contacts of the Cube Station and the Robot are dirty or clean by referring to the "Maintenance" section of the manual. | ||
| The Cube Station is not connected to the power supply. | Make sure that the Cube Station is connected to the power supply. | ||
| The battery is completely discharged. |
| ||
| 3 | Situations such as disorderly routes, deviation, repeated cleaning and small area leakage may occur when the Robot is working. | The Robot will make a back-and-forth exploration for the whole home environment during initial mapping. |
|
| Dust accumulates on the sensor surface. | Please wipe the Laser Sensor in front of the Robot and the Visual Sensor at the top of the Robot regularly with a dry cloth. | ||
| Power cords, slippers and other objects placed on the ground will affect the normal operation of the Robot. |
| ||
| Working on freshly waxed and polished floors, resulting in reduced friction between the Driving Wheels and the floor. | Please have the Robot clean the floor after the wax has dried. | ||
| The Robot may not be able to enter narrow areas to clean due to the layout of your house and the location of the furniture. |
| ||
| 4 | The Robot gets stuck while working and stops. | The Robot is tangled with something on the floor (electrical wires, curtains, carpet fringing, etc.). |
|
| 5 | The Robot makes a lot of noise when cleaning. | The Edge Brushes and Multi-Surface Main Brush may be tangled, or the Dustbin and Filter may be stuck. | Clear out any stuck debris regularly. Please refer to the "Maintenance" section of this manual. |
| The Robot's Driving Wheels or Universal Wheel are/is stuck. | Clear the wheels. Please refer to the "Maintenance" section of the manual. | ||
| The Robot is in Max and Max+ Mode. |
| ||
| 6 | The Easy-to-Clean Mopping Pad is installed, but no water is coming out of the Robot while it mops. | The UFO Water Tank is short of water. | Make sure the UFO Water Tank is filled with water before each cleaning task. |
| The Robot did not start cleaning from the Station. |
| ||
| The water outlets on the bottom of the Robot are clogged. | Clean the water outlets on the bottom of the Robot with a clean cloth and start it to check whether water is coming out normally. If water is still not coming out, please contact after-sales service. | ||
| 7 | There will be a voice prompt stating "Please install the UFO Water Tank". | The UFO Water Tank is not installed properly. | Please press hard when installing until you hear a "click", to ensure that the UFO Water Tank is installed correctly. |
| 8 | The Robot leaves behind dust or debris while cleaning. | The blocking plate of the Dustbin or the Dust Disposal Port is stuck by debris. | Please clear the debris. |
| 9 | The Robot returns to charge before it has finished cleaning. | The room is so large that the Robot needs to return to recharge. |
|
| In the case of a very complex home environment, cleaning time may be prolonged and the Robot may return to charge before the work has been finished. |
| ||
| 10 | The Robot could not find the Cube Station signal and is unable to return to the Station. | The Cube Station is not positioned correctly. | Please position the Cube Station correctly by following the instructions in the Mapping and Cleaning section of the manual. |
| The Cube Station is powered off |
| ||
| The Cube Station was moved manually while the Robot was cleaning. | Do not manually move the Cube Station while the Robot is cleaning. | ||
| The Robot did not start from the Cube Station. | Have the Robot start from the Cube Station in the Auto Clean and Area Clean modes. | ||
The recharge route is blocked, for example:
| Please open the door of the room where the Cube Station is located and keep the way to the recharge point clear. | ||
| 11 | The Robot cannot return to the Cube Station. | The Robot has slipped. |
|
| Detachable Base is not installed properly. |
| ||
| The Robot positioning has failed and it cannot find the Cube Station. |
| ||
| 12 | Warnings relating to the Driving Wheels | The Driving Wheels are tangled or stuck by foreign objects. | Please rotate and press the Driving Wheels to check whether any foreign objects have become tangled with or stuck to them. If yes, please clean them up promptly. |
| 13 | The Cleaning Sink of the Cube Station is full of water that cannot be sucked out. There is a voice alarm stating that the sink is full of water. | The Dirty Water Tank is not installed properly. | Press the Dirty Water Tank down to ensure proper installation and the indicator light shall be solid blue. |
| The Dirty Water Tank is full. | Please clean up the dirty water in the Dirty Water Tank and reset. | ||
| There are foreign objects at the water inlet of the Cleaning Sink. | Ensure that there are no foreign objects blocking the Cleaning Sink water inlet. Remove the Filter from the Base and reinstall it after removing any foreign objects. | ||
| The above has been performed but the voice alarm remains. | Unplug the power socket of the Cube Station and replug in. |
Product Specifications
| Model | YDAX11 | |
| Rated Input | 20V  2A 2A | |
| Charging Time | About 6.5 h | |
| OMNI Station Model | CH2251 | |
| Rated Input (Charging) | 220-240 V~ 50-60 Hz 0.3 A | |
| Power(Washing Mopping Pads) | 35W | |
| Power(Drying) | 90W | |
| Power (Emptying) | 1000 W | |
| Rated Output | 20 V  2 A 2 A | |
| Frequency bands | 2400-2483.5MHz | |
| Networked Standby Power | Less than 2.00W | |

- Output power of the Wi-Fi module is less than 100mW.
- Technical and design specifications may be changed for continuous product improvement.
- Explore more accessories at https://www.yeedi.com.

Documents / Resources
References
Download manual
Here you can download full pdf version of manual, it may contain additional safety instructions, warranty information, FCC rules, etc.
Advertisement









Need help?
Do you have a question about the Cube and is the answer not in the manual?
Questions and answers